1. הקדמה
Thank you for choosing the Allsmartlife 50-inch Flush Mount Ceiling Fan with Lights. This manual provides essential information for the safe installation, operation, and maintenance of your new ceiling fan. Please read these instructions thoroughly before beginning installation and retain them for future reference.
מידע בטיחות חשוב
- Always disconnect power at the main fuse box or circuit breaker before installation or servicing.
- כל החיווט חייב להיות בהתאם לתקנות החשמל הלאומיות והמקומיות. אם אינך מכיר את החיווט, התייעץ עם חשמלאי מוסמך.
- ודא שאתר ההתקנה יכול לתמוך במשקל המאוורר (כ-13.5 ק"ג).
- אין להפעיל את המאוורר עם להבים או מארז פגומים.
- Keep hands, clothing, and other objects away from the fan blades when the fan is in operation.

Figure 1: Allsmartlife 50-inch Flush Mount Ceiling Fan with Remote Control

Figure 2: Ceiling Fan in a Bedroom Setting
2. תכולת החבילה
ודא שכל הרכיבים המפורטים להלן כלולים בחבילה שלך. אם חסרים או פגומים חלקים כלשהם, אנא פנה לתמיכת הלקוחות.
- בית מנוע מאוורר תקרה
- להבי מאווררים (5)
- ערכת תאורת LED משולבת
- שְׁלַט רָחוֹק
- Wall Mount Bracket for Remote
- חומרת הרכבה (ברגים, אומים של חוטים וכו')
- מדריך הוראות

Figure 3: Fan Dimensions and Blade Options
3. מדריך התקנה
Your Allsmartlife ceiling fan comes with pre-assembled parts to simplify installation. For detailed visual instructions, search for installation videos using the model number DY1172X on Google.
שלבי התקנה כלליים:
- ניתוק חשמל: לפני תחילת העבודה, יש לוודא שאספקת החשמל לאזור ההתקנה מנותקת במפסק החשמל.
- התקנת תושבת הרכבה: Secure the mounting bracket to the ceiling junction box. Ensure the junction box is adequately supported for the fan's weight.
- תִיוּל: Connect the fan's electrical wires to the household wiring according to the provided wiring diagram in the full manual. Use appropriate wire nuts.
- מכלול מאווררים: חבר את בית מנוע המאוורר לתושבת ההרכבה.
- חיבור להב: Securely attach the five fan blades to the motor housing.
- התקנת ערכת אור: חבר והתקן את ערכת תאורת ה-LED המשולבת.
- שחזור חשמל: לאחר השלמת ההתקנה וכל החיבורים מאובטחים, יש להחזיר את החשמל למפסק החשמל.

Figure 4: Aerodynamic Blade Design and Canopy Features
4. הוראות הפעלה
Your ceiling fan is controlled by the included remote control. Ensure the remote has fresh batteries installed.
פונקציות שלט רחוק:
- מאוורר הפעלה/כיבוי: מפעיל או מכבה את המאוורר.
- מהירות מאוורר (1-6): כוונון מהירות המאוורר מ-1 (הנמוך ביותר) ל-6 (הגבוה ביותר).
- אור הפעלה/כיבוי: Controls the integrated LED light independently.
- טמפרטורת צבע (3CCT): Cycles through 3000K (Warm White), 4000K (Natural White), and 6500K (Daylight White).
- התאמת בהירות: Increases or decreases light brightness from 10% to 100%.
- מצב שינה: Activates a patented mode that varies fan frequency to simulate natural wind.
- קדימה/אחורה: משנה את כיוון סיבוב הלהב לשימוש עונתי.
- טיימר (שעה אחת/ארבע שעות/שמונה שעות): מגדיר את המאוורר לכיבוי אוטומטי לאחר שעה, 3 או 6 שעות.

Figure 5: Remote Control Functionality Overview
Seasonal Operation (Forward/Reverse):
- מצב קיץ (זרימת אוויר כלפי מטה): Press the reverse button to set blades to rotate counter-clockwise, creating a downward breeze for cooling.
- מצב חורף (זרימת אוויר כלפי מעלה): Press the reverse button again to set blades to rotate clockwise, drawing warm air up and distributing it evenly without creating a direct draft.

Figure 6: Summer and Winter Airflow Modes
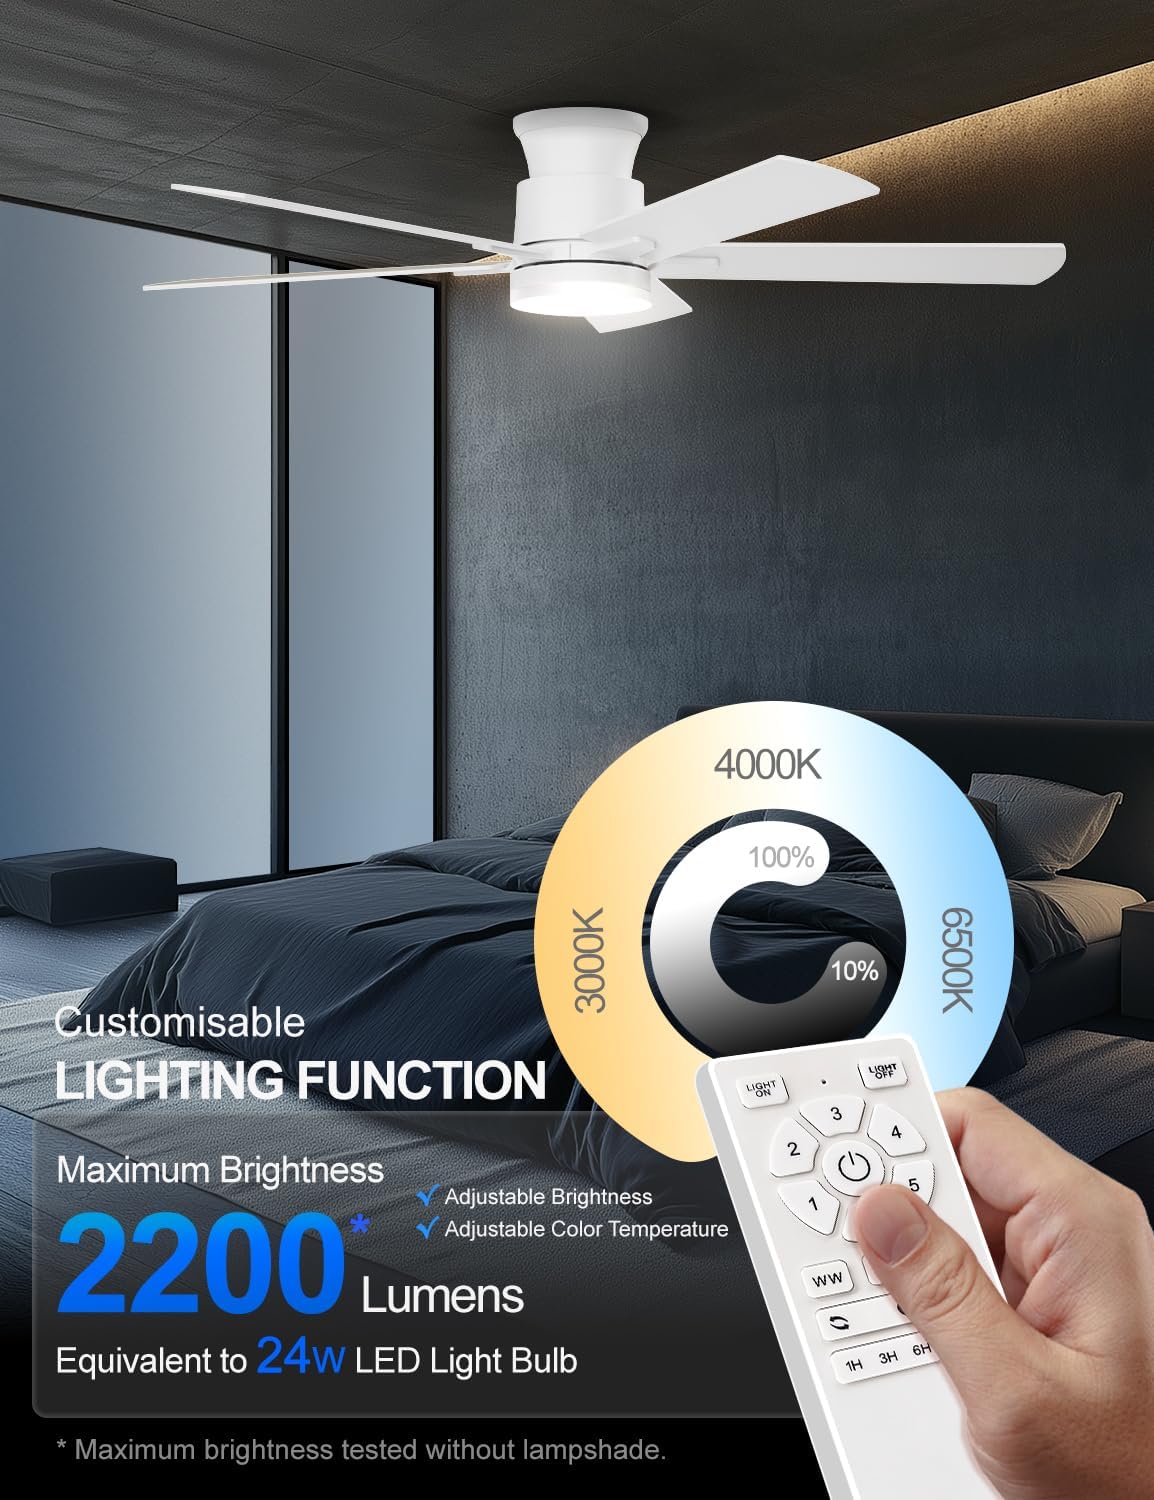
Figure 7: Customizable Lighting Functions
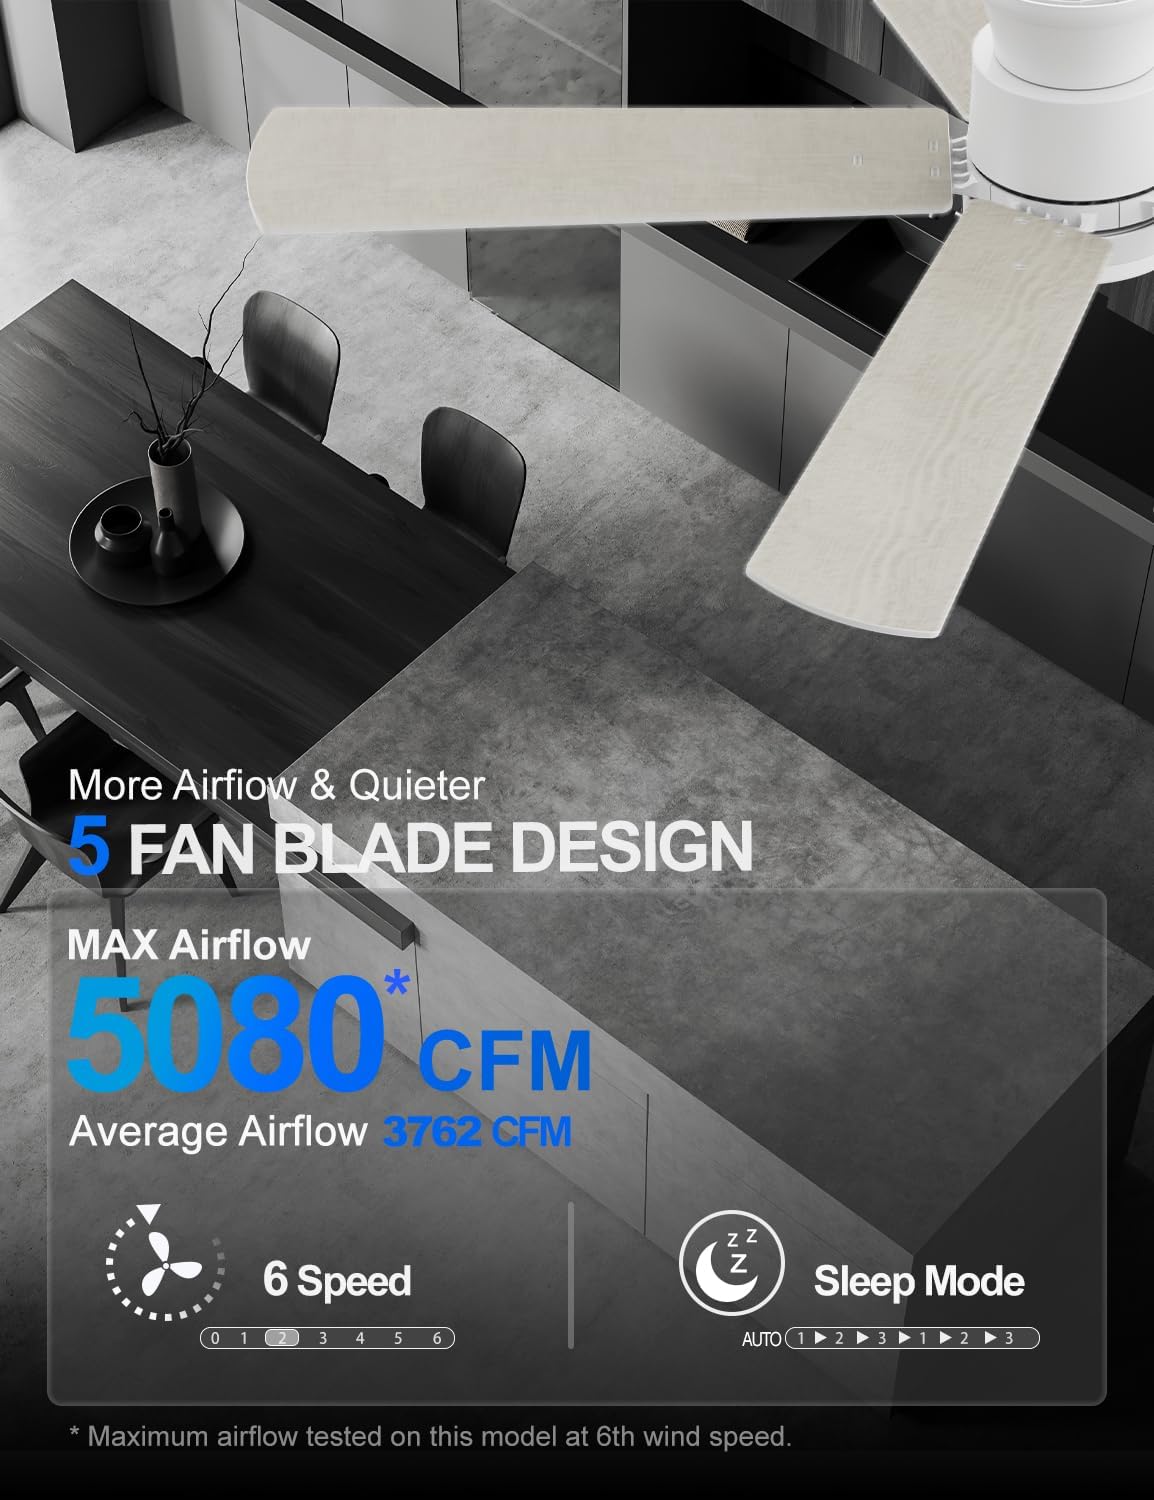
Figure 8: Airflow and Sleep Mode Features
5. תחזוקה
תחזוקה שוטפת מבטיחה ביצועים אופטימליים ומאריכה את תוחלת החיים של מאוורר התקרה שלכם.
- ניקוי: יש לנקות מעת לעת את להבי המאוורר ואת בית המנוע בעזרת מטלית רכהamp בַּד. אין להשתמש בחומרי ניקוי שוחקים או ממסים.
- בדיקת להב: Check fan blades for any cracks or damage. Replace damaged blades immediately.
- בדיקת אטימות: Ensure all screws and connections are tight at least once a year.
- מקור אור: The integrated LED light source is designed for long-term use and typically does not require replacement.
6. פתרון תקלות
אם נתקלת בבעיות עם המאוורר שלך, עיין בבעיות הנפוצות ובפתרונות הבאים:
| בְּעָיָה | סיבה אפשרית | פִּתָרוֹן |
|---|---|---|
| המאוורר לא מופעל | אין ספק כוח חיבורי חוטים רופפים סוללת השלט רחוק מתה | בדוק את מפסק/נתיך ודא שכל חיבורי החיווט מאובטחים החלף סוללות שלט רחוק |
| האור לא עובד | כיבוי אור חיבור חוט רופף סוללת השלט רחוק מתה | Ensure light is turned on via remote Check light kit wiring החלף סוללות שלט רחוק |
| מאוורר מתנדנד | ברגי להב רופפים להבים לא מאוזנים תושבת הרכבה רופפת | הדק את כל ברגי הלהב Ensure blades are evenly weighted and installed Check mounting bracket for secure installation |
| השלט רחוק לא מגיב | הסוללה מתה שלט רחוק לא משויך (אם רלוונטי) חסימה בין שלט למקלט | החלף סוללות עיין בהוראות הצימוד במדריך המלא הקפידו על קו ראייה ברור |
7. מפרט מוצר
| תכונה | פְּרָט |
|---|---|
| מותג | Allsmartlife |
| שם הדגם | 1172X |
| גוֹדֶל | 50 אינץ' |
| צֶבַע | לבן טרי |
| מידות המוצר | 50" D x 50" W x 10.5" H |
| משקל פריט | 13.5 פאונד |
| סוג מנוע | מנוע DC ללא מברשות |
| מספר להבים | 5 |
| מהירויות מאוורר | 6 |
| קיבולת זרימת אוויר | 3762 רגל מעוקב לדקה (CFM) |
| סוג אור | LED משולב |
| בְּהִירוּת | Up to 2200 lumens (10%-100% adjustable) |
| טמפרטורת צבע | 3000K (לבן חם), 4000K (לבן טבעי), 6500K (לבן אור יום) |
| שיטת בקרה | שְׁלַט רָחוֹק |
| כרך ידtage | 120 וולט |
| מהtage | 32 וואט |
| שימוש בפנים/חוץ | Indoor, Outdoor (with specific humidity and rain exposure guidelines) |
| הסמכה | ETL |

Figure 9: DC Brushless Motor Noise Comparison

Figure 10: Room Size Recommendation Guide

Figure 11: Guidelines for Outdoor Use
8. אחריות ותמיכה
Allsmartlife offers a lifetime of free replacement service for parts. If you require any assistance, have questions, or need to claim warranty service, please contact our customer support team. We are committed to providing prompt and effective solutions.
For further support, please refer to the contact information provided with your purchase or visit the official Allsmartlife webאֲתַר.
