מָבוֹא
Welcome to the ULTRICS Digital Multimeter D2 user manual. This device is designed for precise and reliable electrical measurements, suitable for professionals and DIY enthusiasts. It accurately measures AC/DC voltage, DC current, resistance, continuity, and diodes. This manual provides essential information for safe and effective operation, helping you to maximize the utility of your new multimeter.
מידע בטיחות
אַזהָרָה: Always exercise extreme caution when working with electrical circuits. Improper use of this multimeter can result in electric shock, personal injury, or damage to the device.
- אין לחרוג מערכי הקלט המרביים עבור אף טווח.
- Do not use the multimeter if it or the test leads appear damaged. Inspect them before each use.
- Ensure the function switch is in the correct position before making measurements. Changing ranges while connected to a live circuit can cause damage.
- Disconnect power to the circuit before measuring resistance, continuity, or diodes.
- היזהר בעת עבודה עם כרךtagמעל 30V AC RMS, 42V שיא, או 60V DC. נפחים אלהtages pose a significant shock hazard.
- Always connect the common (COM) test lead first, then the live lead. Disconnect the live lead first, then the common lead.
- Replace the battery when the low battery indicator appears to ensure accurate readings and proper device function.
This multimeter is rated CAT II 600V, indicating its suitability for measurements on circuits directly connected to the low-voltagההתקנה.
תוכן החבילה
ודא שכל הפריטים נמצאים בחבילה:
- 1 x ULTRICS Digital Multimeter D2
- 2 חוטי בדיקה (אדום ושחור)
- 1 x 9V סוללה
- מדריך למשתמש אחד (מסמך זה)
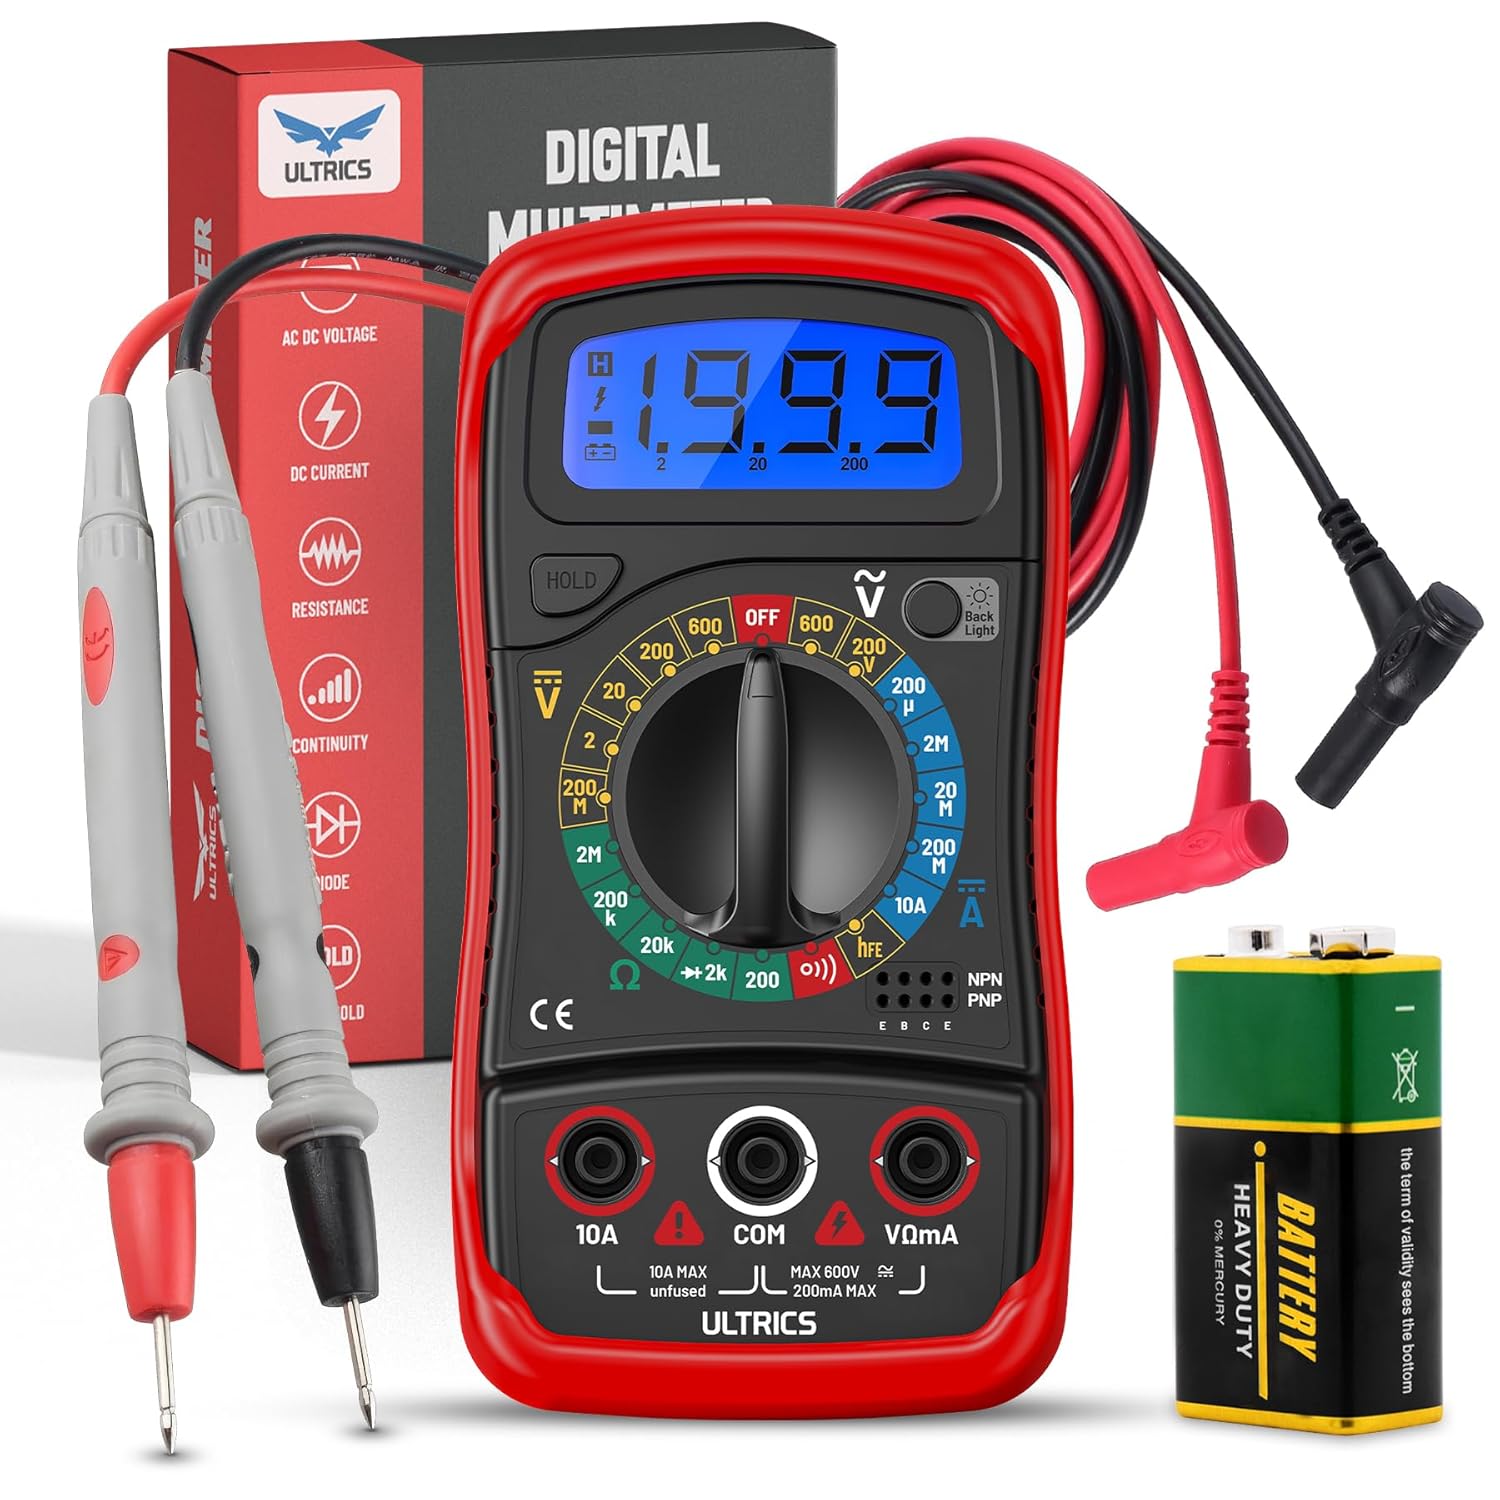
Image: Contents of the ULTRICS Digital Multimeter D2 package, including the multimeter, red and black test leads, and a 9V battery.
המוצר נגמרview
Familiarize yourself with the components of your ULTRICS Digital Multimeter D2.

Image: Detailed diagram of the ULTRICS Digital Multimeter D2, highlighting its key components such as the LCD display, data hold button, backlight button, function switch, test lead jacks, and protective rubber shell.
- תצוגת LCD: Shows measurement readings, units, and polarity. Features a bright backlight for low-light conditions.
- כפתור עצירת נתונים: Freezes the current reading on the display for easier recording.
- לחצן תאורה אחורית: מפעיל או מכבה את התאורה האחורית של הצג.
- Function Switch (Rotary Dial): בוחר את פונקציית המדידה והטווח הרצויים.
- שקע כניסה 10A: Used for measuring DC current up to 10 Ampארס.
- COM (Common) Input Jack: The negative (-) input for all measurements. Always connect the black test lead here.
- VΩmA Input Jack: The positive (+) input for voltage, התנגדות ומיליampere current measurements. Connect the red test lead here.
- Transistor Test Jacks (hFE): Used for testing NPN and PNP transistors.
- Protective Rubber Shell: Provides durability and protection against minor impacts and splashes.
- סטנד מתקפל: מאפשר הפעלה ללא ידיים וקלה viewזווית ing.
הגדרה
התקנת הסוללה
The ULTRICS Digital Multimeter D2 requires one 9V battery (included).
- אתר את תא הסוללות בגב המולטימטר.
- השתמש במברג כדי להסיר את הבורג המאבטח את מכסה הסוללה.
- הסר בעדינות את מכסה הסוללה.
- Connect the 9V battery to the battery clips, ensuring correct polarity (+ to + and - to -).
- הנח את הסוללה בתוך התא.
- החזר את מכסה הסוללה למקומו ואבטח אותו באמצעות הבורג.
חיבור מובילי מבחן
ודאו תמיד שחוטי הבדיקה מחוברים היטב לפני ביצוע מדידות.
- Insert the black test lead's banana plug into the COM שקע קלט (משותף).
- עבור רוב המדידות (נפחtage, resistance, continuity, diode, small current), insert the red test lead's banana plug into the VΩmA שקע קלט.
- For high current measurements (up to 10A DC), insert the red test lead's banana plug into the 10A שקע קלט.
הוראות הפעלה
This section details how to perform various measurements using your multimeter.
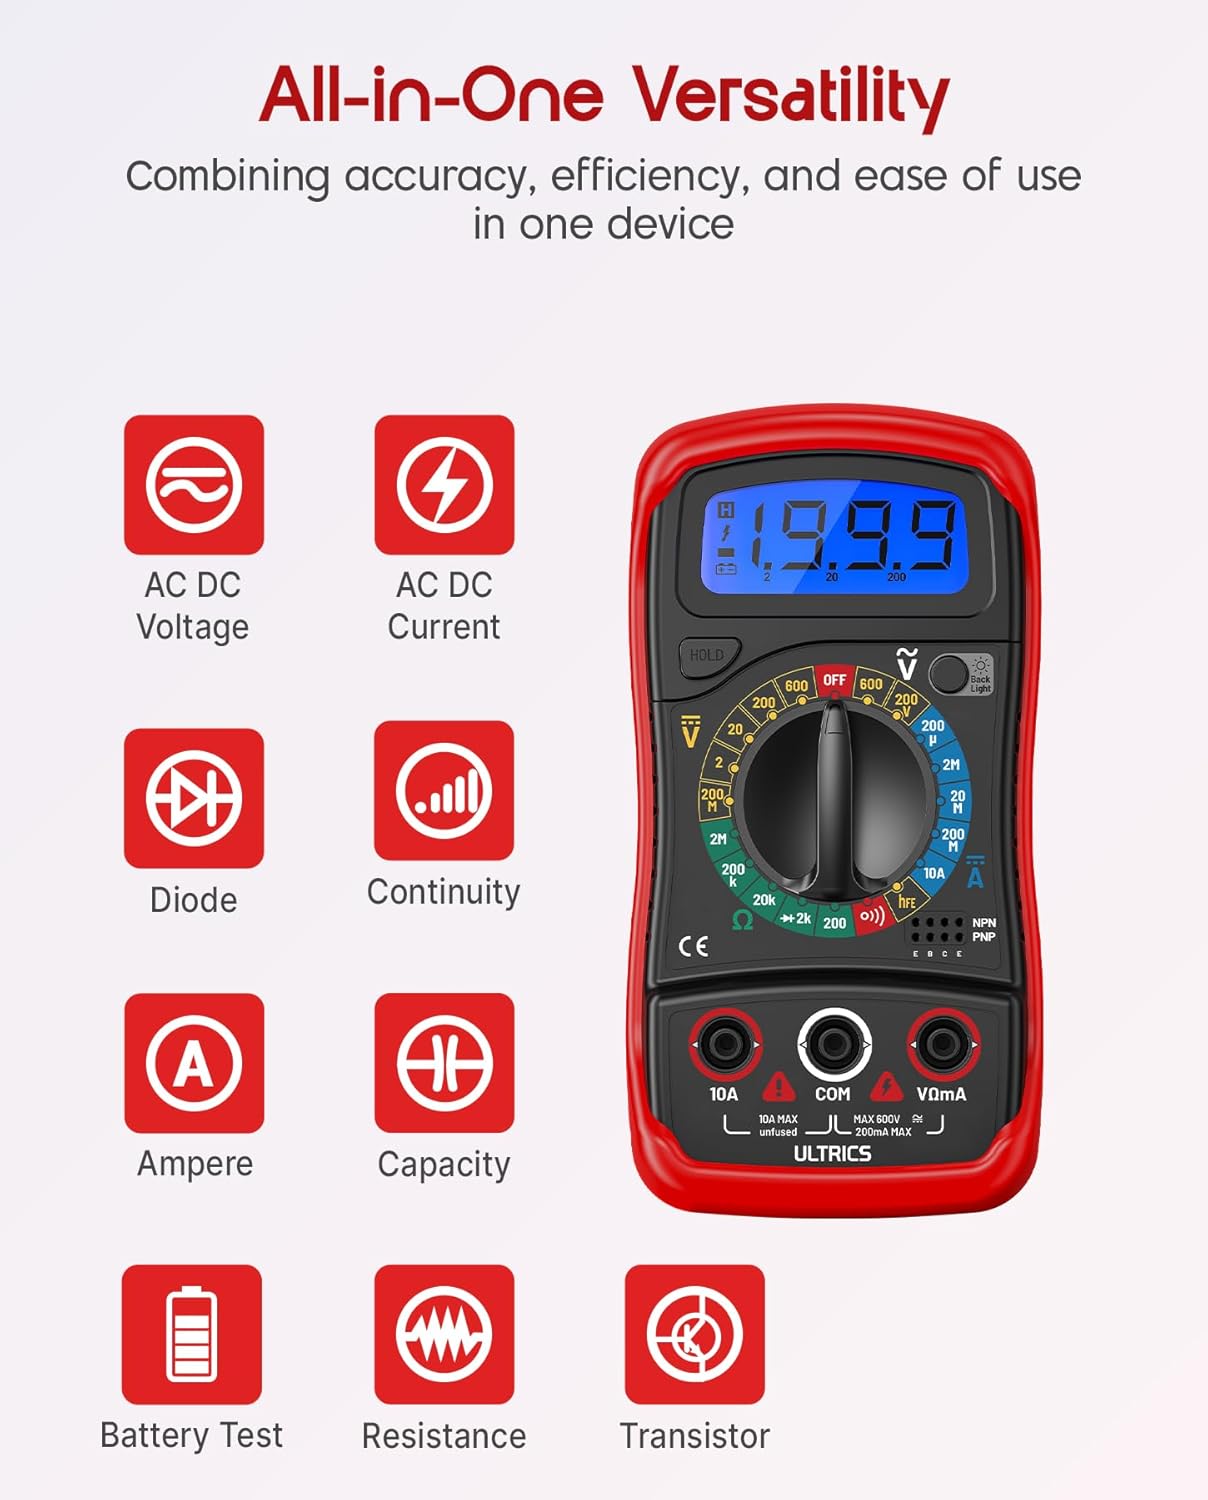
Image: Visual representation of the multimeter's versatile functions, including AC/DC Voltage, AC/DC Current, Diode, Continuity, Ampere, Capacity, Battery Test, Resistance, and Transistor measurements.
מדידת DC כרךtage (VDC)
- חבר את מוביל הבדיקה השחור אל ה- COM ג'ק וכבל הבדיקה האדום אל VΩmA ג'ֵק.
- Turn the function switch to the desired VDC range (e.g., 200mV, 2V, 20V, 200V, 600V). If unsure, start with the highest range and decrease as needed.
- חבר את חוטי הבדיקה במקביל על פני הרכיב או המעגל המיועד למדידה.
- קרא את הכרךtagערך e בתצוגת ה-LCD.
מדידת AC Voltage (VAC)
- חבר את מוביל הבדיקה השחור אל ה- COM ג'ק וכבל הבדיקה האדום אל VΩmA ג'ֵק.
- Turn the function switch to the desired VAC range (e.g., 200V, 600V).
- חברו את חוטי הבדיקה במקביל על פני מתח ACtagהמקור.
- קרא את הכרךtagערך e בתצוגת ה-LCD.
Measuring DC Current (ADC)
זְהִירוּת: Never connect the multimeter in parallel when measuring current. Always connect it in series with the circuit. Improper connection can damage the multimeter or the circuit.
- כבה את החשמל למעגל.
- For currents up to 200mA, connect the black test lead to the COM ג'ק וכבל הבדיקה האדום אל VΩmA ג'ֵק.
- For currents up to 10A, connect the black test lead to the COM ג'ק וכבל הבדיקה האדום אל 10A ג'ֵק.
- Turn the function switch to the desired ADC range (e.g., 200µA, 2mA, 20mA, 200mA, 10A).
- נתק את המעגל וחבר את המולטימטר בטור עם המעגל.
- Turn on power to the circuit.
- קרא את הערך הנוכחי בצג ה-LCD.
- Turn off power to the circuit before disconnecting the multimeter.
Measuring Resistance (Ω)
זְהִירוּת: Ensure the circuit is completely de-energized before measuring resistance. Measuring resistance on a live circuit can damage the multimeter.
- חבר את מוביל הבדיקה השחור אל ה- COM ג'ק וכבל הבדיקה האדום אל VΩmA ג'ֵק.
- Turn the function switch to the desired Ω range (e.g., 200Ω, 2kΩ, 20kΩ, 200kΩ, 2MΩ, 20MΩ).
- חבר את חוטי הבדיקה על פני הרכיב שאת ההתנגדות שלו ברצונך למדוד.
- קרא את ערך ההתנגדות על גבי צג ה-LCD.
מבחן המשכיות
The continuity test checks for a complete circuit path. An audible buzzer will sound if continuity is detected.
- חבר את מוביל הבדיקה השחור אל ה- COM ג'ק וכבל הבדיקה האדום אל VΩmA ג'ֵק.
- סובב את מתג הפונקציות למצב הֶמשֵׁכִיוּת (buzzer) position.
- חבר את חוטי הבדיקה לרוחב המעגל או הרכיב.
- אם ההתנגדות נמוכה מכ-50Ω, יישמע זמזם, מה שמצביע על רציפות.
בדיקת דיודה
בדיקת הדיודה מודדת את כרך קדימהtagטיפה של דיודה.
- חבר את מוביל הבדיקה השחור אל ה- COM ג'ק וכבל הבדיקה האדום אל VΩmA ג'ֵק.
- סובב את מתג הפונקציות למצב דיודה מַצָב.
- Connect the red test lead to the anode (+) and the black test lead to the cathode (-) of the diode.
- קרא את כרך קדימהtage drop on the LCD display. Reverse the leads; the display should show "OL" (Overload) for a good diode.
בדיקת טרנזיסטור hFE
This function tests the DC current gain (hFE) of NPN and PNP transistors.
- סובב את מתג הפונקציות למצב hFE מַצָב.
- זהה את חוטי הפולט (E), הבסיס (B) והקולט (C) של הטרנזיסטור.
- Insert the transistor leads into the corresponding holes in the hFE socket on the multimeter, ensuring correct NPN or PNP type.
- קרא את ערך ה-hFE על גבי צג ה-LCD.
פונקציית החזקת נתונים
הקש על לְהַחזִיק כדי להקפיא את הקריאה הנוכחית בתצוגה. לחץ עליו שוב כדי לשחרר את ההחזקה ולחדש את הקריאות בזמן אמת.
תאורה אחורית פונקציה
הקש על תאורה אחורית button to turn the LCD backlight on or off, improving visibility in dim environments.

תמונה: תקריב view of the multimeter's LCD display, demonstrating its bright backlight feature for enhanced readability in various lighting conditions.
תַחזוּקָה
ניקוי
כדי לנקות את המולטימטר, נגבו את המארז עם מודפסamp cloth and a mild detergent. Do not use abrasives or solvents, as these may damage the casing או תצוגה.
החלפת סוללה
When the low battery indicator appears on the display, replace the 9V battery as described in the "Installing the Battery" section to ensure continued accurate readings.
החלפת נתיך
If the current measurement function stops working, the fuse may need replacement. This multimeter is equipped with internal fuses for protection.
- Ensure the multimeter is OFF and all test leads are disconnected.
- הסר את מכסה הסוללה ואת הסוללה.
- Carefully open the main casing (this may require removing additional screws, typically located under the rubber shell).
- Locate the fuse(s) on the circuit board. This model typically uses a 200mA/250V fuse for the mA range and a 10A/250V fuse for the 10A range.
- Replace the blown fuse with a fuse of the same type and rating. Never use a fuse with a different rating.
- Reassemble the multimeter, ensuring all screws are tightened and the casing is properly sealed.
אִחסוּן
If the multimeter is not used for a long period, remove the battery to prevent leakage and store the device in a cool, dry place, away from direct sunlight and extreme temperatures.
פתרון בעיות
| בְּעָיָה | סיבה אפשרית | פִּתָרוֹן |
|---|---|---|
| אין תצוגה או תצוגה עמומה | סוללה מתה או חלשה | החלף את סוללת 9 וולט. |
| מוצג "OL" (עומס יתר) | Input value exceeds selected range; open circuit (for resistance/continuity) | Select a higher range; check for breaks in the circuit or component. |
| קריאות שגויות | Incorrect function/range selected; poor test lead connection; low battery | Verify function switch position and range; ensure leads are firmly connected; replace battery. |
| מדידת הזרם לא עובדת | נתיך מפוצץ | Replace the appropriate fuse (refer to Maintenance section). |
| No continuity buzzer | Open circuit; resistance too high | Ensure circuit is closed; check resistance value (buzzer typically activates below 50Ω). |
מפרטים
| תכונה | פְּרָט |
|---|---|
| דֶגֶם | Digital Multimeter D2 |
| לְהַצִיג | 3 ½ digit LCD, 1999 counts, with backlight |
| DC כרךtage | 200mV / 2V / 20V / 200V / 600V |
| AC כרךtage | 200V / 600V |
| זרם DC | 200 µA / 2mA / 20mA / 200mA / 10A |
| הִתנַגְדוּת | 200Ω / 2kΩ / 20kΩ / 200kΩ / 2MΩ / 20MΩ |
| בדיקת דיודה | כֵּן |
| המשכיות זמזם | כֵּן |
| בדיקת טרנזיסטור hFE | כֵּן |
| החזקת נתונים | כֵּן |
| מקור כוח | סוללה 9V |
| דירוג בטיחות | IEC CAT II 600V, CE, RoHS compliant |
| מידות (L x W x H) | 14.6 x 10 x 5 ס"מ (5.75 x 3.94 x 1.97 אינץ ') |
| מִשׁקָל | 240 גרם (0.53 פאונד) |
אחריות ותמיכה
ULTRICS provides a 12-month warranty for this product, covering manufacturing defects from the date of purchase. Please retain your proof of purchase for warranty claims.
For technical support, warranty claims, or any questions regarding your ULTRICS Digital Multimeter D2, please contact ULTRICS customer service through the retailer's platform or the official ULTRICS website. Please have your purchase details and model number ready when contacting support.
יַצרָן: ULTRICS
מספר דגם: Digital Multimeter D2
ASIN: B0DYP62MW7


