1. הקדמה
The PEAKMETER PM8237 is a high-precision, autoranging digital multimeter designed for professional and home use. It features a 30000-count display with automatic unit symbol indication, True RMS measurement capabilities, and a USB interface for data logging. This manual provides essential information for the safe and effective operation of your PM8237 multimeter.
תכונות מפתח כוללות:
- 30000 Counts Display with Digital and Analog Bar Graph
- True RMS (TRMS) Measurement
- מידות AC/DC כרךtage, AC/DC Current, Resistance, Capacitance, Frequency, Duty Cycle, Diode, Continuity, hFE, and NCV (Non-Contact Voltage)
- USB Interface for PC Connectivity
- Low Pass Filter (LPF) for accurate AC measurements
- MAX/MIN, Data Hold, and Relative Measurement functions
- Automatic Power Off and Low Battery Indication
- Over-range indication: “OL” is displayed
- Backlight for improved visibility in dim conditions

Image 1.1: The PM8237 multimeter highlighting its comprehensive range of functions, including AC/DC Voltage, Current, Resistance, Capacitance, Frequency, Diode, Continuity, HFE, USB Interface, Auto Power Off, and Auto Range.
2. מידע בטיחות
To ensure safe operation and avoid damage to the meter, please read and follow all safety instructions carefully. This device complies with EN61010-1, EN61010-2-033, EN61326, CAT.Ⅲ 1000V/CAT.Ⅳ 600V safety standards.
אמצעי בטיחות כלליים:
- Always inspect the test leads for damage (cracks, breaks) before use. Do not use if damaged.
- אין ליישם כרךtage or current that exceeds the maximum rated value for the selected range. The maximum voltage allowed between measurement ends and earth is 1000V DC or 1000V AC RMS.
- Ensure the function switch is in the correct position for the measurement you intend to make.
- Be extremely cautious when working with high voltages. Avoid contact with live circuits.
- החלף סוללות מיד כאשר מופיע מחוון סוללה חלשה כדי להבטיח קריאות מדויקות.
- אין להפעיל את המונה אם הוא נראה פגום או אם המארז פתוח.
- השתמש במונה רק כמפורט במדריך זה; אחרת, ההגנה שמספק המד עלולה להיפגע.
- Before measuring current, ensure the circuit power is off and the test leads are connected in series with the circuit.
- When measuring resistance, capacitance, or diode, ensure the circuit under test is de-energized and all capacitors are discharged.
3. המוצר נגמרview
Familiarize yourself with the components and controls of your PM8237 Digital Multimeter.
3.1 פריסת הפאנל הקדמי
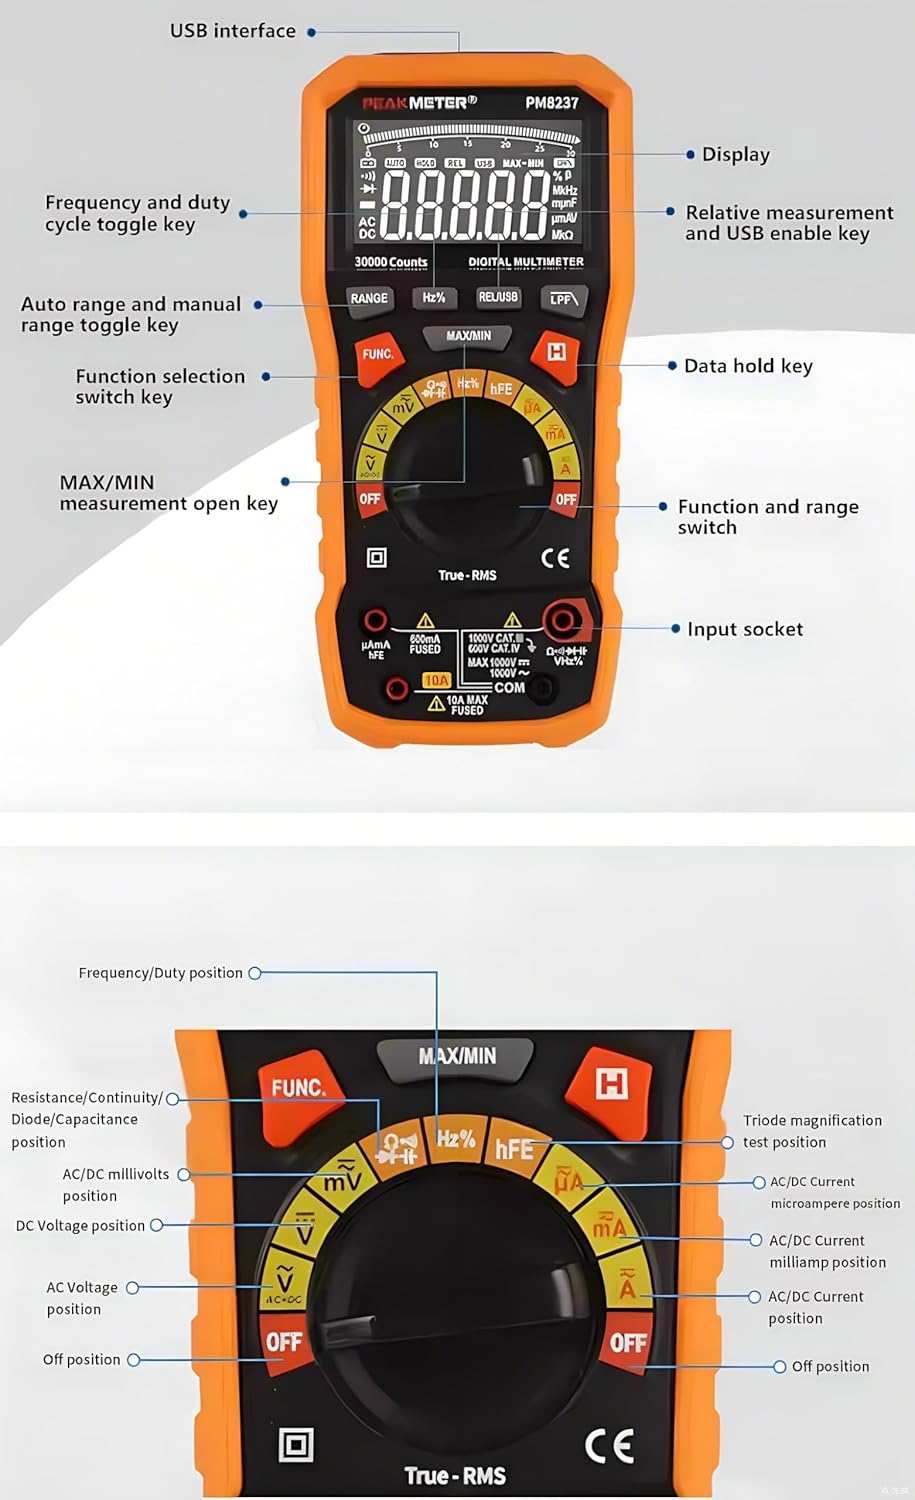
Image 3.1: Detailed diagram of the PM8237's front panel, indicating the display, USB interface, function keys, rotary switch, and input sockets.
- לְהַצִיג: 30000-count LCD with backlight and analog bar graph.
- ממשק USB: לחיבור למחשב לצורך העברת נתונים.
- לחצן RANGE: Toggles between auto range and manual range.
- לחצן Hz%: בוחר מדידת תדר או מחזור עבודה.
- REL/USB Button: Activates relative measurement mode or enables USB communication.
- LPF Button: Activates Low Pass Filter for AC voltagמדידות אלקטרוניות/נוכחיות.
- לחצן MAX/MIN: Records maximum and minimum values.
- כפתור FUNC: Selects different functions within a single rotary switch position (e.g., AC/DC, Diode/Continuity).
- החזק לחצן: מקפיא את קריאת התצוגה הנוכחית.
- מתג סיבובי: Selects the main measurement function (e.g., Voltag(למשל, זרם, התנגדות).
- שקעי קלט:
- COM: טרמינל משותף לכל המידות.
- VΩHz: קלט עבור ווליוםtage, Resistance, Frequency, Capacitance, Diode, Continuity, Temperature, NCV.
- mAµA: קלט עבור מיליampכאן ומיקרוampמדידות זרם.
- 10A: Input for 10 Ampמדידות זרם.
3.2 מידות

Image 3.2: Physical dimensions of the PM8237 multimeter, measuring 204mm (L) x 94mm (W) x 57mm (H).
4. התקנה
4.1 התקנת סוללה
The PM8237 requires four 1.5V AA batteries for operation. The battery compartment is located on the back of the meter.
- ודא שהמולטימטר כבוי.
- אתר את מכסה תא הסוללה בגב היחידה.
- השתמש במברג כדי לשחרר את הברגים המאבטחים את המכסה.
- הסר את המכסה.
- Insert four 1.5V AA batteries, observing the correct polarity (+ and -) as indicated inside the compartment.
- החזר את מכסה תא הסוללה למקומו והדק את הברגים.

Image 4.1: The PM8237 multimeter shown with its carrying case and the four AA batteries required for operation.
4.2 חיבור חוטי בדיקה
Always connect the black test lead to the COM input jack. Connect the red test lead to the appropriate input jack based on the measurement type:
- VΩHz: עבור כרךtage, resistance, frequency, capacitance, diode, continuity, and temperature measurements.
- mAµA: למדידות זרם עד 300mA.
- 10A: למדידות זרם עד 10A.
5. הוראות הפעלה
This section details how to perform various measurements with your PM8237 multimeter.
5.1 DC כרךtagמדידה (V–)
- Insert the black test lead into the COM jack and the red test lead into the VΩHz jack.
- Turn the rotary switch to the V– position.
- חברו את חוטי הבדיקה על פני מתח הזרם הישירtage source or component to be measured.
- קרא את הכרךtagערך e בתצוגה.
5.2 כרך ACtagמדידה e (V∼)
- Insert the black test lead into the COM jack and the red test lead into the VΩHz jack.
- Turn the rotary switch to the V∼ position.
- חברו את חוטי הבדיקה על פני מתח ACtage source or component to be measured.
- קרא את הכרךtage value on the display. Press the LPF button for measurements in noisy environments.

תמונה 5.1: דוגמהamples of common measurements: DC Voltage, Resistance, Diode Test, DC mA, and DC Ampאי.
5.3 DC Current Measurement (A–, mA–, µA–)
- כבה את החשמל למעגל.
- Insert the black test lead into the COM jack.
- For currents up to 300mA, insert the red test lead into the mAµA jack. For currents up to 10A, insert the red test lead into the 10A jack.
- Turn the rotary switch to the appropriate A–, mA–, or µA– position.
- Break the circuit and connect the test leads in series with the circuit.
- החזר את החשמל למעגל וקרא את ערך הזרם.
5.4 AC Current Measurement (A∼, mA∼, µA∼)
- Follow steps 1-5 for DC Current Measurement, but turn the rotary switch to the appropriate A∼, mA∼, or µA∼ position.
- Read the current value. Press the LPF button for measurements in noisy environments.
5.5 מדידת התנגדות (Ω)
- ודא שהמעגל מנותק וכל הקבלים פרוקים.
- Insert the black test lead into the COM jack and the red test lead into the VΩHz jack.
- סובב את המתג הסיבובי למצב Ω.
- חבר את חוטי הבדיקה על פני הרכיב המיועד למדידה.
- קרא את ערך ההתנגדות.
5.6 מדידת קיבול (F)
- ודא שהקבל פרוק לחלוטין לפני המדידה.
- Insert the black test lead into the COM jack and the red test lead into the VΩHz jack.
- Turn the rotary switch to the F position.
- חבר את חוטי הבדיקה על פני הקבל.
- קרא את ערך הקיבול.
5.7 Frequency and Duty Cycle Measurement (Hz%)
- Insert the black test lead into the COM jack and the red test lead into the VΩHz jack.
- סובב את המתג הסיבובי למצב Hz%.
- חבר את חוטי הבדיקה על פני מקור האות.
- Press the Hz% button to toggle between frequency and duty cycle display.
5.8 Diode Test (→|•))
- ודא שהמעגל מנותק מאנרגיה.
- Insert the black test lead into the COM jack and the red test lead into the VΩHz jack.
- Turn the rotary switch to the →|•)) position.
- Press the FUNC button to select Diode Test.
- חבר את חוט הבדיקה האדום לאנודה ואת חוט הבדיקה השחור לקתודה של הדיודה.
- קרא את כרך קדימהtagנפילת חשמל. הפוך את החוטים כדי לבדוק אם יש מעגל פתוח (OL).
5.9 Continuity Test (•))
- ודא שהמעגל מנותק מאנרגיה.
- Insert the black test lead into the COM jack and the red test lead into the VΩHz jack.
- Turn the rotary switch to the →|•)) position.
- Press the FUNC button to select Continuity Test.
- Connect the test leads across the circuit or component. A continuous beep indicates continuity (low resistance).
5.10 hFE Measurement
- Insert the black test lead into the COM jack and the red test lead into the VΩHz jack.
- סובב את המתג הסיבובי למצב hFE.
- Insert the transistor leads (E, B, C) into the corresponding hFE socket holes on the meter.
- קרא את ערך ה-hFE על הצג.
5.11 ללא מגע כרךtagאיתור e (NCV).
- סובב את המתג הסיבובי למצב NCV.
- Move the top end of the multimeter near a live AC voltagהמקור.
- The meter will emit an audible beep and the NCV indicator will light up, indicating the presence of AC voltage.
5.12 פונקציות מיוחדות
- טווח אוטומטי/ידני: המונה מוגדר כברירת מחדל לטווח אוטומטי. לחץ על טווח button to switch to manual ranging. In manual ranging, press טווח שוב ושוב כדי לעבור בין הטווחים הזמינים.
- החזקת נתונים: הקש על לְהַחזִיק לחצן להקפאת הקריאה הנוכחית בתצוגה. לחץ שוב כדי לשחרר.
- מקסימום מינימום: הקש על MAX/MIN button to enter MAX/MIN recording mode. The meter will display the maximum or minimum value measured since activation. Press again to cycle between MAX, MIN, and current reading.
- מדידה יחסית (REL): הקש על REL/USB button to store the current reading as a reference value. Subsequent measurements will be displayed as the difference from this reference. Press again to exit.
- תאורה אחורית: The backlight can be activated for better visibility in low-light conditions.
6. תחזוקה
6.1 ניקוי
נגב את המונה עם מודעהamp מטלית וחומר ניקוי עדין. אין להשתמש בחומרים שוחקים או ממסים. יש לוודא שהמד יבש לחלוטין לפני השימוש.
6.2 החלפת סוללה
When the low battery indicator appears on the display, replace the batteries as described in Section 4.1. Always use four new 1.5V AA batteries.
6.3 החלפת נתיך
If the current measurement function fails, the fuse may need replacement. Fuse replacement should only be performed by qualified personnel.
- ודא שהמולטימטר כבוי וכל חוטי הבדיקה מנותקים.
- Remove the battery compartment cover and batteries.
- Unscrew the case screws and carefully open the meter casing.
- Locate the blown fuse (typically near the current input jacks).
- Replace the fuse with one of the exact same type and rating (e.g., F10A/600V for the 10A range).
- הרכיבו בזהירות את המד מחדש, וודאו שכל הברגים מהודקים היטב.
7. פתרון תקלות
- אין תצוגה: בדוק את התקנת הסוללות וודא שהסוללות אינן ריקות.
- אינדיקציה "OL": This indicates an over-range condition. The measured value exceeds the current range. Switch to a higher range if available, or the value is simply too high for the meter.
- קריאות שגויות: Ensure test leads are properly connected, the function switch is in the correct position, and the circuit under test is prepared correctly (e.g., de-energized for resistance). Check battery level.
- מדידת זרם לא עובדת: Check the fuse as described in Section 6.3.
- כיבוי אוטומטי: The meter will automatically power off after a period of inactivity to conserve battery life. Press any button or turn the rotary switch to reactivate.
8. מפרטים
| מְדִידָה | לָנוּעַ | דִיוּק |
|---|---|---|
| DC כרךtage | ||
| 300mV | ±(0.1%+5) | |
| 3V/30V/300V | ±(0.05%+5) | |
| 1000V | ±(0.1%+5) | |
| זרם DC | ||
| 300µA/3mA/30mA/300mA | ±(0.5%+10) | |
| 10A | ±(1.2%+50) | |
| AC+DC כרךtage (40Hz-500Hz) | ||
| 3V/30V/300V/1000V | ±(1.8%+70) | |
| זרם חילופין | ||
| 300µA (40Hz-1KHz) | ±(0.8%+10) | |
| 300µA (1KHz-10KHz) | ±(3.0%+50) | |
| 3mA (40Hz-1KHz) | ±(0.8%+10) | |
| 3mA (1KHz-10KHz) | ±(3.0%+50) | |
| 30mA (40Hz-1KHz) | ±(1.2%+10) | |
| 30mA (1KHz-10KHz) | ±(3.0%+50) | |
| 300mA (40Hz-1KHz) | ±(1.2%+10) | |
| 300mA (1KHz-10KHz) | ±(3.0%+50) | |
| 10A (40Hz-1KHz) | ±(1.2%+10) | |
| 10A (1KHz-10KHz) | ±(3.0%+50) | |
| הִתנַגְדוּת | ||
| 300Ω/3KΩ/30KΩ/300KΩ | ±(0.5%+10) | |
| 3MΩ | ±(0.8%+10) | |
| 30MΩ | ±(1.5%+10) | |
| 300MΩ | ±(3.0%+10) | |
| קיבול | ||
| 30nF/300nF/3µF/30µF | ±(3.0%+5) | |
| 300 µF | ±(4.0%+5) | |
| 3mF | ±(4.0%+5) | |
| 30mF | ±(10.0%+5) | |
| 300mF | ±(20.0%+5) | |
| תֶדֶר | ||
| 10Hz-300MHz | ±(0.01%+5) | |
| מחזור חובה | ||
| 0.1% ~ 99.9% | ±(2.0%+5) | |
מפרט כללי:
- לְהַצִיג: 30000 ספירות
- ספק כוח: 4 × 1.5V AA Batteries
- מידות: 204 (L) × 94 (W) × 57 (H) מ"מ
- מִשׁקָל: כ-1 ק"ג (כולל סוללות)
- דירוג בטיחות: EN61010-1, EN61010-2-033, EN61326, CAT.Ⅲ 1000V / CAT.Ⅳ 600V
- טמפרטורת הפעלה: 0℃ עד 40℃ (32℉ עד 104℉)
- טמפרטורת אחסון: -10℃ עד 50℃ (14℉ עד 122℉)
- לַחוּת: <80% לחות יחסית (ללא עיבוי)
9. אחריות ותמיכה
For warranty information and technical support, please refer to the documentation provided with your purchase or contact the seller directly. PEAKMETER products typically come with a manufacturer's warranty covering defects in materials and workmanship.


