1. הקדמה
This user manual provides detailed instructions for the setup, operation, maintenance, and troubleshooting of your GEEKOM Mini IT12 Mini PC. Please read this manual thoroughly before using the device to ensure proper functionality and longevity.
2. מה בקופסה
Upon opening your GEEKOM Mini IT12 package, you should find the following items:
- 1 x GEEKOM Mini IT12 Mini PC
- 1 x כבל HDMI
- 1 x מתקן VESA
- 1 x מתאם חשמל
- מדריך למשתמש אחד (מסמך זה)
וִידֵאוֹ: Unboxing GEEKOM Mini IT12. This video demonstrates the unboxing process and shows all included components.

תְמוּנָה: The GEEKOM Mini IT12 shown with its VESA mount, demonstrating its compact size and mounting capability.
3. המוצר נגמרview
The GEEKOM Mini IT12 is a compact yet powerful mini PC designed for various computing needs. It features a robust processor, ample memory, and versatile connectivity options.
3.1 לוח קדמי
תְמוּנָה: מְפוֹרָט view of the front and rear ports on the GEEKOM Mini IT12.
- קורא כרטיסי SD: לקריאה וכתיבה של נתונים לכרטיסי SD.
- יציאות USB 3.2 דור 2 (x2): יציאות להעברת נתונים במהירות גבוהה.
- שקע אוזניות 3.5 מ"מ: עבור פלט שמע לאוזניות או רמקולים.
- לחצן הפעלה: להפעלה/כיבוי של המכשיר.
3.2 פאנל אחורי
- שקע: Power input for the Mini PC.
- USB4 Ports (x2): High-speed data transfer and display output, supporting up to 8K resolution.
- יציאת LAN של 2.5GbE: לחיבור רשת קווית במהירות גבוהה.
- USB 3.2 Gen 2 Port (x1): יציאת העברת נתונים במהירות גבוהה.
- יציאת USB 2.0 (x1): יציאת USB סטנדרטית עבור ציוד היקפי.
- יציאות HDMI 2.0 (x2): For connecting to displays, supporting up to 4K resolution.
4. התקנה
Follow these steps to set up your GEEKOM Mini IT12 Mini PC:
- חיבור לתצוגה: Use an HDMI cable to connect the Mini IT12 to your monitor or TV. The device supports up to four displays simultaneously via its HDMI and USB4 ports.
- חבר ציוד היקפי: חברו את המקלדת, העכבר וכל התקני USB אחרים ליציאות ה-USB הזמינות.
- התחבר לרשת: For wired internet, connect an Ethernet cable to the 2.5GbE LAN port. For wireless internet, the device supports Wi-Fi 6E.
- חבר חשמל: Plug the power adapter into the DC Jack on the rear panel, then plug the adapter into a power outlet.
- הפעלה: לחץ על לחצן ההפעלה בלוח הקדמי כדי להפעיל את המיני PC.
5. הפעלה
The GEEKOM Mini IT12 comes pre-installed with Windows 11 Pro, offering a familiar and user-friendly operating environment.
5.1 אתחול ראשוני והגדרת Windows
On the first boot, you will be guided through the Windows 11 Pro setup process. Follow the on-screen instructions to configure your language, region, network, and user account settings.
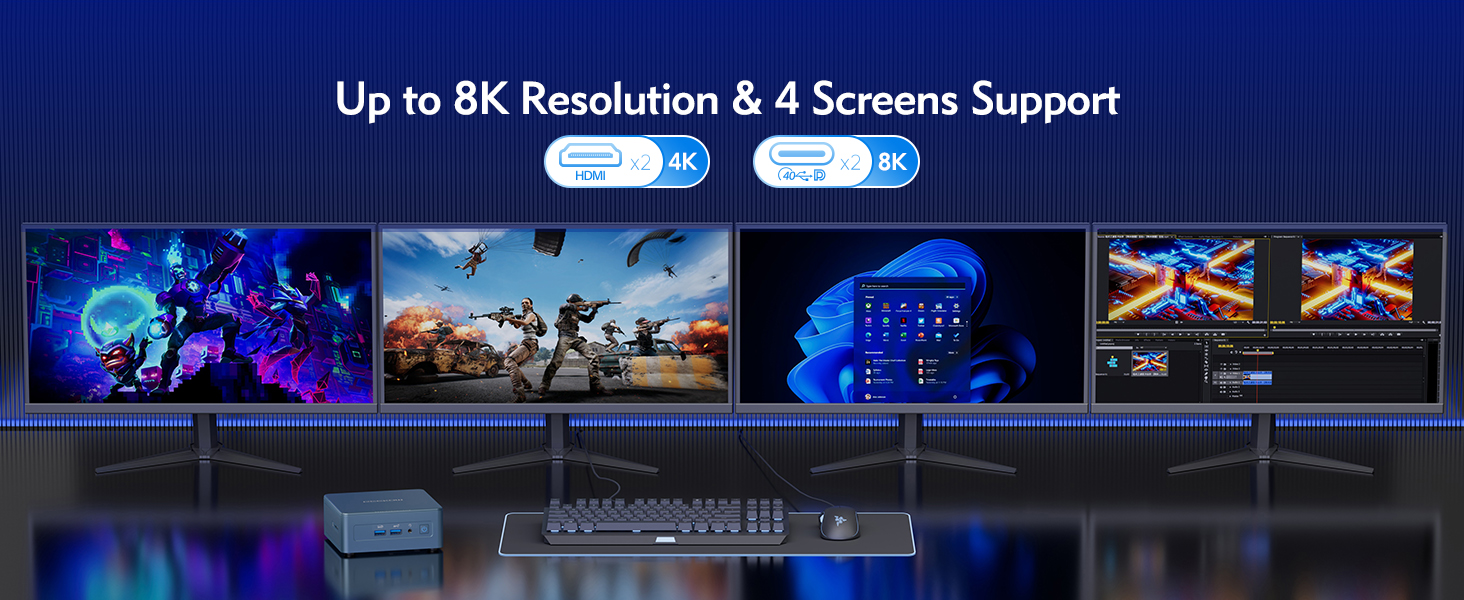
5.2 תמיכה בריבוי מסכים
The Mini IT12 supports up to four displays simultaneously, allowing for enhanced productivity and immersive experiences. Connect your displays to the available HDMI 2.0 ports and USB4 ports. You can configure display settings within Windows 11 Pro (Right-click on desktop > Display settings).

תְמוּנָה: The GEEKOM Mini IT12 demonstrating its capability to support four screens simultaneously for enhanced productivity.
5.3 קישוריות אלחוטית
The Mini IT12 is equipped with Wi-Fi 6E and Bluetooth 5.2 for fast and reliable wireless connections. Connect to your wireless network via Windows settings and pair Bluetooth devices as needed.

תְמוּנָה: Illustration of the GEEKOM Mini IT12's powerful Wi-Fi 6E and Bluetooth 5.2 capabilities, ideal for wireless peripherals and fast internet.
6. תחזוקה ושדרוגים
The GEEKOM Mini IT12 offers options for memory and storage expansion to enhance its performance and capacity.
6.1 Expanding RAM
The Mini IT12 supports dual-channel DDR4 SODIMM memory, expandable up to 64GB. Refer to the video below for detailed instructions on how to expand the RAM.
וִידֵאוֹ: How to expand RAM in GEEKOM Mini IT12. This video guides you through the process of installing additional RAM modules.
6.2 Installing an SSD
The Mini IT12 includes an M.2 2280 PCIe Gen 4 x4 SSD slot, expandable up to 2TB, and an M.2 2242 SATA SSD slot, expandable up to 1TB. Follow the video instructions for SSD installation.
וִידֵאוֹ: How to install an SSD in GEEKOM Mini IT12. This video demonstrates the steps for adding an SSD to your Mini PC.
6.3 Installing a Hard Disk Drive (HDD)
The Mini IT12 also features a 2.5" SATA HDD (7mm) slot, expandable up to 2TB. Watch the video below for guidance on HDD installation.
וִידֵאוֹ: How to install an HDD in GEEKOM Mini IT12. This video provides instructions for installing a hard disk drive.
7. פתרון תקלות
If you encounter issues with your GEEKOM Mini IT12, try the following common troubleshooting steps:
- אין כוח: Ensure the power adapter is securely connected to both the Mini PC and a working power outlet. Try a different outlet or power adapter if available.
- אין תצוגה: Check all HDMI/USB4 cable connections to your monitor. Ensure the monitor is powered on and set to the correct input source.
- אין חיבור אינטרנט: For wired connections, verify the Ethernet cable is properly connected. For Wi-Fi, check your router and ensure Wi-Fi is enabled in Windows settings.
- ביצועים איטיים: Close unnecessary applications. Check for background updates. Consider upgrading RAM or storage if performance issues persist.
- לא זוהה ציוד היקפי: Try connecting the peripheral to a different USB port. Ensure drivers are up to date.
לסיוע נוסף, אנא עיינו בסעיף האחריות והתמיכה.
8. מפרטים
Below are the key specifications for the GEEKOM Mini IT12 Mini PC:
| תכונה | מִפרָט |
|---|---|
| מעבד | 12th Gen Intel Core i7-12650H (10 Cores/16 Threads, up to 4.7GHz) |
| גרָפִיקָה | Intel Iris Xe Graphics eligible |
| אַיִל | 32GB DDR4 RAM (Dual-channel, expandable up to 64GB) |
| אִחסוּן | 1TB PCIe Gen 4 SSD (expandable up to 2TB), M.2 2242 SATA SSD slot (expandable up to 1TB), 2.5" SATA HDD slot (expandable up to 2TB) |
| מַעֲרֶכֶת הַפעָלָה | Windows 11 Pro |
| פלט וידאו | 2x HDMI 2.0 (4K), 2x USB4 (8K) - Supports up to 4 displays |
| קישוריות אלחוטית | Wi-Fi 6E, בלוטות' 5.2 |
| LAN | יציאת LAN 2.5GbE |
| נמלים | 2x USB4, 3x USB 3.2 Gen 2, 1x USB 2.0, 2x HDMI 2.0, 1x SD Card Reader, 1x 3.5mm Headphone Jack, 1x DC Jack |
| מידות | 4.6 x 4.4 x 1.79 אינץ' |
| מִשׁקָל | 1.4 פאונד |

תְמוּנָה: מעלview of the GEEKOM Mini IT12 highlighting its core specifications and features.
9. אחריות ותמיכה
Your GEEKOM Mini IT12 Mini PC is covered by a manufacturer's warranty. For specific warranty terms and conditions, please refer to the warranty card included in your product packaging or visit the official GEEKOM webאֲתַר.
For technical support, troubleshooting assistance, or service inquiries, please contact GEEKOM customer support through their official channels. You can typically find contact information on the GEEKOM website or in the included user guide.
משאבים מקוונים:
- GEEKOM Official Webאֲתַר: www.geekompc.com
- דוא"ל תמיכת לקוחות: support@geekompc.com


