1. מבוא ומעלהview
The Calix GigaCenter 844E-1 is a high-performance wireless router and modem designed to provide robust and reliable internet connectivity for home and small office environments. It supports dual-band Wi-Fi (2.4GHz and 5GHz) for optimal wireless performance and includes multiple Ethernet ports for wired connections. This manual provides detailed instructions for setting up, operating, maintaining, and troubleshooting your GigaCenter 844E-1 device.
2. תכונות מוצר
- Wi-Fi עם פס כפול: Supports 2.4GHz and 5GHz frequencies for flexible and high-speed wireless connections (802.11ac, 802.11n, 802.11a/g/b compatible).
- High LAN Data Rate: Capable of up to 1000 Mbps for fast wired connections.
- יציאות מרובות: Includes Ethernet (RJ-45) ports (4 LAN ports), USB 2.0, and RJ-11 ports for versatile connectivity.
- Integrated Modem: Functions as both a router and a modem, simplifying network setup.
- עיצוב קומפקטי: Designed for efficient space utilization.
3. תכולת החבילה
אנא ודא שכל הפריטים נמצאים בחבילה שלך:
- Calix GigaCenter 844E-1 Wireless Router Modem
- ספק כוח מתאם AC
- (Optional: Ethernet Cable, Phone Cable - may vary by package)
4. מדריך התקנה
Follow these steps to set up your Calix GigaCenter 844E-1:
- מיקום המכשיר: Place the GigaCenter 844E-1 in a central location in your home, away from obstructions and sources of interference (e.g., microwaves, cordless phones). Ensure adequate ventilation.
- חבר חשמל: Connect the provided AC Adapter Power Supply to the "POWER" port on the back of the GigaCenter 844E-1 and then plug the adapter into a standard electrical outlet. The Power indicator light on the front panel should illuminate.

איור 4.1: חזית view of the Calix GigaCenter 844E-1 showing indicator lights and the included power adapter.
- התחברות למקור האינטרנט: Connect your internet service provider's (ISP) cable or fiber optic line to the appropriate WAN/Broadband port on the GigaCenter 844E-1. This port is typically labeled "ETH-WAN" or "Broadband". The Broadband indicator light should turn solid green once a connection is established.

איור 4.2: צד view of the GigaCenter 844E-1 highlighting the ETH-WAN, Power, and Phone ports.
- חיבור התקנים קוויים (אופציונלי): Use standard Ethernet cables to connect computers, gaming consoles, or other network devices to the "ETHERNET 1-4" ports on the back of the GigaCenter 844E-1. The corresponding Ethernet indicator light will illuminate when a device is connected and active.

Figure 4.3: Top/back view of the GigaCenter 844E-1 displaying the USB, Reset, Ethernet (LAN), and Phone ports.
- Connect Phone Devices (Optional): If your service includes voice, connect analog phones to the "PHONE 1" or "PHONE 2" ports using RJ-11 cables.
- חיבור Wi-Fi ראשוני:
- Locate the Wi-Fi Network Name (SSID) and Password (WPA Key) on the label usually found on the bottom or back of your GigaCenter 844E-1.
- במכשיר האלחוטי שלך (מחשב נייד, סמארטפון, טאבלט), חפש רשתות Wi-Fi זמינות.
- Select your GigaCenter's SSID and enter the WPA Key when prompted.
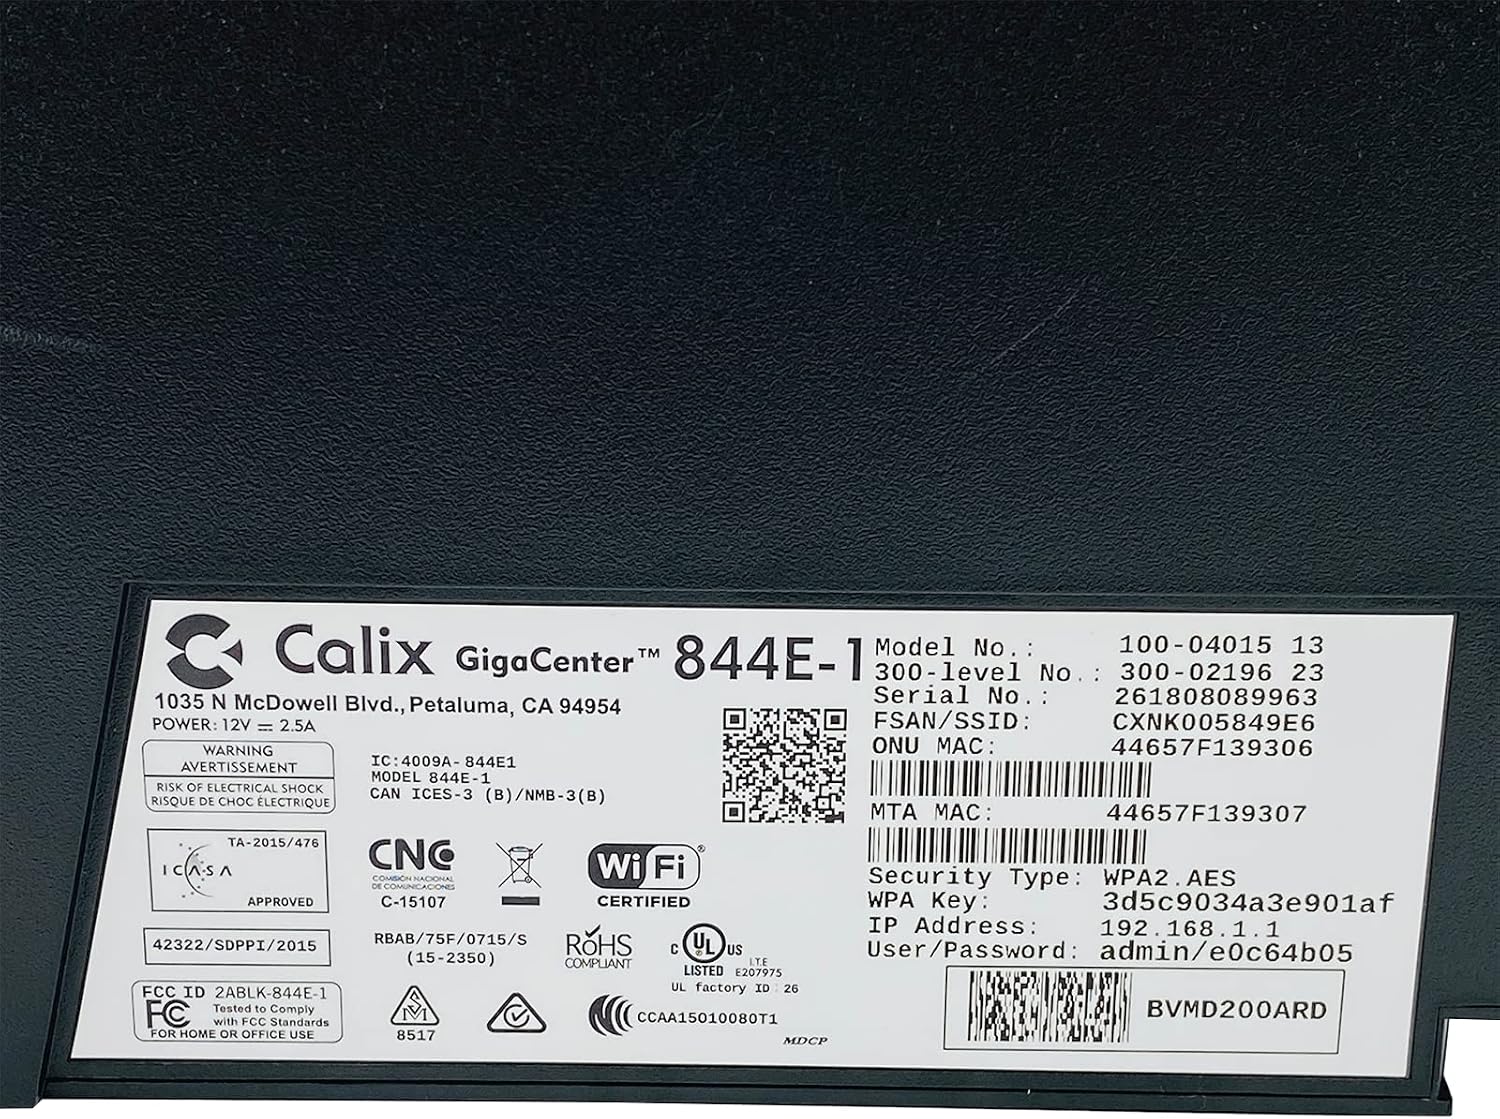
איור 4.4: מפורט view of the bottom label, providing essential information such as model number, serial number, Wi-Fi SSID, and WPA Key for network access.
- אמת חיבור: לאחר החיבור, פתח את א web browser and try to access a webאתר (למשל, www.google.com). If successful, your GigaCenter 844E-1 is set up and ready for use.
5. הוראות הפעלה
5.1 נוריות חיווי
The front panel of the GigaCenter 844E-1 features several indicator lights that provide status information:
| אוֹר | סטָטוּס | תֵאוּר |
|---|---|---|
| כּוֹחַ | ירוק מלא | המכשיר מופעל. |
| פס רחב | ירוק מלא | חיבור האינטרנט פעיל. |
| שֵׁרוּת | ירוק מלא | Service is active and provisioned. |
| WIFI 2.4 גיגה-הרץ | ירוק קבוע/מהבהב | 2.4 GHz Wi-Fi is active/data transfer. |
| WIFI 5 גיגה-הרץ | ירוק קבוע/מהבהב | 5 GHz Wi-Fi is active/data transfer. |
| ETHERNET 1-4 | ירוק קבוע/מהבהב | Wired connection active/data transfer. |
| PHONE 1-2 | ירוק קבוע/מהבהב | Phone service active/in use. |
| USB | ירוק קבוע/מהבהב | USB device connected/data transfer. |
| WPS | הַברָקָה | התאמת WPS מתבצעת. |
5.2 גישה ל Web מִמְשָׁק
To configure advanced settings, you can access the GigaCenter's web מִמְשָׁק:
- Ensure your device is connected to the GigaCenter via Wi-Fi or Ethernet.
- פתח א web browser and enter the IP Address (e.g., 192.168.1.1) found on the product label into the address bar.
- Enter the User/Password (e.g., admin/e0c64b05) from the product label when prompted.
- You can now configure settings such as Wi-Fi name, password, port forwarding, and parental controls.
6. תחזוקה
- ניקוי: השתמשו במטלית רכה ויבשה לניקוי החלק החיצוני של המכשיר. אין להשתמש בחומרי ניקוי נוזליים או בתרסיסים.
- אוורור: Ensure the device's ventilation slots are not blocked to prevent overheating.
- עדכוני קושחה: Periodically check with your Internet Service Provider (ISP) for available firmware updates to ensure optimal performance and security.
- הפעלה מחדש: If you experience connectivity issues, try restarting the device by unplugging the power adapter for 10 seconds and then plugging it back in.
7. פתרון תקלות
סעיף זה עוסק בבעיות נפוצות שאתה עשוי להיתקל בהן:
7.1 אין חיבור לאינטרנט
- בדוק כבלים: Ensure all cables (power, internet source, Ethernet) are securely connected.
- נוריות חיווי: Verify that the POWER, BROADBAND, and SERVICE lights are solid green. If not, refer to Section 5.1 or contact your ISP.
- הפעל מחדש את המכשיר: Power cycle the GigaCenter 844E-1 by unplugging it for 10 seconds and plugging it back in.
- ספק שירותי אינטרנטtage: בדוק עם ספק האינטרנט שלך לגבי כל שירות זמיןtagבאזור שלך.
7.2 Wi-Fi לא עובד או איטי
- Wi-Fi Lights: Ensure the WIFI 2.4 GHz and/or WIFI 5 GHz lights are solid green.
- סִיסמָה: Double-check that you are entering the correct Wi-Fi password (WPA Key).
- חוזק אות: Move closer to the GigaCenter 844E-1 to improve signal strength.
- הַפרָעָה: הפחתת הפרעות ממכשירים אלקטרוניים אחרים.
- אופטימיזציה של ערוצים: גישה אל web interface to change Wi-Fi channels if experiencing congestion.
7.3 אין גישה Web מִמְשָׁק
- כתובת IP: Confirm you are using the correct IP Address (e.g., 192.168.1.1).
- קֶשֶׁר: Ensure your device is connected to the GigaCenter's network.
- אישורים: Verify the User/Password from the product label.
- חומת אש/אנטי-וירוס: השבת זמנית כל תוכנת חומת אש או אנטי-וירוס במחשב שלך שעשויה לחסום את הגישה.
7.4 פונקציונליות WPS
The WPS (Wi-Fi Protected Setup) button allows for easy connection of WPS-compatible devices without manually entering the password. Press the WPS button on the GigaCenter 844E-1 and then activate WPS on your client device within two minutes. The WPS light will flash during the pairing process.
8. מפרטים
| תכונה | פְּרָט |
|---|---|
| דֶגֶם | GigaCenter 844E-1 (100-04015 13) |
| מותג | Calix |
| טכנולוגיית קישוריות | Wireless-Wi-Fi 802.11ac, Ethernet (RJ-45) Hub/Switch, 5G |
| תקנים אלחוטיים | 802.11ac, 802.11n, 802.11a/g/b |
| מחלקה להקת תדרים | דו-פס (2.4 גיגה-הרץ, 5 גיגה-הרץ) |
| Maximum LAN Data Rate | 1000 Mbps |
| נמלים | 4 x Ethernet (RJ-45), 1 x USB 2.0, 2 x RJ-11 (Phone) |
| מכשירים תואמים | Personal Computer, Network Devices |
| שימוש מומלץ | בַּיִת |
| רכיבים כלולים | ספק כוח |
| משקל פריט | 3 פאונד |
9. מידע בטיחות
- אין לחשוף את המכשיר למים או ללחות.
- אל תפתח את המכשיר גasinז. הפנה את כל הטיפולים לצוות מוסמך.
- השתמש רק במתאם החשמל המצורף.
- הרחק את המכשיר ממקורות חום ומאור שמש ישיר.
- הקפידו על אוורור נאות כדי למנוע התחממות יתר.
10. אחריות ותמיכה
For warranty information and technical support, please contact your Internet Service Provider (ISP) or the vendor from whom you purchased this device. The Calix GigaCenter 844E-1 is typically provided and supported by your ISP as part of your internet service package.
For general inquiries or to find more information about Calix products, you may visit the official Calix website (if available, search online for "Calix official website").