1. הקדמה
Thank you for choosing the Strex 12 LED Universal RCA Reversing Camera. This manual provides essential information for the proper installation, operation, and maintenance of your new reversing camera. Please read this manual thoroughly before use to ensure optimal performance and safety.
2. מידע בטיחות
- Always ensure your vehicle is turned off and the parking brake is engaged before attempting any installation or maintenance.
- Disconnect the vehicle's battery before connecting any electrical components to prevent short circuits or damage.
- Ensure all wiring is properly insulated and secured to prevent damage from vibration, heat, or moisture.
- Do not obstruct the camera's view with dirt, snow, or ice. Regularly clean the lens for clear visibility.
- This camera is designed as an aid for reversing and parking. Always check your surroundings visually and use your mirrors.
3. תכולת החבילה
ודא שכל הפריטים נמצאים בחבילה:
- 1x Strex 12 LED Reversing Camera
- 1x Mounting material with 6M RCA cable
- 1x מדריך למשתמש

איור 3.1: תכולת החבילה. The image displays the Strex 12 LED reversing camera, the included 6-meter RCA cable and power cable, and the product packaging.
4. מפרטים
| תכונה | מִפרָט |
|---|---|
| מותג | סטרקס |
| מספר דגם | SP97 |
| כרך ידtage | DC 12V |
| רזולוציית הקלטת וידאו | 720p |
| מַמָשִׁי Viewזווית | 140 מעלות |
| סוג עדשה | זווית רחבה |
| טכנולוגיית חיישן אופטי | CMOS |
| גודל חיישן אופטי | 1/4 אינץ' |
| סוג מחבר | RCA |
| סוג התקנה | חלק אחורי-view הַר |
| מכשירים תואמים | צג |
| מידות המוצר | 40L x 23W x 23H מילימטרים |

Figure 4.1: Camera Dimensions. This image illustrates the physical dimensions of the Strex reversing camera, including its mounting bracket.
5. התקנה והתקנה
The Strex 12 LED Reversing Camera is designed for a plug-and-play installation. Follow these general steps:
- בחר מיקום הרכבה: Select a suitable location at the rear of your vehicle, typically above the license plate, ensuring a clear view and that the camera does not obstruct any vehicle lights or features.
- התקן את המצלמה: Use the provided mounting hardware to securely attach the camera. Ensure it is firmly fixed to prevent movement from vibrations.
- חבר חשמל: Connect the camera's power cable to your vehicle's DC 12V system. It is recommended to connect it to the reverse light circuit so the camera activates automatically when the vehicle is put into reverse.
- חבר כבל וידאו: Route the 6-meter RCA video cable from the camera to your in-car monitor or head unit. Ensure the cable is routed safely, avoiding moving parts, sharp edges, and excessive heat.
- פונקציונליות בדיקה: Once all connections are made, turn on your vehicle and engage reverse gear to test the camera's functionality. Adjust the camera angle if necessary for optimal viewing.
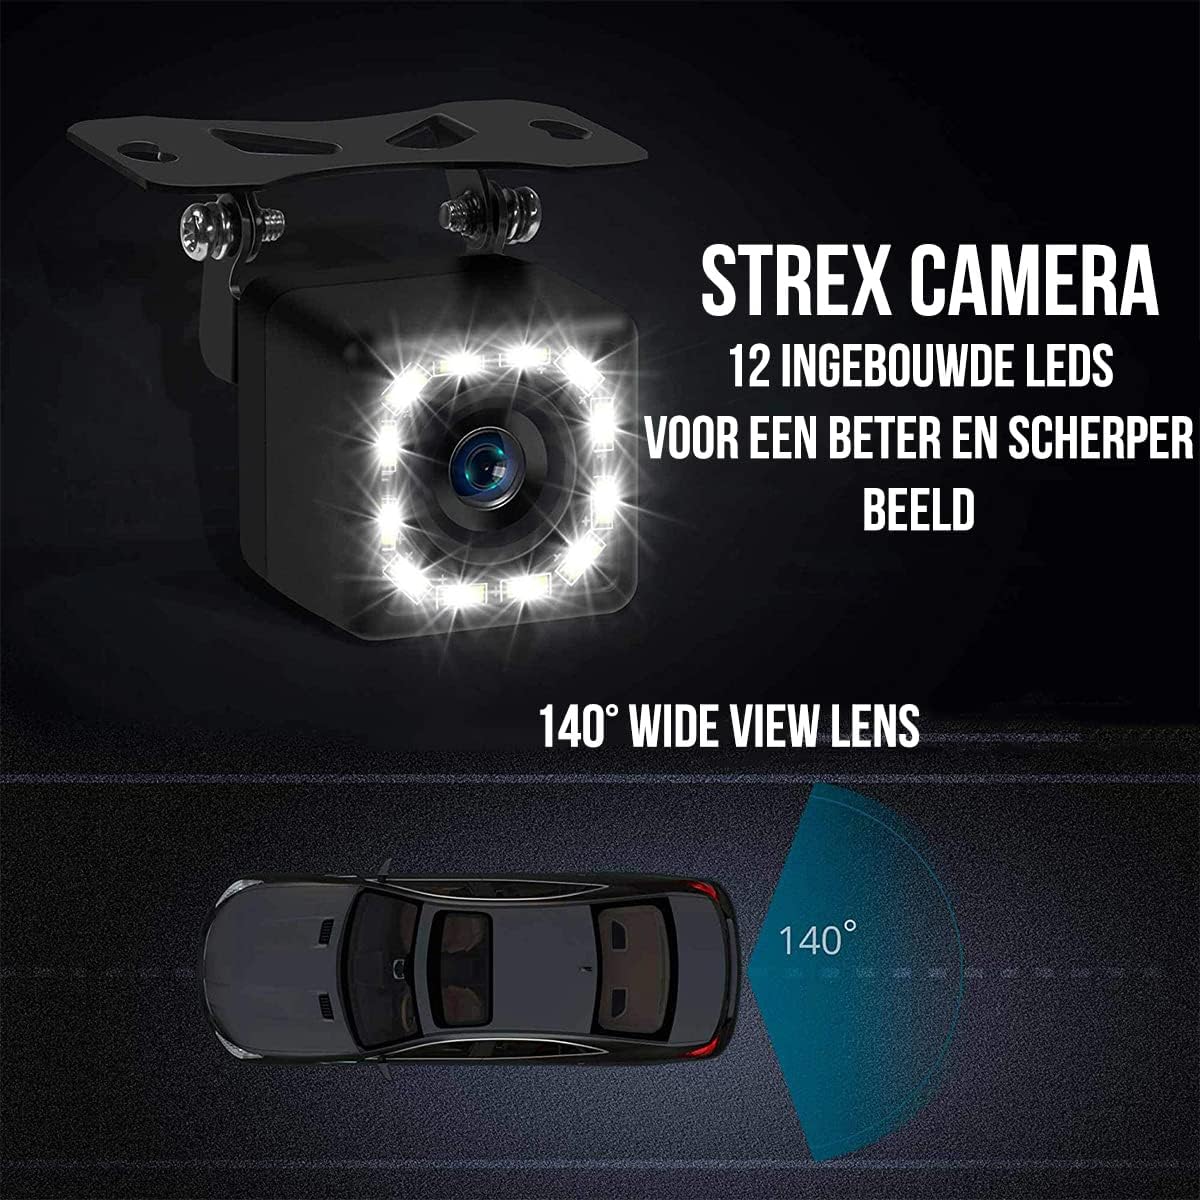
איור 5.1: תכונות המצלמה. This image highlights the 12 built-in LEDs and the 140-degree wide-angle lens of the Strex camera, crucial for installation and operation.
6. הוראות הפעלה
The Strex 12 LED Reversing Camera provides clear visibility to assist with parking and reversing maneuvers.
- הפעלה אוטומטית: When properly installed, the camera will automatically activate and display the rear view on your connected monitor when you shift your vehicle into reverse gear.
- בָּרוּר View: The camera features a 140° wide-angle lens, providing an expansive field of view to detect obstacles and other vehicles.
- ראיית לילה משופרת: Equipped with 12 powerful LED lights and 720P resolution, the camera ensures a clear image even in low-light or completely dark conditions.

Figure 6.1: Ultra Clear Image. The camera's advanced lens and chip technology ensure a clear image both during the day and at night.

Figure 6.2: Improved Night Vision. This comparison demonstrates the superior clarity and brightness provided by the Strex camera's night vision capabilities.
7. תחזוקה
To ensure the longevity and optimal performance of your Strex Reversing Camera, follow these maintenance guidelines:
- ניקוי רגיל: נקו את עדשת המצלמה מעת לעת בעזרת מטלית רכהamp cloth to remove dirt, dust, and water spots. Avoid abrasive cleaners that could scratch the lens.
- בדוק חיבורים: בדקו מדי פעם את כל חיבורי הכבלים כדי לוודא שהם מאובטחים וחופשיים מקורוזיה או נזק.
- עמידות בפני מזג אוויר: The camera features an IP68 waterproof rating, making it resistant to rain, snow, and other extreme weather conditions. However, avoid direct high-pressure water jets on the camera.

Figure 7.1: Robust and Waterproof Design. The image emphasizes the camera's durable construction and IP68 waterproof rating, ensuring reliable performance in all weather conditions.
8. פתרון תקלות
If you encounter issues with your Strex Reversing Camera, refer to the following common problems and solutions:
- אין תמונה על המסך:
- Check all power connections to ensure the camera is receiving 12V power.
- Verify the RCA video cable is securely connected to both the camera and the monitor.
- Ensure your monitor is set to the correct input source for the camera.
- Check the vehicle's reverse light circuit for proper function if the camera is wired to it.
- איכות תמונה ירודה:
- Clean the camera lens to remove any dirt, dust, or moisture.
- ודא שאין מכשולים בשדה הראייה של המצלמה view.
- Check for any kinks or damage in the video cable.
- Verify the monitor's display settings (brightness, contrast) are correctly adjusted.
- אות לסירוגין:
- בדוק את כל חיבורי הכבלים לאיתור רופף או קורוזיה.
- ודא שאספקת החשמל למצלמה יציבה.
אם שלבים אלה אינם פותרים את הבעיה, אנא פנו לתמיכת הלקוחות.
9. אחריות ותמיכה
This Strex product comes with a standard manufacturer's warranty. Please refer to the warranty card included in your package or contact your retailer for specific warranty terms and conditions.
For technical support, troubleshooting assistance, or warranty claims, please contact Strex customer service through the retailer where you purchased the product or visit the official Strex webאתר ליצירת קשר.


