1. הקדמה
Welcome to the Artillery Hornet 3D Printer User Manual. This guide provides comprehensive instructions for setting up, operating, maintaining, and troubleshooting your new 3D printer. The Artillery Hornet is designed for ease of use and high-quality printing, featuring a highly pre-assembled structure and advanced components for reliable performance.
2. מידע בטיחות
- יש להפעיל את המדפסת תמיד באזור מאוורר היטב.
- הרחיק ידיים מחלקים נעים במהלך הפעולה.
- Do not touch the hotend or heated bed during or immediately after printing, as they can reach high temperatures.
- Ensure the power supply is correctly connected and grounded.
- Unplug the printer from the power source before performing any maintenance or cleaning.
- הרחק את המדפסת מחומרים דליקים ומאור שמש ישיר.
- יש לפקח על ילדים וחיות מחמד כאשר המדפסת פועלת.
3. תכולת החבילה
לאחר פתיחת האריזה, אנא ודא שכל הרכיבים נמצאים:
- Artillery Hornet 3D Printer (95% pre-assembled)
- מחזיק סליל נימה
- כבל חשמל
- כבל USB
- Tool Kit (wrenches, screwdrivers, etc.)
- SD Card with Test Files and Software
- מדריך למשתמש (מסמך זה)
- Sampלה נימה
4. המוצר נגמרview
The Artillery Hornet features a robust metal integrated structure and a sleek design. Key components include:

איור 4.1: בסך הכל view of the Artillery Hornet 3D Printer.
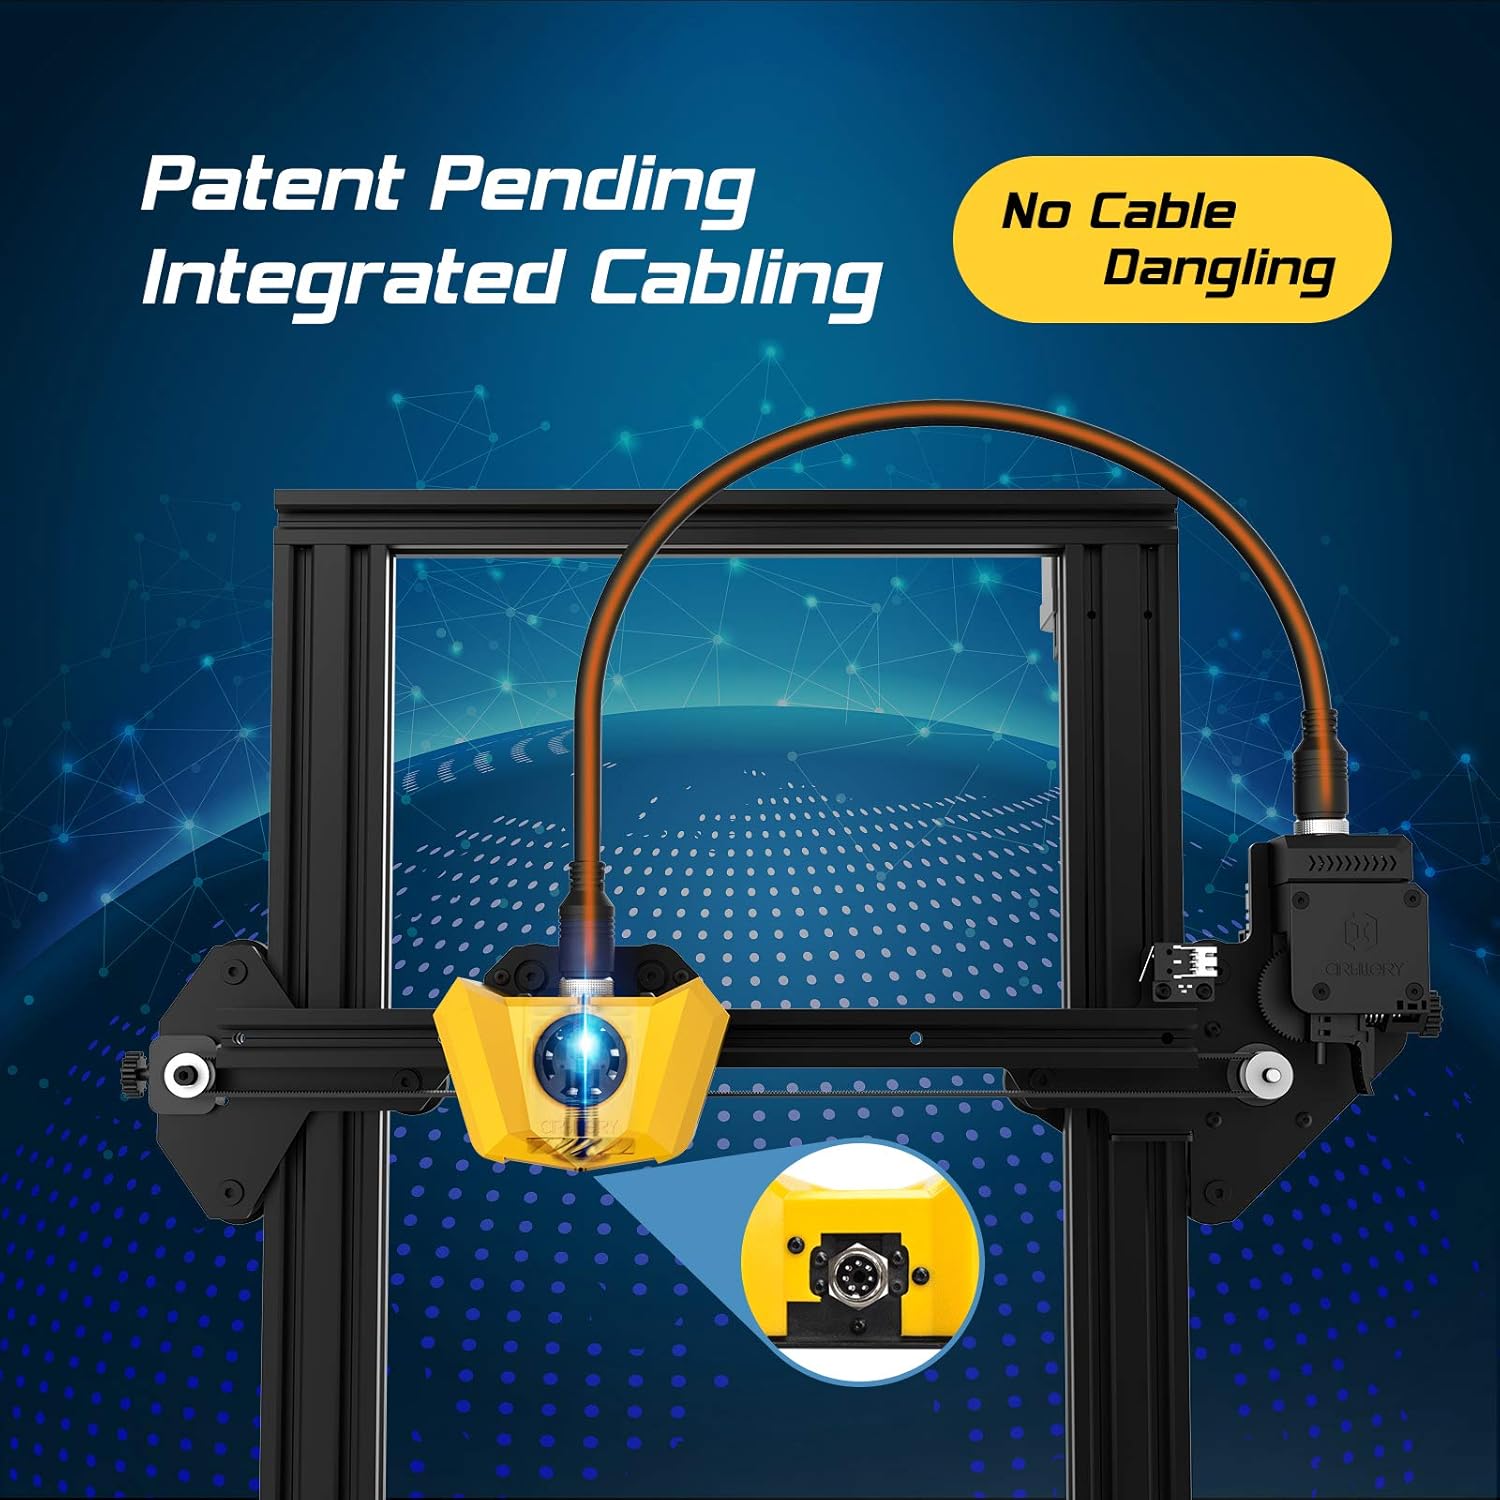
Figure 4.2: Close-up of the innovative integrated cabling system, designed to prevent cable dangling and ensure a neat setup.

Figure 4.3: Details of the New Titan Extruder and Modular Hotend, crucial for stable and precise filament feeding and melting.

Figure 4.4: The self-developed 32-bit motherboard with replaceable drivers, enabling ultra-silent printing and enhanced performance.

Figure 4.5: The user-friendly one-key knob integrated switch for easy operation and the adjustable filament holder designed to maintain a low center of gravity.
5. מדריך התקנה
The Artillery Hornet is designed for quick and easy assembly, being 95% pre-assembled. Follow these steps to complete the setup:

Figure 5.1: The printer arrives 95% pre-assembled, requiring only a few minutes for final setup.
- פריקת אריזה: הסר בזהירות את כל הרכיבים מהאריזה.
- Attach Gantry: Secure the pre-assembled gantry to the base unit using the provided screws. The integrated cabling simplifies this connection.
- התקנת מחזיק נימה: Mount the adjustable filament holder to the designated slot on the side of the printer.
- חבר חשמל: Plug the power cable into the printer and then into a grounded electrical outlet.
- הפעלה: Flip the power switch located at the rear of the base unit.
- יישור מיטה: Perform manual bed leveling as instructed on the printer's display or in the detailed guide on the included SD card. Proper bed leveling is crucial for successful prints.
6. הוראות הפעלה
Operating the Artillery Hornet is intuitive, thanks to its one-key knob integrated switch and efficient design.
6.1. טעינת נימה
- Place your filament spool onto the adjustable filament holder.
- Feed the filament through the filament sensor and into the Titan Extruder.
- Heat the hotend to the appropriate temperature for your filament type (e.g., 200°C for PLA).
- Use the one-key knob to select the 'Load Filament' option. The extruder will automatically pull the filament through the hotend until it extrudes smoothly.
6.2. התחלת הדפסה
- Prepare your 3D model using a slicing software (e.g., Cura, PrusaSlicer) and save it as a G-code file לכרטיס ה- SD.
- הכנס את כרטיס ה-SD לחריץ כרטיס ה-SD של המדפסת.
- Navigate the menu using the one-key knob to 'Print from SD' and select your desired G-code file.
- The printer will automatically heat up the bed and hotend, then begin printing. The self-developed 32-bit motherboard ensures ultra-silent operation during printing.
סרטון 6.1: אובר רשמיview of the Artillery Hornet 3D Printer, showcasing its features and printing capabilities.
7. תחזוקה
Regular maintenance ensures optimal performance and longevity of your Artillery Hornet 3D Printer.
- ניקוי משטח ההדפסה: After each print, clean the print bed with isopropyl alcohol to ensure good adhesion for future prints.
- ניקוי חרירים: Periodically clean the nozzle to prevent clogs. Use a brass brush or needle to clear any residue.
- שימון מוט ציר Z: Apply a small amount of lithium grease or similar lubricant to the Z-axis lead screw every few months to ensure smooth vertical movement.
- בדיקת חגורות: Inspect the X and Y axis belts for proper tension and wear. Adjust if too loose or replace if damaged.
- ניקוי מאווררים: Ensure cooling fans (for hotend, part cooling, and power supply) are free from dust and debris to prevent overheating.
8. פתרון תקלות
הנה כמה בעיות נפוצות ופתרונות אפשריים להן:
| בְּעָיָה | סיבה אפשרית | פִּתָרוֹן |
|---|---|---|
| Filament not feeding | Nozzle clog, tangled filament, incorrect loading. | Clear nozzle, untangle filament, re-load filament carefully ensuring it enters the Bowden tube correctly. |
| Poor print adhesion / Prints lifting | Unleveled bed, dirty print surface, incorrect bed temperature. | Re-level the print bed, clean the print surface with isopropyl alcohol, adjust bed temperature in slicing software. |
| Layering problems / Poor print quality | Loose belts, Z-axis wobble, incorrect print settings. | Check and tighten X/Y belts, ensure Z-coupler is secure, adjust print speed and temperature settings. |
| Printer is noisy | Loose components, worn bearings. | Check all screws and connections. The 32-bit motherboard is designed for silent operation, but external factors can cause noise. |
| בעיות התחממות יתר | Blocked cooling fans. | Ensure all cooling fans are clear of obstructions and functioning correctly. |
9. מפרטים
| תכונה | מִפרָט |
|---|---|
| בניית נפח | 220 x 220 x 250 מ"מ |
| מידות מדפסת | 17.1" D x 16.1" W x 18.5" H |
| משקל פריט | 17.6 פאונד (8 קילוגרם) |
| חוֹמֶר | אֲלוּמִינְיוּם |
| צֶבַע | צָהוֹב |
| סוג אקסטרודר | New Titan Extruder |
| סוג הוט-אנד | Modular Hotend |
| לוח אם | 32-bit with replaceable drivers |
| הַרכָּבָה | 95% Pre-Assembled |

Figure 9.1: Dimensions of the Artillery Hornet 3D Printer.
10. אחריות ותמיכה
For warranty information and technical support, please refer to the documentation included with your product or visit the official Artillery webאתר. שמור את קבלת הרכישה כהוכחת קנייה עבור כל תביעת אחריות.


