מָבוֹא
This instruction manual provides detailed guidance for the assembly, operation, and maintenance of your vidaXL Galvanized Steel Raised Garden Bed, Model 45726. Designed for growing a variety of flowers, plants, vegetables, and herbs, this durable planter is a practical addition to any garden, patio, or backyard. Please read all instructions carefully before beginning assembly and retain this manual for future reference.

Image: The fully assembled vidaXL Galvanized Steel Raised Garden Bed, showcasing its anthracite color and robust design within a garden environment.
מידע בטיחות
תמיד יש לתת עדיפות לבטיחות במהלך ההרכבה והשימוש. אי הקפדה על הוראות אלה עלולה לגרום לפציעה או נזק למוצר.
- Wear appropriate personal protective equipment, such as gloves, during assembly to prevent cuts from sharp edges.
- Ensure all fasteners are securely tightened to maintain structural integrity.
- Do not allow children to play on or around the raised garden bed during assembly or when filled.
- הניחו את ערוגת הגינה על משטח ישר ויציב כדי למנוע התהפכות.
- Be aware of the weight of the garden bed once filled with soil and plants. Do not attempt to move it when full.
- This product is designed for gardening purposes only. Do not use it for unintended applications.
תוכן החבילה
Before assembly, verify that all components are present and undamaged. If any parts are missing or damaged, contact vidaXL customer support.
| רְכִיב | כַּמוּת |
|---|---|
| Galvanized Steel Panels (Anthracite) | (Varies by size, refer to packaging) |
| Corner Support Posts | 4 |
| Internal Bracing Bars | (משתנה לפי גודל) |
| מחברים (ברגים, אומים, דיסקיות) | (Sufficient quantity) |
| Protective Corner Caps | 4 |
| כלי הרכבה (ברגים) | 1 |
פֶּתֶק: The exact number of panels and bracing bars may vary depending on the specific dimensions of your purchased model. Refer to the parts list included in your product packaging for precise quantities.
הוראות התקנה והרכבה
Follow these steps carefully to assemble your raised garden bed. It is recommended to have two people for easier assembly.
שלב 1: הכן את האזור
Choose a level and stable location for your garden bed. Clear any debris or obstacles from the area. The bottomless design allows for direct contact with the ground, promoting good drainage and nutrient absorption.
שלב 2: הרכבת לוחות הצד
Begin by connecting the galvanized steel panels. Align the holes on the edges of two panels and secure them using the provided screws, nuts, and washers. Do not fully tighten the fasteners until all panels are in place, allowing for minor adjustments.

תמונה: צד view of the assembled garden bed, showing the corrugated steel panels connected.
Step 3: Attach Corner Support Posts
Once the side panels form the desired rectangular shape, attach the corner support posts to the inside corners. Align the holes on the posts with the corresponding holes on the panels and secure them with fasteners. These posts provide structural rigidity.
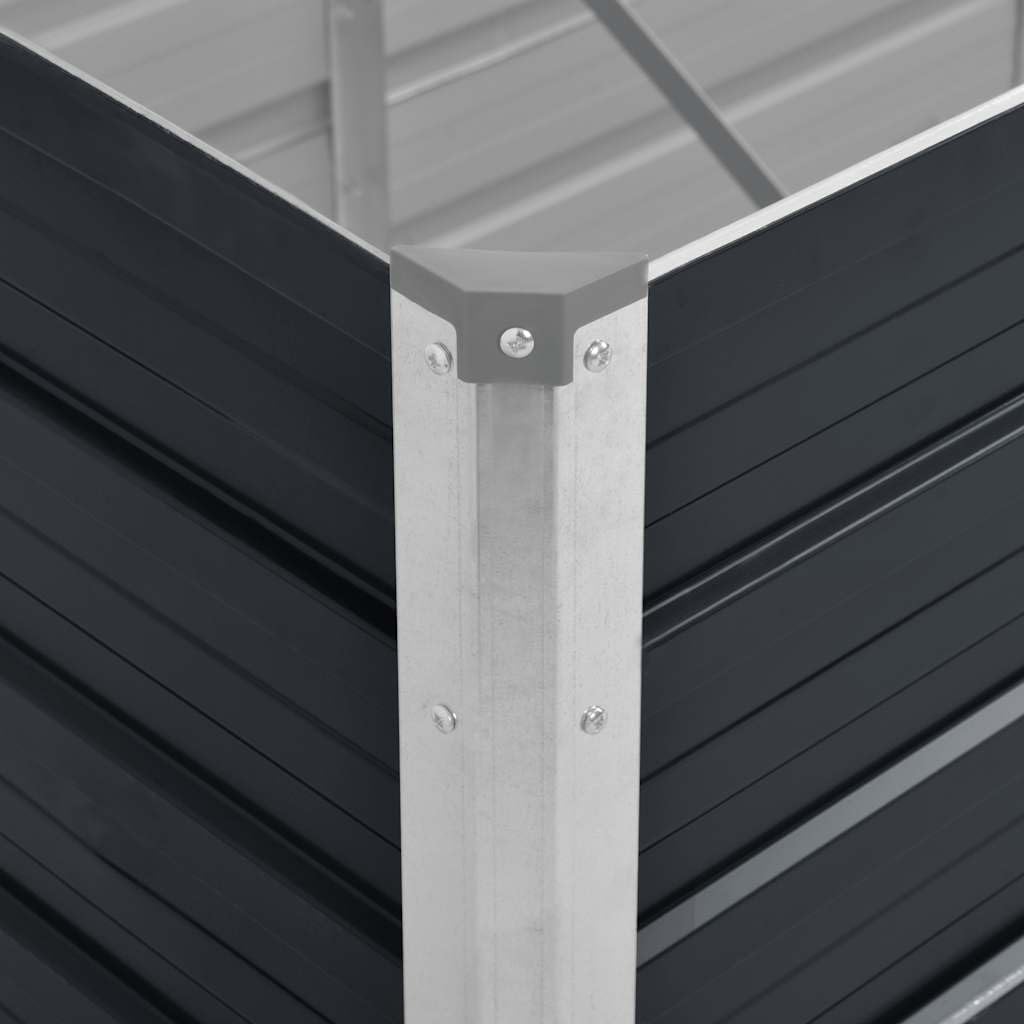
תמונה: מפורט view of a corner joint, illustrating how the panels connect to the support post and the placement of a protective cap.
Step 4: Install Internal Bracing Bars
For larger models, internal bracing bars are included to prevent the sides from bowing outwards once filled with soil. Attach these bars across the width of the garden bed, connecting them to the upper edges of the side panels as indicated in the diagram. Secure them firmly.

תמונה: פנים view of the garden bed, highlighting the cross-bracing bars that add stability to the structure.
Step 5: Final Tightening and Corner Caps
Once all panels, posts, and bracing bars are in place, go back and fully tighten all fasteners. Ensure the structure is rigid and stable. Finally, place the protective corner caps onto the top of the corner support posts for a finished look and added safety.
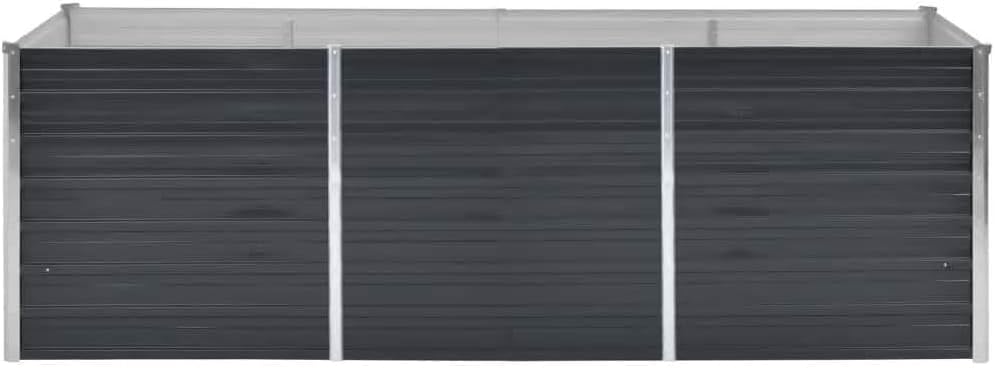
תמונה: תקורה view of the assembled garden bed, showing the complete rectangular structure.
מידות המוצר
Refer to the diagram below for the general dimensions of the raised garden bed. Specific measurements may vary slightly by model.

Image: A diagram illustrating the length, width, and height measurements of the raised garden bed.
הוראות הפעלה
Using your vidaXL Raised Garden Bed is straightforward. Follow these guidelines for optimal plant growth.
- הכן את האדמה: Fill the garden bed with a high-quality soil mix suitable for your chosen plants. Consider adding a layer of coarse material (like branches or gravel) at the bottom for improved drainage, especially if placing on concrete.
- שְׁתִילָה: Plant your desired vegetables, herbs, or flowers according to their specific spacing and depth requirements.
- רִוּוּי: Water regularly, ensuring the soil remains consistently moist but not waterlogged. The open bottom design aids in natural drainage.
- אוֹר שֶׁמֶשׁ: Position the garden bed in an area that receives adequate sunlight for your plants.
תַחזוּקָה
Regular maintenance will extend the life of your galvanized steel raised garden bed.
- ניקוי: Periodically wipe down the exterior surfaces with a damp cloth to remove dirt and debris. Avoid abrasive cleaners that could damage the galvanized finish.
- בְּדִיקָה: Annually inspect all fasteners for tightness. Re-tighten if necessary to maintain stability.
- חורף: In colder climates, consider emptying the bed or covering it during winter months to protect plants. The galvanized steel is weather-resistant, but extreme conditions can affect soil and plant health.
- ניהול קרקע: Replenish or amend the soil as needed each growing season to ensure nutrient availability for your plants.
פתרון בעיות
| בְּעָיָה | סיבה אפשרית | פִּתָרוֹן |
|---|---|---|
| Garden bed feels unstable or wobbly. | מחברים רופפים; קרקע לא אחידה. | Ensure all screws and nuts are fully tightened. Relocate the bed to a more level surface or shim uneven areas. |
| Water pooling at the bottom. | Poor drainage beneath the bed; compacted soil. | Verify the ground beneath the bed allows for drainage. If on concrete, ensure a layer of gravel or drainage material is used before adding soil. Loosen compacted soil. |
| Sides appear to bulge when filled. | Bracing bars not installed or loose; excessive soil pressure. | Ensure all internal bracing bars are correctly installed and tightened. Avoid overfilling with extremely dense soil. |
מפרטים
- מותג: vidaXL
- מספר דגם: 45726
- חוֹמֶר: Galvanized Steel (Alloy Steel, Metal)
- צֶבַע: פֶּחָם אֶבֶן
- מידות המוצר: מידות: 80 ס"מ עומק x 77 ס"מ רוחב x 240 ס"מ גובה (24.9 ס"מ עומק x 15.5 ס"מ רוחב)
- משקל פריט: 32.8 פאונד (14.9 קילוגרם)
- צוּרָה: מַלבֵּנִי
- נדרשת הרכבה: כֵּן
- תכונה מיוחדת: Durable, Rustproof, Weather-proof
אחריות ותמיכה
For warranty information or technical support, please refer to the warranty card included with your product or visit the official vidaXL webאתר. שמור את קבלת הרכישה כהוכחת קנייה.
מידע ליצירת קשר:
- Webאֲתַר: www.vidaxl.com
- שֵׁירוּת לָקוֹחוֹת: עיין ב webאתר לקבלת פרטי קשר אזוריים.


