1. הקדמה
Thank you for choosing the Klarstein Omnichef 30 2G Mini Oven. To ensure safe and proper operation, please read this user manual carefully before using the appliance. Keep this manual for future reference.
2. הוראות בטיחות
יש להקפיד תמיד על אמצעי הזהירות הבסיסיים הבאים בעת שימוש במכשירי חשמל:
- קרא את כל ההוראות לפני השימוש.
- אל תיגע במשטחים חמים. השתמש בידיות או ידיות.
- To protect against electrical shock, do not immerse the cord, plug, or any part of the oven in water or other liquid.
- יש צורך בהשגחה צמודה כאשר כל מכשיר נמצא בשימוש על ידי ילדים או בקרבתו.
- נתק מהשקע כאשר אינו בשימוש ולפני ניקוי. מניחים להתקרר לפני ששמים או מורידים חלקים.
- אין להפעיל מכשיר עם כבל או תקע פגומים, או לאחר שהמכשיר מתקלקל או ניזוק בכל צורה שהיא. פנו לשירות הלקוחות לבדיקה, תיקון או כוונון.
- השימוש באביזרים נלווים שאינם מומלצים על ידי יצרן המכשיר עלול לגרום לסכנות.
- אין להשתמש בחוץ.
- אל תתנו לכבל לתלות מעל קצה השולחן או השיש, או לגעת במשטחים חמים.
- אין להניח על או ליד מבער גז או חשמלי חם, או בתנור מחומם.
- יש לנקוט משנה זהירות בעת העברת מכשיר המכיל שמן חם או נוזלים חמים אחרים.
- תמיד חברו תחילה את התקע למכשיר, ולאחר מכן חברו את הכבל לשקע בקיר. כדי לנתק, כבו כל בקר למצב 'OFF', ולאחר מכן הוציאו את התקע משקע הקיר.
- אל תשתמש במכשיר לשימוש אחר מהשימוש המיועד.
- אסור להכניס מזון גדול מדי או כלי מתכת לטוסטר אובן מכיוון שהם עלולים ליצור שריפה או סיכון להתחשמלות.
- שריפה עלולה להתרחש אם התנור מכוסה או נוגע בחומרים דליקים, כולל וילונות, וילונות, קירות וכדומה, בזמן הפעולה.
- אין להניח בתנור זה חומרים אחרים מלבד האביזרים המומלצים על ידי היצרן כאשר אינו בשימוש.
- אין להכניס אף אחד מהחומרים הבאים בתנור: נייר, קרטון, פלסטיק ומוצרים דומים.
- אין לכסות את מגש הפירורים או כל חלק בתנור בנייר כסף. זה יגרום להתחממות יתר של התנור.
- תמיד לבש כפפות מגן ומבודדות לתנור בעת הכנסת או הסרה של פריטים מהתנור החם.
3. המוצר נגמרview
Familiarize yourself with the components and controls of your Klarstein Omnichef 30 2G Mini Oven.

איור 1: The Klarstein Omnichef 30 2G Mini Oven in operation, showing a pizza baking inside. The oven features a black exterior with a stainless steel handle and control panel on the right side.
3.1 לוח בקרה

איור 2: תקריב חזיתי view of the Klarstein Omnichef 30 2G Mini Oven, highlighting the control panel. It features three distinct rotary knobs for temperature, function selection, and timer, along with a red power indicator light at the bottom right.
- ידית בקרת טמפרטורה: Used to set the desired cooking temperature (e.g., 100°C to 230°C).
- כפתור בורר פונקציות: Allows selection of various cooking modes, such as top heat, bottom heat, top and bottom heat, convection, and rotisserie.
- כפתור טיימר: Sets the cooking duration (e.g., 0 to 60 minutes) or continuous operation (stay on). The oven automatically switches off when the timer reaches zero.
- נורית חיווי כוח: דולק כאשר התנור פועל.
3.2 אביזרים נלווים
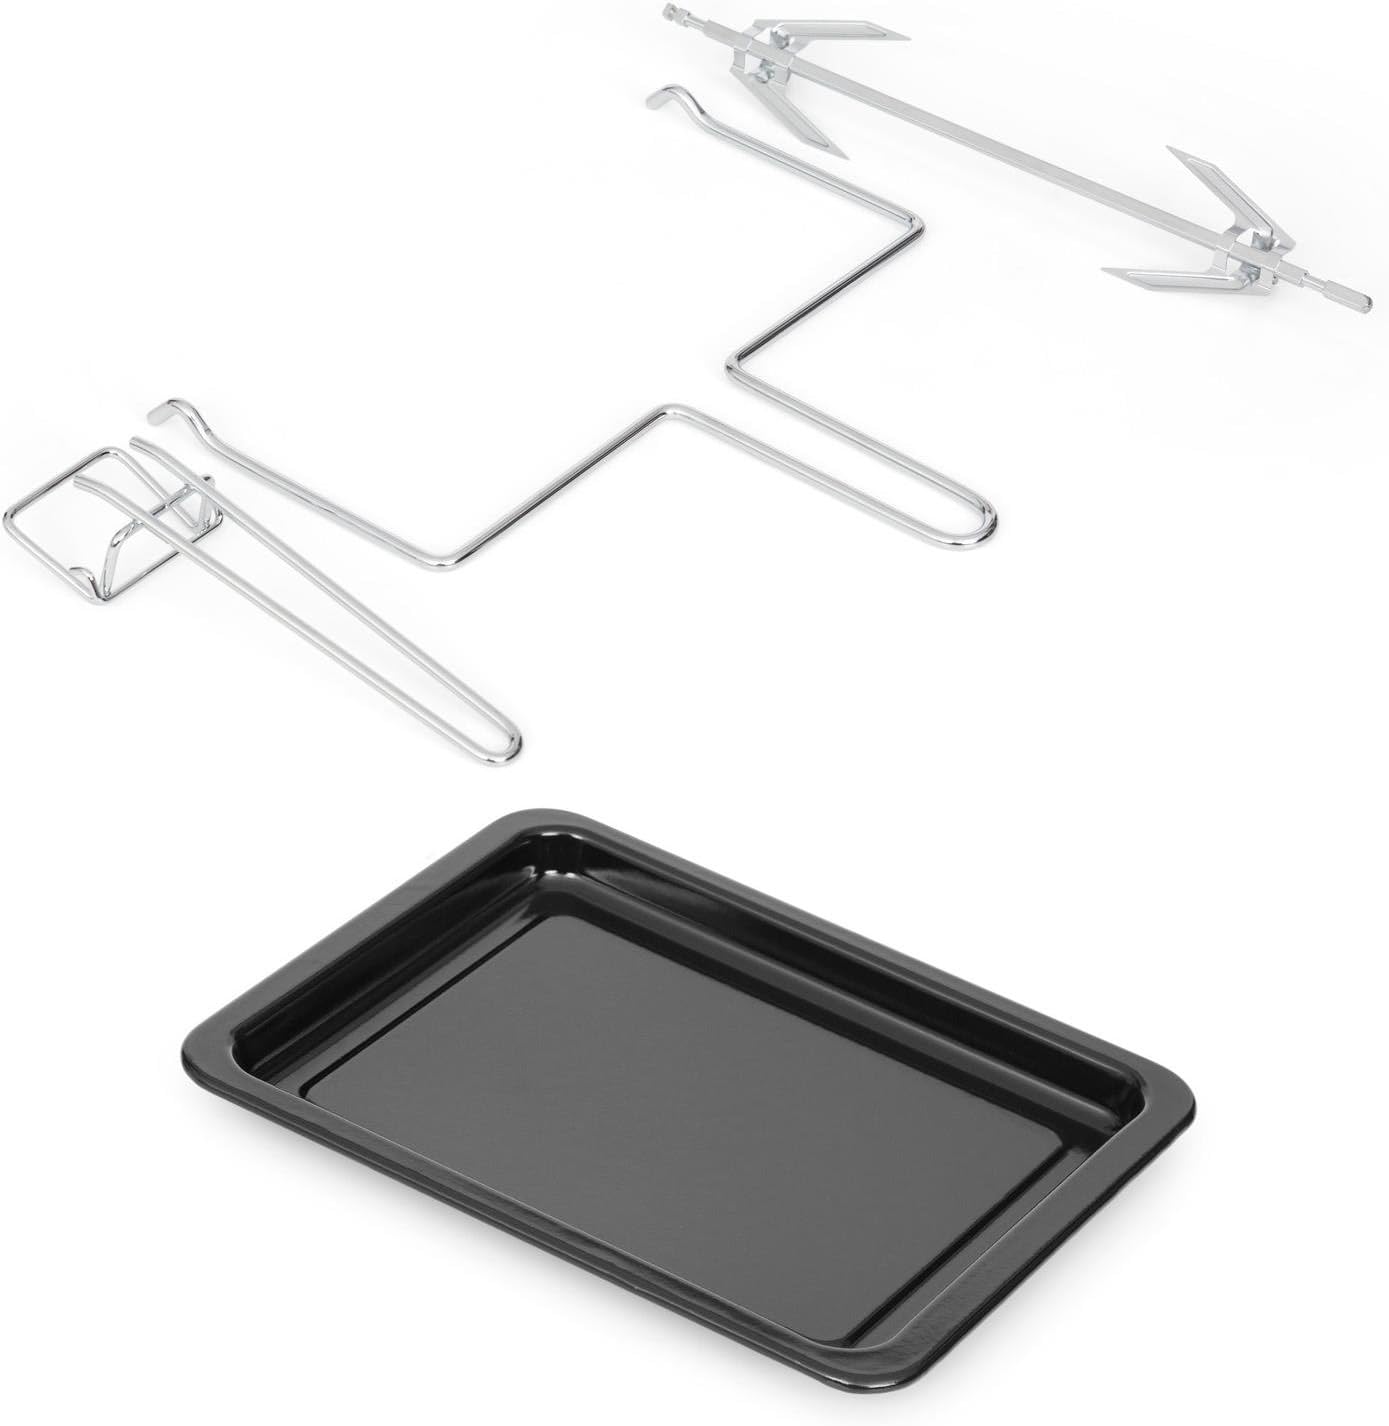
איור 3: The standard accessories included with the Klarstein Omnichef 30 2G Mini Oven. These include a rectangular baking tray, a wire grill rack, and a rotisserie spit with two sets of forks for roasting.
- מגש אפייה: For baking, roasting, and collecting drips.
- מתלה גריל: For grilling and placing dishes.
- רוטיסרי ספיט: לצליית עוף שלם או בשרים אחרים.
- ידית רוטיסרי: להכנסה והוצאה בטוחות של שיפוד הגריל החם.
4. התקנה
- פריקת אריזה: הוציאו בזהירות את התנור ואת כל האביזרים מהאריזה. הסירו את כל סרטי המגן או המדבקות.
- מיקום: Place the oven on a stable, heat-resistant, and level surface. Ensure there is adequate ventilation around the oven (at least 10 cm clearance on all sides) to prevent overheating. Do not place it near flammable materials or under cabinets.
- ניקוי ראשוני: Before first use, wipe the interior of the oven and all accessories with a damp בד וחומר ניקוי עדין. יבש היטב.
- שימוש ראשון (צריבה): To eliminate any manufacturing odors, operate the empty oven for approximately 15 minutes at the maximum temperature (230°C) using the top and bottom heat function. Ensure the room is well-ventilated during this process. A small amount of smoke or odor is normal during this initial burn-in.
5. הוראות הפעלה
5.1 תפעול כללי
- להכין אוכל: Place your food on the baking tray or grill rack.
- הכנס אוכל: Carefully slide the tray or rack into the desired rack position inside the oven. Close the oven door.
- הגדר טמפרטורה: סובב את ידית בקרת טמפרטורה לטמפרטורת הבישול הרצויה.
- בחר פונקציה: סובב את כפתור בורר פונקציות to choose the appropriate cooking mode (e.g., top heat, bottom heat, top and bottom heat, or convection).
- הגדר טיימר: סובב את כפתור טיימר to the desired cooking time. The oven will begin heating immediately, and the power indicator light will illuminate. For continuous operation, turn the timer past the 60-minute mark to the 'Stay On' position.
- מעקב אחר בישול: Observe the cooking process through the oven door.
- סוף הבישול: When the set time elapses, the timer will ring, and the oven will automatically switch off. If using 'Stay On' mode, manually turn the timer knob to 'OFF' to stop cooking.
- הסר מזון: בעזרת כפפות תנור, הוציאו בזהירות את האוכל המבושל מהתנור.
5.2 שימוש בפונקציית הרוטיסרי

איור 4: The Klarstein Omnichef 30 2G Mini Oven demonstrating the rotisserie function, with a perfectly roasted whole chicken rotating on the spit inside the illuminated oven cavity.
- להכין אוכל: Securely attach the food (e.g., a whole chicken) onto the rotisserie spit using the forks. Ensure the food is balanced to allow for even rotation.
- Insert Spit: Insert the pointed end of the rotisserie spit into the drive socket on the right side of the oven interior. Rest the square end of the spit onto the support on the left side.
- בחר פונקציה: סובב את כפתור בורר פונקציות to the rotisserie symbol.
- Set Temperature and Timer: Set the desired temperature and cooking time using the respective knobs.
- הסר מזון: Once cooking is complete, use the rotisserie handle to carefully lift and remove the hot spit from the oven.
6. תחזוקה וניקיון
ניקוי ותחזוקה קבועים יבטיחו את אורך החיים וביצועים אופטימליים של התנור שלכם.
- תמיד נתקו את התנור מהחשמל משקע החשמל ואפשר לו להתקרר לחלוטין לפני הניקוי.
- חִיצוֹנִי: נגב את המשטחים החיצוניים עם רך, דamp מטלית. אין להשתמש בחומרי ניקוי שוחקים, כריות קרצוף או כימיקלים חזקים, מכיוון שאלה עלולים לפגוע בגימור.
- פְּנִים: נגב את הקירות הפנימיים עם מודעהamp cloth and a mild detergent. For stubborn stains, a non-abrasive oven cleaner designed for conventional ovens can be used, following the product instructions carefully. Ensure all cleaner residue is removed.
- אביזרים: The baking tray, grill rack, and rotisserie spit can be washed in warm, soapy water. Rinse thoroughly and dry completely before storing or reusing.
- מגש פירורים: יש להסיר ולנקות את מגש הפירורים באופן קבוע כדי למנוע הצטברות שומן וסכנות שריפה אפשריות.
- אין לטבול את גוף התנור במים או בכל נוזל אחר.
7. פתרון תקלות
If you encounter any issues with your oven, refer to the table below for common problems and solutions.
| בְּעָיָה | סיבה אפשרית | פִּתָרוֹן |
|---|---|---|
| התנור לא מתחמם. | 1. Oven is not plugged in. 2. Timer is set to 'OFF' or 0. 3. Temperature or function knob not set. | 1. ודא שכבל החשמל מחובר היטב לשקע פועל. 2. Turn the timer knob to the desired cooking time. 3. Set both the temperature and function knobs to the desired settings. |
| האוכל לא מתבשל באופן שווה. | 1. Incorrect rack position. 2. Oven overcrowded. | 1. Adjust the grill rack to a different position for better heat distribution. 2. Avoid overcrowding the oven; cook in smaller batches if necessary. |
| עשן או ריח חריג במהלך השימוש הראשון. | שריפת שאריות ייצור. | This is normal during the initial burn-in process. Ensure adequate ventilation. If smoke persists after initial use, contact customer support. |
| Rotisserie spit is not rotating. | 1. Rotisserie function not selected. 2. Spit not correctly inserted into drive socket. | 1. Ensure the function selector knob is set to the rotisserie symbol. 2. Check that the pointed end of the spit is fully engaged in the drive socket. |
8. מפרט טכני
- מותג: קלרשטיין
- דֶגֶם: Omnichef 30 2G
- יְכוֹלֶת: 20 ליטר
- מידות (ב x D x H): 46 x 32 x 30 ס"מ
- מִשׁקָל: 9 ק"ג
- תכונה מיוחדת: שָׁעוֹן עֶצֶר
- צֶבַע: שָׁחוֹר
- התייחסות יצרן: 4060656075209
9. מידע לסילוק
אם קיימת תקנה חוקית לסילוק מכשירים חשמליים ואלקטרוניים במדינה שלך, סמל זה על המוצר או על האריזה מציין שאסור להשליך מוצר זה עם האשפה הביתית. במקום זאת, יש לקחת אותו לנקודת איסוף למיחזור ציוד חשמלי ואלקטרוני. על ידי סילוקו בהתאם לכללים, אתם מגנים על הסביבה ועל בריאותם של בני האדם מפני השלכות שליליות.
10. אחריות ותמיכה
For warranty claims, technical support, or any questions regarding your Klarstein Omnichef 30 2G Mini Oven, please contact your retailer or the Klarstein customer service department. Please retain your proof of purchase for all warranty-related inquiries.