1. הקדמה
This manual provides essential instructions for the proper setup, operation, and maintenance of your Argox AS-8250U Barcode Scanner. The AS-8250U is a long-range scanner designed for various applications, including retail, inventory management, invoicing, and factory receiving. It offers fast and accurate reading of PDF codes, Code 16K, and all standard linear symbologies.
2. מידע בטיחות
- אין לחשוף את הסורק לטמפרטורות קיצוניות, לחות או אור שמש ישיר.
- הימנע מהפלת הסורק או מחשיפתו לפגיעות חזקות.
- אל תנסה לפרק או לשנות את הסורק. פעולה זו תגרום לביטול האחריות.
- Keep the scanning window clean to ensure optimal performance.
- Use only the provided or recommended power source and cables.
3. תכולת החבילה
אנא סמן את התיבה עבור הפריטים הבאים:
- Argox AS-8250U Barcode Scanner
- USB Interface Cable (or other specified interface cable)
- מדריך למשתמש (מסמך זה)
4. המוצר נגמרview
The Argox AS-8250U is a handheld barcode scanner designed for ergonomic use and efficient data capture.
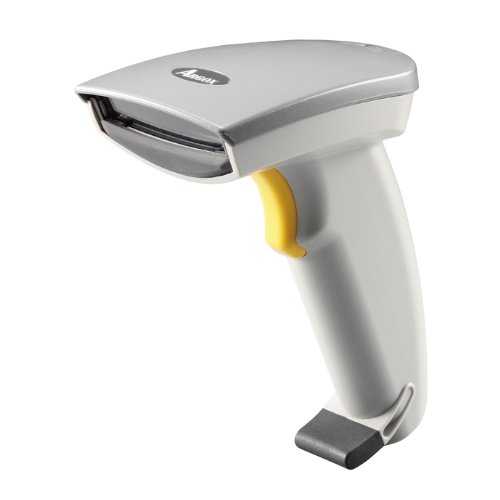
איור 1: צד קדמי view of the Argox AS-8250U Barcode Scanner. This image shows the scanner's ergonomic design, scanning window, and trigger button.

איור 2: זוויתי view of the Argox AS-8250U Barcode Scanner, highlighting its compact form factor and the Argox logo.
מרכיבי מפתח:
- חלון סריקה: Emits and receives the laser beam for barcode reading.
- לחצן ההדק: Activates the scanning process.
- נורית חיווי: Provides feedback on scanning status (e.g., successful read).
- Interface Port: Connects the scanner to the host device via USB, RS-232, or Keyboard Wedge (KBW).
5. התקנה
5.1 חיבור הסורק
- Identify Interface: Determine the interface type required by your host system (USB, RS-232, or Keyboard Wedge). The AS-8250U supports all popular interfaces.
- חיבור כבל: Plug one end of the interface cable into the scanner's interface port.
- Connect to Host: Plug the other end of the interface cable into the corresponding port on your computer or POS system.
- USB: Connect to an available USB port. The scanner is typically plug-and-play, and Windows will automatically install necessary drivers.
- RS-232: Connect to a serial port. You may need to configure serial port settings on your host system.
- Keyboard Wedge (KBW): Connect between your keyboard and the computer's keyboard port.
- הפעלה: Once connected, the scanner should power on automatically. The indicator light may illuminate briefly.
5.2 Driver Installation (for USB)
For USB connections, the Argox AS-8250U is designed for plug-and-play functionality with Windows operating systems. Typically, no manual driver installation is required. Upon connecting the scanner to a USB port, your operating system should automatically detect and install the necessary drivers. If prompted, follow the on-screen instructions. A Windows utility is included for advanced configuration if needed.
6. הפעלת הסורק
6.1 הליך סריקה בסיסי
- הכנה לסריקה: Ensure the scanner is connected and powered on. Open an application on your host system where you want the barcode data to appear (e.g., a text editor, spreadsheet, or POS software).
- Aim the Scanner: Point the scanning window of the AS-8250U at the barcode you wish to read. The optimal scanning distance ranges from contact up to 250mm, depending on the barcode density.
- לחץ על הדק: Press and hold the trigger button. A red laser line will emit from the scanning window.
- Scan the Barcode: Position the laser line across the entire barcode. Once a successful read occurs, the scanner will typically emit an audible beep and/or the indicator light will flash. The barcode data will then be transmitted to your host system.
- טריגר שחרור: שחררו את כפתור ההדק לאחר סריקה מוצלחת.
6.2 סמלוגיות ברקוד נתמכות
The AS-8250U is capable of reading a wide range of barcode types, including:
- PDF codes
- קוד 16K
- All standard linear (1D) symbologies (e.g., UPC/EAN/JAN, Code 39, Code 128, Interleaved 2 of 5, Codabar, etc.)
7. תחזוקה
7.1 ניקוי הסורק
- חלון סריקה: השתמש במטלית רכה נטולת מוך דampened with a mild, non-abrasive cleaner (e.g., glass cleaner) to gently wipe the scanning window. Avoid harsh chemicals or abrasive materials that could scratch the surface.
- חיצוני ג'asing: נגבו את החלק החיצוני של הסורק בעזרת מטלית רכהamp cloth. Do not allow liquids to enter the scanner's internal components.
- כבלים: Inspect cables regularly for any signs of damage.
7.2 אחסון
When not in use, store the scanner in a clean, dry environment, away from direct sunlight and extreme temperatures. Protect it from dust and physical damage.
8. פתרון תקלות
| בְּעָיָה | סיבה אפשרית | פִּתָרוֹן |
|---|---|---|
| הסורק לא נדלק. | כבל לא מחובר כראוי או פגום. | Check cable connections at both the scanner and the host device. Try a different USB port or cable if available. |
| הסורק לא קורא ברקודים. |
|
|
| Barcode data is incorrect or incomplete. |
|
|
| לא הועברו נתונים למארח. |
|
|
9. מפרטים
| תכונה | פְּרָט |
|---|---|
| מותג | ארגוקס |
| דֶגֶם | AS-8250U |
| יַצרָן | Argox Information Co., Ltd, Taiwan |
| טכנולוגיית קישוריות | USB Cable (also supports RS-232, KBW) |
| קצב סריקה | 200 סורק לשנייה |
| טווח עבודה | Contact to 250mm on medium density barcodes |
| סימבולוגיות נתמכות | PDF codes, Code 16K, all standard linear (1D) symbologies |
| תאימות מערכת הפעלה | חלונות |
| מכשירים תואמים | שולחן עבודה, מחשב נייד |
| מקור כוח | חשמלי עם כבלים |
| משקל פריט | 420 גרם |
| מידות חבילה | 22.8 x 11.8 x 11 ס"מ |
10. אחריות ותמיכה
For warranty information and technical support, please refer to the warranty card included with your product or visit the official Argox webאתר. שמור את קבלת הרכישה כהוכחת קנייה לתביעות אחריות.
For further assistance, please contact Argox customer support through their official channels.


