1. הקדמה
This manual provides detailed instructions for the installation, operation, and maintenance of your Gewiss GW10701 Programmable Thermostat. This device is designed to control heating and air conditioning systems, allowing you to manage room temperature efficiently and comfortably. Please read this manual thoroughly before installation and use to ensure proper functionality and safety.
2. מידע בטיחות
יש להקפיד תמיד על אמצעי הזהירות הבאים כדי למנוע פגיעה גופנית או נזק למכשיר:
- ההתקנה צריכה להתבצע אך ורק על ידי אנשי מקצוע מוסמכים, בהתאם לתקנות ולתקנות החשמל המקומיות.
- Disconnect power to the heating/cooling system at the main circuit breaker before installing or servicing the thermostat.
- אין לחשוף את התרמוסטט למים או ללחות מוגזמת.
- השתמשו רק בסוג הסוללה שצוין והקפידו על קוטביות נכונה במהלך ההתקנה.
- Keep batteries out of reach of children. Do not dispose of batteries in fire.
- Do not attempt to open or repair the thermostat yourself. Contact qualified service personnel.
3. המוצר נגמרview
The Gewiss GW10701 is a wall-mounted programmable thermostat featuring an LCD display and intuitive controls for temperature management.
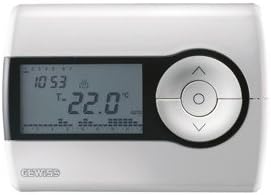
איור 1: חֲזִית view of the Gewiss GW10701 Thermostat. It features a clear LCD screen displaying time and temperature, alongside a circular control panel with directional buttons and a central confirmation button for easy navigation and setting adjustments.
3.1. רכיבים
- תצוגת LCD: Shows current time, temperature, operating mode, and programming settings.
- לחצני שליטה: Typically include UP/DOWN arrows for temperature adjustment, MODE button for selecting operating modes (e.g., Heat, Cool, Auto, Off), and a SET/PROG button for accessing programming menus. (Note: Specific button functions may vary slightly; refer to on-screen prompts.)
- תא סוללות: Located on the rear or side, houses the power supply batteries.
- צלחת הרכבה: להתקנה בטוחה על קיר.
4. התקנה
4.1. בחירת מיקום
Select a central location on an interior wall, approximately 1.5 meters (5 feet) above the floor. Avoid locations near heat sources (lamps, direct sunlight, fireplaces), drafts (windows, doors), or areas with poor air circulation.
4.2. התקנת התרמוסטט
- נתק חשמל: Turn off the power to your heating/cooling system at the main circuit breaker.
- Separate Base Plate: Carefully detach the front cover of the thermostat from its base plate.
- סמן וקדח: Hold the base plate against the wall at your chosen location. Mark the drilling points. Drill holes and insert wall anchors if necessary.
- צלחת בסיס מאובטחת: Fasten the base plate to the wall using the provided screws.
- חיווט (אם רלוונטי): Connect the system wires to the appropriate terminals on the base plate. Refer to the wiring diagram provided with your heating/cooling system or consult a qualified electrician. Note: While the thermostat is battery-powered, it controls a 230V system. Ensure correct wiring.
- התקן סוללות: Insert the required batteries into the battery compartment, observing correct polarity (+/-).
- חבר תרמוסטט: Carefully reattach the thermostat front cover to the base plate, ensuring it clicks securely into place.
- החזר כוח: Turn on the power to your heating/cooling system at the main circuit breaker.
5. תפעול
5.1. הגדרה ראשונית
Upon first power-up or after battery replacement, you may need to set the current time and date. Follow the on-screen prompts or refer to the programming section.
5.2. הגדרת הטמפרטורה
השתמש ב- UP ו לְמַטָה arrow buttons to adjust the desired temperature. The display will show the set temperature temporarily, then revert to the current room temperature.
5.3. מצבי הפעלה
הקש על MODE button (or similar) to cycle through available operating modes:
- חוֹם: התרמוסטט יפעיל את מערכת החימום כאשר טמפרטורת החדר יורדת מתחת לטמפרטורה שנקבעה.
- מגניב: The thermostat will activate the air conditioning system when the room temperature rises above the set temperature.
- אוטומטי: התרמוסטט עובר אוטומטית בין חימום לקירור כדי לשמור על טווח הטמפרטורה שנקבע.
- OFF מערכות החימום והקירור כבויות.
6. תכנות
The Gewiss GW10701 allows you to create custom heating/cooling schedules for different times of the day and days of the week. This feature helps optimize energy consumption and comfort.
6.1. הגדרת שעה ותאריך
- הקש על מַעֲרֶכֶת or פרוג לחצן כדי להיכנס לתפריט ההגדרות.
- Navigate using the arrow buttons to find "Time" or "Date" settings.
- Use the arrow buttons to adjust the values (hour, minute, day, month, year).
- Confirm each setting with the מַעֲרֶכֶת or central button.
6.2. Creating a Program Schedule
The thermostat typically offers daily or weekly programming options. You can set different temperatures for various periods (e.g., Wake, Day, Evening, Sleep).
- הקש על פרוג לחצן כדי להיכנס למצב תכנות.
- Select the day or group of days you wish to program (e.g., Mon-Fri, Sat-Sun, or individual days).
- For each period (e.g., "Wake"), set the desired start time and temperature using the arrow buttons.
- Advance to the next period and repeat the process.
- Save your program and exit programming mode.
Consult the on-screen menu and specific button labels on your device for precise programming steps, as interfaces can vary.
7. תחזוקה
7.1. החלפת סוללה
The thermostat is powered by batteries. When the battery indicator appears on the display, replace the batteries promptly to ensure continuous operation. Typically, 2x AA or AAA alkaline batteries are required.
- Carefully remove the front cover of the thermostat.
- הסר את הסוללות הישנות והשליך אותן בצורה אחראית.
- הכנס סוללות חדשות, תוך הקפדה על קוטביות נכונה.
- חבר מחדש את המכסה הקדמי.
7.2. ניקיון
Clean the thermostat's exterior with a soft, dry cloth. Do not use abrasive cleaners, solvents, or spray cleaners directly onto the device, as this can damage the display or internal components.
8. פתרון תקלות
| בְּעָיָה | סיבה אפשרית | פִּתָרוֹן |
|---|---|---|
| התצוגה ריקה או עמומה. | סוללות חלשות או מתות. | החלף סוללות בחדשות. |
| מערכת החימום/קירור לא מגיבה. |
|
|
| קריאות הטמפרטורה נראות לא מדויקות. | מיקום התרמוסטט מושפע מרוח או מקורות חום. | ודא שהתרמוסטט אינו חשוף לאור שמש ישיר, לרוחות או למכשירים פולטי חום. |
9. מפרטים
- יַצרָן: Gewiss
- מספר דגם: GW10701 (Chorus)
- מידות (L x W x H): 13 x 2.3 x 9.2 ס"מ
- מִשׁקָל: 9.07 גרם
- צֶבַע: לָבָן
- חוֹמֶר: פּלָסטִי
- ספק כוח: מופעל על סוללה
- מיתוג כרךtage: 230 Volt (for controlled system)
- סוג תצוגה: LCD או LED
- סוג הרכבה: צמוד לקיר
- תכונות בקרה: Programmable, Button control
- נוֹהָג: Heating systems, Air conditioning systems
10. אחריות ותמיכה
For warranty information, technical support, or service inquiries regarding your Gewiss GW10701 Thermostat, please refer to the warranty card included with your product or visit the official Gewiss website. You may also contact your local Gewiss distributor or retailer for assistance.
Gewiss Official Webאֲתַר: www.gewiss.com


