
1. הקדמה
This manual provides detailed instructions for the setup, operation, and maintenance of your Tbaxo TB525 UHF 8-Channel Wireless Microphone System. Please read this manual thoroughly before using the product to ensure proper function and to maximize its lifespan. This system is designed for various applications including live vocal performances, karaoke, church speaking, conference meetings, classroom lectures, weddings, parties, and school events.
2. תכולת החבילה
אנא ודא שכל הפריטים המפורטים להלן כלולים בחבילה שלך:
- 1 x Tbaxo TB525 UHF Wireless Microphone Receiver
- 8 x משדרי Bodypack
- 8 x Lavalier/Lapel Microphones
- 8 מיקרופונים לאוזניות
- 4 x Telescoping Receiver Antennas
- 1 x US 110-240V Power Adapter
- 1 x 1/4" Audio Cable (for mixed output)
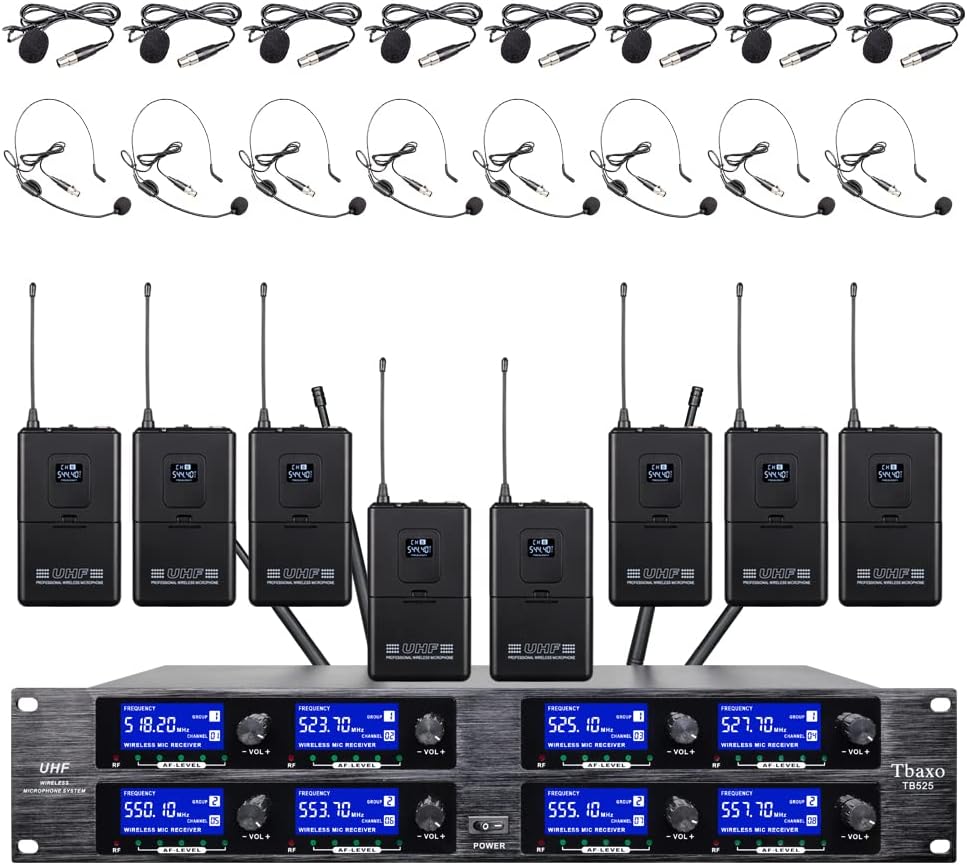
תמונה 2.1: נגמרview of the Tbaxo TB525 Wireless Microphone System, showing the receiver, eight bodypack transmitters, and eight headset microphones.
3. המוצר נגמרview
3.1 יחידת מקלט
The receiver unit is the central component of the system, processing audio signals from the bodypack transmitters. It features individual volume controls for each of the 8 channels, frequency displays, and output connections.

תמונה 3.1: חזית view of the Tbaxo TB525 receiver unit, displaying channel frequencies and volume controls.
3.2 משדרי Bodypack
Each bodypack transmitter is a compact, battery-powered device that sends the microphone's audio signal wirelessly to the receiver. It includes a microphone input, power switch, and a display for channel information.

תמונה 3.2: חזית ואחורה view of a bodypack transmitter, showing the display and belt clip.
מיקרופונים 3.3
The system includes both lavalier/lapel microphones and headset microphones, offering flexibility for different speaking and performance scenarios.

Image 3.3: Lavalier (lapel) and headset microphones included with the system.
4. הוראות התקנה
Follow these steps to set up your wireless microphone system:
- מיקום מקלט: Place the receiver unit on a stable surface, away from potential sources of interference such as large metal objects, digital devices, or other wireless equipment. Ensure good line-of-sight to the area where the transmitters will be used.
- התקנת אנטנה: Screw the four telescoping antennas into the corresponding antenna ports on the rear of the receiver. Extend them fully and position them vertically for optimal signal reception.
- חיבור חשמל: Connect the provided 110-240V power adapter to the DC 16V input on the rear of the receiver, then plug it into a power outlet. Do not power on the unit yet.
- חיבור פלט שמע:
- פלט מעורב: For a combined output of all 8 channels, connect a 1/4" audio cable from one of the "MIXED OUT" jacks on the receiver to the input of your mixer or ampחיים יותר.
- Individual XLR Outputs: For individual channel control, connect XLR cables from the "XLR OUT" ports (one for each channel) on the receiver to the corresponding inputs on your mixer or audio interface.

Image 4.1: Rear panel of the receiver, highlighting the XLR and 1/4" mixed audio output connections.
- Bodypack Battery Installation: Open the battery compartment on each bodypack transmitter. Insert two 1.5V AA batteries, ensuring correct polarity. Close the compartment securely. (Note: Batteries are not included.)
- Microphone Connection to Bodypacks: Connect your chosen lavalier/lapel or headset microphone to the 3-pin mini XLR input on the bodypack transmitter. Ensure a secure connection.

תמונה 4.2: צד view of a bodypack transmitter, showing the ON/OFF switch and the microphone input port.
5. הוראות הפעלה
לאחר הגדרת המערכת, בצע את השלבים הבאים להפעלה:
- מקלט הפעלה: Press the power button on the front panel of the receiver unit. The display screens should illuminate.
- Power On Bodypack Transmitters: For each microphone you intend to use, slide the ON/OFF switch on the bodypack transmitter to the "ON" position. The bodypack's display should show its assigned channel and frequency.
- התאמת עוצמת הקול:
- עוצמת קול של המקלט: Adjust the individual volume knobs on the receiver for each active channel to a suitable level.
- מִיקסֵר/Amplifier Volume: Further adjust the overall volume and individual channel volumes on your connected mixer or ampחיים יותר.
- שימוש במיקרופון:
- Lavalier/Lapel Microphones: Clip the microphone to clothing, approximately 6-8 inches below the chin, ensuring it is not covered by fabric.
- Headset Microphones: Position the headset microphone boom approximately 1-2 inches from the corner of your mouth.
- אודיו ניטור: Speak or sing into the microphone. Observe the AF (Audio Frequency) level indicators on the receiver to ensure a strong, clear signal without clipping. Adjust volume as needed.
- כיבוי: After use, first turn off all bodypack transmitters, then power off the receiver unit.
6. תחזוקה
Proper maintenance ensures the longevity and optimal performance of your system:
- ניקוי: Use a soft, dry cloth to clean the exterior of the receiver and transmitters. Do not use liquid cleaners or solvents.
- טיפול בסוללה: Remove batteries from bodypack transmitters if the system will not be used for an extended period to prevent leakage.
- אִחסוּן: יש לאחסן את המערכת במקום קריר ויבש, הרחק מאור שמש ישיר וטמפרטורות קיצוניות.
- אנטנות: Handle receiver antennas with care to prevent bending or damage.
7. פתרון תקלות
If you encounter issues, refer to the following troubleshooting guide:
| בְּעָיָה | סיבה אפשרית | פִּתָרוֹן |
|---|---|---|
| אין פלט קול | Receiver or transmitter not powered on; low battery; incorrect cable connection; receiver volume too low; mixer/amplifier input issues. | Ensure all units are powered on. Check bodypack batteries. Verify all audio cables are securely connected. Increase receiver and mixer/amplifier volume. Check mixer/amplifier input settings. |
| סטטי או הפרעה | Proximity to other wireless devices; environmental interference; transmitter too far from receiver; weak signal. | Move receiver away from other electronics. Ensure clear line-of-sight between transmitter and receiver. Reduce distance between transmitter and receiver. Ensure antennas are fully extended. |
| Low volume or distorted sound | Microphone not positioned correctly; low battery; receiver or mixer volume settings incorrect. | Adjust microphone position. Replace bodypack batteries. Adjust receiver and mixer/amplifier volume levels to avoid clipping or being too low. |
| טווח פעולה קצר | Obstructions between transmitter and receiver; environmental interference; receiver antenna position. | Ensure clear line-of-sight. Reposition receiver antennas. Avoid using the system near large metal structures or dense walls. |
8. מפרטים
Technical specifications for the Tbaxo TB525 Wireless Microphone System:
| תכונה | מִפרָט |
|---|---|
| מספר ערוצים | 8 ערוצים |
| טווח תדרים של מנשא | 500MHz-580MHz (Specific frequencies: 520.1, 523.7, 525.1, 527.7 MHz and 550.1, 553.7, 555.1, 557.7 MHz) |
| יציבות תדר | ±0.006% |
| סטייה נורמלית | ±22kHz |
| יחס S/N | <120dB |
| T.H.D (Total Harmonic Distortion) | <0.6% |
| תגובת תדר | 50Hz-15kHz |
| רגישות מקלט | >80dB |
| פלט אודיו | Balanced (XLR) and Unbalanced (1/4" Jack) |
| דרישת חשמל למקלט | מתח זרם חילופין 16 וולט, 2000 מיליאמפר |
| מידות מקלט | 510 × 290 × 70 mm (Approx. 20.1 x 11.4 x 2.8 inches) |
| משקל מקלט | כ. 13 פאונד (5.9 ק"ג) |
| Microphone Cartridge Type | דִינָמִי |
| Bodypack RF Output | <10mW |
| Bodypack Power Source | 2 x 1.5V סוללות AA |
| חוֹמֶר | Metal (Receiver) |
| טכנולוגיית קישוריות | XLR, 6.35 mm Jack |
9. מידע על אחריות
The Tbaxo TB525 Wireless Microphone System comes with a three-year free warranty. For warranty service or inquiries, please contact the seller or manufacturer directly. Our maintenance department is located in NY.
10. תמיכה
For further assistance, technical support, or questions not covered in this manual, please refer to the contact information provided by your retailer or the manufacturer. Ensure you have your product model (TB525) and purchase details available when seeking support.