
Antec Antec 900
Antec 900 Full Tower Case Instruction Manual
Model: Antec 900
1. הקדמה
The Antec 900 is a full-tower computer chassis designed for high-performance computing, including AI workstations and 8K gaming systems. It supports a wide range of motherboard form factors and offers extensive cooling and storage capabilities. This manual provides detailed instructions for assembly, installation, operation, and maintenance of your Antec 900 case.

Figure 1.1: The Antec 900 Full Tower Case, showcasing its modern design and internal layout.
2. תכונות עיקריות
- AI Workstation Ready: Supports E-ATX, SSI-EEB, Threadripper, and Back-Connect motherboards. Accommodates dual GPUs up to 495mm long and 160mm thick.
- Superior Cooling System: Includes 6 pre-installed PWM fans (3x140mm Front, 2x120mm Reverse on PSU shroud, 1x140mm Rear) for optimized airflow.
- Extreme Radiator Support: Front radiator support up to 420mm, top radiator support up to 360mm.
- Massive Storage & Fast Connectivity: Features 9 drive bays (4x 3.5"/2.5" combo, 5x 2.5") and a USB Type-C 3.2 Gen 2 (10Gbps) port.
- Tool-Free Access & Easy Maintenance: 4mm tempered glass side panel, full dust filtration (front/top/bottom), and reusable PCIe slot covers.
3. התקנה והתקנת רכיבים
Before beginning installation, ensure you have all necessary components and tools. Work on a clean, static-free surface.
3.1. הכנת התיק
The Antec 900 features a tool-free design for easy access to internal components.
- Remove the 4mm tempered glass side panel by unfastening the thumb screws and gently pulling it away.
- Remove the right metal panel to access the cable management area.
- The top and front panels can also be removed for easier access during installation or for cleaning dust filters.

Figure 3.1: Tool-free panel design for easy access to internal components.

איור 3.2: התפוצץ view illustrating the various removable components of the Antec 900 chassis.
3.2. התקנת לוח אם
The Antec 900 supports E-ATX, SSI-EEB, Threadripper, and Back-Connect motherboards.
- Install the necessary standoffs for your motherboard form factor onto the motherboard tray.
- הנח בזהירות את לוח האם שלך על המעמדים, תוך יישור חורי הברגים.
- אבטח את לוח האם באמצעות ברגים.
- For back-connect motherboards, route cables through the designated cutouts behind the motherboard tray for a cleaner build and improved airflow.

Figure 3.3: Motherboard installation area, highlighting support for various form factors including E-ATX and Threadripper.

Figure 3.4: Illustration of cable routing for back-connect motherboards, enabling a clean front interior.
3.3. GPU and Expansion Card Installation
The chassis supports dual GPUs up to 495mm long and 160mm thick, and features 8 reusable PCIe slots.
- Remove the necessary reusable PCIe slot covers from the rear of the case.
- Insert your GPU or other expansion cards into the appropriate PCIe slots on the motherboard.
- אבטחו את הכרטיסים בעזרת ברגים.

Figure 3.5: AI-optimized GPU support, demonstrating space for multiple high-performance graphics cards.

Figure 3.6: The 8 reusable PCIe slots, providing flexibility for various expansion cards.
3.4. התקנת כונן
The Antec 900 offers 9 drive bays: 4x 3.5"/2.5" combo bays and 5x 2.5" bays.
- Locate the drive cages and mounting points within the case.
- For 3.5" drives, slide the drive into the appropriate bay and secure it.
- For 2.5" SSDs, mount them to the dedicated 2.5" trays or use adapters in the 3.5" bays.
- Connect SATA data and power cables to each installed drive.

Figure 3.7: Storage and data readiness, illustrating the placement of 2.5" and 3.5" drive bays.

איור 3.8: מעלview of the 9 total drive bays, including 5x 2.5" and 4x 3.5" (convertible) options.
3.5. התקנת יחידת ספק כוח (PSU)
The Antec 900 supports bottom-mount PSUs and an optional iShift 90-degree side mount.
- החלק את ספק הכוח לתא הייעודי שלו בחלק האחורי התחתון של המארז.
- אבטחו את ספק הכוח באמצעות ברגים מחלקו האחורי של המארז.
- If using the optional iShift side-mount PSU bracket, follow its specific installation instructions to mount the PSU at a 90-degree angle.
- Connect the necessary power cables to your motherboard, GPU, and drives.
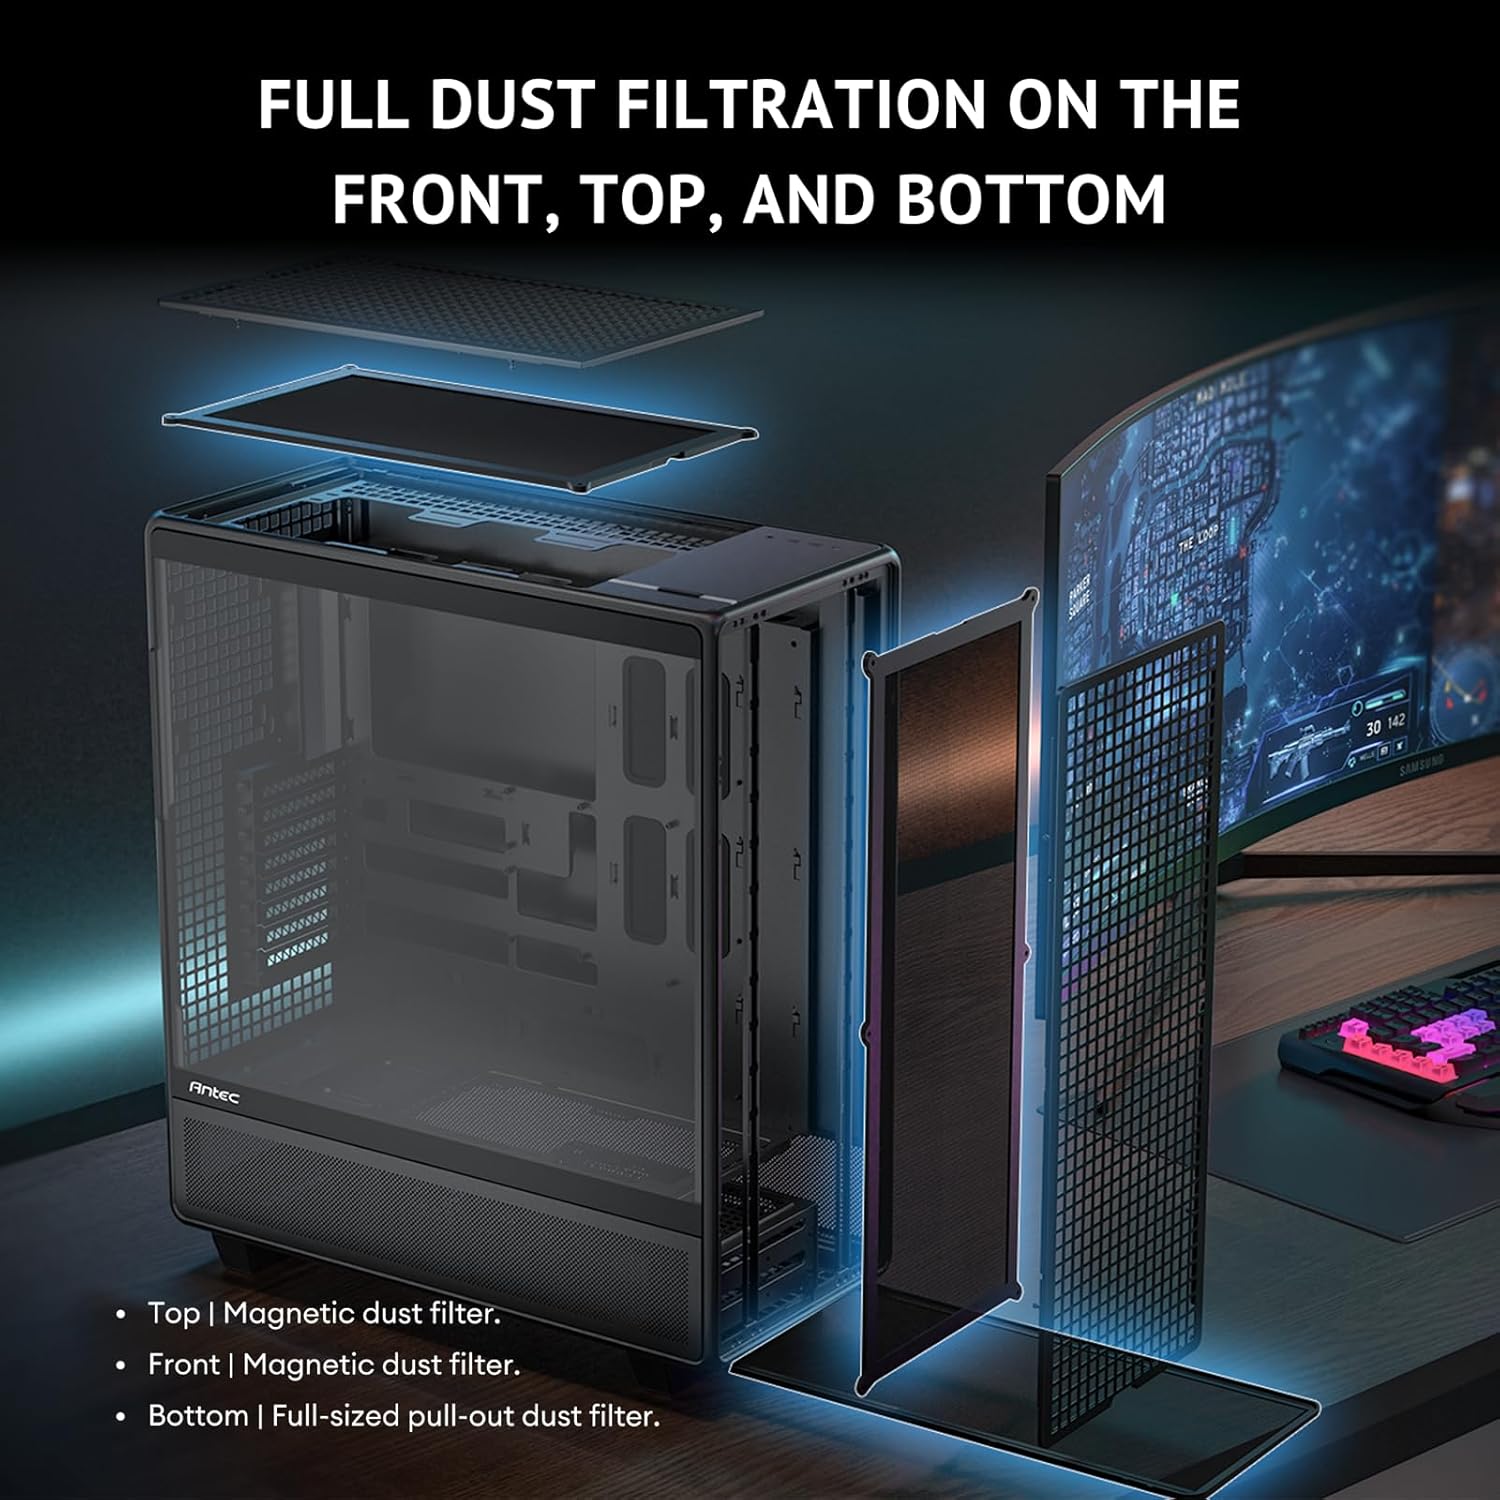
Figure 3.9: Innovative iShift PSU 90-degree mount, offering alternative power supply orientation (requires optional bracket).
3.6. התקנת מאוורר ורדיאטור
The case comes with 6 pre-installed PWM fans and supports extensive radiator configurations.
- The Antec 900 includes 3x 140mm front intake fans, 2x 120mm reverse fans on the PSU shroud, and 1x 140mm rear exhaust fan.
- For additional cooling, radiators up to 420mm can be installed in the front and up to 360mm on the top.
- The top cooling bracket is removable for easier installation of fans or radiators.
- Utilize the adjustable fan bracket to support various fan sizes (e.g., 200mm, 140mm, 120mm) in the front.

Figure 3.10: Powerful airflow path design, illustrating optimal air intake and exhaust for efficient cooling.
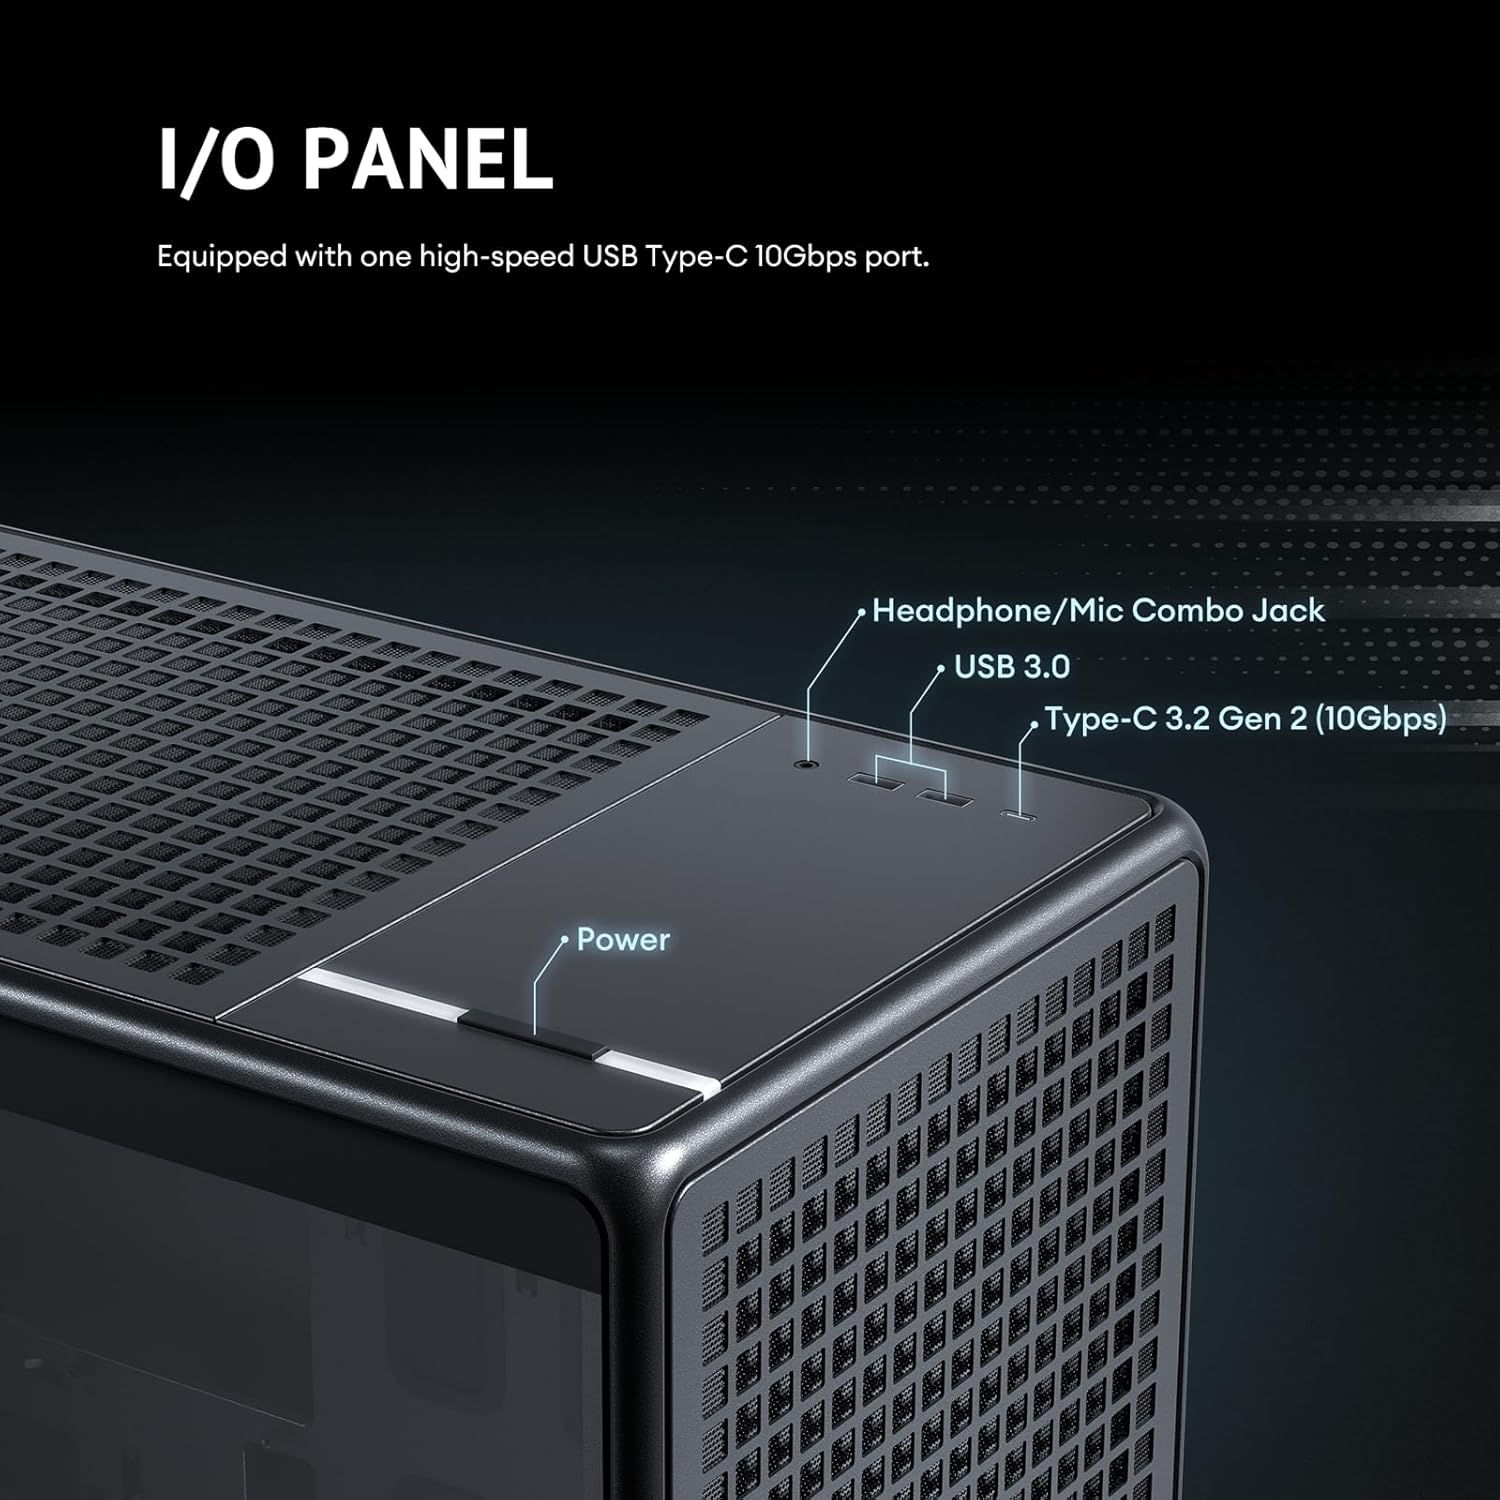
Figure 3.11: Details of the 6 pre-installed high-performance PWM fans, including their speed, airflow, and noise levels.
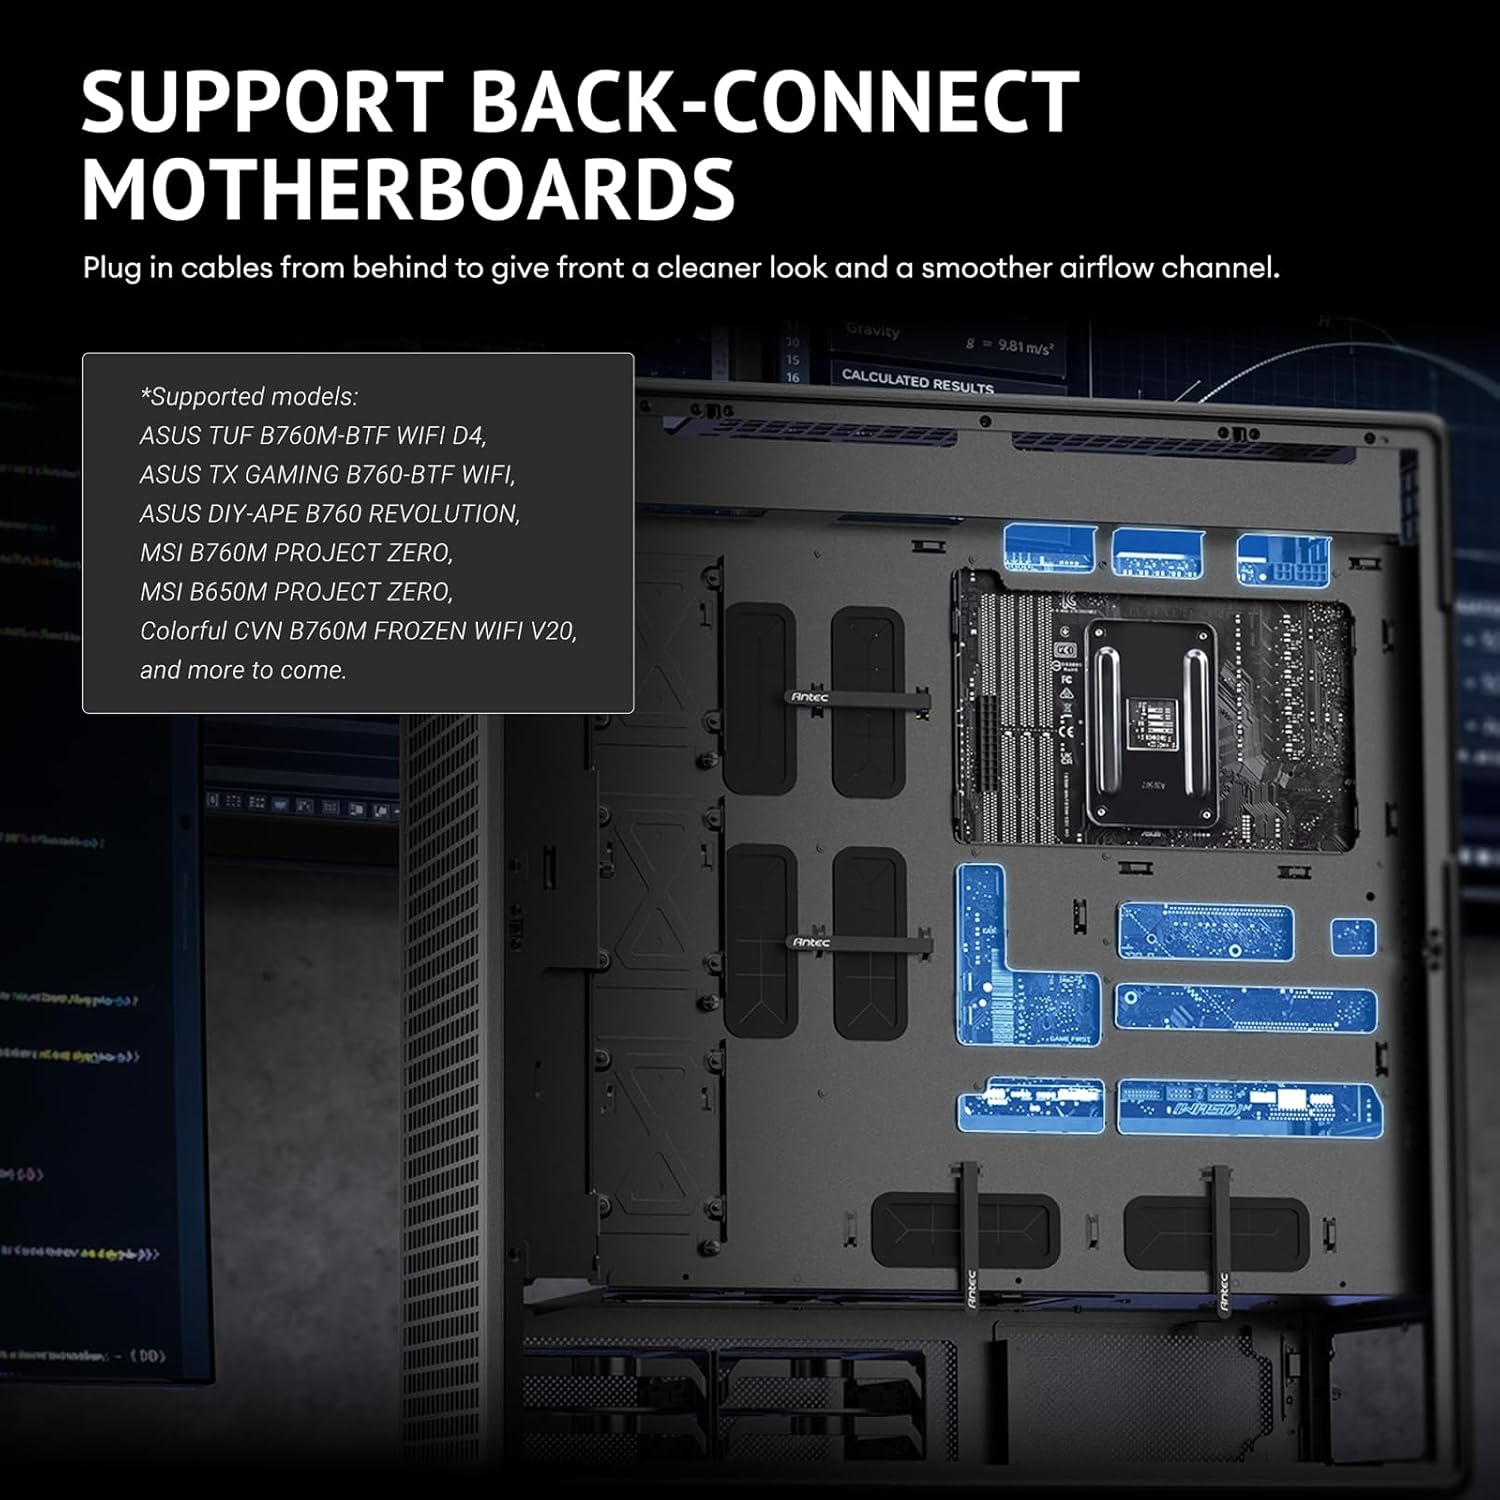
Figure 3.12: Adjustable fan bracket supporting multiple fan sizes (200mm, 140mm, 120mm) for front intake.

Figure 3.13: Comprehensive fan and radiator support diagrams for various mounting locations.

Figure 3.14: Removable top cooling bracket for simplified installation of fans or radiators.
3.7. ניהול כבלים
The Antec 900 is designed for optimal cable routing to ensure a clean build and unobstructed airflow.
- Utilize the numerous cable tie-down points and cutouts behind the motherboard tray.
- Route power supply cables and data cables neatly to their respective components.
- Ensure cables do not obstruct fan blades or airflow paths.
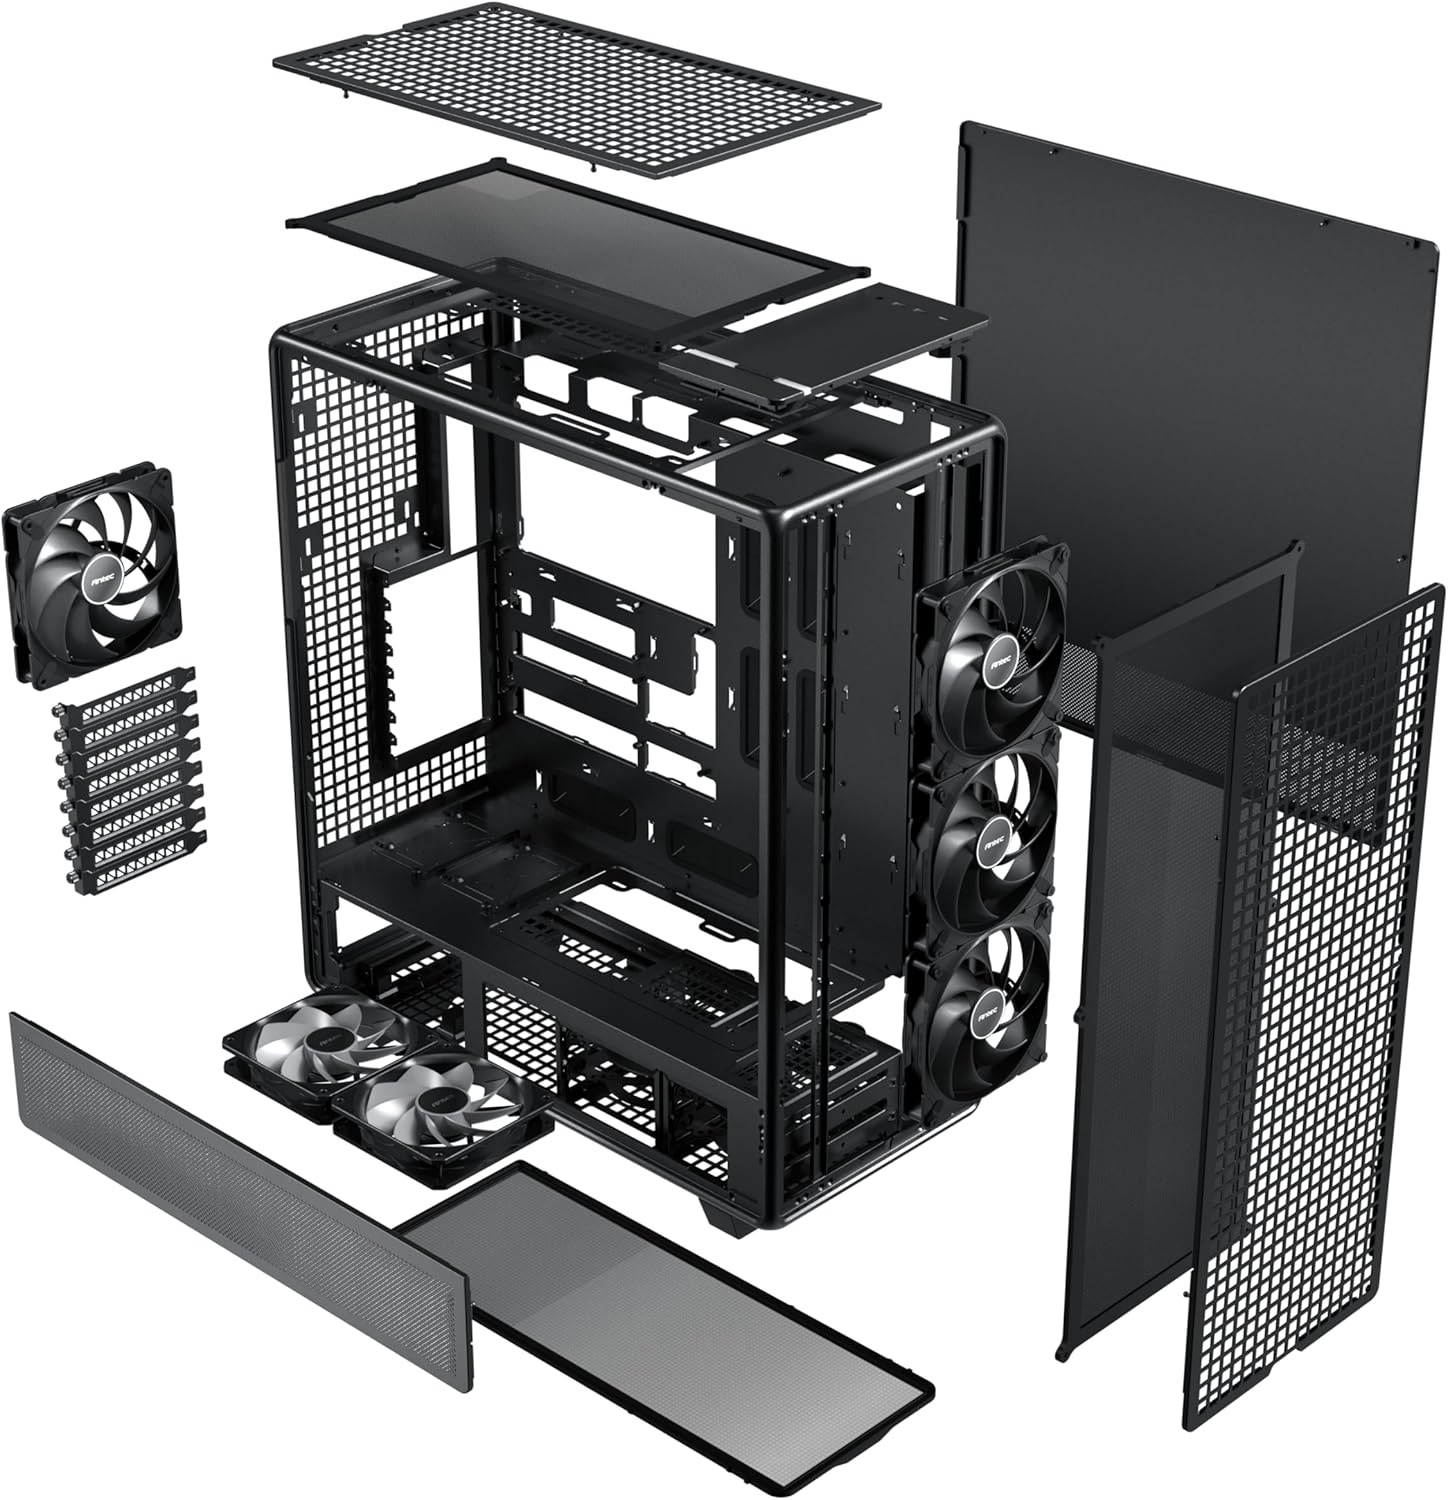
Figure 3.15: Optimal cable routing experience, showing suggested paths for various cables for both regular and iShift PSUs.
4. הוראות הפעלה
Once all components are installed and secured, and cables are connected, you can begin operating your system.
4.1. הפעלה
- Ensure the power supply switch is in the "ON" position.
- Press the power button located on the top I/O panel of the case.
4.2. לוח קלט/פלט קדמי
The front I/O panel provides convenient access to essential ports.
- לחצן הפעלה: כדי להפעיל או לכבות את המערכת.
- שקע משולב לאוזניות/מיקרופון: עבור קלט ופלט שמע.
- יציאת USB 3.0: להעברת נתונים במהירות גבוהה עם מכשירים תואמים.
- Type-C 3.2 Gen 2 (10Gbps) Port: For ultra-fast data transfer and connectivity with modern USB-C devices.

Figure 4.1: Front I/O panel, detailing the location of the power button, audio jack, USB 3.0, and USB Type-C 3.2 Gen 2 ports.
5. תחזוקה
Regular maintenance ensures optimal performance and longevity of your Antec 900 case and its components.
5.1. Dust Filtration
The Antec 900 features full dust filtration on the front, top, and bottom to prevent dust buildup inside the system.
- Front and Top Filters: These are magnetic dust filters. Gently pull them off for cleaning.
- Bottom Filter: This is a full-sized pull-out dust filter. Slide it out from the rear or side for cleaning.
- Clean the dust filters regularly (e.g., monthly) using compressed air or by rinsing with water (ensure they are completely dry before re-installation).

Figure 5.1: Full dust filtration system, showing the magnetic top and front filters, and the pull-out bottom filter.
5.2. ניקיון כללי
- השתמש במטלית רכה ויבשה כדי לנגב את החלק החיצוני של המארז.
- עבור לוח הזכוכית המחוסמת, השתמשו בחומר ניקוי זכוכית ובמטלית מיקרופייבר כדי למנוע פסים.
- Periodically use compressed air to clear dust from internal components, especially heatsinks and fan blades, after removing the side panels.
6. פתרון תקלות
This section addresses common issues that may arise during or after system assembly.
| בְּעָיָה | סיבה אפשרית | פִּתָרוֹן |
|---|---|---|
| המערכת לא נדלקת. | Power supply switch off, loose power cables, front panel connector issue. | Ensure PSU switch is ON. Check all power connections (24-pin ATX, CPU, GPU). Verify front panel power button connector is correctly attached to the motherboard. |
| Fans are not spinning. | Loose fan cables, incorrect fan header connection, faulty fan. | Check fan connections to motherboard headers or fan controller. Ensure fans are properly seated. Test with another fan if possible. |
| זרימת אוויר לקויה או טמפרטורות גבוהות | Blocked dust filters, incorrect fan orientation, insufficient cooling. | Clean all dust filters. Verify fan orientation (intake/exhaust). Ensure sufficient fans/radiators are installed for your components. |
| Front I/O ports not working. | חיבורי כבל פנימיים רופפים. | Check the USB 3.0, USB Type-C, and audio header connections from the front panel to the motherboard. |
If you encounter issues not listed here, please refer to the Antec support webאתר או צור קשר עם שירות הלקוחות.
7. מפרטים
Detailed technical specifications for the Antec 900 Full Tower Case.
| תכונה | פְּרָט |
|---|---|
| מותג | Antec |
| שם הדגם | אנטק 900 |
| סוג מקרה | מגדל מלא |
| תאימות לוח אם | E-ATX, SSI-EEB, Threadripper, Back-Connect MB |
| תמיכה באורך ה-GPU | Up to 495mm (465mm with front fans installed) |
| GPU Thickness Support | עד 160 מ"מ |
| גובה מצנן מעבד | עד 190 מ"מ |
| חריצי הרחבה | 8 (Reusable) |
| Drive Bays (3.5"/2.5" Combo) | 4 |
| Drive Bays (2.5") | 5 |
| מאווררים מותקנים מראש | 3x 140mm Front, 2x 120mm Reverse (PSU Shroud), 1x 140mm Rear |
| תמיכת רדיאטור קדמי | Up to 420mm (≤ 52mm thickness) |
| תמיכת רדיאטור עליון | Up to 360mm (≤ 52mm thickness) |
| יציאות קלט / פלט קדמיות | 1x USB 3.0, 1x USB Type-C 3.2 Gen 2 (10Gbps), Headphone/Mic Combo Jack |
| חומרים | פלדה, זכוכית מחוסמת |
| מידות (D x B x H) | 21.54" D x 9.84" W x 24.49" H |
| משקל פריט | 33.07 פאונד |

Figure 7.1: Extensive interior layout, showing mainboard, CPU, GPU, SSD, HDD/SSD, and Power Supply areas.
8. מידע על אחריות
The Antec 900 Full Tower Case comes with a אחריות לשנה from the date of purchase. This warranty covers defects in materials and workmanship under normal use. It does not cover damage caused by accident, misuse, abuse, unauthorized modification, or improper installation.
For warranty claims or further details, please retain your proof of purchase and contact Antec customer support.
9. תמיכה
For technical assistance, product inquiries, or to download the latest drivers and manuals, please visit the official Antec webאֲתַר:
You may also contact Antec customer service directly through the contact information provided on their webאֲתַר.
Ask a question about this manual
Ask about setup, troubleshooting, compatibility, parts, safety, or missing instructions. Manuals+ will review the question and use this page’s manual context to help answer it.