1. הקדמה
This manual provides detailed instructions for the installation, operation, and maintenance of your ZSUS X99-8D4 Motherboard Set Kit. This kit includes the ZSUS X99-8D4 motherboard, an Intel Xeon E5 2650 V4 CPU, and 16GB (1x16GB) of DDR4 2133MHz memory. Please read this manual thoroughly before proceeding with installation to ensure proper setup and optimal performance.
2. המוצר נגמרview
The ZSUS X99-8D4 motherboard is designed for high-performance computing, supporting Intel LGA2011-3 processors and DDR4 memory. It features an NVMe M.2 slot for high-speed storage and Gigabit Ethernet for reliable network connectivity.
איור 2.1: ZSUS X99-8D4 Motherboard Set Kit. This image displays the complete motherboard kit, including the motherboard, CPU, and RAM, ready for installation.
תכונות עיקריות:
- תמיכה במעבד: LGA2011-3 socket for Intel Xeon E5 V3/V4 series processors.
- זֵכֶר: 4x DDR4 memory slots, supporting up to 128GB of RAM.
- אִחסוּן: NVMe M.2 slot (2280 form factor) for high-speed SSDs, and multiple SATA 2.0 ports.
- הַרחָבָה: 1x PCIe x16 slot (PCI-E 3.0) for graphics cards, 1x PCIe x1 slot.
- רשת: Integrated Gigabit Ethernet (1000Mbps).
- USB: Multiple USB 2.0 ports.
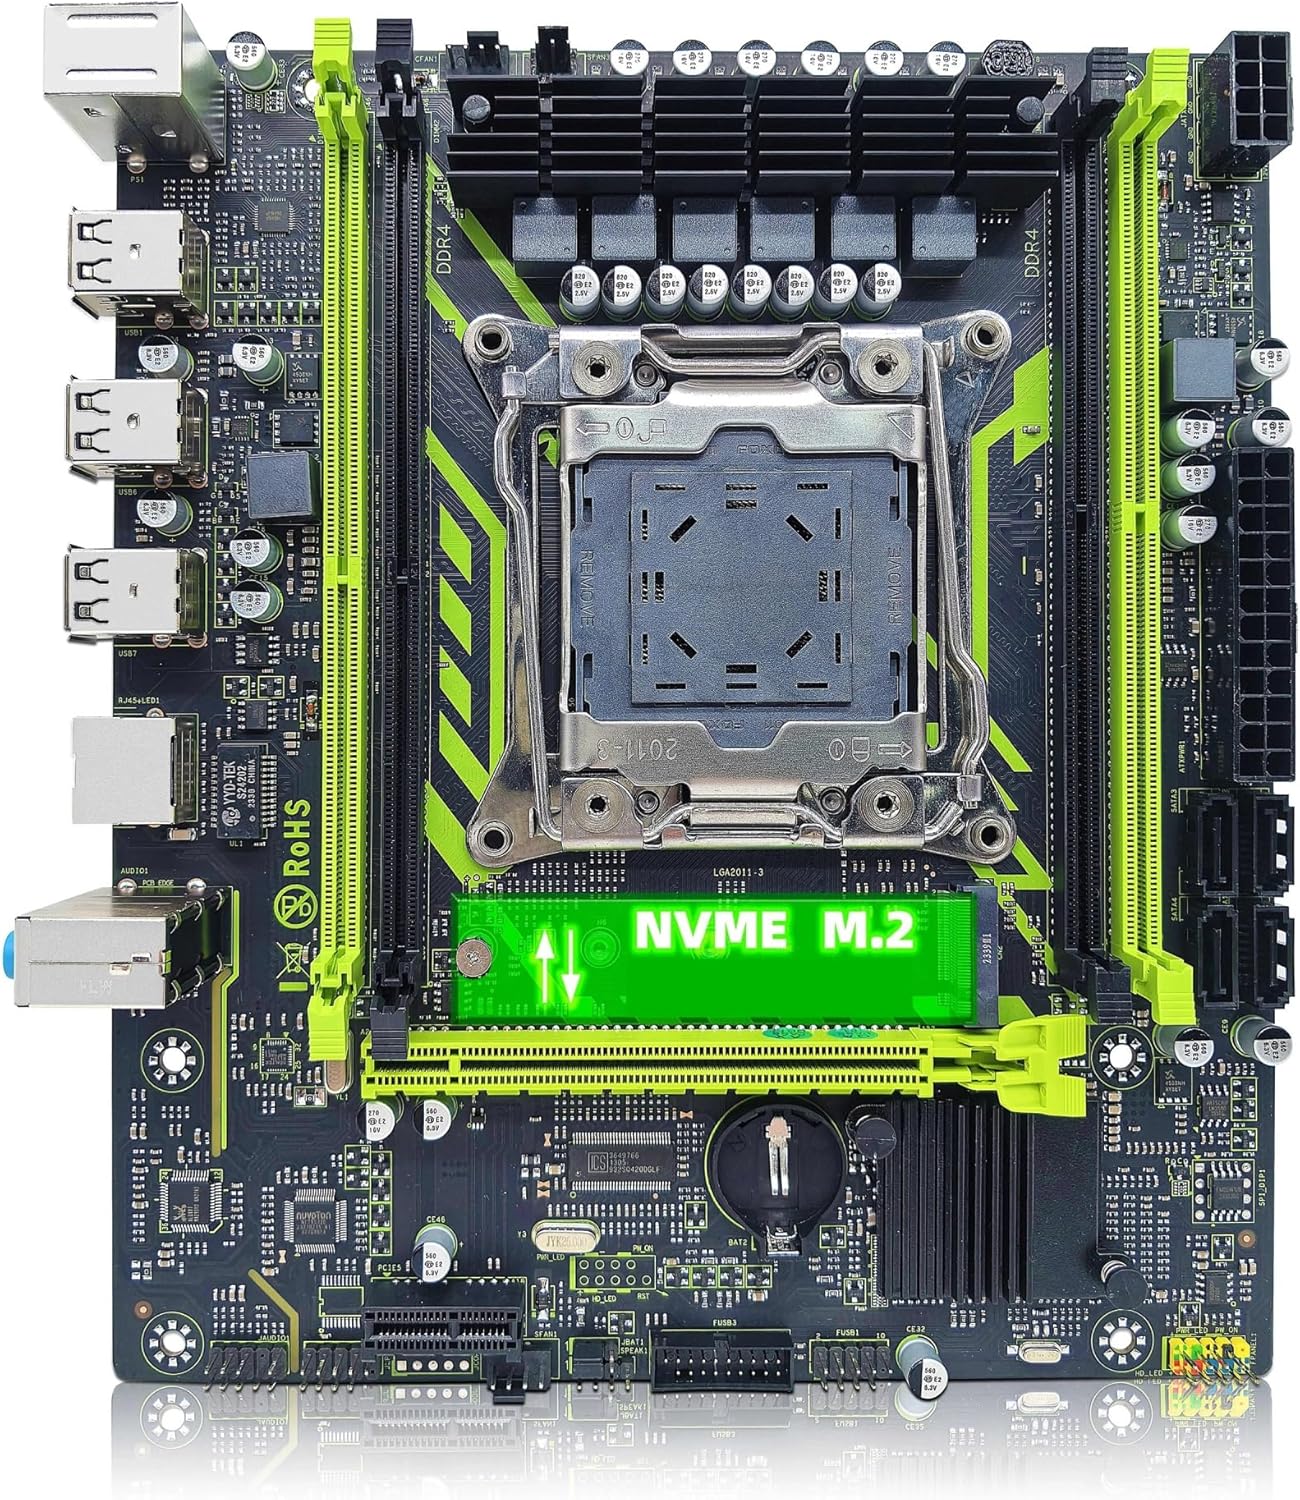
איור 2.2: ZSUS X99-8D4 Motherboard highlighting the NVMe M.2 slot. This image shows the motherboard with the NVMe M.2 slot clearly visible, indicating its location for SSD installation.
3. התקנה והתקנה
Before beginning installation, ensure your system is powered off and unplugged. Wear an anti-static wrist strap to prevent electrostatic discharge (ESD) damage to components.
3.1 פריקה ובדיקה
Carefully remove all components from their packaging. Verify that all items listed in your kit are present and undamaged. The kit typically includes the motherboard, CPU, RAM, I/O shield, and SATA cable.
3.2 התקנת לוח אם
- התקן את מגן הקלט/פלט בפתח האחורי של מארז המחשב.
- Align the motherboard with the standoffs inside your computer case.
- אבטחו את לוח האם בעזרת ברגים, וודאו שהוא יושב היטב ואינו נוגע ישירות בחלקי מתכת של המארז.

איור 3.1: ZSUS X99-8D4 Motherboard with dimensions. This image illustrates the physical dimensions of the motherboard, showing a width of 215mm and a length of 190mm, which is useful for case compatibility.
התקנת מעבד 3.3 (Intel Xeon E5 2650 V4)
- אתר את שקע המעבד LGA2011-3 בלוח האם.
- פתחו את מנגנון החזקת שקע המעבד על ידי דחיפה כלפי מטה והחוצה של הידית/ים.
- Carefully place the Intel Xeon E5 2650 V4 CPU into the socket, aligning the gold triangle on the CPU with the corresponding mark on the socket. Do not force the CPU into place.
- סגור את מנגנון האחיזה כדי לאבטח את המעבד.
- מרחו שכבה דקה ואחידה של משחה תרמית על החלק העליון של המעבד.
- התקן את מקרר המעבד שלך בהתאם להוראות היצרן.
3.4 התקנת זיכרון RAM (DDR4)
- אתר את ארבעת חריצי זיכרון DDR4 בלוח האם.
- פתחו את הקליפסים בשני קצוות חריץ הזיכרון.
- Align the notch on the 16GB DDR4 memory module with the key in the memory slot.
- לחץ בחוזקה על שני קצוות מודול הזיכרון עד שהקליפסים יתייצבו במקומם.
3.5 NVMe M.2 SSD Installation
- אתר את חריץ ה-NVMe M.2 בלוח האם.
- הסר את בורג המעמד M.2.
- הכנס את כונן ה-SSD מסוג M.2 לחריץ בזווית של 30 מעלות.
- דחוף את ה-SSD כלפי מטה ואבטח אותו בעזרת בורג התמיכה.
כרטיס מסך 3.6 והתקני PCIe אחרים
- Locate the PCIe x16 slot for your graphics card.
- פתח את קליפס השמירה בקצה החריץ.
- יישר את כרטיס המסך עם החריץ ולחץ בחוזקה עד שייכנס למקומו בנקישה.
- חברו את כרטיס המסך למארז בעזרת בורג.
- Install any other PCIe x1 expansion cards as needed.
3.7 חיבורי ספק כוח
- חבר את מחבר החשמל ATX בעל 24 הפינים מספק הכוח שלך ללוח האם.
- Connect the 8-pin CPU power connector (and 4-pin if available/needed) to the corresponding sockets near the CPU.
- חברו כבלי חשמל SATA להתקני האחסון שלכם.
3.8 חיבורי לוח קדמי וציוד היקפי
- Connect the front panel headers (Power SW, Reset SW, HDD LED, Power LED) to the designated pins on the motherboard. Refer to the motherboard diagram for correct pin assignments.
- Connect USB 2.0 headers from your case to the motherboard.
- Connect the front panel audio header.
- Connect SATA data cables from your storage devices to the SATA 2.0 ports on the motherboard.

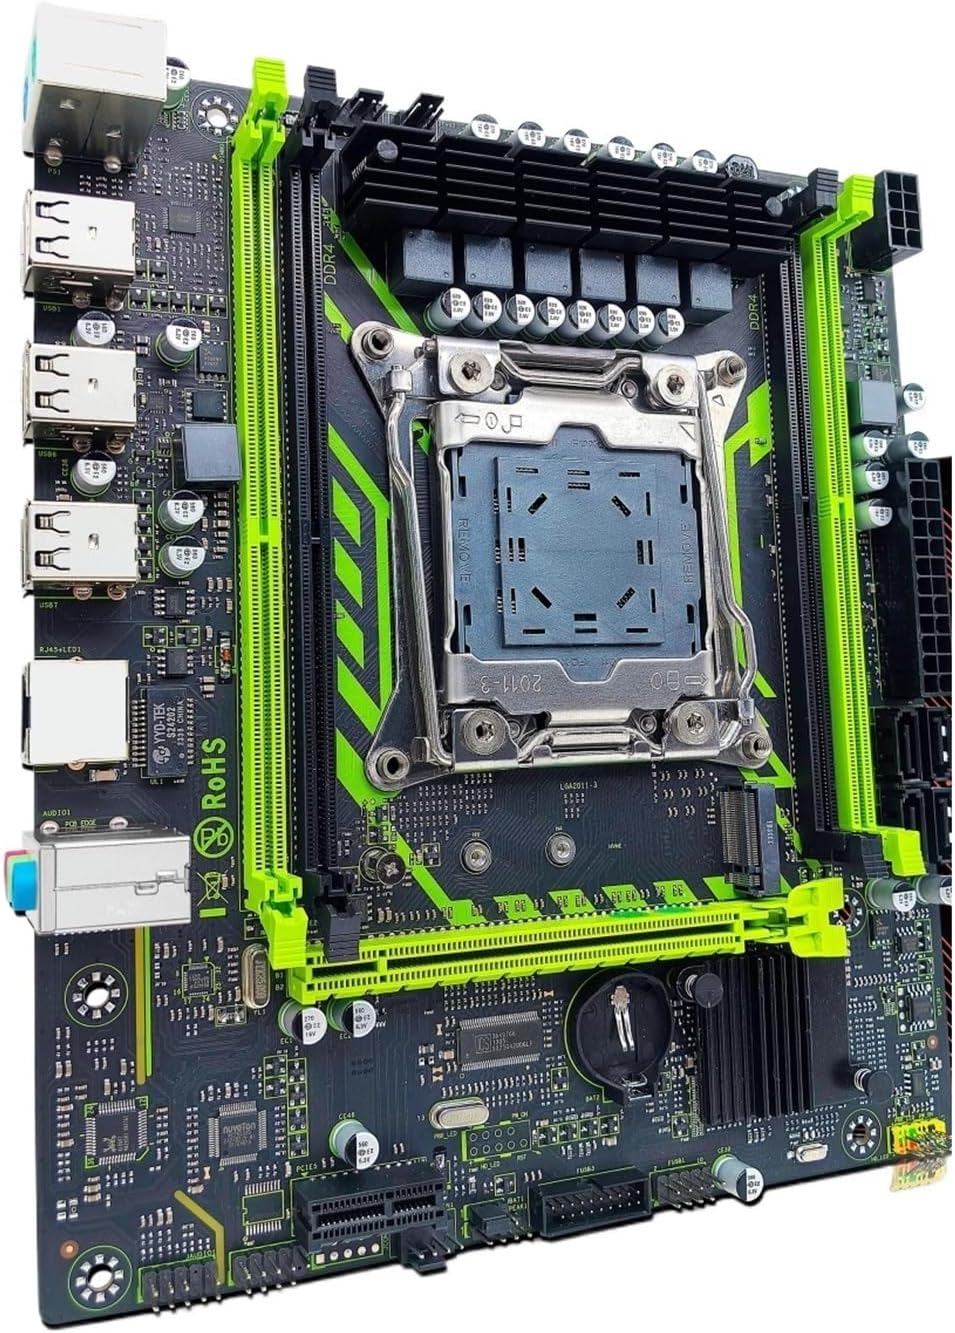
איור 3.2: ZSUS X99-8D4 Motherboard with labeled ports and connectors. This image provides a detailed layout of the motherboard, indicating the locations of the CPU socket, DDR4 slots, PCIe slots, SATA ports, USB headers, and power connectors.

איור 3.3: ZSUS X99-8D4 Motherboard I/O Shield and SATA Cable. This image shows the included I/O shield for the rear panel and a SATA data cable, essential accessories for system assembly.
4. הוראות הפעלה
4.1 אתחול ראשון
- After all connections are made, connect your monitor, keyboard, and mouse.
- Plug in the power cord and turn on your power supply.
- לחץ על כפתור ההפעלה במארז המחשב שלך.
- המערכת אמורה להידלק ולהציג את מסך הפתיחה של ה-BIOS/UEFI.
4.2 הגדרת BIOS/UEFI
במהלך האתחול הראשוני, לחצו על המקש הייעודי (בדרך כלל DEL or F2) to enter the BIOS/UEFI setup utility. Here you can configure boot order, system time, and other hardware settings. Ensure your storage device with the operating system is set as the primary boot device.
4.3 התקנת דרייבר
After installing your operating system, install the necessary drivers for the motherboard chipset, LAN, and audio. These drivers are typically provided on a CD/DVD or can be downloaded from the manufacturer's website. Installing the correct drivers ensures optimal performance and stability.
5. תחזוקה
5.1 ניקוי
נקו את פנים המחשב באופן קבוע כדי למנוע הצטברות אבק, אשר עלול להוביל להתחממות יתר. השתמשו באוויר דחוס כדי להסיר אבק ממאווררים, גופי קירור ורכיבי לוח האם. ודאו שהמערכת כבויה ומנותקת מהחשמל לפני הניקוי.
5.2 עדכוני BIOS
בדקו מעת לעת את הוראות היצרן webאתר לעדכוני BIOS/UEFI. עדכונים יכולים לשפר את יציבות המערכת, להוסיף תמיכה בחומרה חדשה או לתקן באגים. יש לפעול בקפידה אחר הוראות העדכון כדי למנוע נזק ללוח האם.
6. פתרון תקלות
סעיף זה עוסק בבעיות נפוצות שאתה עשוי להיתקל בהן.
6.1 אין חשמל / אין אתחול
- Check all power connections: 24-pin ATX, 8-pin CPU, and power button header.
- ודא שמתג ספק הכוח נמצא במצב 'ON'.
- Test the power supply with another system or a power supply tester if possible.
6.2 אין תצוגה
- Ensure your monitor is connected to the graphics card (not the motherboard's I/O if no integrated graphics are present).
- התקן מחדש את כרטיס המסך ואת מודולי הזיכרון.
- נסה כבל תצוגה או מסך אחר.
6.3 Memory Errors
- Ensure memory modules are fully seated in their slots.
- Try booting with one memory module at a time to identify a faulty stick or slot.
- Verify memory compatibility with the motherboard.
6.4 חוסר יציבות מערכת / קריסות
- בדוק את טמפרטורות המעבד והכרטיס הגרפי כדי לוודא שהן נמצאות בטווח הפעולה הבטוחה.
- ודא שכל הדרייברים מעודכנים.
- הפעל כלי אבחון זיכרון כדי לבדוק אם יש שגיאות RAM.
7. מפרטים
| תכונה | מִפרָט |
|---|---|
| דֶגֶם | ZSUS X99-8D4 |
| שקע מעבד | LGA 2011-3 |
| מעבד נתמך | Intel Xeon E5 V3/V4 series (e.g., E5 2650 V4 included) |
| סוג זיכרון | DDR4 |
| חריצי זיכרון | 4 |
| קיבולת זיכרון מקסימלית | 128 ג'יגה-בייט |
| ממשק אחסון | M.2 (NVMe 2280), SATA 2.0 |
| חריצי PCIe x16 | 1 (PCI-E 3.0) |
| חריצי PCIe x1 | 1 |
| מהירות רשת מקומית (LAN) | 1000Mbps (Gigabit Ethernet) |
| יציאות USB | 6 x USB 2.0 (rear I/O) |
| יציאות אודיו | 3 x Jacks |
| גורם צורה | ATX (approx. 215mm x 190mm) |
| הסמכה | RoHS, CE |
8. אחריות ותמיכה
למידע על אחריות ותמיכה טכנית, אנא עיין בתיעוד המצורף לרכישה שלך או צור קשר ישירות עם המוכר. שמור את הוכחת הרכישה שלך לצורך תביעות אחריות.