מָבוֹא
This manual provides detailed instructions for the setup, operation, maintenance, and troubleshooting of your Pisichen 24-inch Touchscreen Monitor with Built-in Webcam (Model 238TS-CMR). This monitor features a 2K QHD (2560x1440) resolution display with a 100Hz refresh rate, 10-point multi-touch functionality, and an integrated pop-up webcam, designed to enhance your productivity and interactive experience.
מידע בטיחות
- Always place the monitor on a stable, flat surface to prevent accidental falls.
- אין לחשוף את הצג לגשם, לחות או טמפרטורות קיצוניות.
- הימנע מחסימת פתחי אוורור כדי למנוע התחממות יתר.
- השתמשו רק במתאם החשמל המצורף לצג.
- נתק את כבל החשמל מהשקע לפני ניקוי או אם הצג לא יהיה בשימוש למשך תקופה ממושכת.
- אל תנסה לפרק או לתקן את הצג בעצמך. יש לפנות לכל תיקון וטיפול באנשי מקצוע מוסמכים.
תוכן החבילה
אנא ודאו שכל הפריטים נמצאים בחבילה שלכם:
- Pisichen 24-inch Touchscreen Monitor (Model 238TS-CMR)
- מעמד למסך (בסיס וזרוע)
- מתאם חשמל וכבל
- כבל HDMI
- כבל USB-C ל-USB-C
- USB-A to USB-B Cable (for touch functionality with non-USB-C devices)
- מדריך למשתמש (מסמך זה)
הגדרה
1. הרכבת מעמד
- הוציאו בזהירות את הצג מאריזתו והניחו אותו כשפניו כלפי מטה על משטח רך ונקי כדי למנוע שריטות.
- Attach the stand arm to the back of the monitor using the provided screws.
- Connect the stand base to the stand arm and secure it with the designated screw.
- Once assembled, carefully lift the monitor and place it upright on your desk.

Figure 1: Monitor stand assembly and adjustment capabilities.
2. התחברות למכשיר שלך
The monitor supports multiple connection types. Choose the appropriate cable for your device.
- חיבור חשמל: Connect the power adapter to the monitor's DC power port and then plug it into a power outlet.
- USB-C Connection (Recommended for full functionality): If your device has a USB-C port that supports DisplayPort Alternate Mode, connect the monitor using the provided USB-C to USB-C cable. This single cable can transmit video, audio, and touch signals, and may also provide power delivery to your laptop.
- HDMI or DisplayPort Connection: Connect an HDMI or DisplayPort cable from your device to the corresponding port on the monitor for video and audio. For touch functionality, you must also connect the USB-A to USB-B cable from your device's USB port to the monitor's USB-B upstream port.
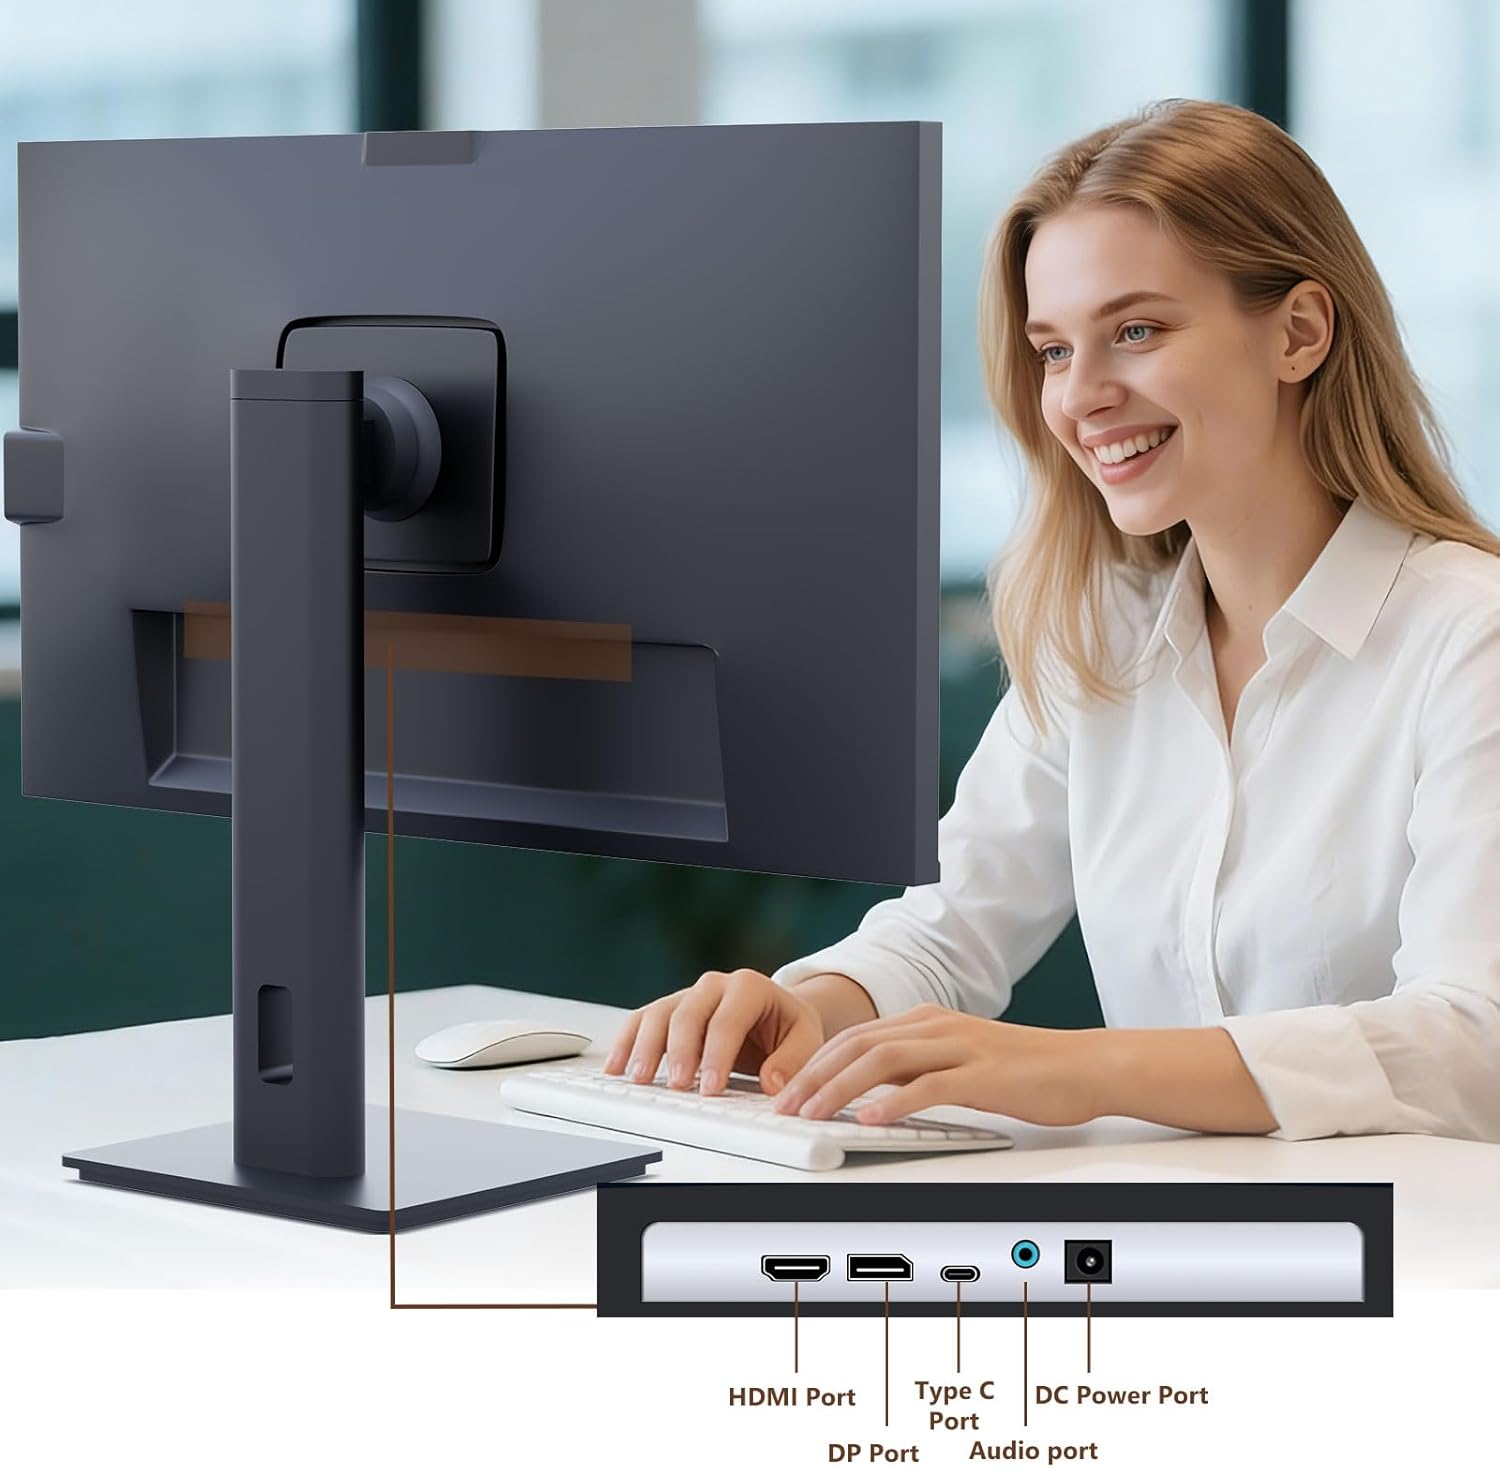
Figure 2: Available ports on the Pisichen monitor.

Figure 3: USB-C one-cable connection for simplified setup.

Figure 4: Connection options for desktop and laptop devices.
3. הפעלה ראשונית
Press the power button located on the monitor to turn it on. The monitor will automatically detect the active input source. If multiple sources are connected, you may need to select the correct input via the On-Screen Display (OSD) menu.
הוראות הפעלה
1. פונקציונליות מסך מגע
The monitor supports 10-point multi-touch. Ensure the USB-C cable is connected (for full functionality) or the USB-A to USB-B cable is connected in addition to your video cable for touch input to work. Touch gestures are similar to those used on tablets or smartphones.
- בֶּרֶז: Single touch for selection or activation.
- גרור: Touch and hold, then move your finger to move items.
- צביטה/מריחה: השתמשו בשתי אצבעות כדי להגדיל או להקטין את התצוגה.
- לִגנוֹב: Move your finger across the screen to scroll or navigate.

Figure 5: Demonstrating intuitive touch interaction.

Figure 6: Collaborative use of the multi-touch display.
2. Built-in Webשימוש במצלמות
The monitor features a pop-up webcam for privacy and convenience. To use the webcam, gently press the top center of the monitor frame where the webcam is located. It will pop up. To retract it, gently press it down until it clicks into place.
Ensure your operating system and video conferencing software recognize the webcam. No additional drivers are typically required for basic functionality.

Figure 7: The monitor with its built-in pop-up webcam in use during a video conference.

Figure 8: High-definition video calls using the integrated webפִּקָה.
3. תפריט תצוגה על המסך (OSD).
The OSD menu allows you to adjust various monitor settings. Use the buttons on the back or bottom of the monitor to navigate and select options.
- ניגוד בהירות: כוונן את רמות הבהירות והניגודיות של הצג.
- הגדרות צבע: שינוי טמפרטורת צבע, גמא ופרמטרים אחרים הקשורים לצבע.
- מקור קלט: Manually select between HDMI, DisplayPort, or USB-C inputs.
- שֶׁמַע: כוונן את עוצמת הקול עבור רמקולים מובנים או אוזניות מחוברות.
- מצב תמונה: בחר מצבי תצוגה מוגדרים מראש (למשל, רגיל, משחק, סרט).
- HDR: Enable or disable High Dynamic Range settings for improved dark detail optimization.

Figure 9: HDR feature for enhanced visual detail.
4. התאמות ארגונומיות
מעמד הצג מאפשר מגוון אפשרויות כוונון כדי לייעל את הביצועים שלך viewנוחות:
- התאמת גובה: Gently push or pull the monitor up or down.
- הטיה: Tilt the screen forward or backward to find the ideal angle.
- לְהִסְתוֹבֵב: סובבו את הצג שמאלה או ימינה על בסיסו.
- צִיר: סובב את המסך ב-90 מעלות למצב צפייה לאורך viewing.
Figure 10: Ergonomic adjustments for optimal viewing.
תַחזוּקָה
- ניקוי המסך: נגבו בעדינות את המסך בעזרת מטלית רכה ונטולת סיבים. במקרה של סימנים עקשניים,ampשטפו את המטלית מעט במים או בחומר ניקוי מסך שאינו שוחק. אין לרסס נוזל ישירות על המסך.
- ניקוי הגוף: השתמש במטלית רכה ויבשה כדי לנגב את הצגasinז. הימנעו משימוש בחומרי ניקוי חזקים או שוחקים.
- אִחסוּן: אם מאחסנים את הצג לתקופה ממושכת, נתק את כל הכבלים ואחסן אותו במקום קריר ויבש, רצוי באריזתו המקורית.
פתרון בעיות
אין כוח
- ודא שכבל החשמל מחובר היטב הן לצג והן לשקע החשמל.
- ודא ששקע החשמל פועל על ידי חיבור מכשיר אחר.
- Check if the power adapter is correctly connected to the monitor.
אין אות / מסך ריק
- Confirm the video cable (HDMI, DP, or USB-C) is securely connected to both the monitor and your device.
- ודא שמקור הקלט הנכון נבחר בתפריט המסך של הצג.
- בדוק את הגדרות התצוגה של המחשב שלך כדי לוודא שהצג מזוהה ומופעל.
- נסה כבל וידאו או יציאה אחרת, אם זמינים.
Touch Functionality Not Working
- If using HDMI or DisplayPort, ensure the USB-A to USB-B cable is connected from your device to the monitor.
- If using USB-C, ensure your device's USB-C port supports DisplayPort Alternate Mode and touch data transmission.
- Check your operating system's touch settings.
- Note that some devices, such as game consoles (PS3/4/5, Xbox, Steam Deck, Fire TV Cube) and certain Apple products (iPhone, iPad, Switch), do not support touch functionality with this monitor.

Figure 11: Touch compatibility chart for various devices.
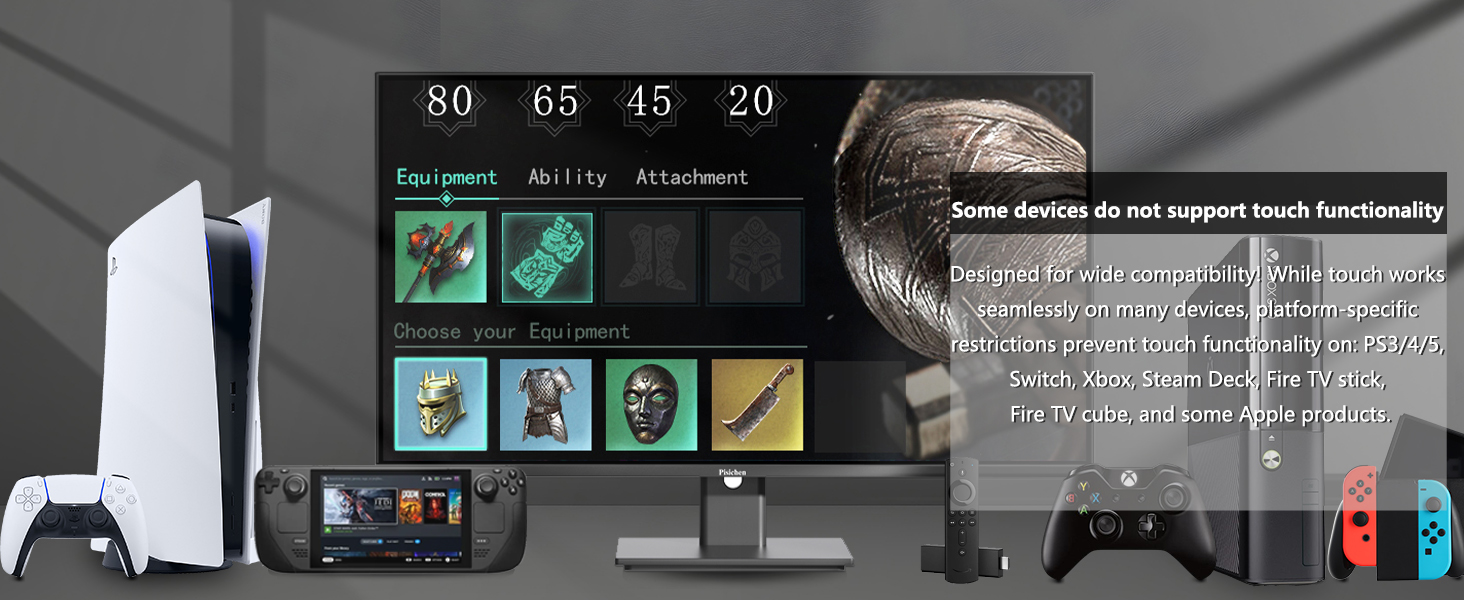
Figure 12: Devices that do not support touch functionality.
Webהמצלמה לא זוהתה
- להבטיח את webcam is fully popped up.
- Verify that the USB connection (either USB-C or USB-A to USB-B) is properly established.
- בדוק את הגדרות הפרטיות של מערכת ההפעלה שלך כדי לוודא שמותר לאפליקציות גישה למצלמה.
- הפעל מחדש את המחשב.
מפרטים
| תכונה | תֵאוּר |
|---|---|
| מספר דגם | 238TS-CMR |
| גודל מסך | 23.8 אינץ' |
| הַחְלָטָה | 2560 x 1440 (רזולוציה רחבה QHD 1440p) |
| קצב רענון | 100 הרץ |
| בְּהִירוּת | 400 קנדלה (ניטים) |
| יחס ניגודיות | 3000:1 |
| טכנולוגיית מגע | Multi-Touch 10 נקודות |
| Webפִּקָה | Built-in Pop-up Camera |
| קישוריות | HDMI, DisplayPort (DP), USB Type-C, USB-B (upstream), Audio Out, DC Power |
| יחס גובה-רוחב | 16:9 |
| משטח המסך | מַברִיק |
| מידות המוצר | 1.97 x 21.26 x 12.6 אינץ' |
| משקל פריט | 11.53 פאונד |
| יַצרָן | שנזן קונובה אלקטרוניקה בע"מ |
אחריות ותמיכה
Your Pisichen monitor is covered by a limited warranty. Please refer to the warranty card included in your package for specific terms and conditions, including the warranty period and coverage details.
For technical support, troubleshooting assistance, or warranty claims, please contact Pisichen customer service. Contact information can typically be found on the manufacturer's webבאתר או על גבי כרטיס האחריות.
When contacting support, please have your monitor's model number (238TS-CMR) and purchase information readily available.