מָבוֹא
This manual provides comprehensive instructions for the installation, operation, maintenance, and troubleshooting of the ASUS Prime H810M-E-CSM Intel H810 mATX Commercial CSM Motherboard. This motherboard is engineered for Intel Core Ultra (Series 2) processors, offering robust performance and essential features for commercial and AI PC applications.
מידע בטיחות
יש להקפיד תמיד על אמצעי הזהירות הבאים במהלך ההתקנה והתפעול:
- נתק את כבל החשמל משקע הקיר לפני נגיעה ברכיבים כלשהם.
- ענדו רצועת כף יד אנטי-סטטית כדי למנוע נזק לרכיבים כתוצאה מפריקה אלקטרוסטטית (ESD).
- יש להחזיק את הרכיבים בקצוותיהם כדי להימנע ממגע עם חלקים רגישים.
- ודא אוורור נאות בתוך מארז המחשב שלך כדי למנוע התחממות יתר.
- Refer to the specific component manuals for additional safety guidelines.
תוכן החבילה
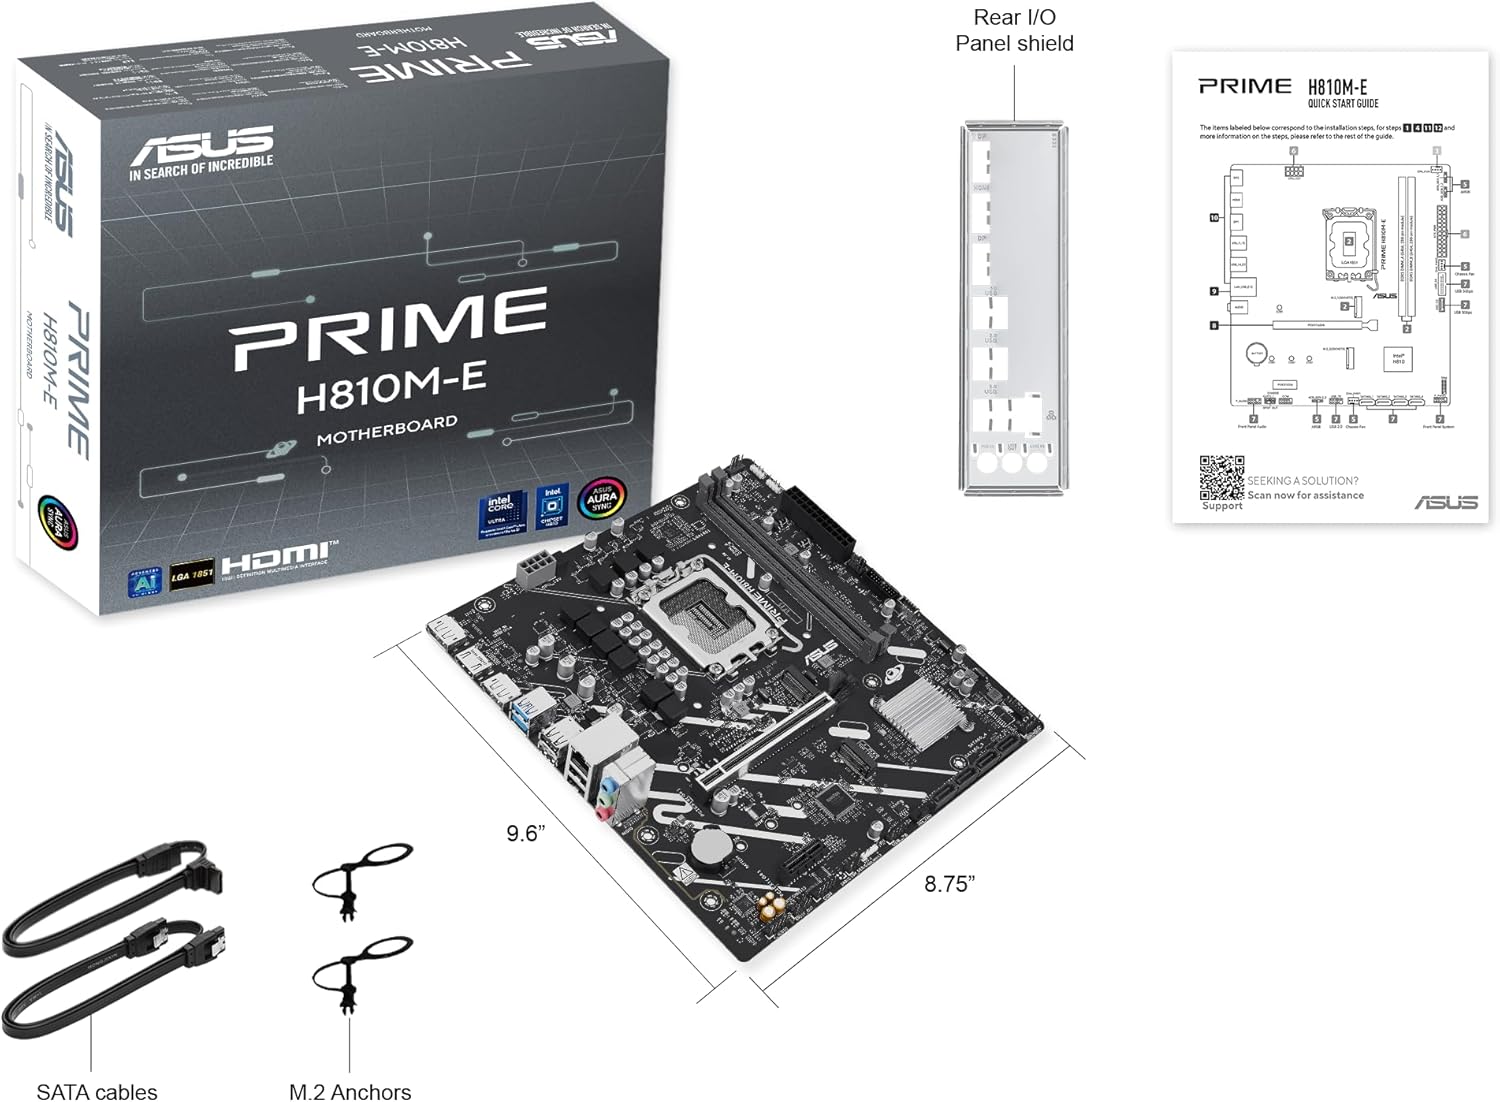
ודא שכל הפריטים נמצאים בחבילת לוח האם שלך:
- ASUS Prime H810M-E-CSM Motherboard
- SATA 6Gb/s Data Cables (2x)
- M.2 SSD Anchors (2x)
- Rear I/O Shield
- מדריך למשתמש / מדריך להתחלה מהירה
פריסת לוח האם
הכיר את הרכיבים והמחברים העיקריים בלוח האם.


הגדרה
1. התקנת מעבד
This motherboard supports Intel Core Ultra (Series 2) processors with an LGA 1851 socket.
- פתח את ידית שקע המעבד והסר את מכסה המגן.
- Carefully align the CPU with the socket, ensuring the notches on the CPU match the keys on the socket.
- הכנס בעדינות את המעבד לשקע מבלי להפעיל כוח.
- סגור את ידית השקע כדי לאבטח את המעבד.
- התקן את מקרר המעבד בהתאם להוראות היצרן.
2. התקנת זיכרון (RAM)
The motherboard features two DDR5 DIMM slots, supporting up to 128GB of RAM.
- פתחו את הקליפסים בשני קצוות חריץ ה-DIMM.
- יישר את מודול הזיכרון עם החריץ, וודא שהחריץ במודול תואם למפתח בחריץ.
- לחץ בחוזקה על שני קצוות מודול הזיכרון עד שהקליפסים יתייצבו במקומם.
3. התקנת אחסון
The motherboard supports M.2 SSDs and SATA drives.
התקנת SSD M.2:
- אתר את חריץ M.2 בלוח האם.
- הכנס את כונן ה-SSD מסוג M.2 לחריץ בזווית של 30 מעלות.
- Gently push down the SSD and secure it with the provided M.2 anchor or screw.

התקנת כונן SATA:
- חבר קצה אחד של כבל נתונים SATA ליציאת SATA בלוח האם.
- חבר את הקצה השני של כבל הנתונים SATA לכונן האחסון שלך (HDD/SSD).
- Connect a SATA power cable from your power supply unit (PSU) to the storage drive.
4. התקנת כרטיס PCIe
Install graphics cards or other expansion cards into the PCIe 4.0 slots.
- פתח את קליפס השמירה בקצה חריץ ה-PCIe.
- Align the expansion card with the slot and press down firmly until it is seated and the clip snaps shut.
- חברו את הכרטיס למארז המחשב בעזרת בורג.

5. חיבורי חשמל
חבר את כבלי יחידת ספק הכוח (PSU) ללוח האם.
- מחבר חשמל ATX בעל 24 פינים: חבר את כבל החשמל הראשי בן 24 הפינים מספק הכוח שלך למחבר המתאים בלוח האם.
- 8-pin CPU Power Connector (EATX12V): Connect the 8-pin CPU power cable from your PSU to the connector located near the CPU socket.
6. חיבורי לוח קדמי
Connect your PC case's front panel cables (power button, reset button, USB ports, audio jacks, LED indicators) to the corresponding headers on the motherboard. Refer to the motherboard diagram for exact locations.
פועל
אתחול ראשון והגדרת BIOS/UEFI
לאחר הרכבת המערכת, חבר צג, מקלדת ועכבר. הפעל את המערכת.
- הקש על לִמְחוֹק מקש במהלך האתחול כדי להיכנס לכלי התקנת BIOS/UEFI.
- קבע את סדר האתחול, זמן המערכת והגדרות חיוניות אחרות.
- שמור שינויים וצא מה-BIOS.

Driver and Operating System Installation
Install your preferred operating system (e.g., Windows 10/11) from a bootable USB drive or DVD. After OS installation, install the latest drivers for the motherboard chipset, LAN, audio, and any other integrated components from the ASUS support webאתר כדי להבטיח ביצועים ויציבות אופטימליים.
תַחזוּקָה
ניקוי
Regularly clean your PC to prevent dust buildup, which can lead to overheating and component failure. Use compressed air to remove dust from heatsinks, fans, and other components. Ensure the system is powered off and unplugged before cleaning.
עדכוני BIOS
בדוק מעת לעת את התמיכה של ASUS website for BIOS updates. BIOS updates can improve system stability, compatibility, and performance. Follow the instructions provided by ASUS carefully when performing a BIOS update to avoid system damage.
פתרון בעיות
סעיף זה עוסק בבעיות נפוצות שאתה עשוי להיתקל בהן.
- No Display / No Post:
- ודא שכל כבלי החשמל (ATX בעל 24 פינים, מעבד בעל 8 פינים) מחוברים היטב.
- Reseat the RAM modules. Try booting with only one RAM stick.
- Verify the CPU is correctly seated and the CPU cooler is properly installed.
- Check that the graphics card is fully seated in its PCIe slot and has adequate power.
- אם משתמשים בכרטיס מסך משולב, ודאו שהמסך מחובר ליציאת הווידאו של לוח האם (HDMI).
- חוסר יציבות מערכת / קריסות:
- ודא שכל הדרייברים מעודכנים.
- בדוק את טמפרטורות המעבד והכרטיס הגרפי באמצעות תוכנת ניטור.
- הפעל כלי אבחון זיכרון כדי לבדוק אם יש זיכרון RAM פגום.
- אימות ספק הכוחtage מספיק לכל הרכיבים.
- לא זוהה ציוד היקפי:
- נסה לחבר את ההתקן ההיקפי ליציאה אחרת.
- התקן או עדכן מנהלי התקנים עבור הציוד ההיקפי.
- Check BIOS settings to ensure the port is enabled.
מפרטים
| תכונה | מִפרָט |
|---|---|
| מותג | ASUS |
| שם הדגם | PRIME H810M-E-CSM |
| שקע מעבד | LGA 1851 |
| מעבדים תואמים | מעבדי אינטל Core Ultra (סדרה 2) |
| סוג ערכת שבבים | אינטל H810 |
| טכנולוגיית זיכרון RAM | DDR5 |
| חריצי זיכרון זמינים | 2 |
| Ram Memory Maximum Size | 128 ג'יגה-בייט |
| ממשק כרטיס מסך | PCI Express 4.0 |
| Total PCIe Ports | 2 |
| Total SATA Ports | 4 |
| Total M.2 Slots | 1 |
| סך כל יציאות USB | 11 (סוגים שונים) |
| Total Number of HDMI Ports | 1 |
| מספר יציאות אתרנט | 1 (1Gb LAN) |
| סוג מחבר מתח ראשי | 24 פינים |
| פּלַטפוֹרמָה | Windows 10, Windows 11 |
| מידות פריט L x W x H | אורך 9.6 אינץ', רוחב 8.7 אינץ', גובה 1.5 אינץ' |
| משקל פריט | 1.1 פאונד |
מידע על אחריות
The ASUS Prime H810M-E-CSM Motherboard comes with a אחריות יצרן לשנה. For detailed terms and conditions, please refer to the warranty card included in your package or visit the official ASUS support webאֲתַר.
תְמִיכָה
For further assistance, technical support, driver downloads, or BIOS updates, please visit the official ASUS support webאֲתַר:
You can also find additional resources and FAQs on the ASUS product page for the Prime H810M-E-CSM.