
1. הקדמה
This manual provides detailed instructions for the installation, operation, and maintenance of your darkFlash DS900 Air ATX Mid-Tower PC Gaming Case. Please read this manual thoroughly before beginning assembly to ensure proper setup and safe usage. The DS900 Air is designed to offer a clear view of your components with its 270° full-view tempered glass and provides excellent cooling capabilities for high-performance systems.

Figure 1.1: darkFlash DS900 Air ATX Mid-Tower PC Gaming Case with internal components and RGB lighting.
2. מידע בטיחות
יש להקפיד תמיד על אמצעי הזהירות הבאים במהלך ההתקנה והתפעול:
- נתק את ספק הכוח משקע הקיר לפני התקנה או הסרה של רכיבים כלשהם.
- ענדו רצועת כף יד אנטי-סטטית כדי למנוע נזק לפריקה אלקטרוסטטית (ESD) לרכיבים רגישים.
- Handle tempered glass panels with care. Avoid impacts or dropping them, as they can shatter.
- הרחיקו חלקים קטנים וברגים מהישג ידם של ילדים.
- ודא אוורור נאות סביב המארז כדי למנוע התחממות יתר.
- Do not attempt to modify the case structure, as this may void the warranty and pose safety risks.
3. מפרטים
| תכונה | מִפרָט |
|---|---|
| שם הדגם | DS900 Air |
| סוג מקרה | ATX Mid-Tower |
| תמיכה בלוח אם | ATX, מיקרו ATX, מיני ITX |
| מרווח אורך GPU | עד 425 מ"מ |
| מרווח גובה של מקרר המעבד | עד 170 מ"מ |
| סוג PSU | ATX (Bottom-mounted) |
| דרייב בייס | 2x 3.5" HDD or 2x 2.5" SSD, 2x 2.5" SSD |
| חריצי הרחבה | 7 חריצי PCIe |
| יציאות I/O | 1x USB-C, 1x USB 3.0, Audio (HD Audio) |
| תמיכת מעריצים | Bottom: 3x 120mm; Top: 3x 120mm or 2x 140mm; Rear: 1x 120mm; Right Side: 2x 120mm |
| תמיכת רדיאטור | Top: Up to 360mm; Side: Up to 240mm |
| חומרים | פלדה, זכוכית מחוסמת |
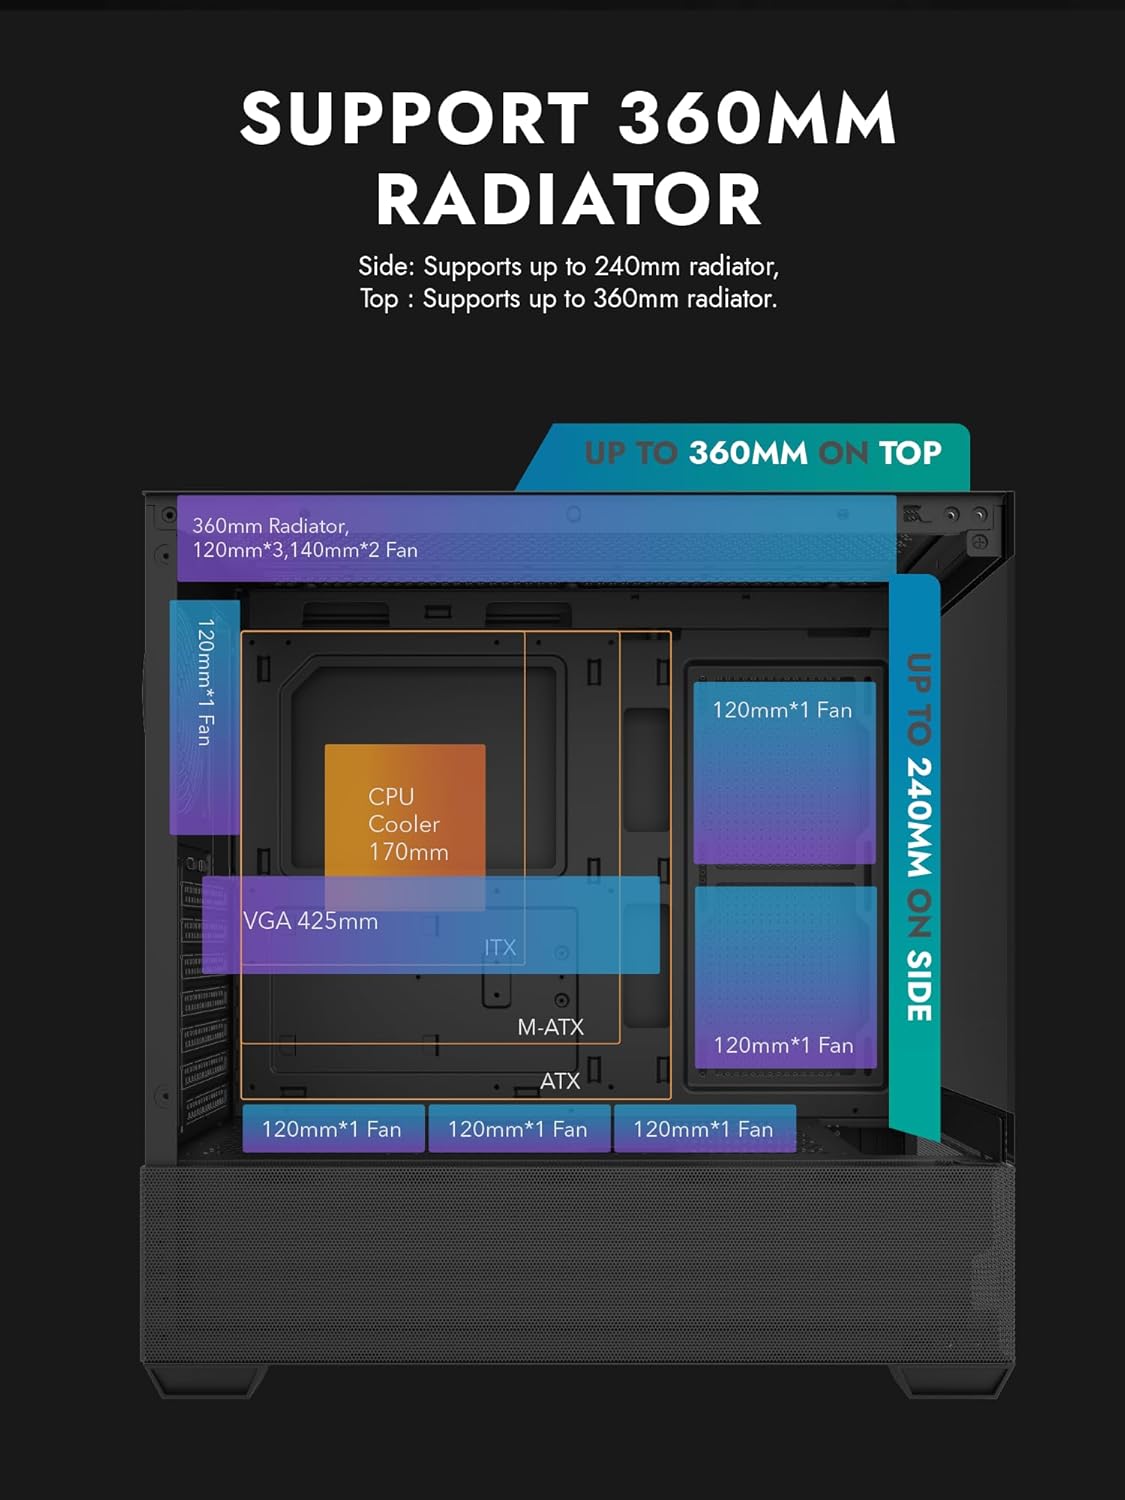
Figure 3.1: Radiator and fan support diagram for the DS900 Air case, illustrating maximum component dimensions.
4. התקנה והתקנה
Follow these steps to assemble your PC components within the darkFlash DS900 Air case.
4.1. הכנת התיק
- הסר לוחות צד: The DS900 Air features a tool-free clamshell side panel. Gently pull the top edge of the tempered glass side panel to unlatch it, then lift it off. Repeat for the other side panel if necessary.
- תיבת אביזרים: Locate the accessory box inside the case, which contains screws, cable ties, and other mounting hardware.
4.2. התקנת לוח אם
- התקן את מגן ה-I/O בפתח האחורי של המארז.
- Align your ATX, Micro-ATX, or Mini-ITX motherboard with the standoffs inside the case. Ensure the I/O ports align with the I/O shield.
- אבטחו את לוח האם באמצעות הברגים המצורפים.
4.3. התקנת יחידת ספק כוח (PSU)
- The DS900 Air has a dedicated bottom PSU chamber. Slide your ATX power supply into the chamber from the rear of the case.
- אבטחו את ספק הכוח באמצעות ברגים מחלקו האחורי של המארז.
- Route necessary power cables through the cutouts into the main compartment.
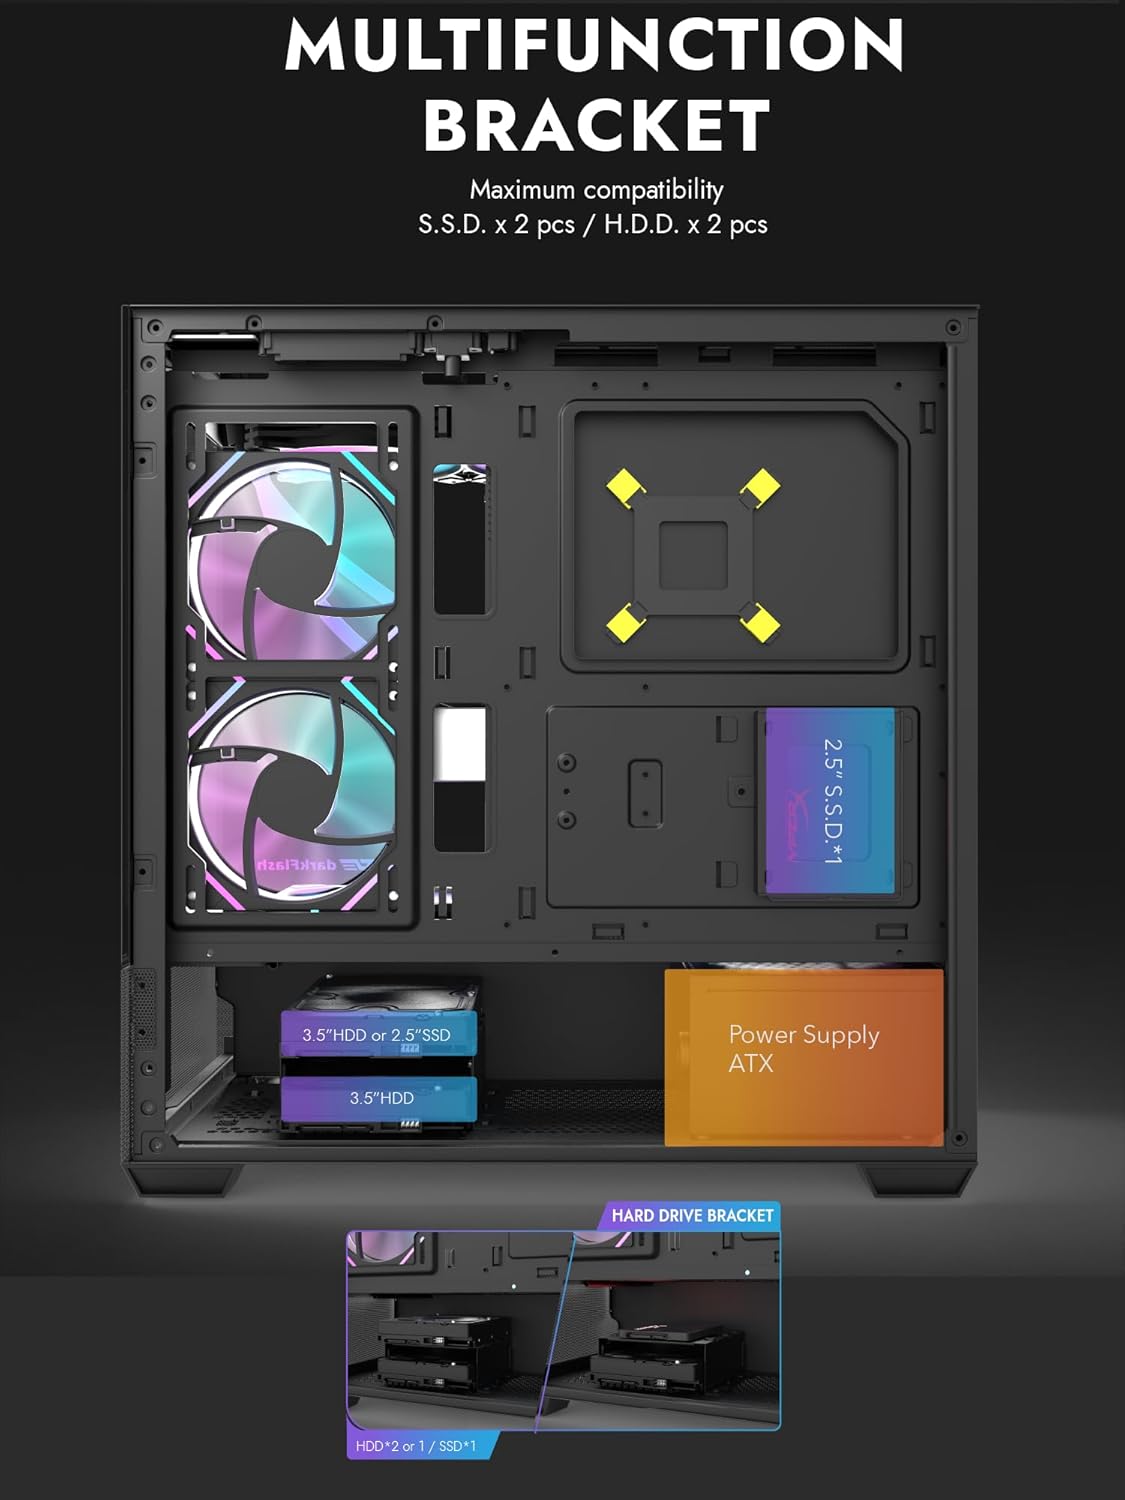
Figure 4.1: Internal layout showing the multifunction drive bracket and the bottom-mounted PSU chamber.
4.4. התקנת התקן אחסון
The case supports up to two 3.5" HDDs or 2.5" SSDs in the hard drive bracket, and two additional 2.5" SSDs on the multifunction bracket.
- 3.5" HDD / 2.5" SSD: Install drives into the removable hard drive bracket located in the PSU chamber. Secure with screws.
- כונן SSD בגודל 2.5 אינץ': Mount 2.5" SSDs onto the multifunction bracket located on the motherboard tray. Secure with screws.
4.5. התקנת כרטיס מסך (GPU)
- הסר את כיסויי חריצי ה-PCIe הדרושים מחלקו האחורי של המארז.
- הכנס את כרטיס המסך שלך לחריץ PCIe המתאים בלוח האם.
- Secure the graphics card with screws. The case supports GPUs up to 425mm in length.
4.6. Cooling System Installation (Fans/Radiators)
The DS900 Air offers extensive cooling options:
- רֹאשׁ: Supports up to 3x 120mm fans or 2x 140mm fans, or a 360mm radiator.
- תַחתִית: Supports up to 3x 120mm fans.
- אֲחוֹרִי: תומך במאוורר 1x120 מ"מ.
- יָמִין: Supports 2x 120mm fans or a 240mm radiator.
Install fans and radiators using the appropriate screws and mounting points. Ensure correct airflow direction for optimal cooling.

Figure 4.2: Fan support locations and quantities within the DS900 Air chassis.

Figure 4.3: Airflow diagram demonstrating optimal cooling paths through the case.
4.7. Connecting Front I/O Cables
Connect the front panel cables (USB-C, USB 3.0, HD Audio, Power, Reset, LED) to their corresponding headers on your motherboard. Refer to your motherboard manual for exact header locations.

Figure 4.4: Top-right I/O panel featuring USB-C and USB 3.0 ports.
4.8. ניהול כבלים
נצלו את פתחי ניתוב הכבלים ואת נקודות הקשירה שמאחורי מגש לוח האם כדי לנהל את הכבלים. זה משפר את זרימת האוויר ואת האסתטיקה.
5. הפעלת המחשב
Once all components are installed and cables are connected, replace the side panels. Connect your monitor, keyboard, mouse, and power cable. Press the power button on the case to start your system. Ensure all fans are spinning and components are receiving power.
6. תחזוקה
תחזוקה שוטפת מסייעת להבטיח ביצועים אופטימליים ואורך חיים של רכיבי המחשב שלך.
- ניקוי אבק: Periodically clean dust filters and internal components using compressed air. The DS900 Air features mesh panels that help filter dust.
- זרימת אוויר: Ensure no obstructions block the intake or exhaust vents of the case.
- ניהול כבלים: Re-evaluate cable routing periodically to ensure no cables are interfering with fan blades or airflow.
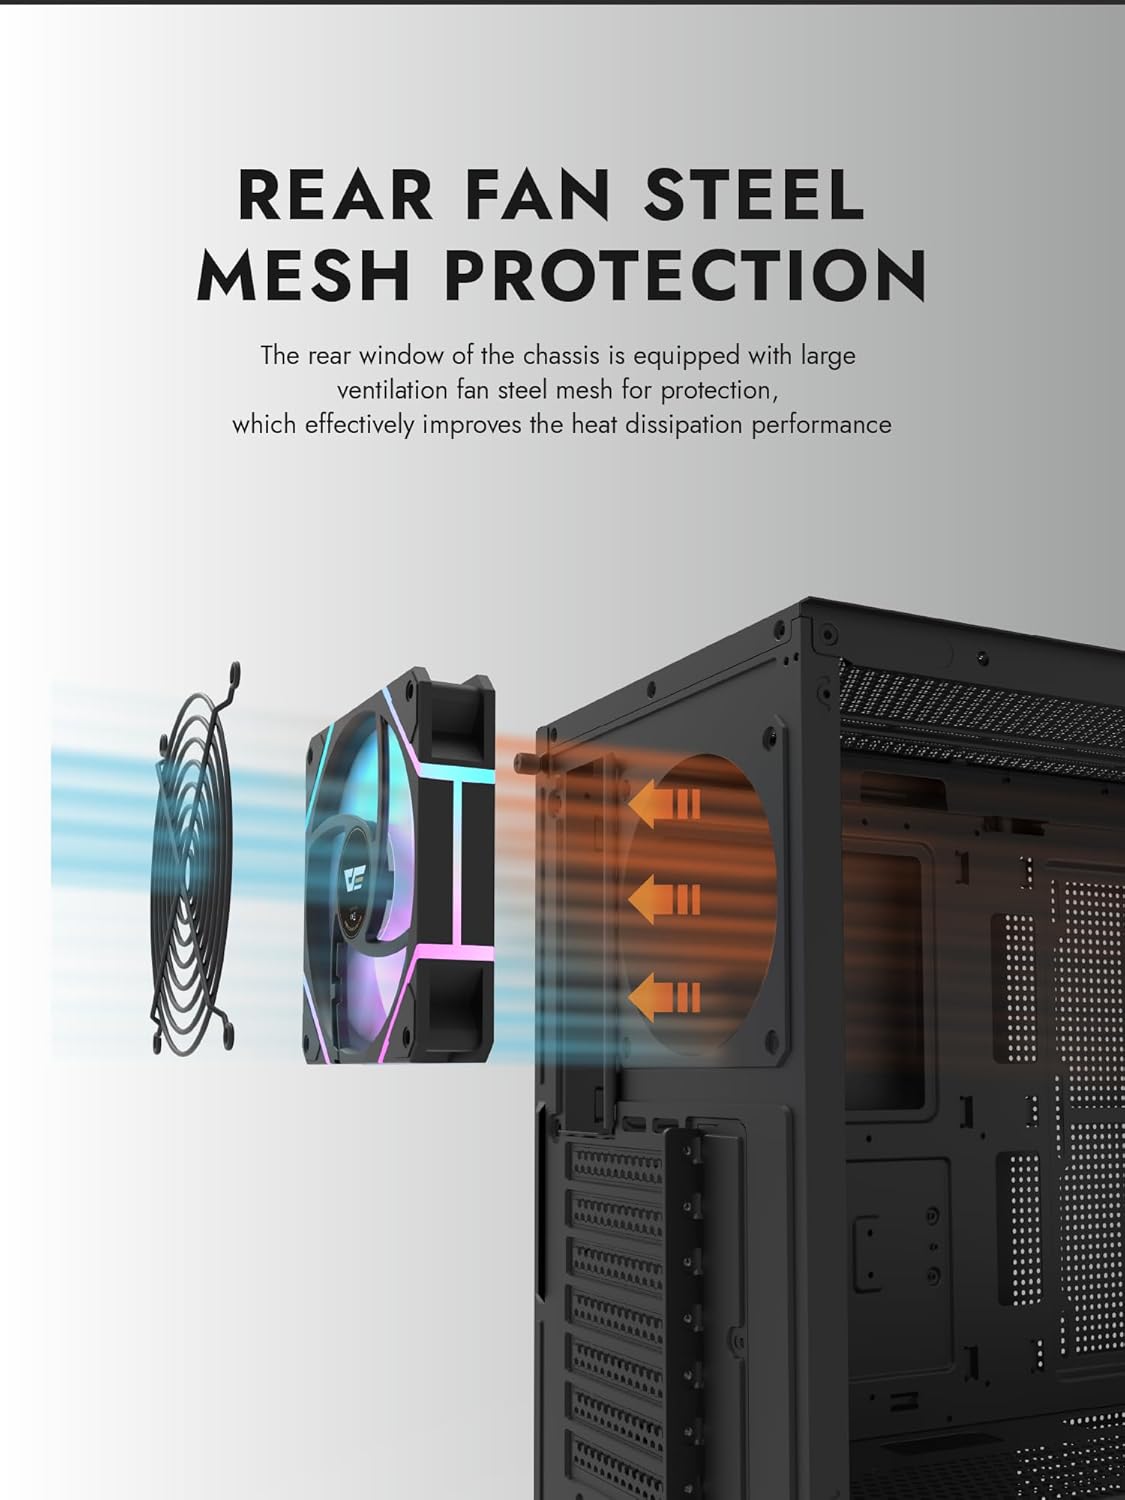
Figure 6.1: Rear fan steel mesh protection, designed to improve heat dissipation.
7. פתרון תקלות
אם אתם נתקלים בבעיות בבניית המחשב שלכם, שקלו את השלבים הנפוצים הבאים לפתרון בעיות:
- אין כוח: Check all power connections, including the PSU to the wall, PSU to motherboard, and front panel power switch cable to the motherboard.
- אין תצוגה: Ensure your monitor is connected to the graphics card (not the motherboard I/O unless using integrated graphics). Reseat the graphics card and RAM.
- התחממות יתר: Verify all fans are spinning correctly and are oriented for proper airflow. Check CPU cooler installation.
- רכיב לא זוהה: Reseat the component (e.g., RAM, GPU, storage drive) and check its power and data connections.
8. אחריות ותמיכה
darkFlash products are manufactured to high-quality standards. For warranty information or technical support, please refer to the official darkFlash webאתר או צור קשר עם הקמעונאי שלך. שמור את הוכחת הרכישה שלך לצורך תביעות אחריות.