
1. הקדמה
Thank you for choosing the CROSSIO Mid Century Modern Chandelier. This manual provides essential information for the safe installation, operation, and maintenance of your new lighting fixture. Please read these instructions thoroughly before beginning installation and retain them for future reference.

Image 1.1: The CROSSIO Mid Century Modern Chandelier with green glass shades.
2. מידע בטיחות
אַזהָרָה: כדי להפחית את הסיכון לשריפה, התחשמלות או פגיעה גופנית, יש להקפיד תמיד על אמצעי הזהירות הבאים:
- נתק חשמל: Always turn off the electrical supply at the main fuse box or circuit breaker before beginning installation or performing any maintenance.
- חשמלאי מוסמך: ההתקנה צריכה להתבצע על ידי חשמלאי מוסמך או אדם בעל ידע מתאים בחשמל.
- הַאֲרָקָה: Ensure the fixture is properly grounded to avoid potential electrical shocks.
- טפל בזהירות: Glass components are fragile. Handle them carefully to prevent breakage.
- דרישות נורה: Use only G9 bulbs as specified. Do not exceed the maximum wattagהמצוין על המתקן.
- הימנע ממים: Do not install this fixture in damp or wet locations. It is designed for indoor use only.
- הרכבה מאובטחת: ודא שמשטח ההרכבה יכול לתמוך במשקל גוף התאורה.
3. תכולת החבילה
Verify that all components are present before discarding packaging materials. If any parts are missing or damaged, contact customer support.
- הרכבת מסגרת נברשת
- Green Glass Shades (16 pieces + 1 replacement)
- חומרת הרכבה (חופה, לוחית הרכבה, ברגים, אומי חוט)
- Adjustable Downrods (2 x 11.8 inches, 2 x 23.62 inches)
- מדריך הוראות

Image 3.1: The package includes one replacement lampצֵל.
4. מפרטים
| תכונה | פְּרָט |
|---|---|
| מותג | CROSSIO |
| שם הדגם | GLS-HLP084GR |
| צֶבַע | Gold+Green |
| חוֹמֶר | זכוכית, מתכת |
| סִגְנוֹן | Mid Century Modern / Art Deco |
| מידות המוצר | 39"L x 10"W x 70.87"H (Maximum) |
| מקור כוח | חשמלי עם כבלים |
| סוג התקנה | הר חצי פלאש |
| סוג מקור אור | LED (G9 bulbs recommended, not included) |
| מספר מקורות האור | 16 |
| בסיס נורה | G9 |
| תכונות מיוחדות | Adjustable Height, Dimmable, 180° Rotatable for Sloped Ceilings |
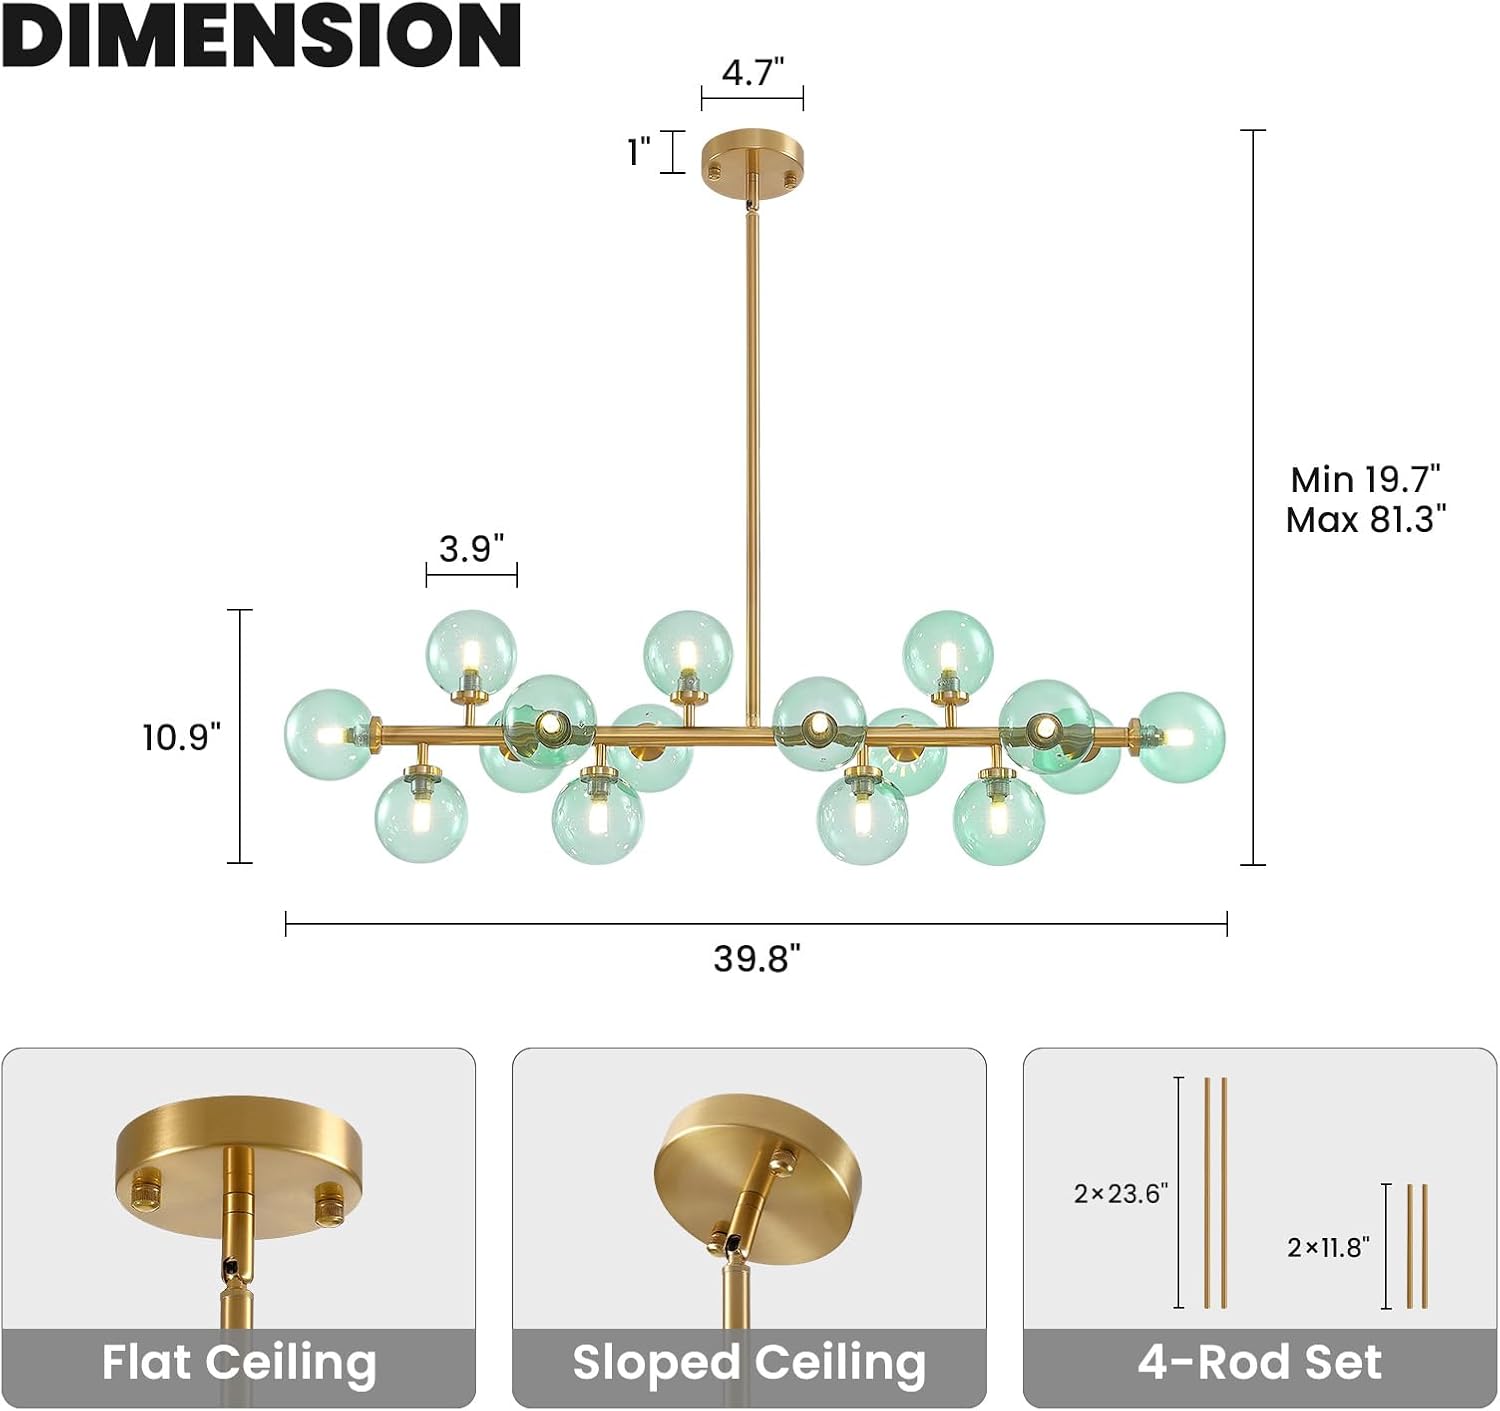
Image 4.1: Chandelier dimensions and adjustable downrod options.
5. התקנה והתקנה
Follow these steps for proper installation. It is recommended to have two people for installation due to the size and weight of the fixture.
- היכונו להתקנה: כבה את החשמל במפסק החשמל. פנה את אזור העבודה.
- התקנת לוחית הרכבה: אבטחו את לוחית ההרכבה לקופסת החיבורים בתקרה באמצעות הברגים המצורפים. ודאו שהיא מחוברת היטב.
- התאם גובה: Select the appropriate combination of downrods (11.8" x 2, 23.62" x 2) to achieve your desired hanging height. The fixture can be adjusted from a minimum of 19.7" to a maximum of 81.3". For sloped ceilings, the canopy is 180° rotatable.
- חיבורי חוטים: Connect the fixture's wires to the household electrical wires according to local electrical codes. Typically, black to black (live), white to white (neutral), and green/bare copper to green/bare copper (ground). Secure connections with wire nuts.
- קובץ מצורף לחופה: Carefully push the wires into the junction box and secure the canopy to the mounting plate with the provided screws.
- התקן נורות: Insert 16 G9 bulbs (not included) into the lamp holders. Ensure bulbs are securely seated.
- חבר צללי זכוכית: Carefully screw each green glass shade onto its respective lamp holder. Avoid overtightening.
- החזר כוח: לאחר השלמת ההתקנה, הפעל מחדש את החשמל דרך מפסק החשמל.

Image 5.1: Equipped with four downrods for adjustable hanging height.

Image 5.2: The 180° rotatable canopy allows for installation on sloped ceilings.

Image 5.3: G9 LED light socket for easy bulb installation.
6. תפעול
The CROSSIO Chandelier is designed for ease of use and offers versatile lighting options.
6.1 הפעלה/כיבוי
Operate the chandelier using a standard wall switch. Flip the switch to turn the light fixture on or off.

Image 6.1: Chandelier in a room, demonstrating on and off states.
6.2 פונקציונליות עמעום
This chandelier is fully dimmable when used with compatible G9 dimmable bulbs and a suitable dimmer switch (both not included). This allows you to adjust the light intensity to create the desired ambiance.

Image 6.2: The chandelier is fully dimmable with compatible bulbs and dimmer switch.
6.3 Light Color Effects
If you use color-changing G9 bulbs (not included), you can achieve different light color effects (Cool White, Neutral White, Warm White) by quickly toggling your standard ON/OFF wall switch. This feature depends entirely on the capabilities of the bulbs you install.

תמונה 6.3: דוגמהample of 3 light color effects achievable with compatible bulbs.
7. תחזוקה
Regular maintenance ensures the longevity and appearance of your chandelier.
- ניקוי: Always turn off the power before cleaning. Use a soft, dry cloth to wipe the metal frame and glass shades. Do not use abrasive cleaners, solvents, or polishes as they may damage the finish.
- החלפת נורה: Ensure the fixture is cool before attempting to replace bulbs. Follow the safety instructions for disconnecting power.
- בְּדִיקָה: בדקו מעת לעת את כל החיבורים וחומרת ההרכבה כדי לוודא שהם נשארים מאובטחים.

Image 7.1: Product details including durable ceiling plate, sleek iron body, and G9 light socket.
8. פתרון תקלות
אם נתקלתם בבעיות עם הנברשת שלכם, עיינו בבעיות הנפוצות ובפתרונות הבאות:
| בְּעָיָה | סיבה אפשרית | פִּתָרוֹן |
|---|---|---|
| האור לא נדלק | אין חשמל, חיווט רופף, נורה תקולה, מתג תקול. | Check circuit breaker. Ensure all wire connections are secure. Replace bulbs. Test the wall switch. |
| אורות מרצדים | Loose bulb, incompatible dimmer, loose wiring. | Tighten bulbs. Ensure dimmer switch and bulbs are compatible. Check wire connections. |
| Bulbs burn out frequently | סוג/וואט נורה לא נכוןtagה, כרךtage fluctuations, poor quality bulbs. | Ensure G9 bulbs are used and wattage is not exceeded. Consider higher quality LED G9 bulbs. Consult an electrician for voltagהבעיות. |
| Glass shades fall off | Shades not tightened properly, damaged threads. | Ensure shades are securely screwed onto the lamp holders. Do not overtighten. If threads are damaged, contact support for replacement parts. |
9. אחריות ותמיכה
CROSSIO is committed to providing quality products and customer satisfaction.
- 1 שנות אחריות: This product is covered by a 1-year warranty. Contact us for free replacement if any quality issues arise within this period.
- Quality Service: If you have any questions or require assistance, our customer service team is available to provide a solution within 24 hours.
- Customization Service: For specific product customization inquiries, please feel free to contact us for consultation.

Image 9.1: CROSSIO Warranty and Service Information.
לתמיכה, אנא בקרו באתר חנות CROSSIO באמזון או צרו איתנו קשר ישירות דרך פלטפורמת הרכישה שלכם.