
1. הקדמה
This manual provides detailed instructions for the installation, operation, and maintenance of your plplaaoo 100A MPPT Solar Charge Controller. This advanced controller is designed to optimize energy harvest from your solar panels and manage battery charging efficiently for 12V, 24V, 36V, and 48V solar power systems. Please read this manual thoroughly before installation and use to ensure proper function and safety.
2. הוראות בטיחות
אנא הקפידו על אמצעי הזהירות הבאים במהלך ההתקנה והתפעול:
- Ensure all wiring is correctly connected and securely fastened to prevent loose connections and overheating.
- יש לנתק תמיד את הפאנל הסולארי ואת הסוללה לפני התקנה או כוונון הבקר.
- Use appropriate tools and wear protective gear, including eye protection, during installation.
- Install the controller in a well-ventilated area, away from flammable gases and liquids.
- אין לפרק או לנסות לתקן את הבקר בעצמך. פנה לאנשי מקצוע מוסמכים לקבלת שירות.
- Ensure the battery bank is properly sized and compatible with the controller's voltage ודירוגים נוכחיים.
- הימנע מקצר חשמלי בין הפאנל הסולארי, הסוללה או הדקי העומס.
3. תכונות מוצר
- מעקב אחר נקודות הספק מקסימליות (MPPT): Achieves up to 98% conversion efficiency by intelligently tracking the maximum power point of solar panels under varying conditions.
- כרך אוטומטיtage Adaptation: Automatically detects and adapts to 12V, 24V, 36V, or 48V battery systems.
- בקרה רב תכליתית: Supports various operating modes including PWM charging, constant current output, and voltagתקנה e.
- Integrated USB and DC Outputs: Features dual 5V 1A USB ports and a 2A DC output for charging external devices.
- הגנה מקיפה: Includes safeguards against overvoltage, overcurrent, overtemperature, overload, short circuits, and reverse polarity.
- ממשק ידידותי למשתמש: Equipped with a backlit LCD display for real-time monitoring and intuitive buttons for configuration.
- בנייה עמידה: Features an aluminum heatsink for efficient cooling and robust design for harsh environments (0°C to 60°C).
- תאימות סוללה: Compatible with gel, sealed lead-acid, and lithium batteries.
4. תכולת החבילה
- 1 x plplaaoo 100A MPPT Solar Charge Controller
- 1 x מדריך למשתמש
5. המוצר נגמרview ורכיבים
Familiarize yourself with the main components and interface of the solar charge controller.

איור 5.1: חֲזִית view of the solar charge controller, highlighting the LCD screen and various connection terminals.
The controller features an intuitive LCD display and clearly labeled ports for easy connection. The display provides real-time information about the system's status.
איור 5.2: מְפוֹרָט view of the controller's connection ports.

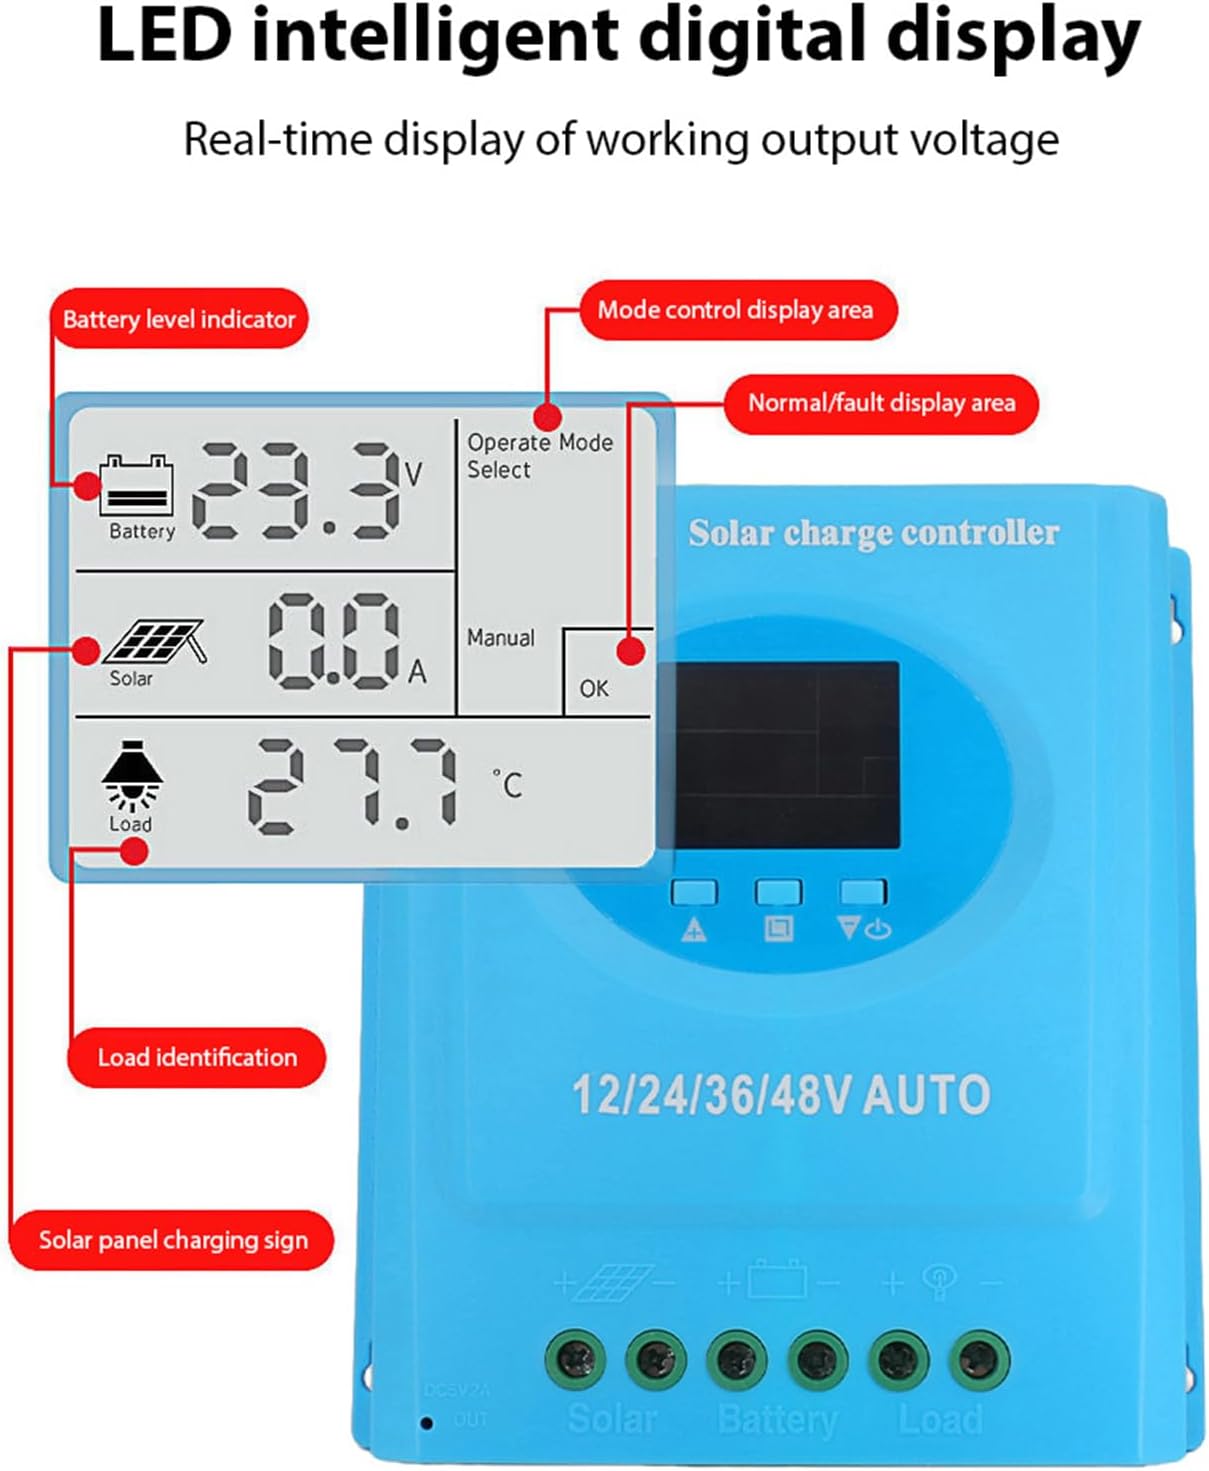
איור 5.3: מְפוֹרָט view of the LCD display, indicating battery level, solar panel charging sign, load identification, operating mode, and real-time voltage.
5.1. יציאות חיבור
- ממשק USB כפול: Two 5V 1A USB ports for charging mobile devices.
- יציאת פאנל סולארי: Connects to your solar panels (positive and negative).
- יציאת סוללה: Connects to your battery bank (positive and negative).
- יציאת טעינה DC: Connects to your DC loads (positive and negative).
- יציאת פלט DC: יציאת DC נוספת.
6. התקנה והתקנה
Follow these steps for proper installation of the solar charge controller. Ensure all power sources are disconnected before beginning.
6.1. שיטת החיווט
חברו את הרכיבים בסדר הבא כדי למנוע נזק:
- חבר את הסוללה: Connect the battery to the controller's battery terminals (positive to positive, negative to negative). The controller will automatically detect the battery voltage.
- חבר את הפנל הסולארי: Connect the solar panel to the controller's solar panel terminals (positive to positive, negative to negative).
- חבר את עומס הזרם הישיר: Connect the DC load to the controller's load terminals (positive to positive, negative to negative).
חָשׁוּב: תמיד חברו תחילה את הסוללה, לאחר מכן את הפאנל הסולארי, ולבסוף את המטען. נתק את המכשיר בסדר הפוך.

איור 6.1: Solar energy system wiring diagram. Note the correct polarity for all connections.
6.2. הַרכָּבָה
Mount the controller vertically on a flat surface in a well-ventilated area, ensuring adequate clearance for air circulation around the heatsink. Avoid direct sunlight, high temperatures, and humid environments.
7. הוראות הפעלה
Once installed, the controller will automatically begin operating. The LCD display provides real-time system status.
7.1. מידע תצוגת LCD
The LCD screen displays various parameters:
- מחוון רמת הסוללה: Shows the current charge status of the battery.
- Solar Panel Charging Sign: Indicates when the solar panels are actively charging the battery.
- Load Identification: Shows the status of the connected DC load.
- Operating Mode Display Area: Displays the current operating mode (e.g., manual, automatic).
- Normal/Fault Display Area: Indicates normal operation or displays error codes if a fault occurs.
- Real-time Working Output Voltage: מציג את עוצמת הקול הנוכחיתtagה של המערכת.
7.2. פונקציות כפתור
The controller typically features multiple buttons for navigation and setting adjustments:
- לחצן תפריט: Used to enter and exit the menu settings.
- לחצנים למעלה/למטה: Used to navigate through menu options and adjust parameter values.
- לחצן אישור: Used to confirm selections and save settings.
Refer to the on-screen menu for specific parameter adjustments such as battery type, load control mode, and charging thresholds.
8. תחזוקה
תחזוקה שוטפת מבטיחה ביצועים אופטימליים ואורך חיים של בקר הטעינה הסולארי שלך.
- ניקוי: יש לנקות מעת לעת את החלק החיצוני של הבקר בעזרת מטלית יבשה כדי להסיר אבק ופסולת. יש לוודא שפתחי האוורור נקיים.
- בדיקת חיבור: Annually inspect all wiring connections for tightness and corrosion. Re-tighten if necessary.
- בדיקה סביבתית: Ensure the installation environment remains within the specified operating temperature range and is free from excessive moisture or dust.
- בדיקת סוללה: Regularly check the battery terminals for corrosion and ensure the battery is in good condition.
9. פתרון תקלות
אם נתקלתם בבעיות בבקר הטעינה הסולארי שלכם, עיינו בבעיות הנפוצות ובפתרונות הבאים:
| בְּעָיָה | סיבה אפשרית | פִּתָרוֹן |
|---|---|---|
| הבקר לא נדלק / מסך LCD ריק |
|
|
| סוללה לא נטענת |
|
|
| טעינה לא עובדת |
|
|
| קוד שגיאה מוצג | תקלה ספציפית במערכת. | Refer to the controller's display for the specific error code and consult the full product documentation or contact support for detailed interpretation and resolution. |
10. מפרטים
| פָּרָמֶטֶר | עֵרֶך |
|---|---|
| דֶגֶם | plplaaoozi6egog4wm-0A |
| מותג | plplaaoo |
| נוכחי מדורג | 100A |
| מערכת כרךtage | 12V / 24V / 36V / 48V Automatic Adaptation |
| סוג טעינה | MPPT (מעקב אחר נקודות כוח מקסימליות) |
| יעילות המרה | עד 98% |
| יציאת USB | Dual 5V 1A ports |
| פלט DC | 2A |
| טמפרטורת הפעלה | 0 מעלות צלזיוס עד 60 מעלות צלזיוס |
| מידות (בערך) | 19.5 ס"מ x 18.3 ס"מ x 6.8 ס"מ (7.7 אינץ' x 7.2 אינץ' x 2.7 אינץ') |

איור 10.1: מידות משוערות של בקר טעינה סולארי.
11. אחריות ותמיכה
למידע על אחריות, תמיכה טכנית או שאלות בנוגע לשירות, אנא צרו קשר ישירות עם הקמעונאי או היצרן. שמרו את קבלת הרכישה כהוכחת קנייה.