
Vetroo M06
Vetroo M06 Micro-ATX/Mini-ITX Gaming PC Case Instruction Manual
דגם: M06
מָבוֹא
This manual provides detailed instructions for the installation, operation, and maintenance of your Vetroo M06 Micro-ATX/Mini-ITX Gaming PC Case. Please read this manual thoroughly before beginning assembly to ensure proper setup and optimal performance.

Image: The Vetroo M06 Micro-ATX/Mini-ITX Gaming PC Case in black, showcasing its mesh front panel and side window, viewed מזווית.
תכונות מפתח
- עיצוב קומפקטי: Micro-ATX / Mini-ITX form factor with a high-airflow mesh front panel, designed for space-efficient builds.
- קירור אופטימלי: Supports up to five 120mm fans and a 240mm top-mounted liquid radiator for efficient thermal management.
- תאימות GPU: Accommodates graphics cards up to 355mm in length.
- Flexible PSU Mounting: Features an adjustable power supply installation area with a maximum length of 160mm.
- קישוריות מודרנית: Front panel includes USB Type-C and USB 3.0 ports for convenient peripheral access.
תוכן החבילה
אנא ודא שכל הרכיבים קיימים לפני שתמשיך בהתקנה:
- Vetroo M06 PC Case
- קופסת אביזרים (ברגים, מעמדים, אזיקוני כבלים)
- SFX PSU Bracket (1x)
- מדריך למשתמש (מסמך זה)
מפרטים
| תכונה | פְּרָט |
|---|---|
| שם הדגם | M06 |
| סוג מקרה | מיני-מגדל |
| תאימות לוח אם | מיקרו ATX, מיני ITX |
| מידות המוצר (L x W x H) | 15.55 אינץ' x 7.87 אינץ' x 13.07 אינץ' (395 מ"מ x 200 מ"מ x 332 מ"מ) |
| משקל פריט | 13.37 פאונד (6.06 ק"ג) |
| חוֹמֶר | Acrylonitrile Butadiene Styrene (ABS), SPCC (0.8mm metal plate) |
| אורך GPU מקסימלי | 355 מ"מ |
| מקסימום גובה מצנן מעבד | 165 מ"מ |
| אורך PSU מקסימלי | 160mm (Adjustable mounting) |
| תמיכת מעריצים | מאווררים של עד 5X120 מ"מ |
| תמיכת רדיאטור | 1 x 240mm (Top) |
| יציאות קלט / פלט קדמיות | 1 x USB Type-C, 1 x USB 3.0, HD Audio, Power Button, Reset Button |

Image: Diagram illustrating the compact dimensions of the Vetroo M06 PC case, measuring 15.5 inches in depth, 7.8 inches in width, and 13.0 inches in height.

Image: A detailed diagram outlining the compatibility specifications for the Vetroo M06 PC case, including maximum CPU cooler height (165mm), GPU length (355mm), PSU length (160mm), and supported motherboard form factors (M-ATX/ITX).
התקנה והתקנה
Before starting, ensure you have a clean, static-free workspace. Refer to your component manuals for specific installation details.
1. התקנת לוח אם
- Remove the side panel(s) of the case.
- Install the necessary motherboard standoffs into the case tray according to your motherboard's form factor (Micro-ATX or Mini-ITX).
- הנח בזהירות את לוח האם שלך על המעמדים, תוך יישור חורי הברגים.
- אבטח את לוח האם באמצעות ברגים.
2. התקנת כרטיס מסך
- Remove the appropriate PCIe slot covers from the rear of the case.
- Insert your graphics card into the primary PCIe slot on your motherboard.
- חברו את כרטיס המסך למארז בעזרת ברגים.
- Connect any required PCIe power cables from your power supply to the GPU.
3. התקנת PSU
- Determine the desired mounting position for your power supply. The Vetroo M06 supports adjustable PSU mounting.
- If using an SFX power supply, attach the included SFX bracket to the PSU.
- Slide the power supply into its designated bay and secure it with screws from the rear of the case.
- Route the necessary power cables to your components.

תמונה: פנימי view of the Vetroo M06 PC case highlighting the three adjustable mounting positions for ATX/SFX power supplies, along with an illustration of the included SFX bracket.
4. Storage Installation (HDD/SSD)
- Locate the designated mounting points for 3.5" HDDs and 2.5" SSDs.
- Secure your storage drives using the provided screws.
- Connect SATA data and power cables to each drive.
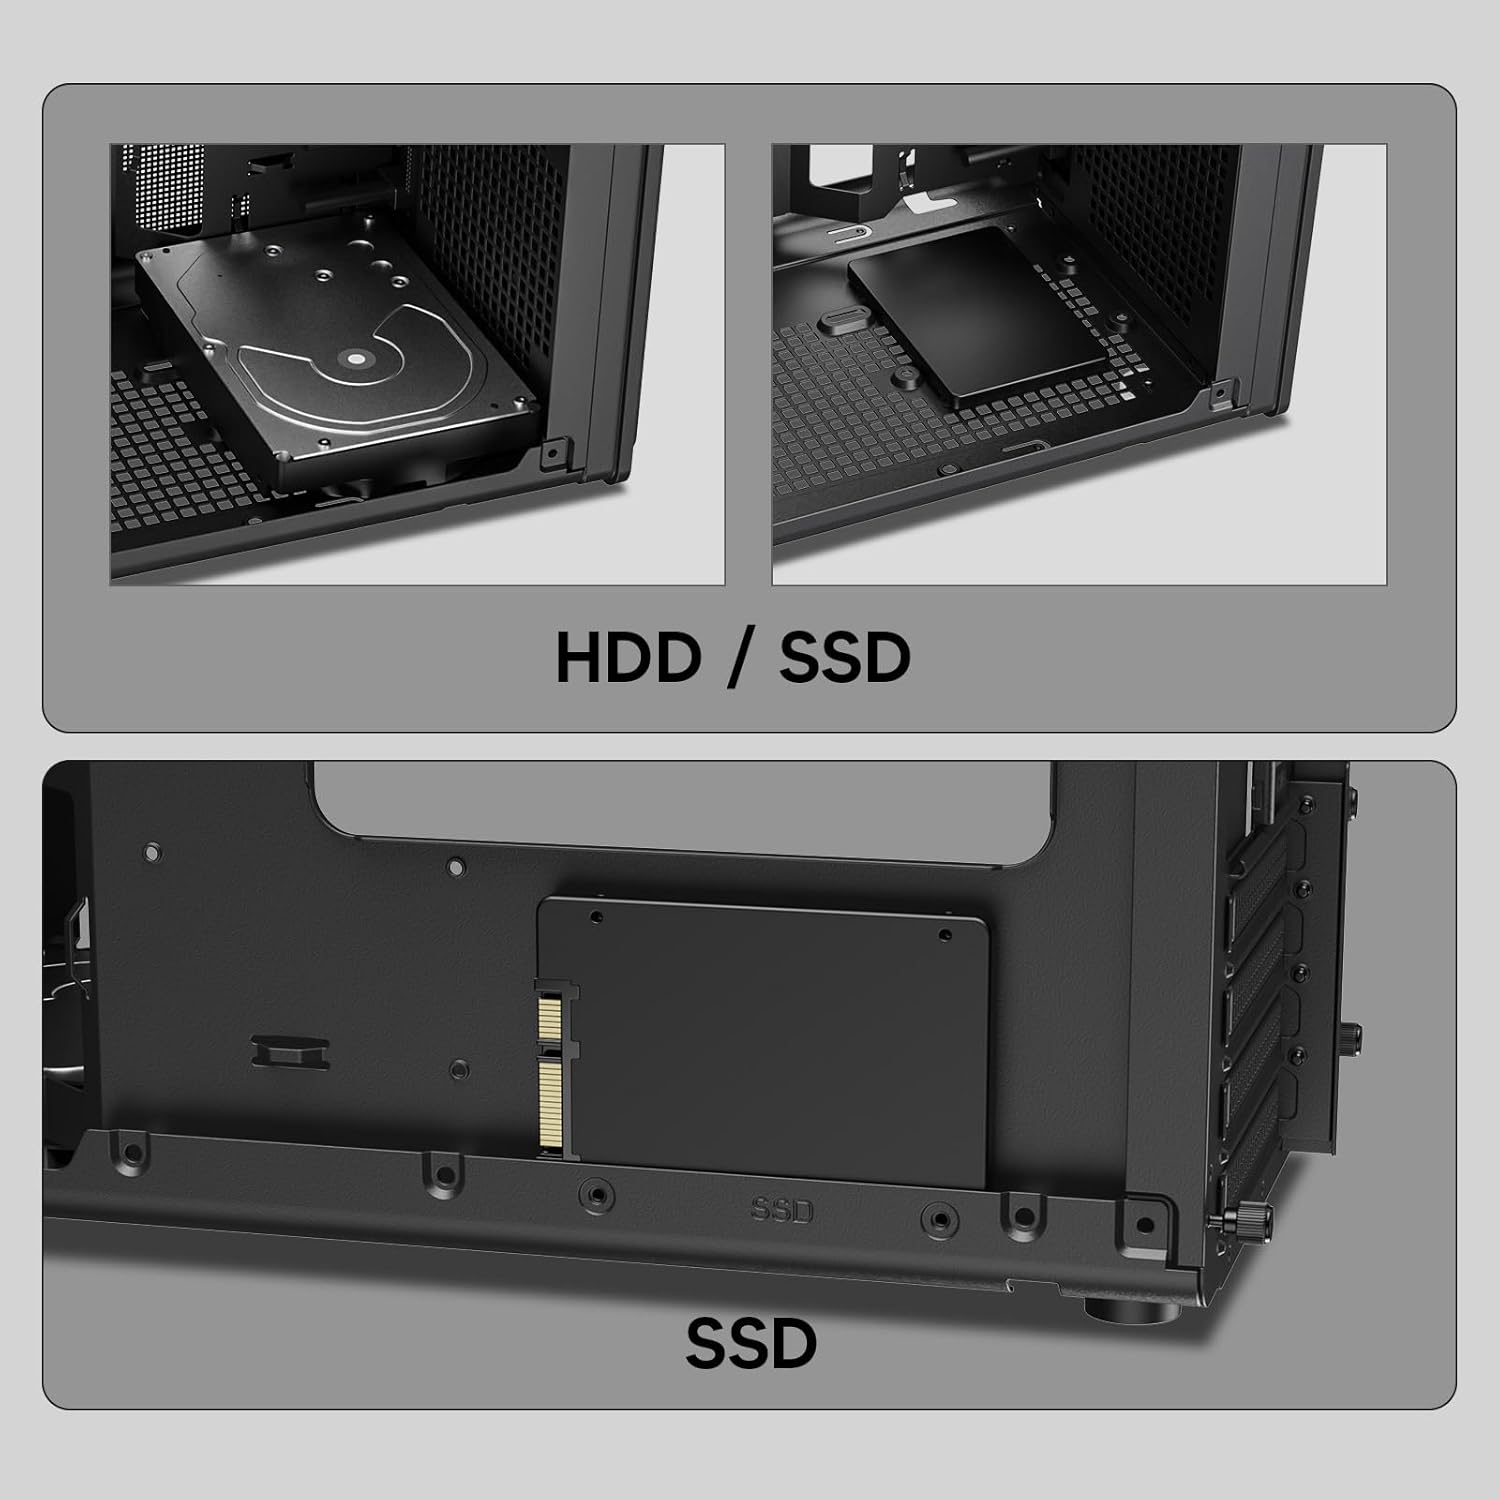
תמונה: תקריב views of the Vetroo M06 PC case interior, demonstrating the mounting options for both 3.5-inch Hard Disk Drives (HDDs) and 2.5-inch Solid State Drives (SSDs).
5. Cooling System Installation (Fans/Radiator)
- Identify the fan mounting locations (up to five 120mm fans).
- Mount fans using appropriate screws, ensuring correct airflow direction.
- For liquid cooling, install a 240mm radiator at the top mounting position, securing it with screws.
- Connect fan and pump cables to your motherboard or fan controller.
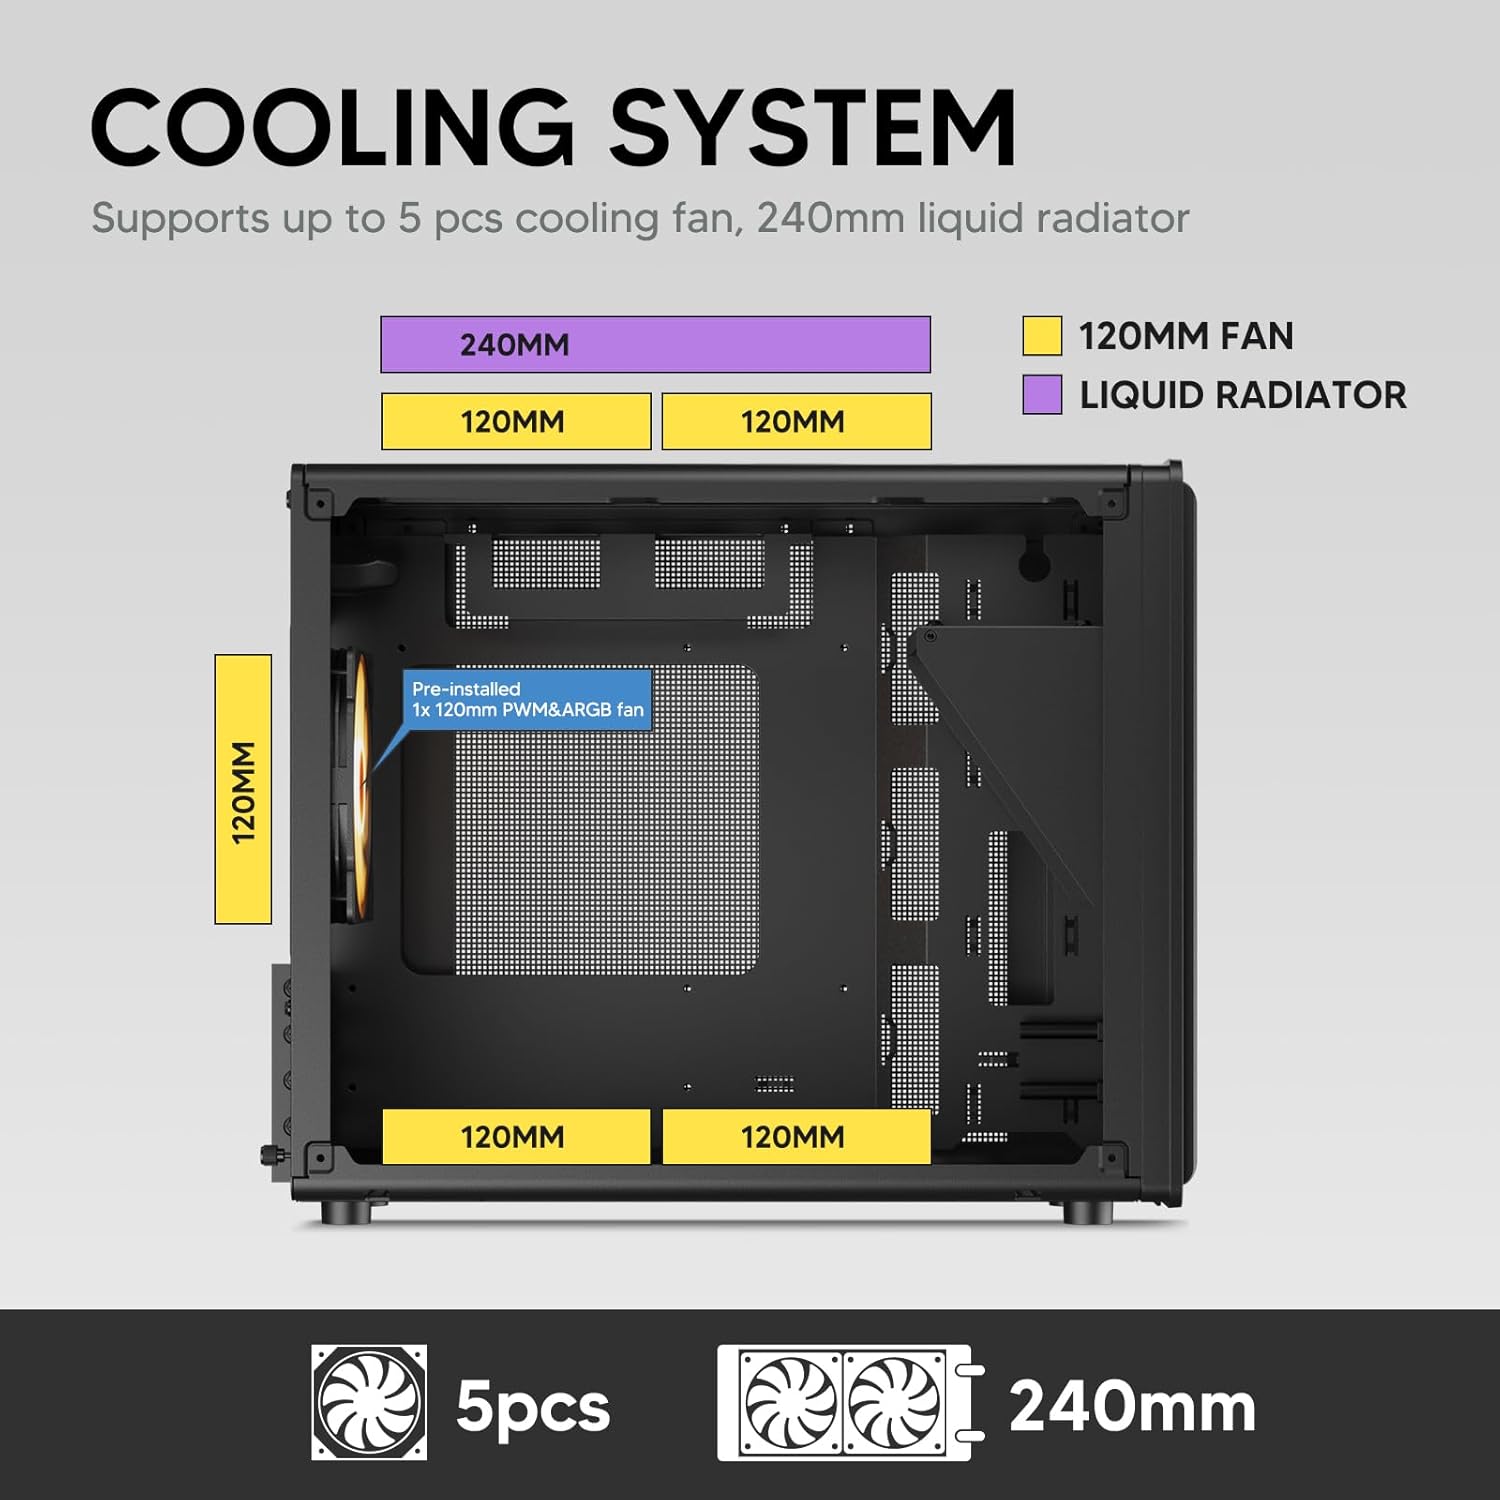
Image: A diagram illustrating the cooling system layout within the Vetroo M06 PC case, detailing the positions for up to five 120mm fans and a 240mm liquid radiator at the top.
6. חיבורי לוח קלט/פלט
- Connect the front panel cables (Power, Reset, USB 3.0, USB Type-C, HD Audio) to the corresponding headers on your motherboard. Refer to your motherboard manual for header locations.

Image: A close-up of the Vetroo M06 PC case's front I/O panel, clearly labeling the Power button, Reset button, USB 3.0 port, HD Audio jack, and USB Type-C port.
הוראות הפעלה
Once all components are installed and cables are connected, replace the side panels. Connect your peripherals (monitor, keyboard, mouse) and power cable to the PSU. Press the power button on the front panel to start your system.
ניהול זרימת אוויר
The Vetroo M06 case features an excellent airflow design with mesh panels to facilitate optimal cooling. Ensure fans are installed to create a balanced airflow, typically with intake fans at the front/bottom and exhaust fans at the rear/top.

Image: An exploded diagram of the Vetroo M06 PC case, illustrating the intended airflow patterns with blue arrows indicating cool air intake and red arrows showing warm air exhaust through its mesh panels.
תַחזוּקָה
Regular maintenance helps prolong the life of your PC components and ensures optimal performance.
- ניקוי אבק: יש לנקות מעת לעת את מסנני האבק והרכיבים הפנימיים באמצעות אוויר דחוס. יש לוודא שהמערכת כבויה ומנותקת מהחשמל לפני הניקוי.
- ניהול כבלים: Verify that internal cables are neatly routed and do not obstruct airflow.
- בדיקות רכיבים: Ensure all screws are tight and components are securely seated.

Image: A close-up shot of the Vetroo M06 PC case, featuring a digital caliper measuring the thickness of the metal plate, which is specified as 0.8mm, highlighting the case's robust construction.
פתרון בעיות
אם נתקלת בבעיות, עיין בשלבים הנפוצים הבאים לפתרון בעיות:
- המערכת לא נדלקת:
- Check all power connections, including the PSU to wall outlet, PSU to motherboard (24-pin and CPU 8-pin), and front panel power switch cable to motherboard.
- ודא שמתג ספק הכוח נמצא במצב 'ON'.
- אין פלט תצוגה:
- Verify that your monitor is connected to the graphics card (not the motherboard's integrated graphics ports, unless you are using integrated graphics).
- התקן מחדש את כרטיס המסך ואת מודולי ה-RAM.
- בעיות התחממות יתר:
- Ensure all case fans are spinning and oriented correctly for optimal airflow.
- Check CPU cooler installation and thermal paste application.
- Clean any dust buildup from fans and filters.
- יציאות USB לא פועלות:
- Verify that the front panel USB 3.0 and USB Type-C cables are correctly connected to the motherboard headers.
אחריות ותמיכה
Vetroo products are designed for quality and reliability. For warranty information and technical support, please visit the official Vetroo webאתר או צרו קשר עם שירות הלקוחות שלהם. שמרו את הוכחת הרכישה שלכם לצורך תביעות אחריות.
Vetroo Official Webאֲתַר: Vetroo Store on Amazon
For further assistance, please refer to the contact information provided with your product packaging or on the official Vetroo support channels.
Ask a question about this manual
Ask about setup, troubleshooting, compatibility, parts, safety, or missing instructions. Manuals+ will review the question and use this page’s manual context to help answer it.