1. הקדמה
This manual provides comprehensive instructions for the Denash X99D3M M ATX Motherboard. It is designed to assist users with the proper installation, configuration, and maintenance of the motherboard to ensure stable and efficient operation of your computer system. Please read this manual thoroughly before proceeding with installation.

תמונה 1.1: נגמרview of the Denash X99D3M M ATX Motherboard. This image displays the general layout of the motherboard, highlighting key components such as the CPU socket, RAM slots, and various expansion ports.
2. תכונות מוצר
- תמיכה במעבד: Designed for LGA 2011-3 sockets, supporting E5 V3/V4 and i7 58xx/68xx series CPUs.
- זֵכֶר: Features 4 x DDR4 DIMM slots, supporting up to 128GB of DDR4 2666, 2400, or 2133MHz memory.
- אִחסוּן: Equipped with 4 x SATA 2.0 ports and 1 x NVME M.2 interface (supporting NGFF and NVME protocols).
- הַרחָבָה: Includes 1 x PCIE x16 graphics card slot and 1 x PCIE X1 slot.
- קישוריות: Offers 4 x USB 2.0 and 4 x USB 3.0 ports, 1 x RJ45 network port, and PS/2 keyboard/mouse universal port.
- עֲמִידוּת: Constructed with metal and PCB materials, featuring all solid-state capacitors for stable performance and extended lifespan.
3. תכולת החבילה
ודא שכל הפריטים נמצאים בחבילה:
- 1 x Denash X99D3M M ATX Motherboard
- 1 x לוחית קלט/פלט ממתכת
- 1 x כבל נתונים SATA
4. התקנה והתקנה
Before beginning installation, ensure your workspace is clean, well-lit, and static-free. It is recommended to wear an anti-static wrist strap to prevent damage to components.
4.1. התקנת מעבד
- אתר את שקע המעבד LGA 2011-3 בלוח האם.
- Gently push down the load lever and pull it away from the socket to open the CPU retention frame.
- יישר בזהירות את המעבד עם השקע, וודא שהמשולש הזהוב על המעבד תואם למשולש שעל השקע. אל תכריח את המעבד למקומו.
- Lower the CPU into the socket. Close the retention frame and secure it with the load lever.
- מרחו משחה תרמית על המעבד והתקינו את מקרר המעבד בהתאם להוראות היצרן.

Image 4.1: Close-up of the LGA 2011-3 CPU socket. This image shows the socket where the processor is installed, emphasizing the retention mechanism.
4.2. התקנת זיכרון (RAM)
- פתחו את הקליפסים בשני קצוות חריצי ה-DDR4 DIMM.
- יישר את החריץ במודול ה-RAM עם המפתח בחריץ ה-DIMM.
- לחץ בחוזקה על שני קצוות מודול ה-RAM עד שהקליפסים יתייצבו במקומם.

תמונה 4.2: View of the four DDR4 DIMM slots. This image illustrates the memory slots where RAM modules are to be installed.
4.3. התקנת התקן אחסון (SATA ו-M.2)
- כונני SATA: Connect SATA data cables from your storage drives (HDDs/SSDs) to the SATA 2.0 ports on the motherboard. Connect SATA power cables from your power supply to the drives.
- SSD מסוג M.2 NVME: Locate the M.2 slot. Insert the M.2 SSD at a 30-degree angle, then gently push it down and secure it with the provided screw. Ensure the jumper switch for the M.2 interface is set correctly for Serial ATA or PCIE mode as required by your M.2 device.

Image 4.3: Close-up of the SATA 2.0 ports and M.2 NVME interface. This image details the connectivity options for storage devices.
4.4. חיבורי חשמל
- חבר את מחבר החשמל ATX בעל 24 הפינים מספק הכוח שלך לשקע החשמל הראשי בלוח האם.
- Connect the 8-pin CPU power connector (EPS12V) from your power supply to the CPU power socket near the CPU.
4.5. חיבורי לוח קדמי וקלט/פלט
- Connect the front panel headers (power switch, reset switch, HDD LED, power LED) to their respective pins on the motherboard. Refer to the motherboard's silkscreen labels for correct orientation.
- Connect USB 2.0 and USB 3.0 front panel cables to the corresponding USB headers.
- Connect the audio front panel cable to the audio header.
- Install your graphics card into the PCIE x16 slot and secure it.
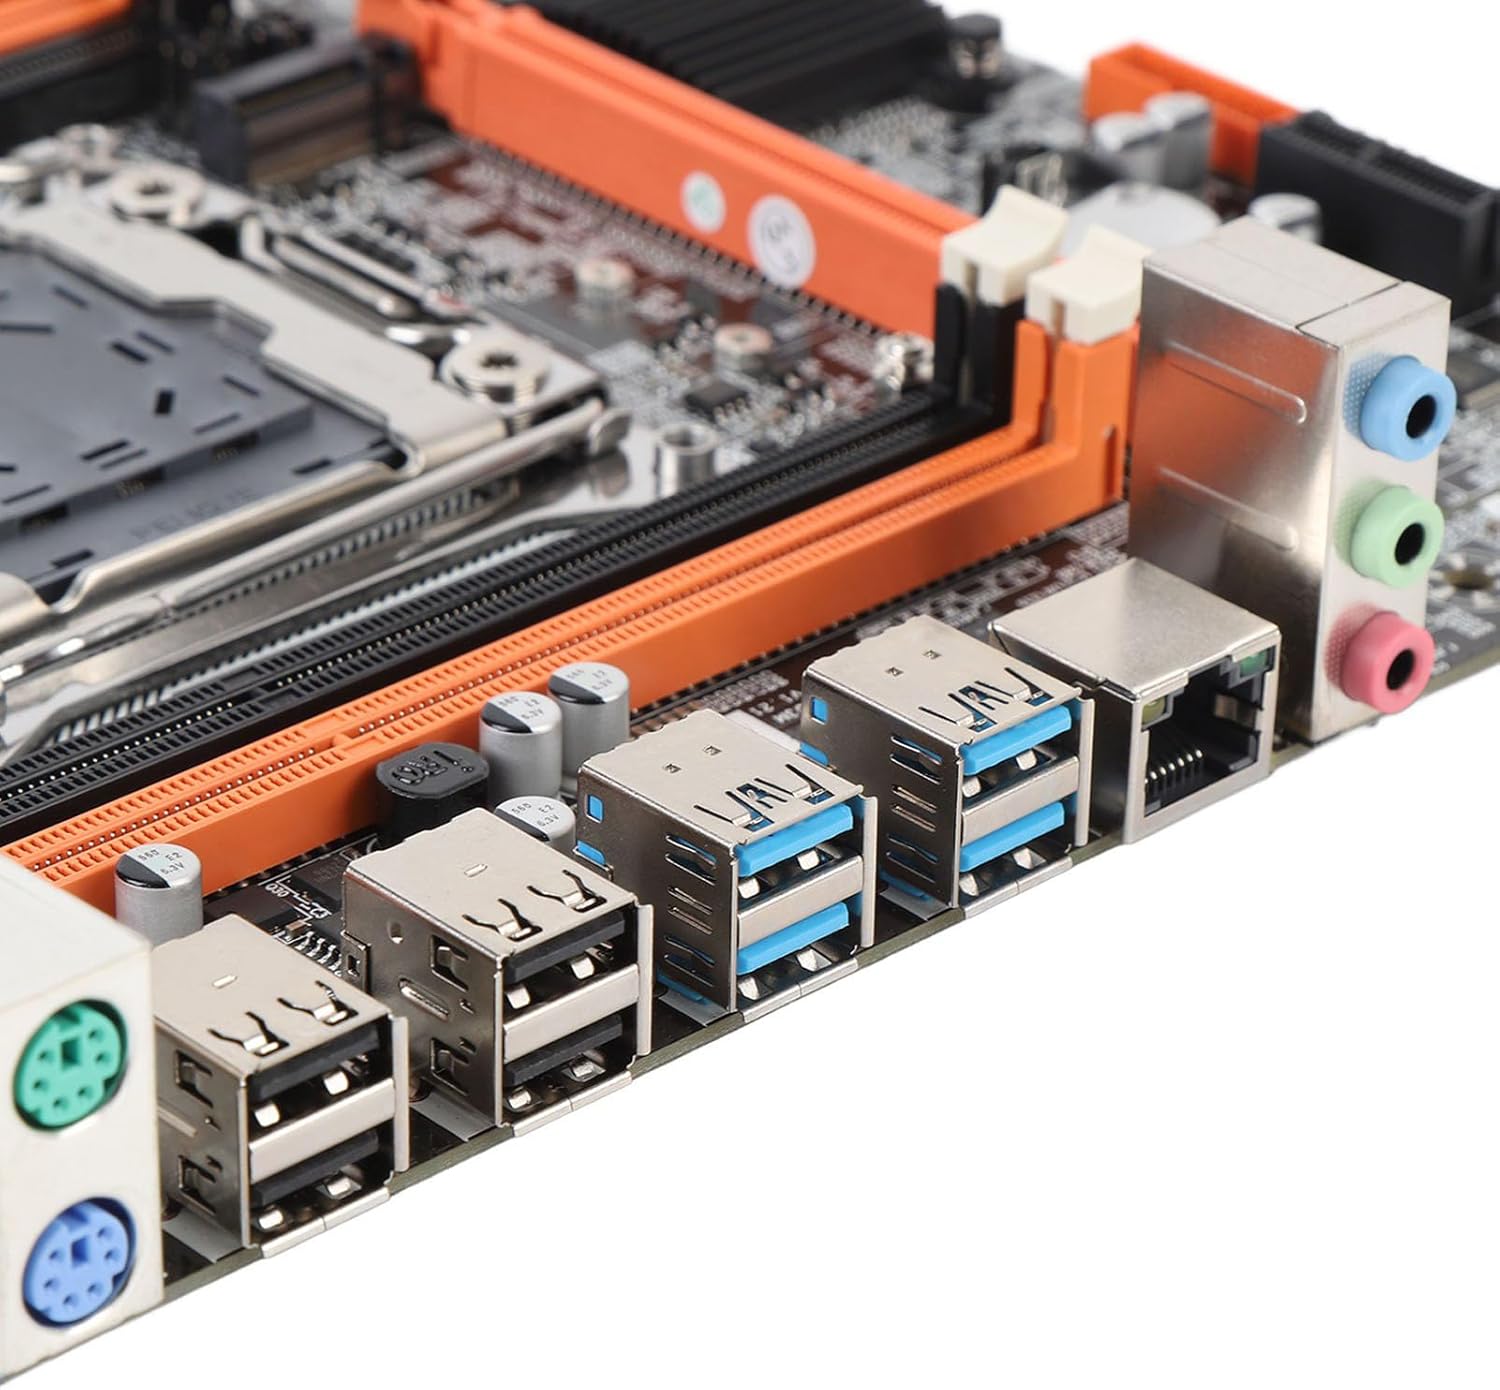
Image 4.4: Rear I/O ports including USB, LAN, and audio jacks. This image shows the external connectivity options available on the motherboard.
5. הוראות הפעלה
5.1. אתחול ראשוני
- לאחר השלמת כל התקנות החומרה, חבר את הצג, המקלדת והעכבר.
- Power on your system. The system should display the BIOS/UEFI splash screen.
- לחץ על המקש המיועד (בדרך כלל DEL or F2) during boot to enter the BIOS/UEFI setup.
5.2. תצורת BIOS/UEFI
In the BIOS/UEFI, you can configure various system settings, including boot order, date/time, and hardware parameters. Ensure your boot device (e.g., SSD with OS) is prioritized in the boot sequence.
5.3. התקנת דרייבר
After installing your operating system, install the necessary drivers for the motherboard chipset, network, audio, and any other integrated components. These drivers are typically provided on a CD/DVD or can be downloaded from the manufacturer's webאֲתַר.
6. מפרטים
| סוג פריט | לוח אם |
| Motherboard Architecture | M ATX |
| ערכת שבבים | X99H |
| Supported CPU Types | for LGA 2011-3 (E5 V3/V4, i7 58xx/68xx) |
| סוג זיכרון | DDR4 2666, 2400, 2133MHz |
| חריצי זיכרון | 4 × DDR4 DIMM (Max 128GB) |
| Onboard Network Card | כֵּן |
| Graphics Card Standard | PCI Express 16X |
| יציאות USB | 4x USB 2.0, 4x USB 3.0 |
| Serial ATA Ports | 4 x Serial ATA 2.0 |
| סוללה מובנית | CR2032 x 1 (240mAh) |
| חריצי הרחבה | 1 x PCIE x16, 1 x PCIE X1, 1 x NVME M.2 Interface |
| יציאות I/O | PS/2, 1 x RJ45, USB 2.0, USB 3.0, Audio |
| מידות המוצר | 10.24 x 7.87 x 1.97 אינץ' |
| משקל פריט | 1.46 פאונד |
| מספר דגם | Denashckge97d20i |
7. פתרון תקלות
- אין כוח: ודא שכל כבלי החשמל (ATX 24 פינים, מעבד 8 פינים) מחוברים היטב ללוח האם ולספק החשמל. ודא שמתג ספק הכוח פועל.
- אין תצוגה: Check that the monitor is connected to the graphics card (not the motherboard's I/O if a dedicated GPU is installed). Reseat the graphics card and RAM modules.
- חוסר יציבות/קריסות מערכת: This can be caused by incompatible RAM, insufficient power, or overheating. Verify RAM compatibility and seating. Check CPU cooler installation and fan operation.
- לא זוהה ציוד היקפי: Ensure USB devices are properly connected. Try different USB ports. Check for necessary drivers.
- איפוס BIOS: If system settings become unstable, you can clear the CMOS by removing the CR2032 battery for a few minutes or using the CMOS clear jumper (refer to motherboard diagram for location).
8. תחזוקה
- ניקוי: יש לנקות באופן קבוע אבק מלוח האם והרכיבים באמצעות אוויר דחוס. יש לוודא שהמערכת כבויה ומנותקת מהחשמל לפני הניקוי.
- עדכוני BIOS/UEFI: בדקו מעת לעת את הוראות היצרן webאתר לעדכוני BIOS/UEFI. עדכונים יכולים לשפר את היציבות, התאימות והביצועים. יש לפעול בקפידה אחר הוראות העדכון כדי למנוע נזק ללוח האם.
- ניהול כבלים: ודא שהכבלים מנותבים בצורה מסודרת כדי לשפר את זרימת האוויר ולמנוע הפרעות.

Image 8.1: Close-up of solid-state capacitors. These components contribute to the motherboard's stable performance and longevity.
9. אחריות ותמיכה
For warranty information and technical support, please refer to the documentation provided with your purchase or visit the official Denash webאתר. שמור את הוכחת הרכישה שלך לצורך תביעות אחריות.