JEYI PCIe 5.0 NVMe Heatsink
JEYI PCIe 5.0 M.2 NVMe Adapter Card with Aluminum Heatsink User Manual
Model: PCIe 5.0 NVMe Heatsink | Brand: JEYI
מָבוֹא
This manual provides comprehensive instructions for the installation, operation, and maintenance of the JEYI PCIe 5.0 M.2 NVMe Adapter Card with Aluminum Heatsink. This adapter is designed to expand high-speed storage capabilities in desktop, workstation, and server PCs by utilizing PCIe 5.0 slots for M.2 NVMe SSDs.
מידע בטיחות
- Ensure your computer is powered off and unplugged before installation.
- פרוק כל חשמל סטטי מגופך לפני טיפול ברכיבים.
- Handle the adapter card and SSDs with care to avoid damage to sensitive electronic components.
- Refer to your motherboard's manual for specific PCIe slot information and compatibility.
תוכן החבילה
ודא שכל הפריטים נמצאים בחבילה:
- JEYI PCIe 5.0 to M.2 NVMe Adapter Card
- תושבת גובה סטנדרטית
- Pro נמוךfile סוֹגֵר
- מַברֵג
- Thermal Pads (3 pieces)
- ברגי הרכבה (8 חלקים)
- Heatsink Securing Screw
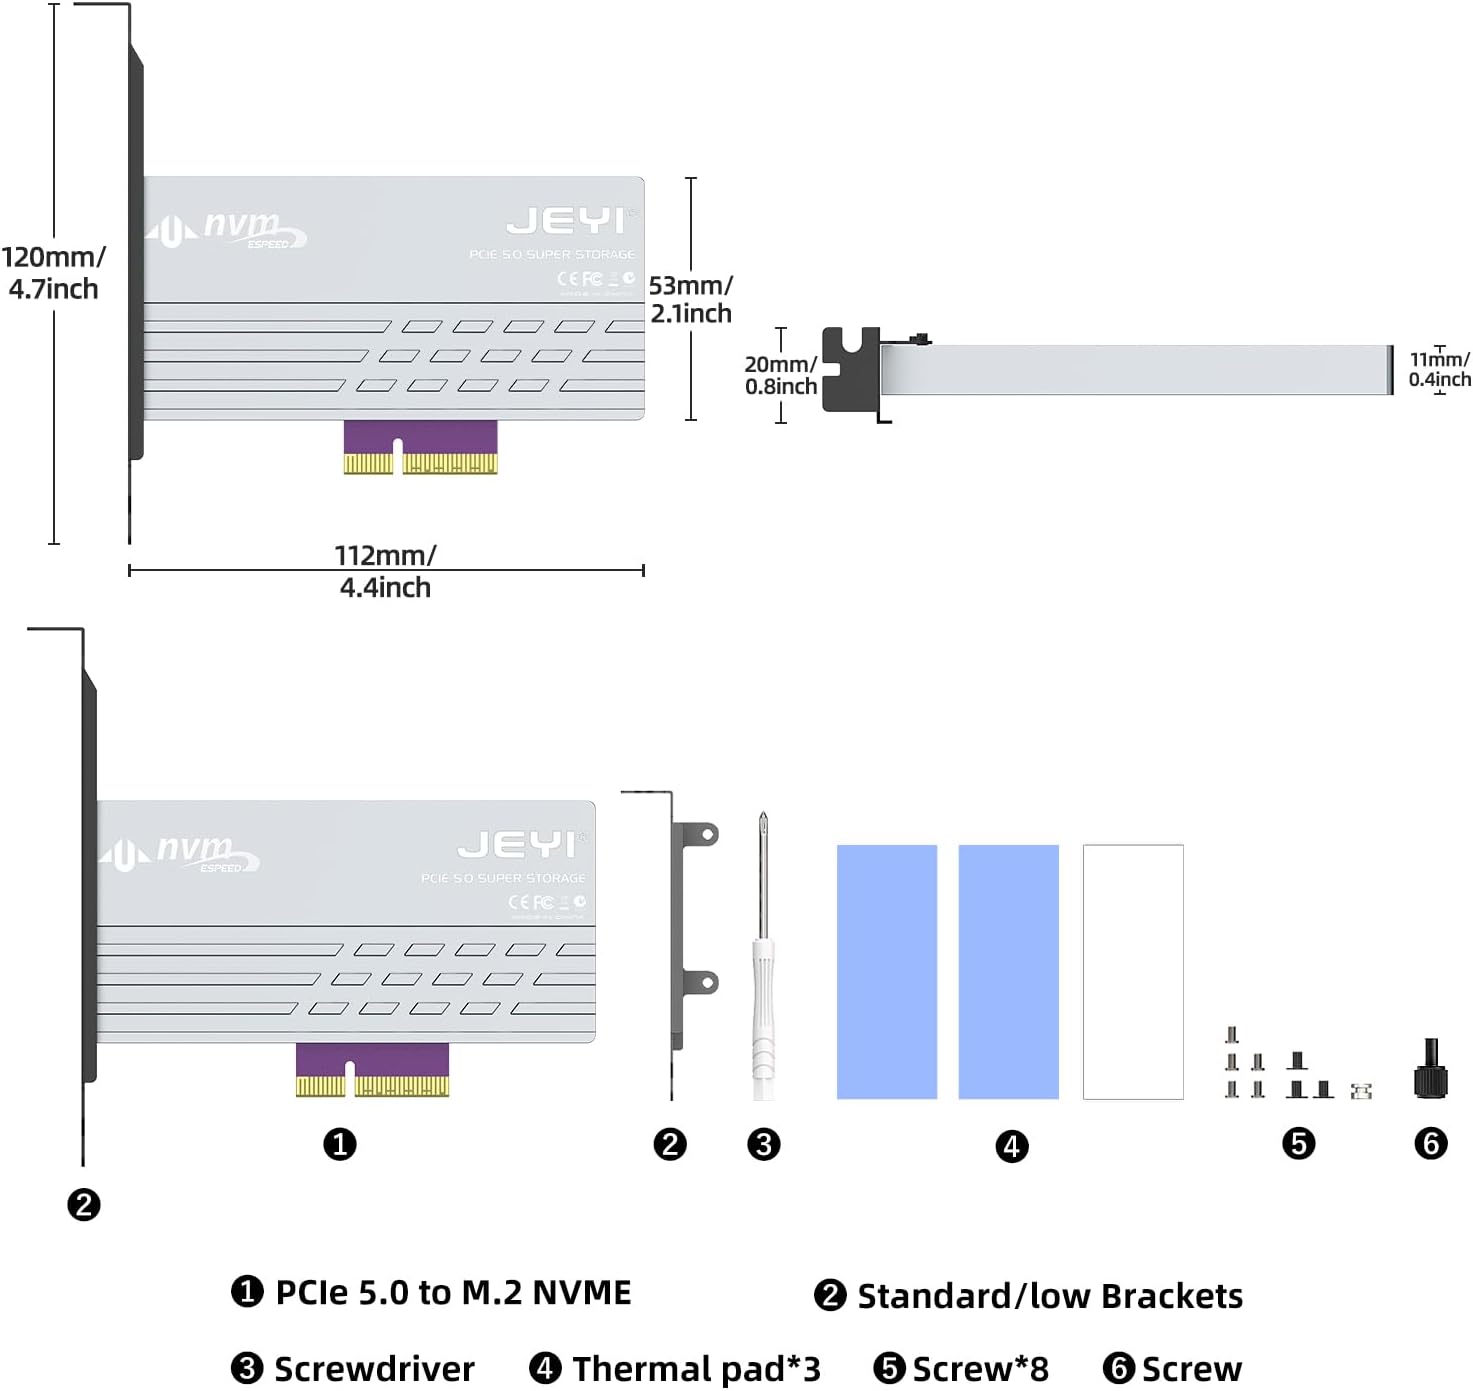
Image: Contents of the JEYI PCIe 5.0 M.2 NVMe Adapter Card package. It includes the adapter card, standard and low-profile brackets, a screwdriver, thermal pads, and various screws for installation.
התקנה והתקנה
Follow these steps to install your M.2 NVMe SSD onto the adapter card and then install the card into your computer.
1. SSD Installation onto Adapter Card
- Remove Heatsink Screws: Locate and remove the screws securing the aluminum heatsink to the adapter card. Carefully detach the heatsink.
Video: This video demonstrates the unboxing and installation process for the JEYI PCIe 5.0 M.2 NVMe Adapter Card. It shows how to remove the heatsink, install an M.2 SSD, and secure the bracket.
- Insert M.2 NVMe SSD: Gently insert your M.2 NVMe SSD into the M.2 slot on the adapter card. Ensure it is fully seated.

Image: Step-by-step visual guide for installing the M.2 SSD onto the adapter card, including inserting the SSD and securing it with a screw.
- SSD מאובטח: Use the provided screw to secure the M.2 NVMe SSD in place on the adapter card.
- הנח רפידות תרמיות: Place the thermal pads onto the M.2 NVMe SSD, ensuring good contact with the SSD's chips.
- Reattach Heatsink: Carefully place the aluminum heatsink back onto the adapter card, aligning it with the screw holes. Secure it with the previously removed screws.
- חבר את התושבת: Choose the appropriate bracket (standard or low-profile) for your PC case. Attach it to the adapter card using the provided screws.
2. Adapter Card Installation into PC
- כבה את המחשב: Shut down your computer completely and unplug the power cord.
- מארז מחשב פתוח: הסר את הפאנל הצדדי של מארז המחשב שלך.
- אתר את חריץ ה-PCIe: Identify an available PCIe 5.0/4.0 x4, x8, or x16 slot on your motherboard.

Image: The JEYI PCIe 5.0 M.2 NVMe Adapter Card shown installed within a desktop computer's PCIe slot.
- הכנס כרטיס מתאם: Carefully align the adapter card with the chosen PCIe slot and press down firmly until it is securely seated.
- סוגר מאובטח: Secure the adapter card's bracket to the PC case with the appropriate screw.
- סגירת מארז המחשב: החזר את הפאנל הצדדי של מארז המחשב וחבר מחדש את כבל החשמל.
הוראות הפעלה
The JEYI PCIe 5.0 M.2 NVMe Adapter Card is designed for plug-and-play functionality, requiring no additional drivers for most modern operating systems.
- שימוש ראשון: Upon booting your computer, the operating system (Windows 10/11, Linux, macOS) should automatically detect the newly installed M.2 NVMe SSD.
- אתחול דיסק: For a new SSD, you may need to initialize and format the drive through your operating system's Disk Management utility before it appears as usable storage. Refer to your OS documentation for specific steps.
- ביצועים: To achieve maximum throughput (up to 128Gbps or 16GB/s), ensure your motherboard and CPU support PCIe 5.0, and the entire data path adheres to PCIe 5.0 specifications. The adapter is backward compatible with PCIe 4.0/3.0/2.0 slots, operating at the speed of the lowest common denominator.

Image: A visual representation comparing the bandwidth of PCIe 5.0 (10000+ MB/s) with PCIe 4.0 (6000+ MB/s), highlighting the ultra-high speed capability of Gen5.

Image: A screenshot of CrystalDiskMark benchmark results, illustrating read and write speeds exceeding 10000 MB/s, demonstrating the high performance of the adapter with a compatible SSD.
- כונן אתחול: The adapter card can support an M.2 NVMe SSD as a boot drive, provided your motherboard's BIOS/UEFI supports booting from PCIe NVMe devices. Consult your motherboard manual for details.
תַחזוּקָה
The JEYI PCIe 5.0 M.2 NVMe Adapter Card is designed for minimal maintenance. However, periodic checks can ensure optimal performance and longevity.
- הסרת אבק: Periodically open your PC case and use compressed air to gently remove any dust accumulation from the adapter card and heatsink. Dust can impede heat dissipation.
- שלמות רפידות תרמיות: If you notice unusual temperatures or performance degradation, inspect the thermal pads for wear or damage. Replace them if necessary.
- חיבורים מאובטחים: Ensure all screws and connections remain tight. Loose components can lead to intermittent issues.

Image: A diagram showing the effective multiple heatsink method, illustrating how the heavy-duty aluminum heatsink with thermal compound pads and airflow notches dissipates heat from the M.2 NVMe SSD.
פתרון בעיות
| בְּעָיָה | סיבה אפשרית | פִּתָרוֹן |
|---|---|---|
| SSD not detected by OS. |
|
|
| ביצועים איטיים. |
|
|
| System instability/crashes. |
|
|
מפרטים
| תכונה | פְּרָט |
|---|---|
| מספר דגם | PCIe 5.0 NVMe Heatsink |
| ממשק חומרה | PCI Express 16 GB/s (PCIe 5.0 x4) |
| קצב העברת נתונים | Up to 128 Gigabits Per Second (16GB/s) |
| PCIe Slot Compatibility | PCIe 5.0/4.0 x4, x8, x16 (backward compatible) |
| תמיכה ב-SSD מסוג M.2 | 2280, 2260, 2242, 2230 M.2 NVMe SSDs (M Key) |
| חומר גוף הקירור | Aluminum with Thermal Pads |
| תאימות מערכת הפעלה | Windows 10/11, Linux, macOS |
| מידות המוצר | מידות אורך 4.72 ס"מ x רוחב 2.09 ס"מ x גובה 4.41 ס"מ (כ-120 מ"מ x 53 מ"מ x 112 מ"מ) |
| משקל פריט | 5.7 אונקיות (0.16 קילוגרם) |

Image: Detailed diagram illustrating the dimensions of the JEYI PCIe 5.0 M.2 NVMe Adapter Card and its included components, such as brackets, screwdriver, thermal pads, and screws.
אחריות ותמיכה
JEYI products are designed for reliability and performance. For warranty information and technical support, please refer to the official JEYI webאתר או צרו קשר ישירות עם שירות הלקוחות שלהם.
- מדיניות החזרות: מוצר זה זכאי להחזר כספי או החלפה תוך 30 יום ממועד הרכישה.
- יַצרָן: JEYI
- מַגָע: לסיוע נוסף, בקר ב- JEYI Store on Amazon or consult the contact information provided in your product packaging.