
1. הקדמה
Welcome to the user manual for your ASUS NUC 15 Pro Tall Barebones Mini PC. This guide provides essential information for setting up, operating, maintaining, and troubleshooting your new mini PC. This barebones kit features an Intel Series 2 Core 7 240H processor, supports dual-channel DDR5 RAM, offers a dual storage design, Thunderbolt™ 4, Wi-Fi 7, Bluetooth 5.4, and toolless chassis access for easy upgrades. A VESA mount is included for flexible placement.
2. מה בקופסה
- ASUS NUC 15 Pro Tall Mini PC Unit (Model: RNUC15CRHC70000U)
- הרכבה VESA
- מתאם מתח AC
- כבל חשמל
3. המוצר נגמרview
Familiarize yourself with the physical layout and connectivity options of your ASUS NUC 15 Pro Tall Mini PC.
3.1 לוח קדמי

Image: Front panel of the ASUS NUC 15 Pro Tall Mini PC, highlighting the USB ports, audio jack, and power button.
- לחצן הפעלה: כדי להפעיל או לכבות את היחידה.
- USB 3.2 Gen 2x2 Type-C Port: להעברת נתונים במהירות גבוהה וחיבור מכשירים תואמים מסוג Type-C.
- 2x USB 3.2 Gen2 Type-A Ports: לחיבור ציוד היקפי מסוג USB.
- שקע אודיו: לחיבור אוזניות או רמקולים.
3.2 פאנל אחורי

Image: Rear panel of the ASUS NUC 15 Pro Tall Mini PC, detailing the power input, display outputs, network, and additional USB/Thunderbolt ports.
- DC-In: מחבר כניסת חשמל.
- 2x HDMI 2.1 (TMDS) Ports: לחיבור צגים.
- יציאת אתרנט של 2.5 ג'יגה-בייט: עבור חיבור רשת קווית.
- יציאת USB 3.2 Gen2 Type-A: לחיבור ציוד היקפי מסוג USB.
- יציאת USB 2.0 Type-A: לחיבור ציוד היקפי מסוג USB.
- 2x Thunderbolt™ 4 Ports: For high-speed data transfer, display output, and power delivery to compatible devices.
- Security Mechanism for Power Cable: To secure the power cable connection.
3.3 עיצוב פנימי
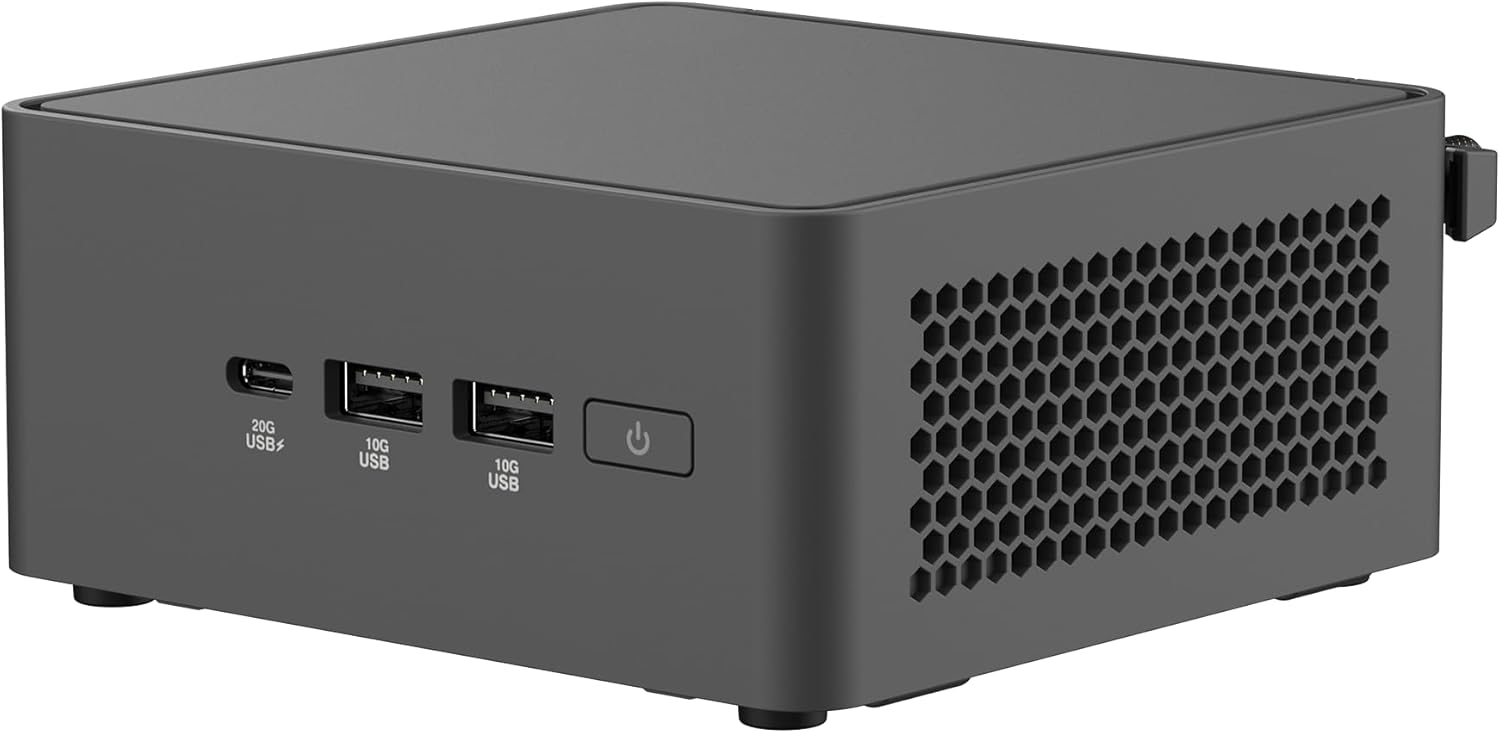
Image: The ASUS NUC 15 Pro Tall Mini PC with its top cover open, illustrating the toolless access for installing or upgrading RAM and storage components.
The chassis features a toolless design, allowing for easy access to internal components for RAM and storage upgrades. This design simplifies maintenance and customization.
4. התקנה
Follow these steps for the initial setup of your ASUS NUC 15 Pro Tall Mini PC.
- פריקת אריזה: הסר בזהירות את כל הרכיבים מהאריזה.
- הרכבה (אופציונלי): If using the included VESA mount, attach it to the rear of a compatible display or a wall mount. Secure the mini PC to the VESA mount. This allows for a clutter-free workspace.

Image: The ASUS NUC 15 Pro Tall Mini PC shown mounted on the back of a display, demonstrating its VESA mounting capability for flexible configuration.
- חיבור ציוד היקפי:
- Connect your monitor(s) to the HDMI 2.1 or Thunderbolt 4 ports. The device supports up to four 4K displays.
- חבר את המקלדת והעכבר שלך ליציאות ה-USB הזמינות.
- For wired network access, connect an Ethernet cable to the 2.5Gb Ethernet port.
- Connect speakers or headphones to the audio jack on the front panel.
- חיבור חשמל: Connect the AC power adapter to the DC-In port on the rear panel, then plug the power cord into an electrical outlet.
- הפעלה ראשונית: לחץ על לחצן ההפעלה בפאנל הקדמי כדי להפעיל את המיני PC.
- התקנת מערכת הפעלה: As a barebones unit, an operating system (e.g., Windows) will need to be installed. Follow the operating system's installation instructions.
5. הפעלה
This section covers basic operation of your mini PC.
5.1 הפעלה/כיבוי
Press the power button on the front panel to turn the unit on. To shut down, use the operating system's shutdown procedure. A short press of the power button can also put the system to sleep.
5.2 תצורת תצוגה
Utilize the HDMI 2.1 and Thunderbolt 4 ports to connect multiple displays. Refer to your operating system's display settings for configuring multi-monitor setups. The device supports headless emulation and a sync power-off feature for energy efficiency.
5.3 קישוריות
- Wi-Fi 7: Connect to wireless networks for high-speed internet access.
- Bluetooth 5.4: Pair with compatible Bluetooth devices such as keyboards, mice, and audio peripherals.
- יציאות USB: Use the various USB ports (USB 3.2 Gen 2x2 Type-C, USB 3.2 Gen2 Type-A, USB 2.0 Type-A) for connecting external devices and data transfer.
- Thunderbolt ™ 4: For high-speed data transfer and connecting advanced peripherals.
6. תחזוקה
Proper maintenance ensures the longevity and optimal performance of your mini PC.
6.1 Toolless Chassis Access for Upgrades
The mini PC features a toolless 2.0 chassis design for easy upgrades. To access internal components:
- Ensure the device is powered off and disconnected from all power sources.
- Follow the instructions in the detailed hardware guide (typically provided with barebones kits) to open the chassis.
- Install or upgrade DDR5 RAM modules (up to 96GB supported).
- Install or upgrade SSD storage drives (dual storage design).
- Close the chassis securely.
6.2 מערכת קירור
The advanced cooling system is designed to maintain optimal performance and reliability. Ensure proper ventilation around the unit to prevent overheating. Avoid blocking air vents.
6.3 ניקוי
Use a soft, dry cloth to clean the exterior of the mini PC. Do not use liquid cleaners or aerosols, as they may damage the components.
7. פתרון תקלות
סעיף זה מספק פתרונות לבעיות נפוצות שאתה עשוי להיתקל בהן.
7.1 אין כוח
- Verify the power adapter and cord are securely connected to the mini PC and a working electrical outlet.
- ודא כי לחצן ההפעלה נלחץ בחוזקה.
7.2 אין פלט תצוגה
- Check all display cable connections (HDMI, Thunderbolt).
- ודא שהצג דולק ומכוון למקור הקלט הנכון.
- אם משתמשים במספר צגים, נסו לחבר רק צג אחד בכל פעם כדי לבודד את הבעיה.
7.3 System Instability or Overheating
- Ensure the mini PC has adequate ventilation and its air vents are not obstructed.
- Update drivers and BIOS to the latest versions from the ASUS support webאֲתַר.
- אם הבעיות נמשכות, פנו לתמיכה של ASUS webאתר או צור קשר עם שירות הלקוחות.
7.4 בעיות קישוריות (Wi-Fi/Bluetooth)
- ודא ש-Wi-Fi ו-Bluetooth מופעלים בהגדרות מערכת ההפעלה שלך.
- Check for updated wireless drivers.
- Verify that your router or Bluetooth device is functioning correctly and within range.
8. מפרטים
| תכונה | פְּרָט |
|---|---|
| שם הדגם | RNUC15CRHC70000U |
| מעבד | Intel Series 2 Core 7 240H (2.5 GHz) |
| אַיִל | עד 96 GB DDR5 |
| אִחסוּן | Dual Storage Design (SSD, PCIE x 4 interface) |
| מעבד גרפי | כרטיס גרפי של אינטל (משולב) |
| רזולוציית מסך מקסימלית | 3840x2160 פיקסלים (4K) |
| תצוגה פלט | 2x HDMI 2.1, 2x Thunderbolt™ 4 (Supports up to 4x 4K displays) |
| קישוריות אלחוטית | Wi-Fi 7 (802.11.be), Bluetooth 5.4 |
| אתרנט | 2.5Gb Ethernet |
| יציאות USB (קדמיות) | 1x USB 3.2 Gen 2x2 Type-C, 2x USB 3.2 Gen2 Type-A |
| יציאות USB (אחוריות) | 1x USB 3.2 Gen2 Type-A, 1x USB 2.0 Type-A |
| מַעֲרֶכֶת הַפעָלָה | Windows (Barebones kit, OS not included) |
| מידות (LxWxH) | 4.61 x 4.41 x 2.13 אינץ' |
| משקל פריט | 12.8 אונקיות |
| צֶבַע | שָׁחוֹר |
9. אחריות ותמיכה
Your ASUS NUC 15 Pro Tall Barebones Mini PC comes with a standard manufacturer's warranty. Please refer to the warranty card included with your product or visit the official ASUS support webבאתר לקבלת תנאי האחריות המפורטים.
For technical assistance, driver downloads, or further support, please visit the ASUS support website. You can find the latest information and contact options at www.asus.com/support.