1. הקדמה
This manual provides detailed instructions for the LinYuvo KS10 Wireless Controller. It covers setup, operation, and maintenance to ensure optimal performance and an enhanced gaming experience across various platforms, including Nintendo Switch, Windows, SteamOS, and iOS devices.
2. המוצר נגמרview
The LinYuvo KS10 is a versatile wireless controller designed for a comfortable and responsive gaming experience. It features a transparent design showcasing internal components, enhanced joysticks, and customizable functions.

איור 2.1: חזית view of the LinYuvo KS10 Wireless Controller, showing its transparent casing ופריסת הכפתורים.
תכונות עיקריות:
- Metal Mushroom Head & Honeycomb Design Joysticks: Provides improved operational feedback and anti-slip functionality for precise control.
- Three-Speed Continuous Firing (Turbo): Offers flexible operation for rapid input in games.
- Integrated Six-Axis Gyroscope: Enables immersive motion sensing for compatible games.
- Adjustable Vibration Level: Dual motors provide haptic feedback that can be customized.
- אפקטי תאורה צבעוניים: Features RGB lighting with various patterns to enhance the gaming atmosphere.
- Back-Key Macro Programming: Allows for personalized macro programming and multi-step combined key output.
- עיצוב ארגונומי: Shaped for comfortable grip during extended gaming sessions.
- פונקציית השכמה: Ability to wake up the connected console.

Figure 2.2: Close-up of the metal rocker and honeycomb joystick design, highlighting enhanced detection and anti-slip features.
3. התקנה
3.1. טעינת הבקר
Before initial use, fully charge the controller using the provided USB-C cable. Connect the cable to the controller's charging port and a compatible USB power source (e.g., a computer USB port or a USB wall adapter). The charging indicator will show the charging status and turn off when fully charged.
3.2. צימוד עם נינטנדו סוויץ'
- בקונסולת ה-Nintendo Switch שלכם, גשו לתפריט HOME.
- לִבחוֹר "Controllers", אז "Change Grip/Order".
- לחץ והחזק את כפתור זיווג on the top of the LinYuvo KS10 controller for a few seconds until the indicator lights start flashing rapidly.
- Once paired, the controller will appear on the Switch screen, and the indicator light(s) on the controller will remain solid.
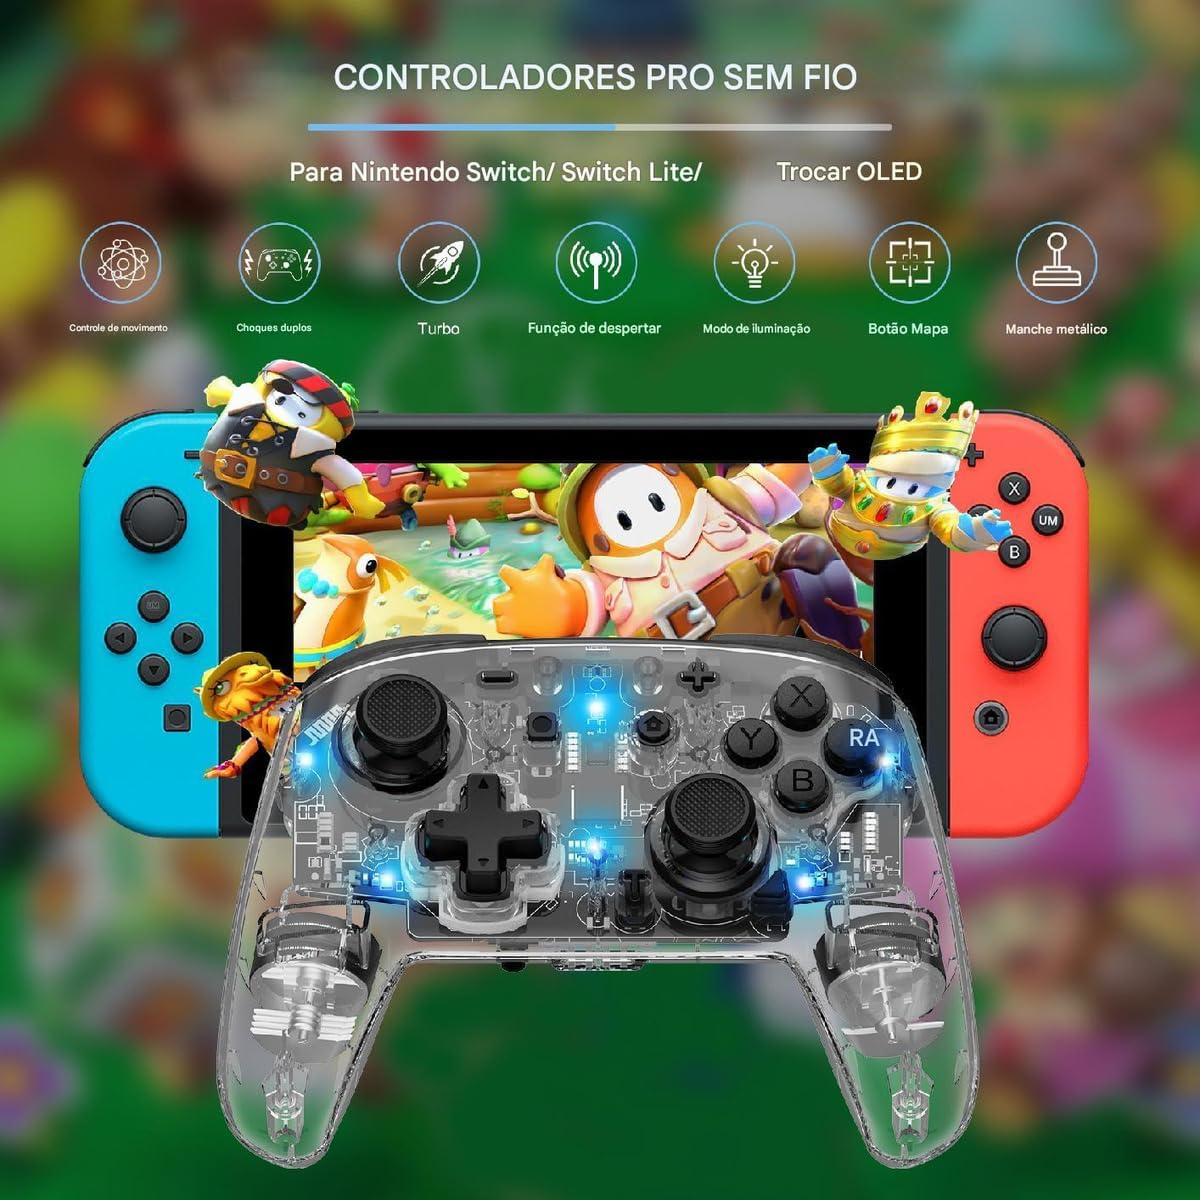
Figure 3.1: The LinYuvo KS10 controller shown alongside a Nintendo Switch console, illustrating its compatibility.
3.3. Pairing with Windows/SteamOS
- Ensure your Windows PC or SteamOS device has Bluetooth enabled.
- עבור אל הגדרות Bluetooth במכשיר שלך ובחר "הוסף בלוטות' או מכשיר אחר".
- לחץ והחזק את כפתור זיווג on the LinYuvo KS10 controller until the indicator lights flash rapidly.
- Select the controller from the list of available devices to complete pairing.
3.4. Pairing with iOS Devices
- במכשיר ה-iOS שלך, עבור אל הגדרות > Bluetooth וודא שה-Bluetooth מופעל.
- לחץ והחזק את כפתור זיווג on the LinYuvo KS10 controller until the indicator lights flash rapidly.
- Look for the controller in the "Other Devices" list and tap to connect.
3.5. פונקציית השכמה
To activate a connected Switch console from sleep mode, simply press and hold the "HOME" button on the controller for approximately 3 seconds.

Figure 3.2: The controller's ergonomic design and the instruction to hold the HOME button for 3 seconds to wake up the Switch console.
4. הוראות הפעלה
4.1. בקרות בסיסיות
The LinYuvo KS10 controller features standard button layouts including A, B, X, Y buttons, D-pad, Left/Right joysticks, L/R and ZL/ZR shoulder buttons, HOME, SELECT, START, and screenshot buttons. Refer to in-game instructions for specific button functions.
4.2. פונקציית טורבו
The Turbo function allows for rapid, continuous input of a selected button. It has three adjustable speeds: 5 shots/second, 12 shots/second, and 20 shots/second.
- כדי להפעיל טורבו: לחץ והחזק את כפתור טורבו (T), then press the desired action button (e.g., A, B, X, Y, L, R, ZL, ZR). The button will now continuously fire when held down.
- כדי להתאים את מהירות הטורבו: תוך כדי החזקת כפתור טורבו (T), לחץ על מינוס (-) button to decrease speed or the פלוס (+) button to increase speed. The corresponding light will flash slowly, medium, or fast to indicate the speed level.
- כדי להשבית את הטורבו: לחץ והחזק את כפתור טורבו (T), לאחר מכן לחץ שוב על כפתור הפעולה.

Figure 4.1: Visual representation of the adjustable Turbo function with three speed settings (5/s, 12/s, 20/s) and instructions for adjustment.
4.3. Gyroscope Motion Control
The integrated six-axis gyroscope provides motion control capabilities for games that support it. This allows for immersive gameplay where tilting and moving the controller translates into in-game actions.

Figure 4.2: A user demonstrating gyroscope motion control with the LinYuvo KS10 controller in a racing game scenario.
4.4. Adjustable Vibration Feedback
The controller features dual motors for haptic feedback. The vibration intensity can be adjusted to suit personal preference.
- To adjust vibration: לחץ והחזק את Vibration button (UM), ולאחר מכן השתמש ב- למעלה/למטה directional buttons on the D-pad to increase or decrease intensity.
- Available levels typically include 0%, 30%, 50%, 75%, and 100%.

Figure 4.3: Illustration of the adjustable vibration feedback levels (0%, 30%, 50%, 75%, 100%) provided by the integrated dual motors.
4.5. אפקטי תאורה צבעוניים
The controller includes customizable RGB lighting to enhance the gaming ambiance. There are various lighting modes and colors.
- To change lighting mode/color: הקש על Lighting button (often represented by a lightbulb icon or a specific combination) to cycle through different colors (Blue, Red, Yellow, Green, Orange, Purple, Pink) or breathing patterns (e.g., rainbow breathing).
- כדי להתאים את הבהירות: לחץ והחזק את כפתור תאורה ולהשתמש ב כפתור Y כדי להתאים את רמות הבהירות.
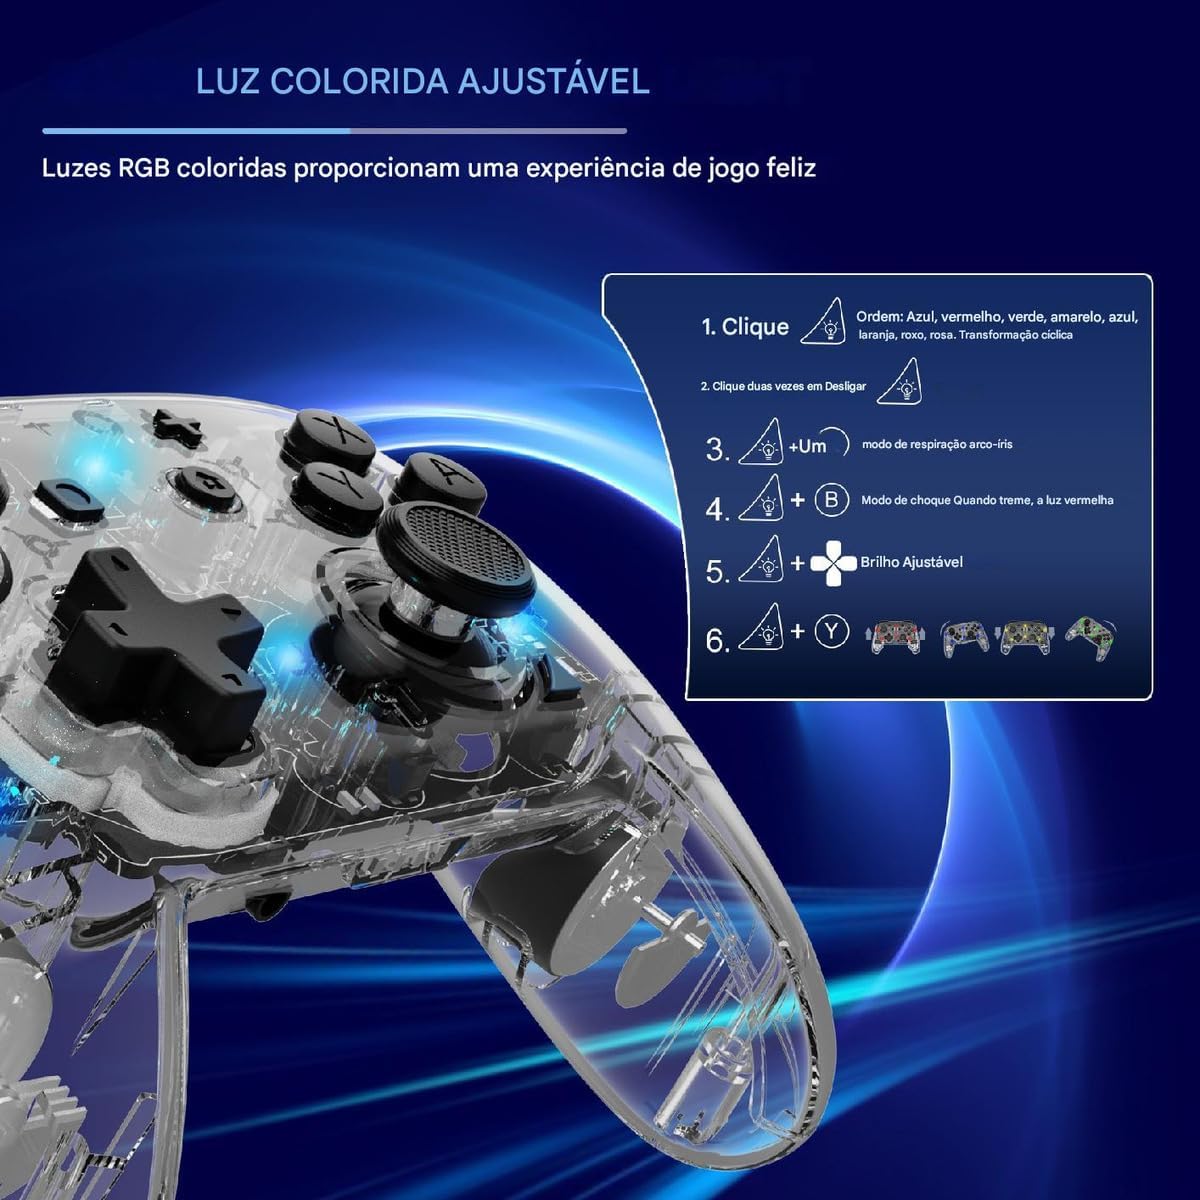
Figure 4.4: Diagram illustrating how to adjust the colorful RGB lighting, including color order and brightness settings.
4.6. Macro Programming (Back-Keys)
The back-keys on the controller can be programmed with custom macros, allowing for complex button sequences to be executed with a single press.
- To enter Macro Programming Mode: Refer to the specific instructions provided with your controller for the exact button combination (e.g., a dedicated Macro button + the back-key you wish to program).
- כדי להקליט מאקרו: While in programming mode, press the sequence of buttons you want to record.
- To save the Macro: Press the Macro button again to save the sequence to the selected back-key.
- To use a Macro: Press the programmed back-key to execute the recorded sequence.
Note: Detailed macro programming steps may vary. Consult the included quick start guide or manufacturer's website for precise instructions.
5. תחזוקה
- ניקוי: השתמשו במטלית רכה ויבשה לניקוי הבקר. אין להשתמש בכימיקלים חזקים או בחומרים שוחקים.
- אִחסוּן: יש לאחסן את הבקר במקום קריר ויבש, הרחק מאור שמש ישיר וטמפרטורות קיצוניות.
- טיפול בסוללה: Avoid fully discharging the battery frequently. Charge the controller regularly, even if not in use for extended periods, to maintain battery health.
- הימנע מטיפות: הגן על הבקר מפני נפילות ופגיעות, אשר עלולות לגרום נזק לרכיבים הפנימיים.
6. פתרון תקלות
| בְּעָיָה | סיבה אפשרית | פִּתָרוֹן |
|---|---|---|
| הבקר לא נדלק. | סוללה חלשה. | טען את הבקר למשך 30 דקות לפחות. |
| Unable to pair with device. | Bluetooth not enabled; controller not in pairing mode; interference. | Ensure Bluetooth is on. Put controller in pairing mode (flashing lights). Move closer to the device. Restart both devices. |
| Input lag or disconnection. | Low battery; too far from device; wireless interference. | Charge controller. Move closer to device. Reduce other wireless activity. |
| כפתורים או ג'ויסטיקים לא מגיבים. | תקלת תוכנה; נזק פיזי. | Restart the controller and the connected device. If problem persists, contact support. |
| הרטט לא עובד. | Vibration level set to 0%; game does not support vibration. | Adjust vibration intensity (Section 4.4). Check game settings. |
7. מפרטים
- דֶגֶם: KS10
- קישוריות: אלחוטי (Bluetooth)
- תְאִימוּת: Nintendo Switch, Windows, SteamOS, iOS
- מאפיינים מיוחדים: Six-axis gyroscope, adjustable vibration, customizable RGB lighting, Turbo function, macro programming back-keys, metal joysticks.
- מקור כוח: סוללה פנימית נטענת
- יציאת טעינה: USB-C
- ארץ מוצא: סִין
- ASIN: B0F18PLLLF
8. אחריות ותמיכה
For warranty information and technical support, please refer to the documentation included with your purchase or contact the retailer. Keep your proof of purchase for any warranty claims.
This product is not an official Nintendo product but is compatible with the Nintendo Switch console.