1. המוצר נגמרview
This manual provides detailed instructions for the installation, operation, and maintenance of your Denash A78SD3 AM3 Motherboard. Please read this manual thoroughly before proceeding with installation to ensure correct setup and optimal performance.
תכונות מפתח
- Stable Power Design: Features a multi-phase power system for stable and optimal performance.
- קישוריות נרחבת: Includes 4 USB 2.0 ports and 4 Serial ATA 3.0 ports for versatile peripheral and storage connections.
- ביצועים חזקים: Supports AM3 socket APU processors and 2-channel DDR3 memory up to 16GB.
- Immersive Visuals & Audio: Equipped with HDMI and VGA video outputs, 100Mbps Ethernet, and 5.1 channel sound.
- Ampאפשרויות אחסון: 4 Serial ATA 3.0 ports accommodate high-capacity storage needs.

איור 1.1: מעלview of the Denash A78SD3 AM3 Motherboard. This image displays the full layout of the motherboard, including the CPU socket, memory slots, expansion slots, and various I/O ports.

Figure 1.2: Denash A78SD3 Motherboard with key components labeled. This image highlights the locations of the 24-pin ATX power connector, 2-channel DDR3 memory slots, SATA 2.0 ports, keyboard and mouse ports, HDMI, VGA, USB 2.0 ports, network port, sound output, 4-pin CPU power connector, and PCIe X16 slot.
2. מפרט טכני
The following table details the technical specifications of the Denash A78SD3 Motherboard:
| תכונה | מִפרָט |
|---|---|
| סוג פריט | A78SD3 Computer Motherboard |
| חוֹמֶר | PCB |
| שבב לוח אם | Integrated Sound Card, Card with Integrated Graphics |
| ערכת שבבים ראשית | for RS780 Series |
| Card Chip | Integrated 100Mbps Ethernet |
| שבב סאונד | Integrated 6 Channel Sound Chip |
| מפרט מעבד | Supports AM3 Interface for APU Processors |
| שקע מעבד | AM3 |
| Supported CPU Quantity | 1 Piece (CPU Excluded) |
| סוג זיכרון | DDR3 1600/1333/1066 מגה-הרץ |
| חריצי זיכרון | 2 x DDR3 (Memory Excluded), Maximum supported 16GB (Maximum 8GB per stick) |
| חריצי הרחבה | 1 x PCI-E X16 Graphics Card Slot, 1 x COM Serial Port Header, 2 x USB 2.0 Headers, 4 x Serial ATA 3.0 Ports |
| I / O ממשקים | PS/2 (Keyboard/Mouse) x 1 Each, 1 x RJ45 Ethernet Port, 1 x VGA Port, 1 x High Definition Multimedia Interface Output, 4 x USB 2.0 Ports, Sound Interfaces |
| גודל לוח האם | Approx. 17x21.3cm / 6.7x8.4in |
| סוג סוללה | 1 x CR2032L Battery (Included) |
| מחברי חשמל | 4 Pin and 24 Pin Power Connector |
| מצב אספקת חשמל | 4 פאזות |
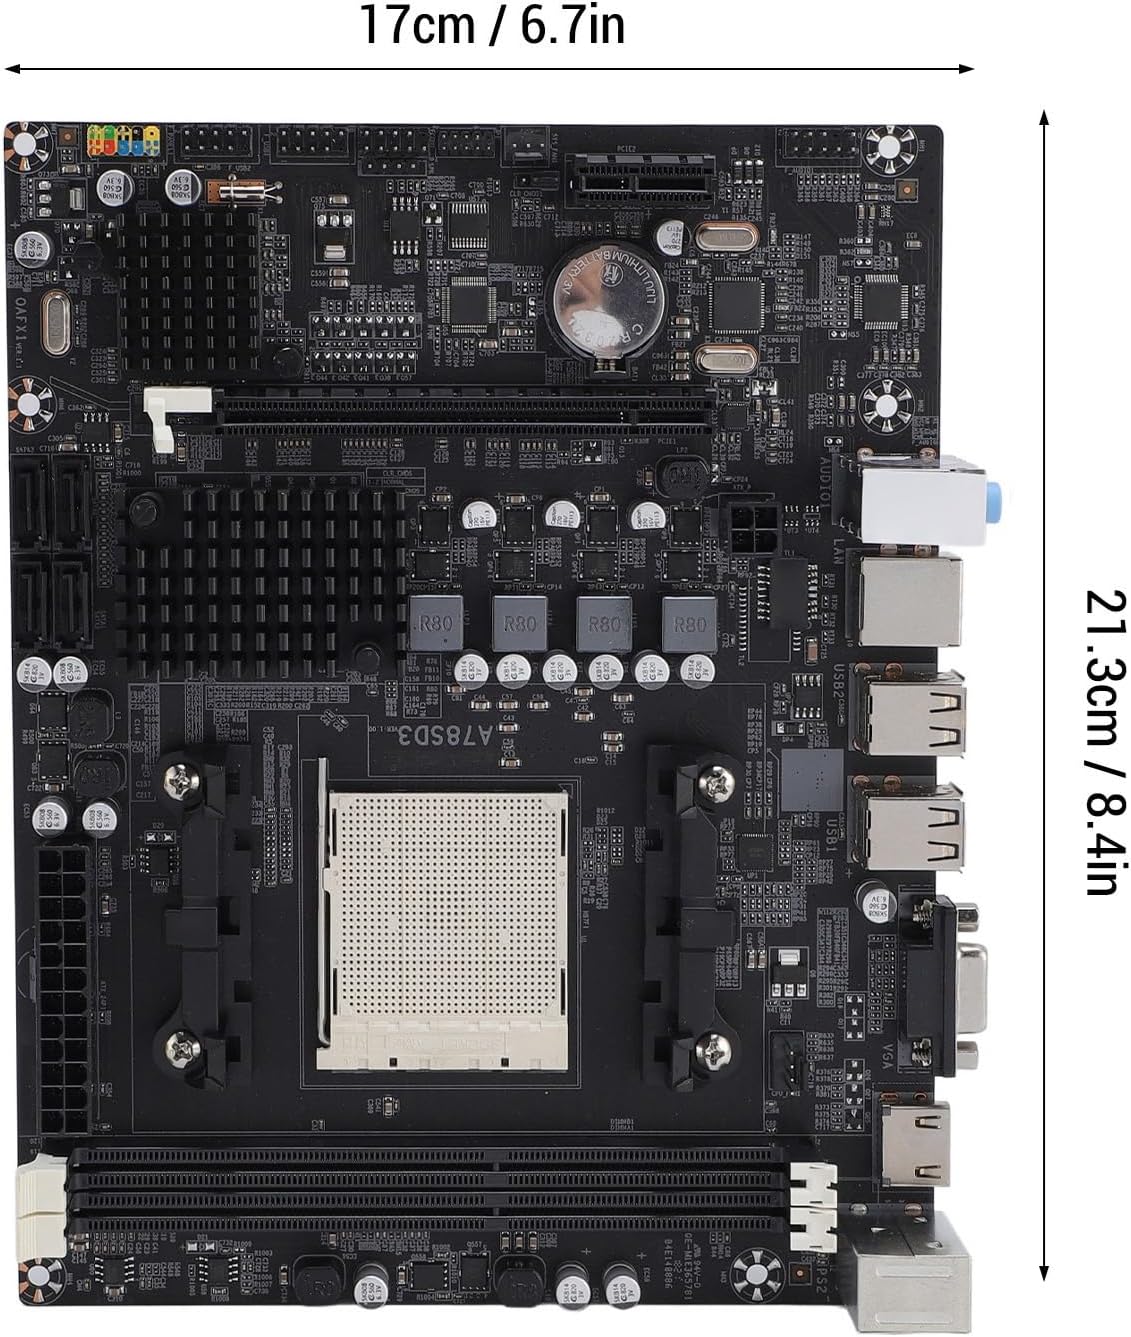
Figure 2.1: Dimensions of the Denash A78SD3 Motherboard. The image shows the motherboard measuring approximately 17cm (6.7in) in width and 21.3cm (8.4in) in length.
3. התקנה והגדרה
בצע את השלבים הבאים להתקנה נכונה של לוח האם והרכיבים שלך.
3.1 התקנת מעבד
- אתר את שקע המעבד AM3 בלוח האם.
- Gently lift the load lever on the side of the socket.
- Align the triangular mark on your AM3 processor with the corresponding mark on the socket. Carefully place the CPU into the socket without forcing it.
- Lower the load lever back into its locked position to secure the CPU.
- מרחו משחה תרמית על המעבד והתקינו את מקרר המעבד בהתאם להוראות היצרן.
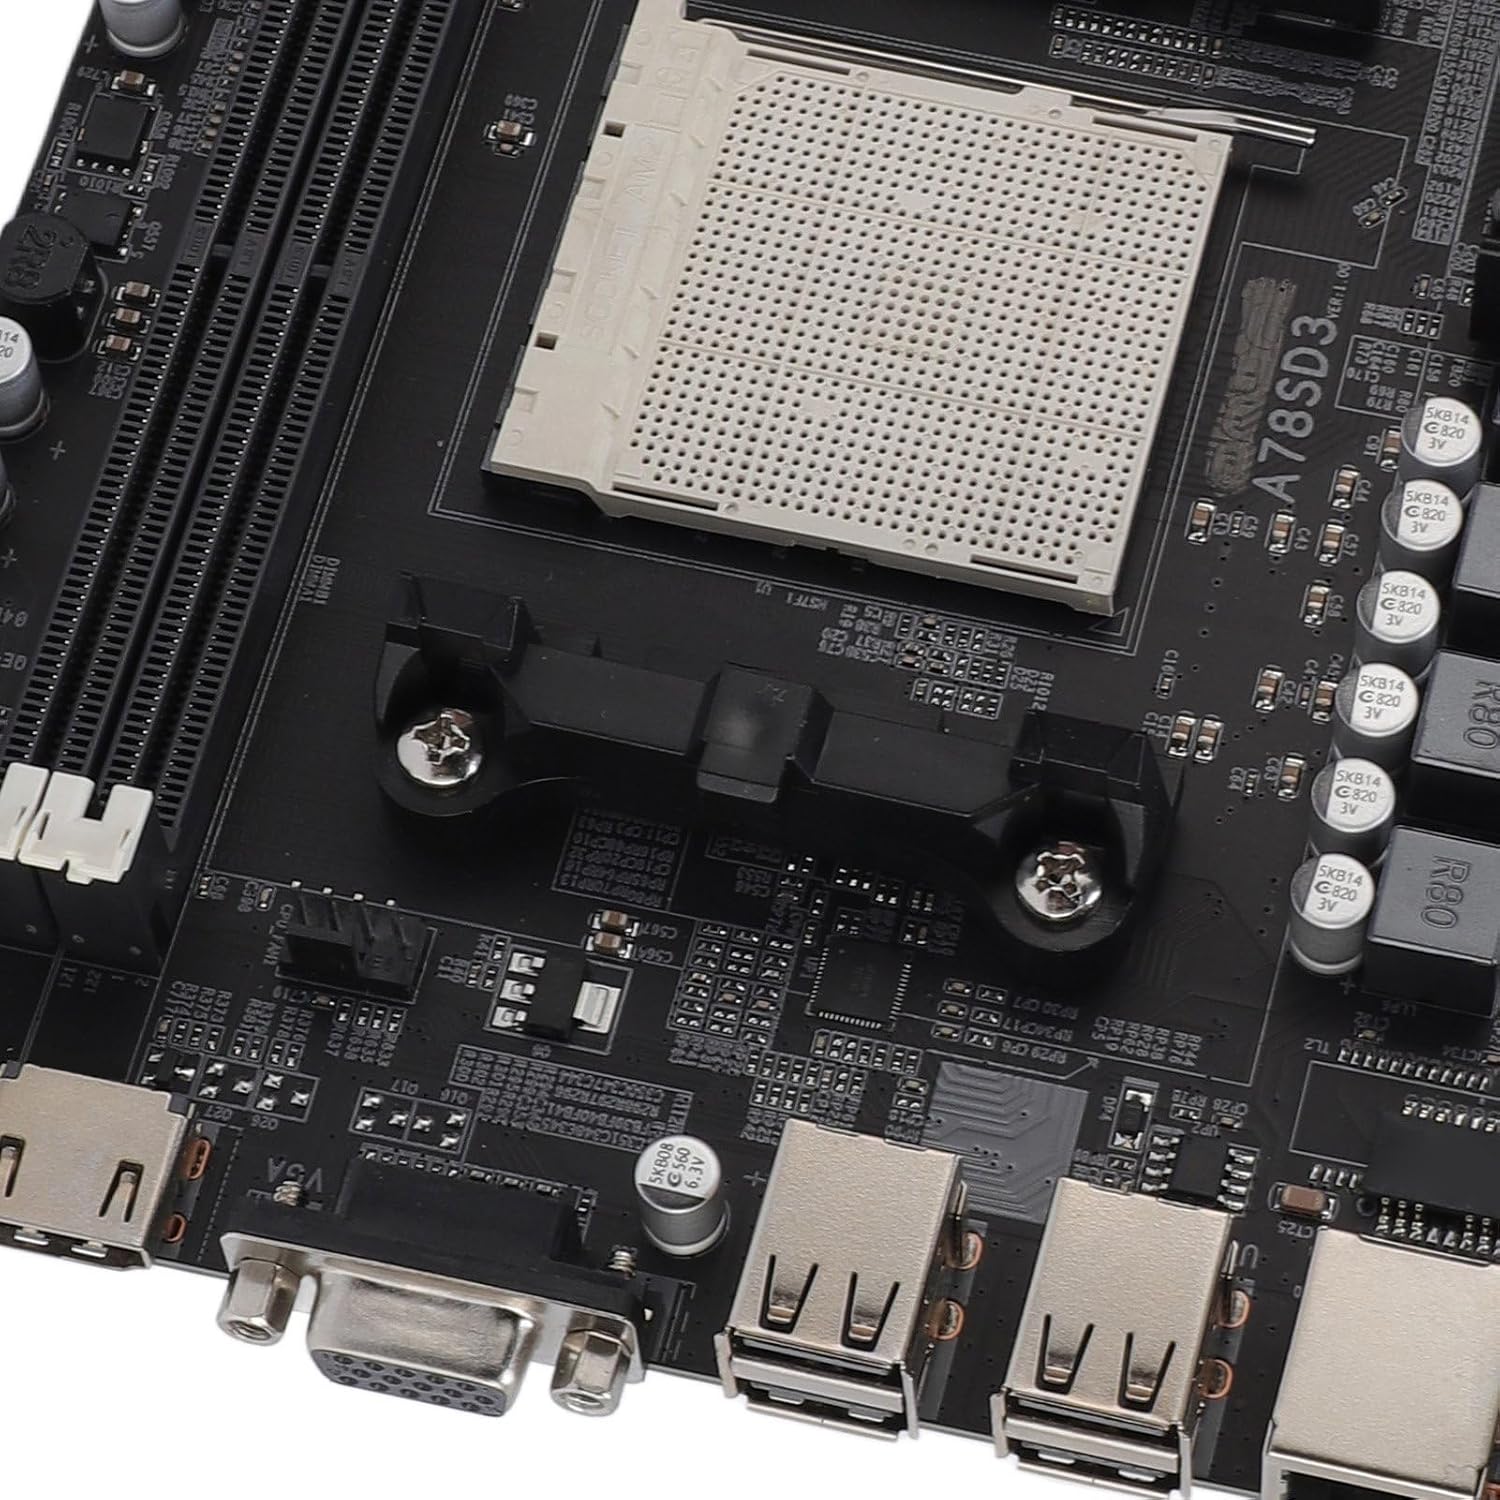
איור 3.1: תקריב view of the AM3 CPU socket on the Denash A78SD3 Motherboard. This image shows the pin grid array (PGA) socket where the processor is installed.
3.2 התקנת זיכרון (RAM)
- אתר את שני חריצי זיכרון DDR3.
- פתחו את הקליפסים בשני קצוות חריץ הזיכרון.
- יישר את החריץ במודול זיכרון DDR3 עם המפתח בחריץ הזיכרון.
- הכנס את מודול הזיכרון בחוזקה לחריץ עד שהקליפסים יתייצבו במקומם בנקישה. ודא ששני הקלפסים סגורים לחלוטין.

איור 3.2: תקריב view of the 2-channel DDR3 memory slots on the Denash A78SD3 Motherboard. This image highlights the slots where RAM modules are to be installed.
3.3 חיבור התקן אחסון
- Locate the 4 Serial ATA 3.0 ports on the motherboard.
- חבר קצה אחד של כבל נתונים SATA ליציאת SATA בלוח האם.
- חבר את הקצה השני של כבל הנתונים SATA להתקן האחסון שלך (כונן קשיח/כונן SSD).
- חבר כבל חשמל SATA מיחידת ספק הכוח (PSU) שלך להתקן האחסון.
3.4 חיבורי חשמל
- Connect the 24-pin ATX main power connector from your PSU to the corresponding slot on the motherboard. Ensure it clicks into place.
- Connect the 4-pin CPU power connector from your PSU to the 4-pin power socket near the CPU.
3.5 חיבורים היקפיים
- פלט וידאו: Connect your monitor to either the VGA port or the HDMI port on the motherboard's I/O panel.
- התקני USB: Connect your keyboard, mouse, and other USB devices to the available USB 2.0 ports.
- רֶשֶׁת: Connect an Ethernet cable from your router or modem to the RJ45 Ethernet port for network access.
- שֶׁמַע: Connect speakers or headphones to the appropriate audio jacks on the I/O panel.
- מחברי לוח קדמי: Connect the power switch, reset switch, power LED, HDD LED, and front panel audio/USB headers from your computer case to the corresponding pins on the motherboard. Refer to your case manual for specific pin assignments.

איור 3.3: תקריב view of the I/O ports on the Denash A78SD3 Motherboard. This image shows the USB ports, VGA port, HDMI port, Ethernet port, and audio jacks.
4. מדריך מבצע
Once all components are installed and connected, you can proceed with system operation.
4.1 Initial System Startup
- Ensure all power cables are securely connected and the power supply is switched on.
- לחץ על כפתור ההפעלה במארז המחשב שלך.
- המערכת אמורה להידלק, ואתה אמור לראות תצוגה על הצג שלך.
4.2 הגדרת BIOS/UEFI
The BIOS (Basic Input/Output System) or UEFI (Unified Extensible Firmware Interface) is the firmware that initializes hardware during the booting process. To access the BIOS/UEFI setup utility:
- במהלך הפעלת המערכת, לחצו שוב ושוב על המקש הייעודי (בדרך כלל DEL, F2, או F10) as indicated on the screen.
- Within the BIOS/UEFI, you can configure boot order, system time, hardware settings, and more. Save changes before exiting.
4.3 התקנת מערכת הפעלה ומנהלי התקנים
- הכנס את מדיית ההתקנה של מערכת ההפעלה (כונן USB או DVD).
- פעל לפי ההנחיות שעל המסך כדי להתקין את מערכת ההפעלה המועדפת עליך.
- After OS installation, install the necessary drivers for the motherboard components (chipset, audio, LAN, graphics) from the provided driver disc or the manufacturer's webאֲתַר.
5. תחזוקה
תחזוקה שוטפת מסייעת להבטיח את אורך החיים והביצועים היציבים של לוח האם שלך.
5.1 ניקוי
- Periodically clean dust from the motherboard and other internal components using compressed air.
- ודא שהמערכת כבויה ומנותקת מהחשמל לפני הניקוי.
- הימנע משימוש בנוזלים או בחומרים שוחקים.
5.2 עדכוני BIOS
BIOS updates can improve system stability, add support for new hardware, or fix bugs. Check the Denash support website for the latest BIOS versions and follow their instructions carefully. Incorrect BIOS updates can damage your motherboard.
5.3 החלפת סוללת CMOS
The motherboard uses a CR2032L coin cell battery to retain BIOS settings and system time when the computer is off. If your system consistently loses time or BIOS settings, the battery may need replacement.
- Power off the computer and unplug it from the wall outlet.
- Locate the CR2032L battery on the motherboard.
- Gently pry the old battery out of its holder.
- Insert a new CR2032L battery with the positive (+) side facing up.
6. פתרון תקלות
סעיף זה מספק פתרונות לבעיות נפוצות שאתה עשוי להיתקל בהן.
6.1 אין חשמל / המערכת לא נדלקת
- Check if the power supply unit (PSU) is properly connected to the wall outlet and switched on.
- Ensure the 24-pin and 4-pin power connectors are securely attached to the motherboard.
- ודא שכבל מתג ההפעלה של הלוח הקדמי מחובר כראוי לראש לוח האם.
- בדוק את ספק הכוח באמצעות מערכת אחרת או בודק ספק כוח, אם זמין.
6.2 אין תצוגה על הצג
- Ensure the monitor is powered on and the video cable (VGA or HDMI) is securely connected to both the monitor and the motherboard.
- If using a dedicated graphics card, ensure the monitor is connected to the graphics card's output, not the motherboard's integrated graphics ports.
- Reseat the memory modules. Incorrectly seated RAM is a common cause of no display.
- Check if the CPU is properly installed and the CPU cooler is functioning.
6.3 ציוד היקפי שלא זוהה
- For USB devices, try connecting them to different USB ports.
- Ensure all necessary drivers for the motherboard and peripherals are installed.
- Check BIOS/UEFI settings to ensure USB ports or other relevant controllers are enabled.
- For SATA devices, ensure both data and power cables are securely connected.
6.4 חוסר יציבות מערכת / קריסות
- Check for overheating. Ensure CPU and case fans are working correctly and heatsinks are clean.
- Run memory diagnostic tools to check for faulty RAM modules.
- ודא שכל הדרייברים מעודכנים.
- Check the power supply unit for sufficient wattagה ויציבות.
7. אחריות ותמיכה
Denash products are designed for reliability and performance. For specific warranty terms and conditions, please refer to the warranty card included with your product or visit the official Denash webאֲתַר.
7.1 תמיכה טכנית
If you encounter issues that cannot be resolved using this manual, please contact Denash customer support. Have your product model number (A78SD3) and purchase information ready when contacting support.
For the most up-to-date support information, including FAQs and driver downloads, please visit the official Denash support webאֲתַר.