1. הקדמה
This manual provides comprehensive instructions for the safe and efficient operation of your Jopix AT-5555N II Amateur Radio Station. This complete transceiver is designed for amateur radio enthusiasts, supporting AM, FM, and SSB modes across the 10M CW TRX 28-29.7 MHz frequency range. Please read this manual thoroughly before operating the device to ensure proper usage and to maximize its performance.
תכונות מפתח כוללות:
- Complete transceiver for AM, FM, SSB frequencies, ideal for 10M CW TRX 28-29.7 MHz.
- Various operating modes including AM, FM, SSB, VOX, and Roger Beep for flexible communication.
- Advanced functions allowing effective communication on amateur radio frequencies.
- Operates with a 13.8V power supply, suitable for amateur radio station setups.
2. מידע בטיחות
Always observe the following safety precautions to prevent injury or damage to the radio station:
- ספק כוח: Use only a stable 13.8V DC power supply. Ensure correct polarity when connecting the power cable. Incorrect voltagחיבור חשמל או קוטביות עלולים לגרום נזק ליחידה.
- אַנטֶנָה: Connect a properly tuned antenna before transmitting. Transmitting without an antenna or with a mismatched antenna can cause damage to the transceiver's final ampחיים יותר.
- אוורור: Ensure adequate ventilation around the unit to prevent overheating. Do not block ventilation slots.
- סְבִיבָה: Do not expose the unit to rain, moisture, direct sunlight, or extreme temperatures. Avoid dusty environments.
- שֵׁרוּת: אל תנסה לפתוח או לטפל ביחידה בעצמך. יש לפנות לכל טיפול וטיפול באנשי מקצוע מוסמכים.
- הַפרָעָה: This device may cause radio interference. Take appropriate measures to mitigate such interference.
3. תכולת החבילה
ודא שכל הפריטים המפורטים להלן כלולים בחבילה שלך:
- Jopix AT-5555N II Radio Station
- מִיקרוֹפוֹן
- מחזיק למיקרופון
- תושבת הרכבה לתחנה
- כבל חשמל
- כבל תכנות

Figure 3.1: The Jopix AT-5555N II radio station with its included microphone.

Figure 3.2: The power cable supplied with the radio station.
4. רכיבי מוצר ובקרות
4.1 לוח קדמי

Figure 4.1: Front panel of the Jopix AT-5555N II.
The front panel features the multi-function backlight display and various controls for operation:
- לְהַצִיג: Multi-function backlight display showing frequency, mode, S-meter, and other operational indicators.
- FRQ/REP Button: Frequency adjustment and repeater function.
- BAND/TONE Button: Band selection and tone control.
- AFG/PWR Knob: Audio Gain and Power output adjustment.
- כפתור VOL: בקרת עוצמת הקול.
- לחצן MENU: גישה לתפריט הראשי עבור הגדרות.
- לחצן MODE: Selects operating modes (AM, FM, LSB, USB, CW, PA).
- DW/TSQ Button: Dual Watch and Tone Squelch control.
- RB/BEEP Button: Roger Beep and Key Tone control.
- NB/HCUT Button: Noise Blanker and HI-CUT filter activation.
- SCAN/SKIP Button: Channel scan and skip function.
- MEM/STOR Button: Memory recall and store function.
- EMG/LOCK Button: Emergency channel access and keypad lock.
- CLAR/SQ Knob: Clarifier and Squelch control.
- CH Knob: בחירת ערוץ.
4.2 פאנל אחורי

Figure 4.2: Rear panel of the Jopix AT-5555N II.
The rear panel provides essential connections for the radio's operation:
- מחבר אנטנה: Standard coaxial connector for connecting an external antenna.
- קלט כוח: כניסת מתח 13.8V DC.
- שקע רמקול חיצוני: 3.5 mm jack for connecting an additional external speaker.
- PA Connection: Output for connecting to a Public Address (PA) system.
- Programming Connection: Port for connecting the programming cable to a computer.
4.3 מיקרופון
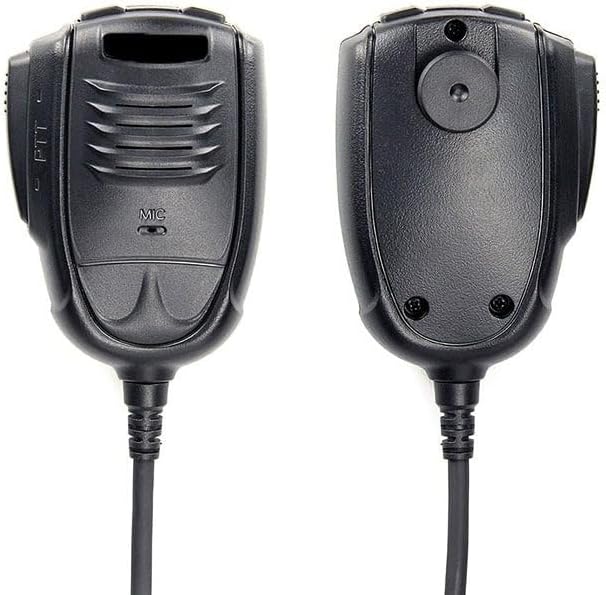
איור 4.3: חזית ואחורה view של המיקרופון.
The microphone connects to the front panel via an RJ-45 connector and includes a Push-To-Talk (PTT) button for transmission.
5. התקנה
5.1 הרכבת הרדיו
Use the provided station mounting bracket to securely install the radio in a suitable location. Ensure the location allows for adequate ventilation and easy access to controls and connections.
5.2 חיבור מתח
- Ensure the radio is turned off and the power supply is disconnected.
- Connect the supplied power cable to the 13.8V DC power input on the rear panel of the radio.
- Connect the other end of the power cable to a stable 13.8V DC power source, observing correct polarity (red to positive, black to negative).
5.3 חיבור אנטנה
Connect a properly tuned 10-meter band antenna to the antenna connector on the rear panel. Use a high-quality coaxial cable with appropriate connectors. אַזהָרָה: Do not transmit without an antenna connected, as this can severely damage the radio.
5.4 חיבור מיקרופון
Plug the RJ-45 connector of the microphone into the corresponding jack on the front panel of the radio. Secure the microphone using the provided microphone holder.
6. הוראות הפעלה
6.1 פעולה בסיסית
- הפעלה: Turn the VOL knob clockwise to power on the radio. Adjust the volume to a comfortable level.
- כוונון סקווש: Rotate the SQ knob clockwise until the background noise disappears. This sets the squelch level.
- בחירת ערוץ: Use the CH knob to select the desired operating channel.
- בחירת מצב: Press the MODE button to cycle through available modes: AM, FM, LSB, USB, CW, PA.
- התאמת תדירות: Use the FRQ knob for fine-tuning the frequency within the selected channel or band.
- הפצה: Press and hold the PTT button on the microphone to transmit. Release to receive.
6.2 תכונות מתקדמות
- צפייה כפולה (DW): Allows monitoring of two channels simultaneously. Activate using the DW button.
- סריקת ערוצים: Automatically scans through active channels. Activate using the SCAN button.
- רווח RF: Adjusts the receiver's sensitivity to incoming signals. Control with the RFG knob.
- משתיק קול אוטומטי (ASQ): Provides automatic squelch control for hands-free operation.
- נעילת לוח מקשים: Prevents accidental changes to settings. Activate using the LOCK function.
- Noise Filters (NB, ANL, HI-CUT): Reduce various types of noise. Activate using the NB/HCUT button.
- רוג'ר ביפ: Transmits a short tone at the end of your transmission. Activate using the RB button.
- מבהיר: Fine-tunes the receive frequency for SSB signals. Use the CLAR knob.
- Emergency Channel (9/19): Quick access to emergency channels.
- Channel Memory: Store and recall up to 100 channels. Use MEM/STOR buttons.
- RF Power Control: Adjusts the transmission power output.
- פונקציית הד: Adds an echo effect to your transmitted audio.
- מד SWR: Displays the Standing Wave Ratio of your antenna system.
- קוֹל: שידור קולי, המאפשר הפעלה ללא ידיים.
- S-meter: Indicates the strength of received signals.
- TOT (טיימר פסק זמן): Limits continuous transmission time to prevent overheating.
- טוקבק: Allows you to hear your own voice through the speaker during transmission.
- טון מפתח: משוב קולי עבור לחיצות כפתור.
- CTCSS/DCS: Sub-audible tones for selective calling.
7. תחזוקה
Proper maintenance ensures the longevity and optimal performance of your Jopix AT-5555N II radio station.
- ניקוי: השתמשו במטלית רכה ויבשה לניקוי החלק החיצוני של היחידה. אין להשתמש בחומרי ניקוי שוחקים או ממסים.
- חיבורים: בדקו מעת לעת את כל חיבורי הכבלים (חשמל, אנטנה, מיקרופון) כדי לוודא שהם מאובטחים וחופשיים מקורוזיה.
- אוורור: Ensure that the ventilation slots on the unit are clear of dust and debris to prevent overheating.
- אִחסוּן: כאשר הרדיו אינו בשימוש למשך תקופות ממושכות, יש לאחסן אותו במקום קריר ויבש, הרחק מאור שמש ישיר וטמפרטורות קיצוניות.
8. פתרון תקלות
This section addresses common issues you might encounter with your radio station. If the problem persists after following these steps, contact customer support.
| בְּעָיָה | סיבה אפשרית | פִּתָרוֹן |
|---|---|---|
| אין כוח | Power cable disconnected; Incorrect polarity; Blown fuse in power cable or supply. | Check power cable connection; Verify correct polarity; Replace fuse if necessary. |
| No transmission (TX) | Antenna not connected; Microphone not connected; PTT button faulty; SWR too high. | Connect antenna; Connect microphone; Test PTT button; Check antenna SWR. |
| No reception (RX) | Squelch set too high; Volume too low; Antenna disconnected. | Adjust SQ knob counter-clockwise; Increase VOL; Check antenna connection. |
| איכות שמע ירודה | Microphone issue; Noise filters active; Incorrect mode. | Check microphone connection; Disable NB/ANL/HI-CUT; Ensure correct operating mode. |
| התצוגה לא עובדת | Power issue; Display settings. | Check power supply; Refer to menu settings for display brightness/backlight. |
9. מפרטים
Detailed technical specifications for the Jopix AT-5555N II Amateur Radio Station:
| תכונה | תֵאוּר |
|---|---|
| דֶגֶם | AT5555N-II |
| טווח תדרים | 28,000 - 29,700 MHz (Programmable) |
| סוג להקה | PA - CW - AM - FM - LSB - USB |
| ערוצים | 60 programmable channels in each band, 100 memory channels |
| ספק כוח | 13.8 V DC |
| מידות (B x H x D) | 200 x 180 x 60 מ"מ (7.87 x 7.09 x 2.36 אינץ') |
| מִשׁקָל | 1.768 ק"ג (3.9 פאונד) |
| סוג מיקרופון | RJ-45 |
| רגישות (20dB SINAD) | 1.0 µV AM/FM; 0.25 µV SSB |
| Sensitivity (10dB S+N/N) | SSB: 0.25 µV, AM: 1.0 µV |
| Speaker Audio Power | 3 ואט @ 8 Ω |
| כוח הילוכים | AM: 60W / FM: 50W / SSB: 60W (PEP) |
| טמפרטורת הפעלה | -20°C עד +55°C (-4°F עד +131°F) |
| תכונות מיוחדות | Dual Watch, Channel Scan, RF Gain, ASQ, Keypad Lock, NB, ANL, HI-CUT, Roger Beep, Clarifier, Frequency Step Adjustment, Emergency Channel (9/19), Channel Memory (100), RF Power Control, Echo Function, SWR Meter, VOX, S-meter, TOT, Talkback, Key Tone, CTCSS/DCS, Multi-function Backlight Display |
| חיבורים חיצוניים | External Speaker (3.5mm), PA Output, Programming Port |
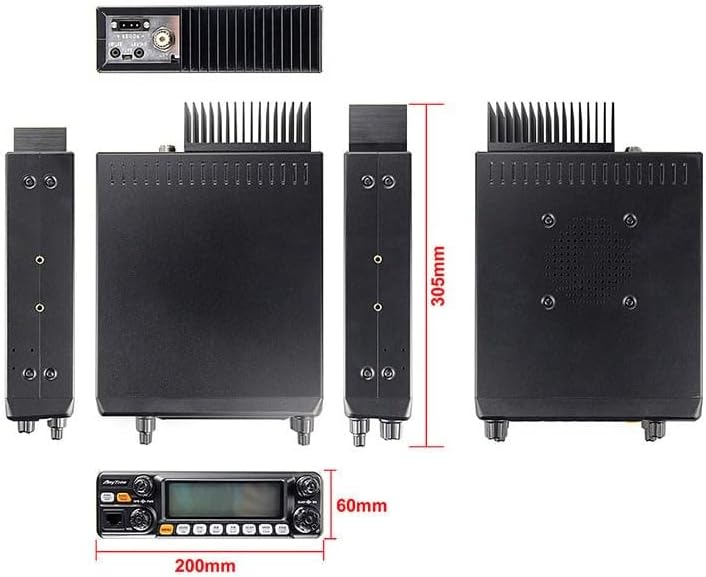
איור 9.1: מעל מימדיview of the Jopix AT-5555N II radio.
10. אחריות ותמיכה
For specific warranty terms and conditions, please refer to the documentation provided at the time of purchase or contact your retailer. Warranty coverage typically varies by region and seller.
For technical support, troubleshooting assistance beyond this manual, or inquiries regarding parts and service, please contact the manufacturer or your authorized dealer. Keep your purchase receipt and product model number (AT-5555N II) readily available when seeking support.
You can often find additional resources, firmware updates, and FAQs on the official Jopix webבאתר או באמצעות מפיצים מורשים.