
1. הקדמה
This manual provides detailed instructions for the safe installation, operation, and maintenance of your Carro 36-inch Low Profile Ceiling Fan. Please read this manual thoroughly before installation and use, and retain it for future reference. This ceiling fan is designed for indoor living spaces, offering efficient air circulation and integrated lighting.

תמונה 1.1: נגמרview of the Carro 36-inch Low Profile Ceiling Fan. This image displays the fan's compact design, white finish, and integrated light fixture.
2. מידע בטיחות
To reduce the risk of electric shock, fire, or injury to persons, read and follow all instructions carefully. Ensure the power is turned off at the circuit breaker before installation or servicing. All wiring must be in accordance with national and local electrical codes. Installation should be performed by a qualified electrician if you are unsure.
- Do not install the fan if the mounting location cannot support the fan's weight.
- Ensure the fan blades are at least 7 feet (2.1 meters) from the floor.
- אין להפעיל את המאוורר עם חיווט או רכיבים פגומים.
- הימנע מהנחת חפצים בנתיב להבי המאווררים.
- מאוורר זה מיועד לשימוש פנימי בלבד.
3. תכולת החבילה
ודא שכל הרכיבים קיימים לפני תחילת ההתקנה:
- Ceiling Fan Unit (including motor, blades, and integrated light) x1
- שלט רחוק x1
- Mounting Hardware Kit x1
- מדריך למשתמש x1
4. התקנה והתקנה
The Carro 36-inch Low Profile Ceiling Fan features an intuitive flush-mount design, making it suitable for rooms with lower ceilings. Detailed instructions are provided in the separate installation guide included with your product. Ensure all electrical connections are secure and properly insulated.

תמונה 4.1: תקריב view of the fan's three white plastic blades. These blades are designed for efficient air movement and durability.
שלבי התקנה עיקריים:
- ניתוק חשמל: כבה את החשמל במפסק הראשי.
- הרכבה הרכבה: חברו היטב את תושבת ההרכבה לקופסת החיבורים בתקרה.
- תִיוּל: Connect the fan's electrical wires to the household wiring according to the color-coded instructions.
- מכלול מאווררים: חבר את מכלול מנוע המאוורר לתושבת ההרכבה.
- חיבור להב: Secure the fan blades to the motor housing.
- התקנת ערכת אור: חבר ואבטח את ערכת תאורת ה-LED המשולבת.
- בדיקה סופית: Ensure all connections are tight and the fan is securely mounted before restoring power.
5. הוראות הפעלה
Your Carro ceiling fan is operated using the included remote control. Ensure the remote has fresh batteries installed.
5.1 בקרת מאוורר
- הפעלה/כיבוי: לחץ על כפתור ההפעלה כדי להפעיל או לכבות את המאוורר.
- התאמת מהירות: Use the speed control buttons to select from 10 adjustable fan speeds.
- Airflow Direction (Summer/Winter Mode): לחץ על כפתור הסיבוב לאחור כדי לשנות את כיוון להבי המאוורר.

Image 5.1: Illustration of fan airflow in Summer Mode (downward airflow for cooling) and Winter Mode (upward airflow for recirculating warm air).
- מצב קיץ: Blades rotate counter-clockwise, pushing air down to create a cooling breeze.
- מצב חורף: Blades rotate clockwise, drawing air up towards the ceiling to recirculate warm air.
5.2 בקרת אור
- אור הדלקה/כיבוי: לחץ על כפתור התאורה כדי להדליק או לכבות את נורת ה-LED המובנית.
- התאמת טמפרטורת צבע: Cycle through warm (2700K), natural (3500K), and cool (4000K) light options.
- עמעום: Use the dimming buttons to adjust the light brightness from 1% to 100%.
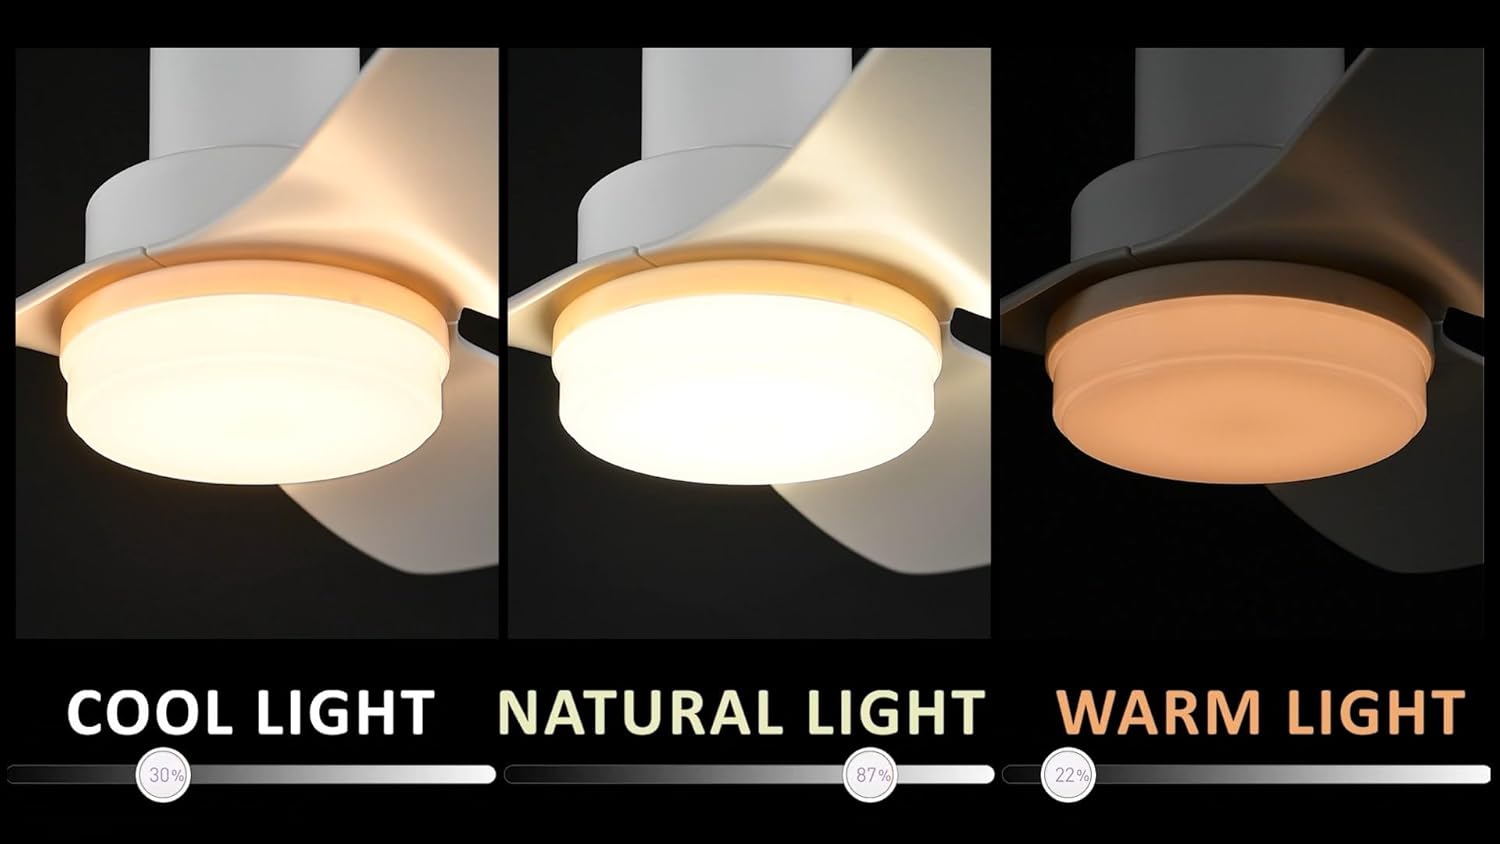
Image 5.2: Visual representation of the three adjustable light color temperatures: Cool Light (4000K), Natural Light (3500K), and Warm Light (2700K).
6. תחזוקה
תחזוקה שוטפת מבטיחה ביצועים אופטימליים ואורך חיים של מאוורר התקרה שלכם.
- ניקוי: Periodically clean the fan housing and blades with a soft, damp בַּד. אין להשתמש בחומרי ניקוי שוחקים או ממסים.
- בדיקת להב: Check fan blades for any cracks or damage. Replace damaged blades immediately.
- בדיקת אטימות: Ensure all screws and fasteners are tight, especially those securing the blades and mounting bracket.
- אין צורך בשימון: מנוע הזרם הישר (DC) משומן באופן קבוע ואינו דורש שימון נוסף.
7. פתרון תקלות
אם אתם חווים בעיות עם מאוורר התקרה שלכם, עיינו בבעיות הנפוצות ובפתרונות הבאים:
| בְּעָיָה | סיבה אפשרית | פִּתָרוֹן |
|---|---|---|
| המאוורר לא מופעל | אין חשמל למאוורר; חיבורי חוטים רופפים; סוללת השלט רחוק חלשה או לא מחוברת. | Check circuit breaker; Verify all wire connections; Replace remote battery or re-pair remote. |
| האור לא עובד | חיבור חוט רופף לערכת התאורה; בעיה בדרייבר LED. | בדוק את חיווט ערכת התאורה; צור קשר עם תמיכת הלקוחות אם יש חשד לדרייבר LED. |
| מאוורר מתנדנד | ברגי להב רופפים; להבים לא מאוזנים; תושבת הרכבה רופפת. | הדקו את כל ברגי הלהב; השתמשו בערכת איזון (לא כלולה) במידת הצורך; ודאו שתושבת ההרכבה מאובטחת. |
| השלט רחוק לא מגיב | סוללות חלשות או ריקות; השלט לא משויך למאוורר. | Replace batteries; Refer to the remote control pairing instructions in the installation guide. |
If you are unable to resolve the issue after following these steps, please contact Carro customer support.
8. מפרטים
| תכונה | מִפרָט |
|---|---|
| מותג | קארו |
| מספר דגם | 89cd23b0-5492-4454-a1b6-bc9a842cba24 |
| גוֹדֶל | 36 אינץ' |
| מידות המוצר (D x W x H) | 36" D x 36" W x 10.9" H |
| סוג הרכבה | הר הקרח |
| סוג מנוע | מנוע DC |
| מספר מהירויות | 10 |
| מספר להבים | 3 |
| חומר להב | פּלָסטִי |
| קיבולת זרימת אוויר | 2650 רגל מעוקב לדקה |
| כרך ידtage | 120 וולט |
| שיטת בקרה | Remote Control (Voice Control listed as a feature, but remote is primary) |
| טמפרטורת צבע אור | 2700K (חם), 3500K (טבעי), 4000K (קריר) |
| עמעום טווח | 1% עד 100% |
| שימוש בפנים/חוץ | מקורה |
| הסמכה | ETL |
9. אחריות ותמיכה
Carro is committed to product quality and customer satisfaction. If you have any questions, concerns, or require assistance with your ceiling fan, please contact our professional after-sales support team. Refer to your purchase documentation or the Carro webבאתר לקבלת פרטי אחריות ספציפיים ופרטי יצירת קשר.