
1. הקדמה
This manual provides essential information for the safe and efficient operation, installation, and maintenance of your new Amax FL12AX Automatic Front Loading Washing Machine. Please read this manual thoroughly before using the appliance and retain it for future reference. Proper use and care will ensure optimal performance and extend the lifespan of your washing machine.
2. מידע בטיחות
הוראות בטיחות חשובות:
- קרא את כל ההוראות לפני השימוש במכשיר.
- מכשיר זה מיועד לשימוש ביתי בלבד.
- אל תאפשר לילדים לשחק על המכשיר או בתוכו. יש צורך בפיקוח צמוד כאשר המכשיר נמצא ליד ילדים.
- Never operate the washing machine if the power cord is damaged or if the machine is malfunctioning. Contact qualified service personnel.
- ודא שהמכונה מוארקת כהלכה כדי למנוע התחשמלות.
- אין לכבס פריטים המלוכלכים בבנזין, ממסים לניקוי יבש או חומרים דליקים או נפיצים אחרים.
- Always unplug the appliance from the power supply before cleaning, performing maintenance, or if it will be unused for an extended period.
- Do not attempt to repair or replace any part of the appliance unless specifically recommended in this manual. All other servicing should be referred to a qualified technician.
3. המוצר נגמרview
Familiarize yourself with the main components of your Amax FL12AX washing machine.
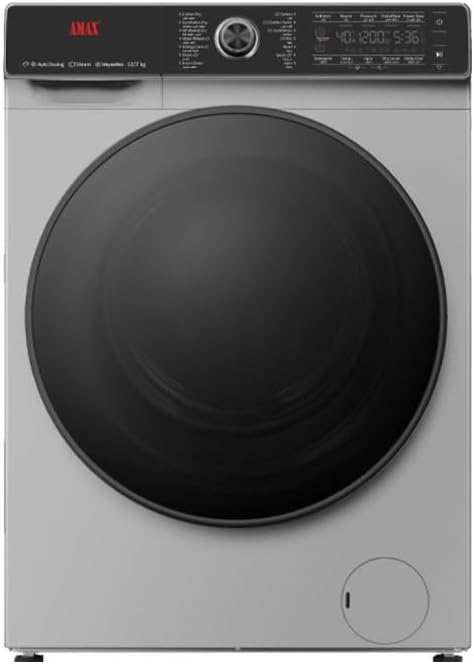
תמונה 1: חֲזִית view of the Amax FL12AX Automatic Front Loading Washing Machine. The machine features a silver-grey body, a large black front-loading door, and a control panel located at the top. The control panel includes a central rotary dial for program selection, a digital display, and various push buttons for settings. A small circular access panel is visible at the bottom right for the drain filter.
מרכיבי מפתח:
- לוּחַ בַּקָרָה: משמש לבחירת תוכניות כביסה, כוונון הגדרות ומעקב אחר התקדמות המחזור.
- מתקן חומרי ניקוי: תאים לקדם כביסה, אבקת כביסה לכביסה עיקרית ומרכך כביסה.
- תוף: Stainless steel drum for washing and drying clothes.
- Front Loading Door: מספק גישה לתוף.
- Drain Filter Access: Located at the bottom right, for periodic cleaning of the drain filter.
4. התקנה והגדרה
התקנה נכונה היא קריטית לביצועים ולבטיחות של מכונת הכביסה שלכם.
4.1 פירוק
- הסר בזהירות את כל חומרי האריזה.
- Remove all transit bolts from the rear of the machine. These bolts secure the drum during transport and must be removed before operation. Refer to the diagram in the separate installation guide for bolt locations.
- הרחק את חומרי האריזה מהישג ידם של ילדים.
4.2 דרישות מיקום
- הניחו את מכונת הכביסה על משטח יציב ומאוזן כדי למזער רעידות ורעש.
- ודאו שיש מספיק מקום סביב המכונה לאוורור ותחזוקה.
- הימנעו מאור שמש ישיר או מטמפרטורות קיצוניות.
4.3 חיבור מים
- חברו את צינור הכניסה לברז מים קרים עם הברגה של 3/4 אינץ'.
- ודא שכל החיבורים מהודקים כדי למנוע דליפות.
- The water pressure should be between 0.1 MPa and 1 MPa.
4.4 חיבור צינור ניקוז
- חברו היטב את צינור הניקוז לצינור עומד או לאמבט כביסה.
- Ensure the drain hose is not kinked or blocked. The end of the drain hose should be positioned at a height between 60 cm and 100 cm from the floor.
4.5 חיבור לחשמל
- חבר את כבל החשמל לשקע חשמל מוארק.
- The appliance requires a 220-240V, 50/60Hz power supply.
- אין להשתמש בכבלים מאריכים או מתאמים.
4.6 יישור המכונה
- השתמש בפלס כדי לבדוק אם המכונה מפולסת לחלוטין.
- Adjust the adjustable leveling legs at the bottom of the machine until it is stable and level.
5. הוראות הפעלה
Follow these steps for effective and safe operation of your Amax FL12AX washing machine.
5.1 הכנת כביסה
- מיין את הכביסה לפי סוג הבד, צבעו ומידת הלכלוך.
- בדקו את הכיסים לאיתור פריטים קטנים שעלולים לגרום נזק למכונה.
- סגרו רוכסנים ווים, וקשרו חוטים רופפים.
5.2 טעינת כביסה
- פתחו את דלת הטעינה הקדמית.
- Place laundry loosely into the drum, ensuring not to overload the machine. The 12 kg capacity refers to dry laundry weight.
- סגור את הדלת בחוזקה עד שתישמע קליק.
5.3 הוספת חומר ניקוי ומרכך
- משוך החוצה את מגירת מתקן חומרי הניקוי.
- הוסיפו כמות מתאימה של חומר ניקוי לתא הכביסה העיקרי ומרכך כביסה לתא המיועד לו.
- סגור בעדינות את מגירת המתקן.
5.4 בחירת תוכנית כביסה
- Turn the program selector dial on the control panel to choose one of the 15 available wash programs (e.g., Cotton, Synthetics, Delicates, Quick Wash, etc.).
- הצג הדיגיטלי יציג את הגדרות ברירת המחדל עבור התוכנית שנבחרה.
5.5 התאמת הגדרות (אופציונלי)
- Use the control buttons to adjust temperature, spin speed, or add special features like extra rinse, if desired and available for the selected program.
- The machine features temperature control and vibration reduction for enhanced performance.
5.6 התחלת המחזור
- לחצו על כפתור 'התחל/השהה' כדי להתחיל את מחזור הכביסה.
- The machine will automatically proceed through the wash, rinse, and spin phases, including the 100% drying function if selected or part of the program.
5.7 After the Cycle
- Once the cycle is complete, the machine will signal with an audible alert or display a 'End' message.
- פתחו את הדלת והוציאו את הכביסה מיד כדי למנוע קמטים וריחות.
- השאירו את הדלת פתוחה מעט כדי לאפשר לתוף להתייבש באוויר.
6. תחזוקה וטיפול
Regular cleaning and maintenance will help keep your washing machine in optimal condition.
6.1 ניקוי החלק החיצוני
- נגב את המשטחים החיצוניים עם רך, דamp בַּד.
- אין להשתמש בחומרי ניקוי שוחקים או ממסים.
6.2 ניקוי מתקן חומר הניקוי
- הוציאו את מגירת המכונה ושטפו אותה תחת מים זורמים כדי להסיר שאריות חומר ניקוי.
- נקו את בית מגירת המתקן בעזרת מברשת.
- הכנס את המגירה מחדש.
6.3 ניקוי התוף
- Periodically run a maintenance wash cycle (e.g., a hot wash with no laundry and a washing machine cleaner) to prevent odor and residue buildup.
6.4 ניקוי מסנן הניקוז
- Locate the drain filter access panel at the bottom right of the machine.
- הניחו מיכל רדוד מתחת למסנן כדי לאסוף שאריות מים.
- פתחו בזהירות את הברגה והסירו את המסנן.
- Clean any lint, debris, or foreign objects from the filter and its housing.
- הברג את המסנן בחזרה במקומו בצורה בטוחה.
7. פתרון תקלות
לפני פנייה לשירות, עיינו בסעיף זה לקבלת מידע על בעיות נפוצות ופתרונותיהן.
| בְּעָיָה | סיבה אפשרית | פִּתָרוֹן |
|---|---|---|
| המכונה לא מתחילה | Power cord unplugged; Door not closed properly; Program not selected; 'Start' button not pressed. | Check power connection; Ensure door is latched; Select a program; Press 'Start'. |
| אין מילוי מים | ברז המים סגור; צינור הכניסה מקופל או חסום; לחץ המים נמוך מדי. | פתחו את ברז המים; יישרו את הצינור; בדקו את לחץ המים הביתי. |
| מים לא מתנקזים | צינור הניקוז מקופל או חסום; מסנן הניקוז סתום. | ישר את הצינור; נקה את מסנן הניקוז (ראה סעיף 6.4). |
| רעידות/רעש מוגזמות | ברגי הובלה לא הוסרו; המכונה אינה מפולסת; עומס לא אחיד. | Remove transit bolts; Adjust leveling legs; Redistribute laundry in the drum. |
| תוצאות כביסה גרועות | Incorrect program/temperature; Too much/too little detergent; Overloading. | Select appropriate program; Use correct detergent amount; Do not overload. |
| Clothes not fully dry | Drying program not selected or interrupted; Overloading. | Ensure drying function is active; Reduce load size for drying. |
אם הבעיה נמשכת לאחר ניסיון פתרונות אלה, אנא פנו לאנשי שירות מוסמכים.
8. מפרטים
Detailed technical specifications for the Amax FL12AX Automatic Front Loading Washing Machine.
| תכונה | מִפרָט |
|---|---|
| מותג | אמקס |
| מספר דגם | FL12AX |
| יְכוֹלֶת | 12 קילוגרם |
| מידות המוצר (D x W x H) | 65D x 70W x 88.3H סנטימטרים |
| משקל פריט | 73 קילוגרם |
| צֶבַע | Black (Note: Product image shows silver-grey, but specification lists Black) |
| גישה למיקום | עומס קדמי |
| חומר תוף מכשיר כביסה | נירוסטה |
| מספר תוכניות כביסה | 15 |
| ייבוש פונקציה | 100% Drying |
| כרך ידtage | 220-240 וולט |
| תֶדֶר | 50-60 הרץ |
| סוג בקרות | לחצן לחיצה, חוגה סיבובית |
| תכונות מיוחדות | Adjustable Leveling Legs, Temperature Control, Vibration Reduction |
| רכיבים כלולים | צינור ניקוז |
| יַצרָן | AlRabee & AlSaif |
9. אחריות ותמיכה
Specific warranty details for the Amax FL12AX washing machine are not provided within this manual. For information regarding warranty coverage, terms, and conditions, please refer to the warranty card included with your purchase or contact the retailer or manufacturer directly.
For technical support, service requests, or to purchase genuine spare parts, please contact the authorized Amax service center or your local dealer. Ensure you have your model number (FL12AX) and purchase date available when contacting support.