
1. המוצר נגמרview
The Raddy AG7 is a comprehensive wireless weather station designed to provide accurate monitoring of various environmental conditions. It features a 7.4-inch digital display for clear readability and includes an atomic clock for precise timekeeping. The system monitors indoor and outdoor temperature, humidity, wind speed and direction, and precipitation. It also offers 12-hour weather forecasts and displays barometric pressure.
- ניטור מקצועי: Tracks temperature, humidity, wind, and precipitation.
- מערכת הניתנת להרחבה: Supports up to three additional R5 sensors for monitoring up to five zones.
- Precise Outdoor Sensor: Equipped with a rain funnel, wind vane, anemometer, thermo-hygrometer with anti-radiation shield, and a solar panel. Offers a range of up to 100 meters.
- תצוגה גדולה: 7.4-inch screen shows indoor/outdoor temperature/humidity, precipitation, atmospheric pressure, wind speed/direction, dew point, felt temperature, 12-hour forecast, and daily max/min values.
- התקנה קלה: Clear instructions and diagrams facilitate quick setup.
2. רכיבים
The Raddy AG7 weather station includes the main display console and a multi-sensor outdoor unit. The outdoor unit integrates several instruments for comprehensive weather data collection.
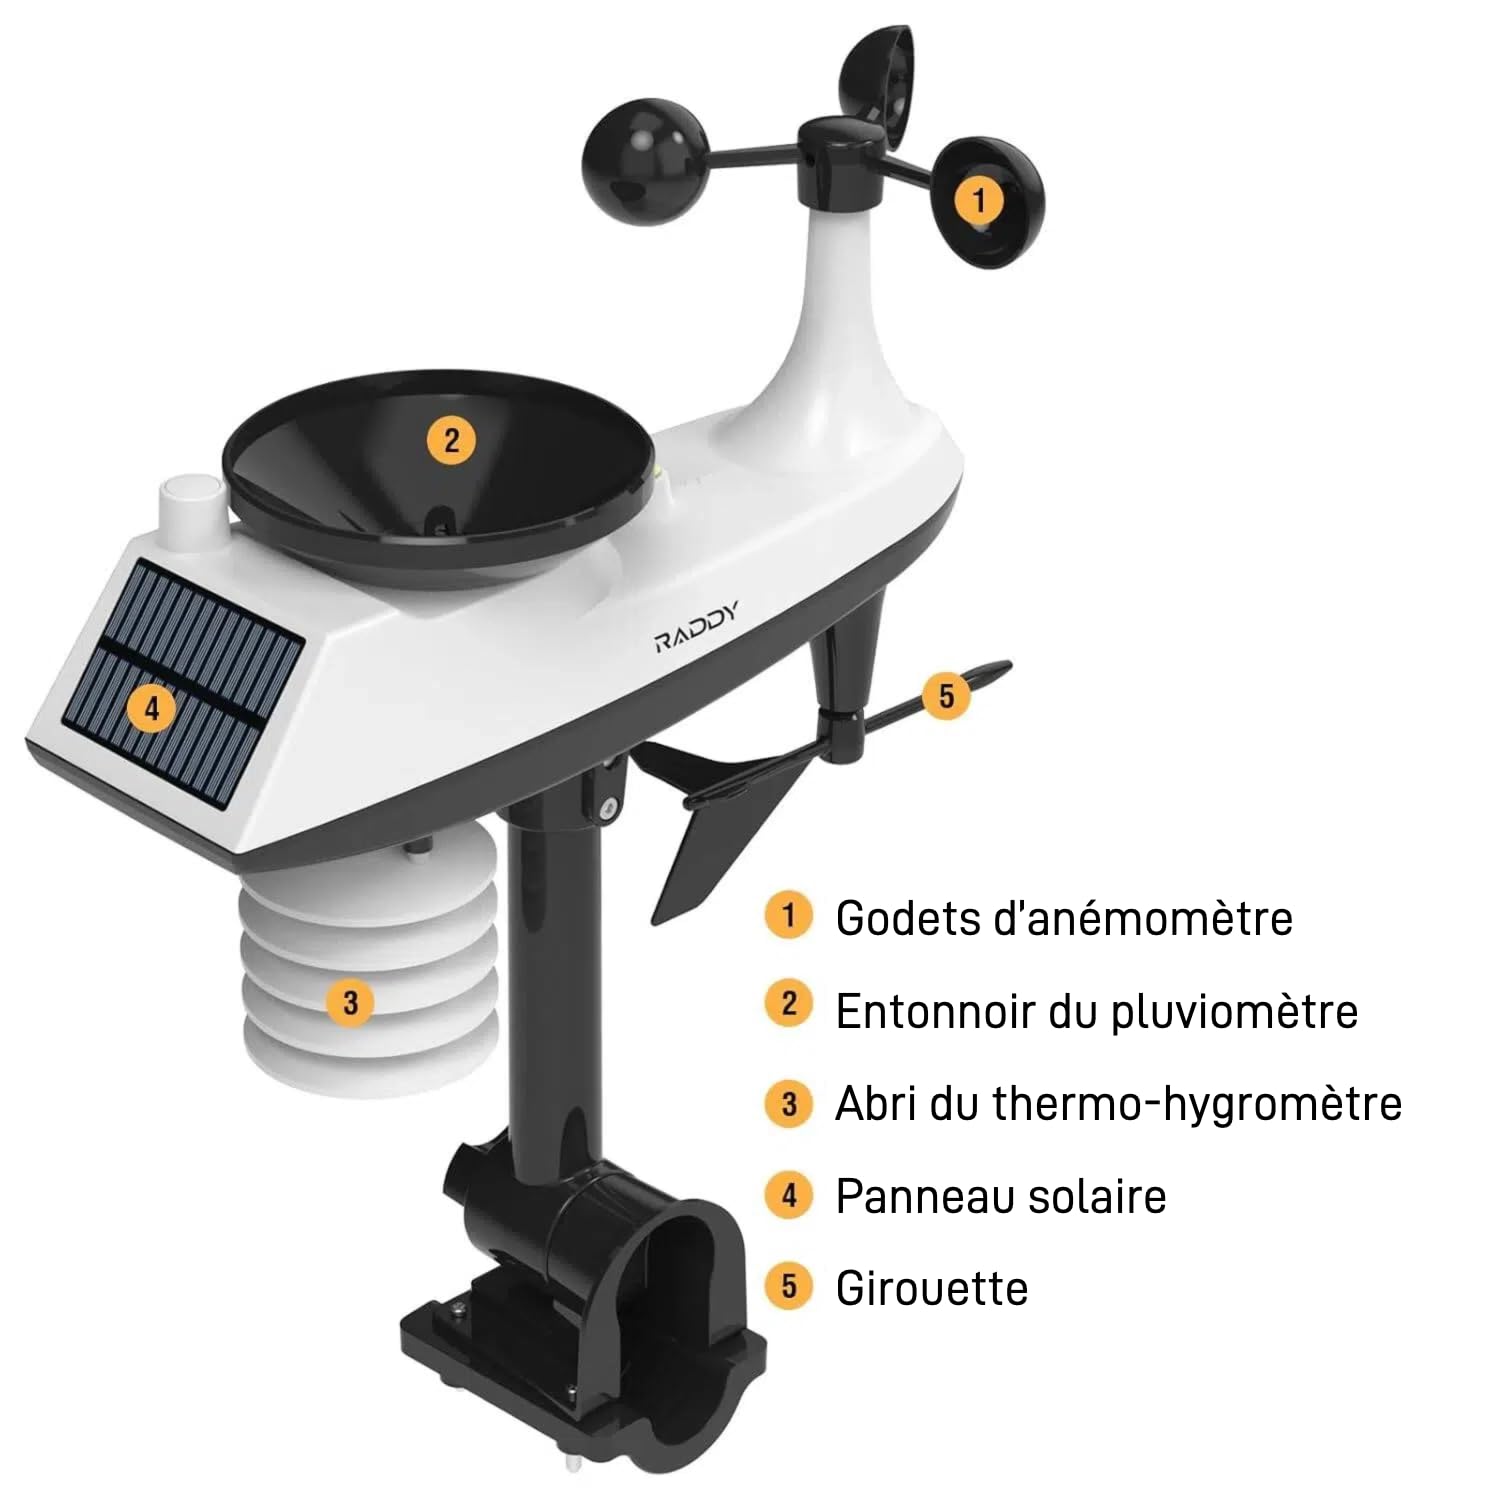
תְמוּנָה: מְפוֹרָט view of the Raddy AG7 outdoor sensor unit, highlighting its key components.
- 1. Anemometer Cups: Measure wind speed.
- 2. Rain Gauge Funnel: Collects precipitation for measurement.
- 3. Thermo-Hygrometer Shield: Protects temperature and humidity sensors from direct sunlight and radiation.
- 4. פאנל סולארי: Powers the outdoor sensor and charges its internal battery.
- 5. Wind Vane: קובע את כיוון הרוח.
3. התקנה והתקנה
3.1. התקנת חיישן חיצוני
Proper placement of the outdoor sensor is crucial for accurate readings. Choose an open location away from obstructions like buildings or trees that could interfere with wind or rain measurements. Ensure the solar panel receives adequate sunlight.

תְמוּנָה: Diagram illustrating various mounting options for the outdoor sensor, including top and side pole mounting. This image also shows the battery compartment and reset button for the sensor.
- אפשרויות הרכבה: The sensor can be mounted on top of a pole or to the side of a pole using the provided hardware.
- קוטר מוט: For pole installation, it is recommended that the pole has a minimum diameter of 2.4 cm (0.9 inches).
- הִתמַצְאוּת: Ensure the wind vane is oriented correctly (usually pointing North) for accurate wind direction readings.
3.2. Display Console Setup
The display console can be placed on a table or mounted on a wall.

תְמוּנָה: The display console shown on a table stand and mounted on a wall, demonstrating flexible placement.
- מקור כוח: The console can be powered by AAA batteries for economy mode or an adapter for continuous display.
- הפעלה ראשונית: Insert batteries or connect the power adapter. The console will automatically search for the outdoor sensor.
- סנכרון שעון אטומי: The atomic clock feature (DCF) will attempt to synchronize automatically. Ensure the console is placed in a location where it can receive the signal.
4. הוראות הפעלה
4.1. הצג מידע
The 7.4-inch display provides a wealth of information at a glance.

תְמוּנָה: The Raddy AG7 display showing various weather parameters and time, illustrating its multifunctionality.
- טמפרטורה ולחות פנימית/חיצונית: קריאות נוכחיות עבור שתי הסביבות.
- מִשׁקָע: Displays rainfall data.
- תחזית מזג האוויר: 12-hour forecast icons.
- זמן ולוח שנה: Atomic clock synchronized time and date.
- כיוון ומהירות הרוח: תנאי הרוח הנוכחיים.
- Dew Point & Felt Temperature: Additional comfort indicators.
- לחץ אטמוספרי: לחץ ברומטרי נוכחי.
- טמפרטורה מקסימלית/מינימלית: Daily maximum and minimum temperature records.
4.2. התאמת תאורה אחורית
The display features 4 adjustable backlight levels for optimal viewבתנאי תאורה שונים.

תְמוּנָה: ארבעה לשעברamples of the display with different backlight levels (LV0 to LV3), demonstrating the adjustability.
Refer to the specific buttons on your console (usually labeled "LIGHT" or similar) to cycle through the backlight levels.
4.3. הגדרות אזעקה
The AG7 allows setting high/low alerts for various parameters and dual alarms for weekdays and weekends. Consult the detailed instructions in the included manual for specific button functions and navigation to set these alarms.
4.4. Multi-Zone Monitoring
The system can connect with up to three additional R5 sensors (sold separately) to monitor up to five distinct zones (one outdoor, one indoor from main console, and three additional indoor/outdoor zones).
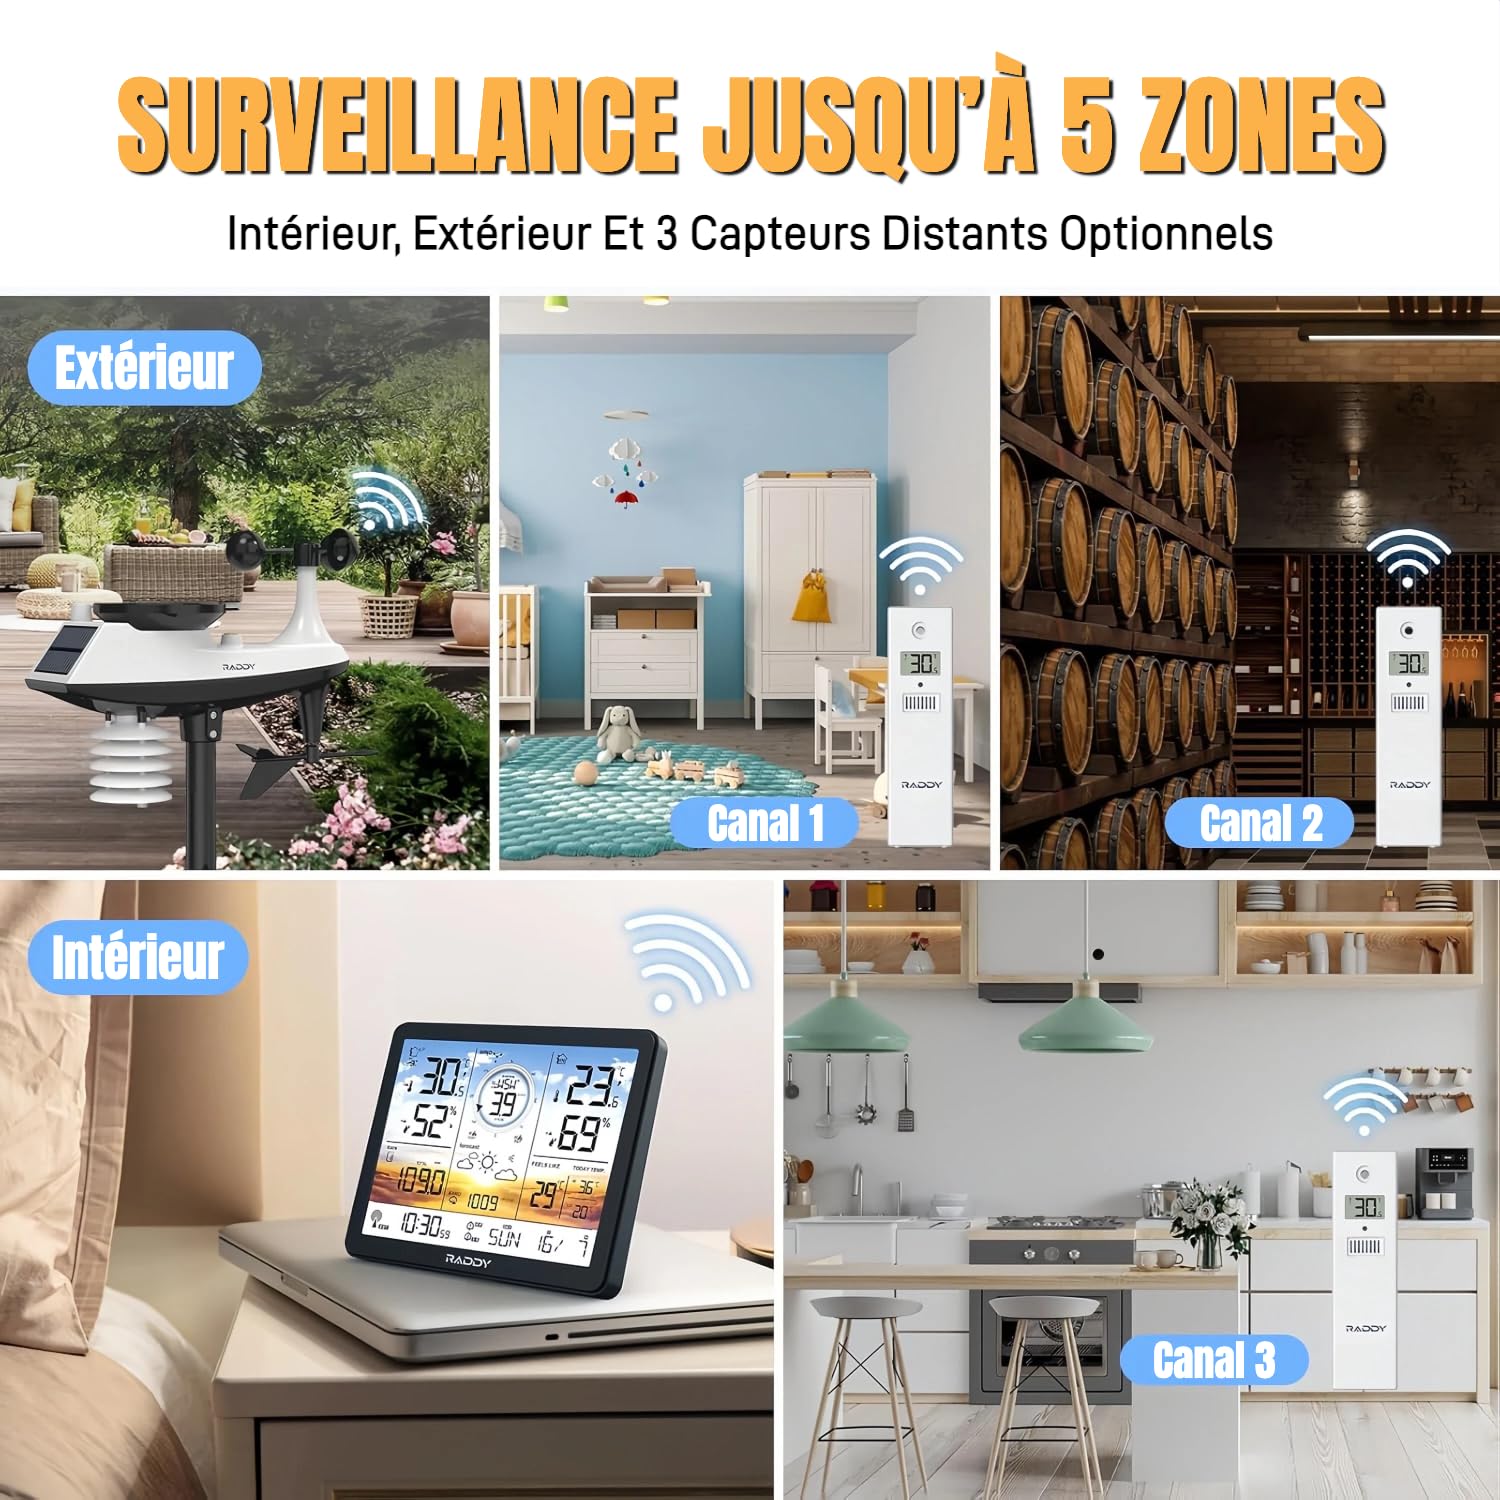
תְמוּנָה: Visual representation of the weather station monitoring multiple zones, including outdoor, indoor, and three additional channels with R5 sensors.
To add R5 sensors, follow the pairing instructions provided with the R5 sensors and the main AG7 manual. Each R5 sensor will transmit data to a specific channel on your main display.
5. תחזוקה
5.1. החלפת סוללה
The display console uses AAA batteries (not included). The outdoor sensor is solar-powered with a backup battery. Replace batteries when the low battery indicator appears on the display.
תְמוּנָה: א מפורט view of the outdoor sensor's underside, showing the battery compartment (labeled 4) and reset button (labeled 1).
- חיישן חיצוני: Access the battery compartment on the underside of the sensor. Ensure proper polarity when inserting new batteries.
- מסוף תצוגה: The battery compartment is typically on the back of the unit.
5.2. ניקיון
- חיישן חיצוני: Periodically clean the rain gauge funnel and anemometer cups to ensure accurate readings. Remove any debris or insects.
- מסוף תצוגה: נגב את המסך ו-casing with a soft, dry cloth. Avoid abrasive cleaners.
6. פתרון תקלות
- No Outdoor Sensor Data / Loss of Radio Contact:
- Ensure the outdoor sensor is within the 100-meter transmission range of the display console.
- Check for obstructions (thick walls, metal structures, large appliances) between the sensor and console.
- Replace batteries in both the outdoor sensor and display console with fresh ones.
- Perform a reset: Press the reset button on the outdoor sensor (often a small pinhole, labeled 1 in the sensor detail image) and then on the display console (refer to your manual for console reset location). Re-pair the units if necessary.
- Avoid placing the console near electronic devices that may cause interference.
- Inaccurate Readings (Wind/Rain):
- Verify the outdoor sensor is installed in an open area, free from obstructions.
- Clean the rain gauge funnel and anemometer cups to remove any debris.
- Ensure the wind vane is correctly oriented.
- Display Not Visible / Dim:
- בדוק את רמות הסוללה והחלף במידת הצורך.
- If using an adapter, ensure it is properly connected and functioning.
- Adjust the backlight level (refer to section 4.2).
- שעון אטומי לא מסתנכרן:
- Ensure the console is placed near a window or in an area with good signal reception.
- Avoid placing it near large metal objects or electronic devices that can block the signal.
- Allow sufficient time (up to 24 hours) for initial synchronization.
7. מפרטים
| תכונה | פְּרָט |
|---|---|
| מותג | ראדי |
| דֶגֶם | AG7 |
| טכנולוגיית קישוריות | 433 מגה -הרץ אלחוטי |
| סוג תצוגה | LCD |
| Power Source (Console) | Battery (AAA, not included) or Power Adapter |
| מקור כוח (חיישן חיצוני) | מופעל סולארי עם גיבוי סוללה |
| דיוק טמפרטורה | ±0.5 מעלות צלזיוס |
| טמפרטורת פעולה מקסימלית | 60 מעלות צלזיוס |
| תכונות מיוחדות | Alarm, Atomic Clock (DCF), 4-level Backlight |
| טווח חיישנים חיצוניים | עד 100 מטר (330 רגל) |
8. אחריות ותמיכה
Raddy provides lifetime technical support for the AG7 weather station. If you encounter any issues or have questions regarding the product, please contact Raddy customer service for assistance.
For contact information, please refer to the packaging or the official Raddy webאֲתַר.