
מָבוֹא
This manual provides detailed instructions for the setup, operation, and maintenance of your ARRIS Jumper T20S V2 Radio Controller. Please read this manual thoroughly before using the device to ensure proper function and safety.
תכונות מפתח
- RDC90 Sensor Gimbals: Experience precise and sensitive control for your RC devices.
- Vivid OLED Screen Display: Stay informed with crucial flight data, telemetry, and settings on a high-resolution screen.
- ELRS and EdgeTX Compatibility: Benefit from reliable, extended-range communication and advanced firmware capabilities.
- תמיכה בריבוי פרוטוקולים: Connect effortlessly to a wide array of RC models and brands.
- Customization for Personalized Flying: Tailor your control setup with configurable switches, buttons, and functions via EdgeTX.
המוצר נגמרview
Familiarize yourself with the components and design of your Jumper T20S V2 Radio Controller.

תמונה: חזית view of the Jumper T20S V2 Radio Controller, showing the gimbals, OLED screen, power button, and various control switches and buttons.
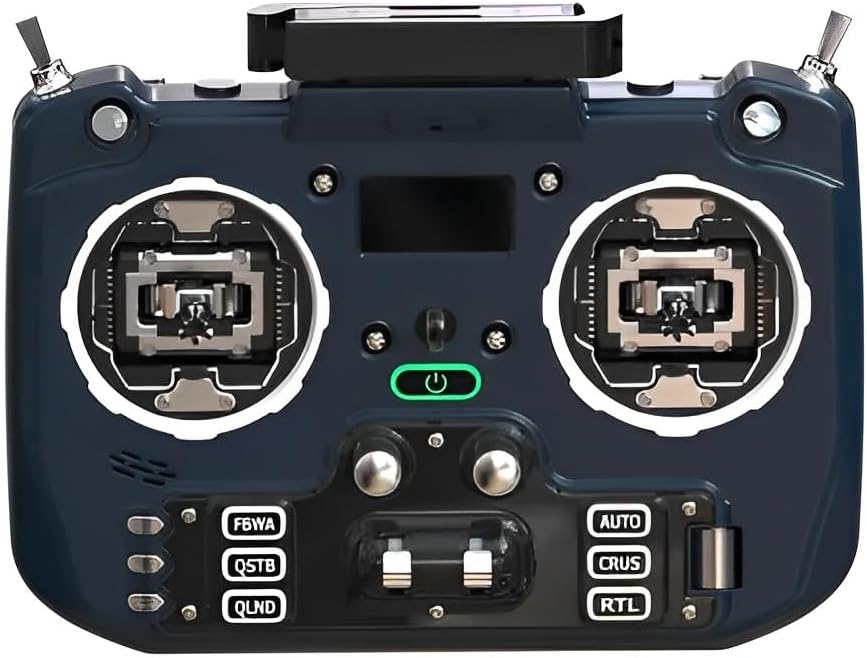
תמונה: חזית בזווית view of the Jumper T20S V2 Radio Controller, highlighting the gimbals and control layout.

תמונה: צד view of the Jumper T20S V2 Radio Controller, showing the foldable antenna in an extended position.

תמונה: אחורי view of the Jumper T20S V2 Radio Controller, displaying the external cooling fan and battery compartment area.

Image: Diagram illustrating the airflow and cooling fan system integrated into the Jumper T20S V2 for high-power ELRS operation.

תמונה: תקריב view of the omnidirectional foldable antenna, designed to provide stable signal support in all directions.
הגדרה
1. התקנת סוללה
- Open the battery compartment cover located on the rear of the controller.
- Insert two 21700 batteries, ensuring correct polarity.
- סגור היטב את מכסה תא הסוללות.
2. הפעלה ראשונית
- Press and hold the power button (located centrally on the front panel) until the OLED screen illuminates.
- The controller will boot into the EdgeTX operating system.
3. Gimbal Calibration (Recommended)
For optimal performance, it is recommended to calibrate the gimbals after initial setup or if you experience inconsistent control. Refer to the EdgeTX documentation for detailed calibration procedures.
הוראות הפעלה
1. מערכת ניווט ותפריטים
The Jumper T20S V2 utilizes the EdgeTX firmware. Navigation is primarily done using the scroll wheel and menu buttons. The OLED screen displays all relevant information.
- גלגל גלילה: Used to navigate through menus and adjust values.
- לחצני תפריט: Access various settings and functions.
- תפריט מערכת: Configure global settings, model setup, and radio calibration.
2. Model Setup and Binding
To control an RC model, you must first create a model profile and bind the controller to the receiver.
- Navigate to the Model Select screen in EdgeTX.
- Create a new model or select an existing one.
- Configure the internal or external RF module settings (e.g., ELRS, Multi-Protocol) to match your receiver.
- Initiate the binding process on both the controller and the receiver according to their respective manuals.
- Verify successful binding by checking receiver telemetry or control response.
3. Customizing Controls
The Jumper T20S V2 offers extensive customization. You can assign functions to switches, buttons, and sliders through the EdgeTX firmware.
- Access the Mixer and Special Functions menus within EdgeTX to configure control assignments.
- Adjust gimbal tension and stick settings by disassembling the radio, if desired (refer to advanced user guides for detailed instructions).
תַחזוּקָה
- ניקוי: השתמשו במטלית רכה ויבשה לניקוי החלק החיצוני של הבקר. הימנעו מחומרי ניקוי שוחקים או ממסים.
- אִחסוּן: Store the controller in a cool, dry place, away from direct sunlight and extreme temperatures. Remove batteries if storing for extended periods.
- עדכוני קושחה: Regularly check for and install the latest EdgeTX firmware updates to ensure optimal performance and access new features. Refer to the official EdgeTX webבאתר להנחיות.
- טיפול בגימבל: Keep gimbals free from dust and debris. Avoid applying excessive force.
פתרון בעיות
- Controller does not power on:
- Ensure batteries are correctly installed and fully charged. Check battery polarity.
- No response from RC model:
- Verify that the controller is properly bound to the receiver. Check model settings in EdgeTX for correct RF protocol and channel assignments. Ensure the RC model's battery is charged and connected.
- OLED screen is blank or flickering:
- Restart the controller. If the issue persists, ensure firmware is up to date. Contact support if the problem continues.
- Gimbal movement is erratic:
- Perform a gimbal calibration through the EdgeTX system menu. Check for any physical obstructions or damage to the gimbals.
מפרטים
| תכונה | פְּרָט |
|---|---|
| MCU | STM32F407ZGT6 |
| External Module Interface | Reserved (1.25mm-5P) |
| מָסָך | 1.3" OLED (128*64) |
| External Module Power Supply | XT30 (2S2A output) |
| כרטיס SD | Chip-based internal (officially recommended by EdgeTX) |
| סוג גימבל | Standard full size gimbal |
| כרך ידtage | 6-8.4V |
| Gimbal Sensors | RDC90 / Hall optional |
| סוֹלְלָה | 2pcs 21700 (not included) |
| פלט כוח | מקסימום 1W |
| מִשׁקָל | 449 גרם (סוללה לא כלולה) |
| מספר דגם של פריט | LA0316 |
| מידות חבילה | 8.7 x 7.91 x 3.78 אינץ' |
| Item Weight (with batteries) | כ-300 גרם (10.6 אונקיות) |
אחריות ותמיכה
למידע על אחריות ותמיכה טכנית, אנא עיינו בתיעוד המצורף לרכישה או בקרו באתר הרשמי של ARRIS. webאתר. שמור את הוכחת הרכישה שלך לצורך תביעות אחריות.
For further assistance with EdgeTX firmware, visit the official EdgeTX project website and community forums for comprehensive resources and community support.