
1. הקדמה
This manual provides instructions for the proper use and maintenance of the SUNMI V2SE Smart Mobile Terminal. The V2SE is a versatile device designed for various business applications, featuring an integrated 58mm thermal printer, 1D/2D barcode recognition, NFC capabilities, and running on Android 12.0.
תכונות מפתח כוללות:
- Integrated 58mm thermal printer with 80mm/s print speed.
- 1D/2D Barcode recognition for efficient scanning.
- NFC for contactless transactions.
- Android 12.0 operating system with a Quad Core 2.0 GHz CPU.
- 2 GB RAM and 8 GB ROM for smooth operation.
- Connectivity: 4G/3G/2G, 2.4G/5G Wi-Fi, Bluetooth 2.1/3.0/4.2.
- Removable Lithium Ion battery.
2. רכיבי מכשיר
Familiarize yourself with the main components of your SUNMI V2SE terminal.
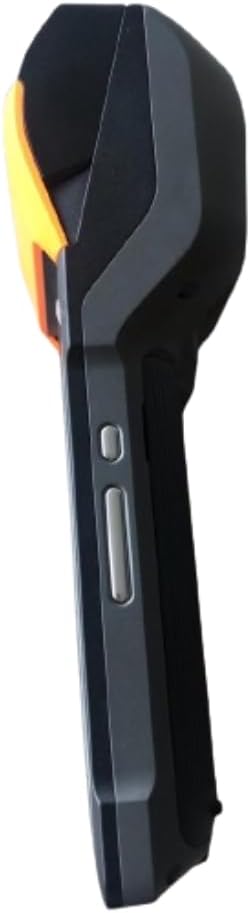
איור 2.1: חזית וצד View. This image displays the device's screen, the integrated barcode scanner at the top, and the power and volume buttons located on the side.

איור 2.2: צַד Viewתמונה זו מציגה את הצד של הפרוfile of the terminal, including the cover for the SIM card slot and additional buttons.

איור 2.3: בְּחֲזָרָה View. This image illustrates the rear of the device, featuring the thermal printer cover, the 0.3 MP camera, and the charging contact points.
רשימת רכיבים:
- מסך תצוגה: Touch-sensitive LCD for user interaction.
- סורק ברקוד: Integrated 1D/2D scanner for data capture.
- מדפסת תרמית: For printing receipts and other documents.
- לחצן הפעלה: כדי להפעיל/לכבות את המכשיר או להעיר אותו/לשינה.
- לחצני עוצמת הקול: כדי לכוונן את רמות השמע.
- מַצלֵמָה: 0.3 MP front photo sensor.
- חריץ לכרטיס SIM: Supports 1 Nano SIM.
- תא סוללות: Houses the removable Lithium Ion battery.
- Charging Port/Contacts: לטעינת המכשיר.
3. הגדרה ראשונית
3.1. התקנת סוללה
- ודא שהמכשיר כבוי.
- Locate the battery compartment cover on the back of the device (refer to Figure 2.3).
- הסר את המכסה על ידי החלקתו או הרמתו בהתאם לסימונים.
- Insert the provided Lithium Ion battery, ensuring the contacts align correctly.
- החזר היטב את מכסה תא הסוללות.
3.2. התקנת כרטיס SIM
- Ensure the device is powered off and the battery is installed.
- Locate the SIM card slot cover on the side of the device (refer to Figure 2.2).
- פתח את המכסה.
- Insert a Nano SIM card into the designated slot with the gold contacts facing down and the notched corner aligned.
- Close the SIM card slot cover firmly.
3.3. Thermal Paper Loading
- Locate the printer cover release latch, typically on the top or side of the printer compartment (refer to Figure 2.3).
- פתח את מכסה המדפסת.
- Insert a 58mm thermal paper roll into the compartment, ensuring the paper feeds from the bottom and the leading edge extends out of the printer slot.
- סגור את מכסה המדפסת בחוזקה עד שייכנס למקומו בנקישה. ודא שאין רפיון בגליל הנייר.
3.4. טעינה ראשונית והפעלה
- Connect the provided power adapter to the device's charging port.
- Plug the adapter into a power outlet. Allow the device to charge fully before first use.
- To power on, press and hold the Power button (refer to Figure 2.1) until the SUNMI logo appears on the screen.
4. הוראות הפעלה
4.1. הפעלה/כיבוי ומצב שינה
- הפעלה: לחץ והחזק את לחצן ההפעלה עד שהמכשיר ירטוט והמסך יידלק.
- כיבוי: Press and hold the Power button until a power menu appears. Select "Power Off" and confirm.
- שינה/התעוררות: Briefly press the Power button to put the device into sleep mode or wake it up.
4.2. Using the Thermal Printer
The integrated 58mm thermal printer can be used to print receipts, tickets, and other documents.
- Ensure thermal paper is correctly loaded (refer to Section 3.3).
- Open the application that requires printing (e.g., POS software).
- Initiate the print command within the application. The device will automatically print the content.
- Tear off the printed paper against the serrated edge.
4.3. סריקת ברקוד
The V2SE supports 1D and 2D barcode recognition.
- Open an application that requires barcode input.
- Point the scanner window (located at the top of the device, refer to Figure 2.1) at the barcode.
- Press the dedicated scan button (if available) or trigger the scan function within the application.
- Ensure the barcode is within the scanner's field of view and well-lit for optimal performance.
4.4. פונקציונליות NFC
The device supports Near Field Communication (NFC) for contactless operations.
- Ensure NFC is enabled in the device settings (Settings > Connected devices > NFC).
- Open an application that utilizes NFC (e.g., payment app, data transfer app).
- Hold the NFC-enabled card or device close to the NFC detection area on your terminal (typically near the top or back of the device).
- Follow the on-screen prompts to complete the transaction or data transfer.
4.5. קישוריות רשת
- Wi-Fi: עבור אל הגדרות > רשת ואינטרנט > Wi-Fi כדי להתחבר לרשתות אלחוטיות זמינות.
- Mobile Data (4G/3G/2G): Ensure a valid SIM card is installed and mobile data is enabled in Settings > Network & internet > Mobile network.
- בלוטות': עבור אל הגדרות > מכשירים מחוברים > Bluetooth כדי להתאים אותם עם התקני Bluetooth אחרים.
5. תחזוקה
5.1. ניקוי המכשיר
- כבה את המכשיר לפני הניקוי.
- השתמש במטלית רכה נטולת מוך מעט דampניגבו את החלק החיצוני במים או בחומר ניקוי עדין ולא שוחק.
- For the display, use a screen-specific cleaner and a microfiber cloth.
- Do not use harsh chemicals, solvents, or abrasive materials. Avoid spraying liquids directly onto the device.
5.2. טיפול בסוללה
- Charge the battery regularly, avoiding complete discharge whenever possible.
- אל תחשוף את הסוללה לטמפרטורות קיצוניות.
- אם לא נעשה שימוש במכשיר למשך תקופה ממושכת, טען את הסוללה עד לכ-50% ואחסן אותה במקום קריר ויבש.
- Use only the original or approved charger and battery.
5.3. Printer Head Cleaning
Regular cleaning of the printer head can prevent print quality issues.
- Power off the device and open the printer cover.
- השתמש במקלון צמר גפן קלות דampened with isopropyl alcohol to gently wipe the thermal print head.
- Allow the print head to dry completely before closing the cover and powering on the device.
6. פתרון תקלות
| בְּעָיָה | סיבה אפשרית | פִּתָרוֹן |
|---|---|---|
| המכשיר לא נדלק | Low battery; Faulty battery; Power button issue | Charge the device for at least 30 minutes. Ensure battery is correctly installed. Try a different charger. |
| מדפסת לא מדפיסה | No paper; Paper jammed; Printer head dirty; Application error | Check and load paper. Clear any paper jams. Clean the printer head (Section 5.3). Restart the application or device. |
| Barcode scanner not working | Scanner window obstructed; Barcode damaged; Application error | Ensure scanner window is clean. Try scanning a different barcode. Restart the application or device. |
| אין חיבור Wi-Fi | Wi-Fi off; Incorrect password; Out of range | Enable Wi-Fi in settings. Re-enter password. Move closer to the Wi-Fi router. |
| אין נתונים ניידים | SIM card not installed; Mobile data off; No network coverage | Check SIM card installation. Enable mobile data in settings. Check for network coverage in your area. |
7. מפרטים
| תכונה | פְּרָט |
|---|---|
| דֶגֶם | V2SE |
| מַעֲרֶכֶת הַפעָלָה | אנדרואיד 12.0 |
| מעבד | ארבע ליבות 2.0 גיגה-הרץ |
| אַיִל | 2 ג'יגה-בייט |
| ROM | 8 ג'יגה-בייט |
| לְהַצִיג | LCD, 1920 x 1080 resolution, 16:9 Aspect Ratio |
| מַדפֶּסֶת | 58 mm thermal printer, 80 mm/s print speed |
| Barcode Recognition | 1D / 2D Barcode recognition |
| מַצלֵמָה | 0.3 MP Front Photo Sensor |
| חריץ ה- SIM | 1 Nano SIM (Dual SIM support) |
| קישוריות | 4G/3G/2G Cellular, Wi-Fi (2.4G/5G), Bluetooth 2.1/3.0/4.2, NFC |
| GPS | True, Supports GPS satellite navigation system |
| סוֹלְלָה | סוללת ליתיום-יון אחת (ניתנת להסרה, כלולה) |
| מידות | 22 x 9 x 9 ס"מ |
| מִשׁקָל | 400 גרם |
| יַצרָן | SUNMI |
8. אחריות ותמיכה
For warranty information and technical support, please refer to the documentation provided with your purchase or contact your vendor. Keep your proof of purchase for warranty claims.