1. הקדמה
This manual provides instructions for the safe operation, maintenance, and troubleshooting of your FLEX 24V Brushless Cordless 1/2-Inch Hammer Drill Turbo Mode Kit, model FX1271T-2B. Please read this manual thoroughly before using the tool to ensure proper and safe operation.
The FLEX FX1271T-2B is a powerful 24V brushless cordless hammer drill designed for demanding drilling and driving applications. It features a 1/2-inch full-metal ratcheting chuck, two-speed settings, a Turbo Mode for increased speed, and an anti-kickback safety feature. This kit includes the drill, a 2.5Ah Lithium-Ion Battery, a 5.0Ah Lithium-Ion Battery, and a 160W Fast Charger.
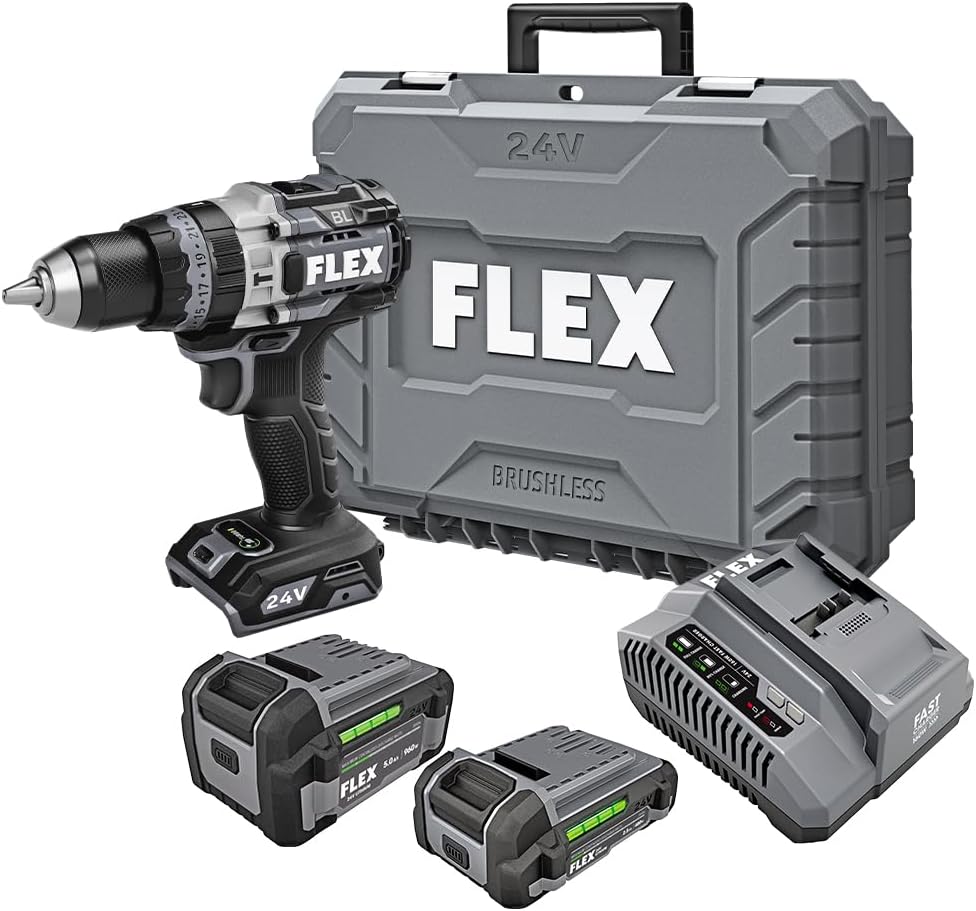
Figure 1: FLEX 24V Brushless Cordless 1/2-Inch Hammer Drill Kit (FX1271T-2B) including drill, two batteries, charger, and carrying case.
2. הוראות בטיחות כלליות
אזהרה: קרא את כל אזהרות הבטיחות, ההוראות, האיורים והמפרטים המסופקים עם כלי חשמלי זה. אי מילוי כל ההוראות המפורטות להלן עלול לגרום להתחשמלות, שריפה ו/או פציעה חמורה.
2.1 בטיחות באזור העבודה
- שמור על אזור עבודה נקי ומואר היטב. אזורים מבולגנים או חשוכים מזמינים תאונות.
- אין להפעיל כלים חשמליים באווירה נפיצה, כגון בנוכחות נוזלים דליקים, גזים או אבק. כלי עבודה חשמליים יוצרים ניצוצות שעלולים להצית את האבק או האדים.
- הרחק ילדים ועוברי אורח בזמן הפעלת כלי עבודה חשמלי. הסחות דעת עלולות לגרום לך לאבד שליטה.
2.2 בטיחות חשמל
- תקעי כלי חשמל חייבים להתאים לשקע. לעולם אל תשנה את התקע בשום צורה. אין להשתמש בתקעי מתאם עם כלי עבודה חשמליים מוארקים (מוארקים). תקעים ללא שינוי ושקעים תואמים יפחיתו את הסיכון להתחשמלות.
- הימנע ממגע גוף עם משטחים מוארקים או מוארקים, כגון צינורות, רדיאטורים, טווחים ומקררים. קיים סיכון מוגבר להתחשמלות אם גופך מוארק או מוארק.
- אין לחשוף כלי עבודה חשמליים לגשם או לתנאי רטיבות. מים שנכנסים לכלי חשמלי יגדילו את הסיכון להתחשמלות.
2.3 בטיחות אישית
- יש ללבוש תמיד הגנה לעיניים. השתמשו במשקפי מגן, משקפי מגן או מגן פנים.
- יש ללבוש הגנה על האוזניים בעת הפעלת הכלי למשך פרקי זמן ממושכים.
- להתלבש כמו שצריך. אין ללבוש בגדים או תכשיטים רפויים. הרחיקו את השיער והבגדים מחלקים נעים.
- הישאר ערני, צפה במה שאתה עושה והשתמש בהיגיון בריא בעת הפעלת כלי עבודה חשמלי.
2.4 שימוש וטיפול בכלים
- אין להכריח את הכלי החשמלי. השתמש בכלי החשמלי המתאים ליישום שלך.
- נתק את ערכת הסוללות מהכלי החשמלי לפני ביצוע התאמות כלשהן, החלפת אביזרים או אחסון כלי עבודה חשמליים.
- אחסן כלים חשמליים סרק הרחק מהישג ידם של ילדים ואל תאפשר לאנשים שאינם מכירים את הכלי החשמלי או הוראות אלה להפעיל את הכלי החשמלי.
- אחזקת כלי עבודה ואביזרים חשמליים. בדוק אם יש חוסר יישור או קשירה של חלקים נעים, שבירה של חלקים וכל מצב אחר שעלול להשפיע על פעולת הכלי החשמלי.
2.5 שימוש וטיפול בכלי סוללה
- טען רק עם המטען שצוין על ידי היצרן. מטען שמתאים לסוג אחד של ערכת סוללות עלול ליצור סכנת שריפה בשימוש עם ערכת סוללות אחרת.
- השתמש בכלי עבודה חשמליים רק עם ערכות סוללות ייעודיות במיוחד. שימוש בכל ערכות סוללות אחרות עלול ליצור סכנת פציעה ושריפה.
- כאשר ערכת הסוללה אינה בשימוש, הרחק אותה מחפצי מתכת אחרים, כמו מהדקי נייר, מטבעות, מפתחות, מסמרים, ברגים או חפצי מתכת קטנים אחרים, שיכולים ליצור חיבור ממסוף אחד למשנהו. קיצור חיבורי הסוללה יחד עלול לגרום לכוויות או שריפה.
- בתנאים פוגעניים, נוזל עלול להיפלט מהסוללה; להימנע ממגע. אם מתרחש בטעות מגע, שטוף במים. אם הנוזל נגע בעיניים, פנה בנוסף לעזרה רפואית. נוזל שנפלט מהסוללה עלול לגרום לגירוי או לכוויות.
3. רכיבים כלולים
Your FLEX 24V Brushless Cordless 1/2-Inch Hammer Drill Kit (FX1271T-2B) includes the following items:
- FLEX 24V Brushless Cordless 1/2-Inch Hammer Drill
- (1) FLEX 24V 2.5Ah Lithium-Ion Battery (FX0111-1)
- (1) FLEX 24V 5.0Ah Lithium-Ion Battery (FX0121-1)
- FLEX 160W Fast Charger
- ידית עזר
- תיק נשיאה

Figure 2: The FLEX Advantage highlights the included 2.5Ah and 5.0Ah Lithium-Ion batteries, emphasizing their power, runtime, and fast charging capabilities.
4. התקנה ושימוש ראשוני
4.1 טעינת הסוללה
- Connect the 160W Fast Charger to a standard power outlet.
- החלק את ערכת הסוללה לתוך המטען עד שהיא תיכנס למקומה בנקישה.
- The charger's indicator lights will show the charging status. A fully charged battery will be indicated by a solid green light.
- לאחר הטעינה המלאה, הסר את הסוללה מהמטען.
4.2 התקנת הסוללה
- Align the battery pack with the battery port on the base of the drill handle.
- Slide the battery into the port until it locks securely into place. Ensure it is fully seated to prevent accidental dislodgement during operation.
- To remove the battery, press the release button(s) on the sides of the battery pack and slide it out.
4.3 חיבור ידית העזר
For improved control and safety, especially during high-torque applications or hammer drilling, attach the auxiliary handle.
- שחררו את ידית העזרamp על ידי סיבובו נגד כיוון השעון.
- Slide the handle over the front of the drill body, positioning it to your preferred angle.
- הדקו את clamp על ידי סיבובו עם כיוון השעון עד שהידית מהודקת היטב.

Figure 3: The drill with the auxiliary handle attached, providing enhanced control and stability, particularly when the anti-kickback feature engages.
4.4 Installing Drill Bits or Accessories
- ודאו שהמקדחה כבויה והסוללה הוסרה למען הבטיחות.
- Grip the rear collar of the 1/2-inch full-metal ratcheting chuck and rotate the front collar counter-clockwise to open the chuck jaws.
- הכנס את המקדח או האביזר במלואם לתוך לסתות הצ'אק.
- Rotate the front collar clockwise to tighten the chuck jaws firmly around the bit. The ratcheting mechanism will provide an audible click when securely tightened.
- Gently pull on the bit to ensure it is properly secured.

Figure 4: Detail of the 1/2-inch full-metal ratcheting chuck, designed for secure bit retention and durability.
5. הוראות הפעלה
5.1 הפעלה/כיבוי ובקרת מהירות
- מתג הדק: Squeeze the trigger switch to turn the drill on. Release it to turn the drill off.
- מהירות משתנה: The trigger switch is pressure-sensitive, allowing for variable speed control. Pressing the trigger further increases the speed.
- בורר קדימה/אחורה: Located above the trigger, push the selector left for forward rotation (drilling/driving) and right for reverse rotation (removing screws). Center position locks the trigger for safety.
5.2 Gear Selection (2-Speed)
The drill features a 2-speed gearbox for optimal performance across various applications.
- Gear 1 (Low Speed, High Torque): Slide the gear selector switch to position '1'. Ideal for driving screws, drilling large holes, or applications requiring maximum torque.
- Gear 2 (High Speed, Lower Torque): Slide the gear selector switch to position '2'. Suitable for fast drilling of smaller holes in wood or metal.
NOTE: Always ensure the drill is stopped before changing gear settings to prevent damage to the gearbox.
5.3 Mode Selection (Drill, Drive, Hammer Drill)
Rotate the collar behind the chuck to select the desired operating mode:
- מצב קידוח (סמל קידוח): For drilling holes in wood, metal, and plastics.
- Drive Mode (Screw Icon): For driving screws. The clutch settings (numbered ring) allow you to adjust the torque to prevent over-driving screws or damaging materials.
- מצב מקדחת פטיש (סמל פטיש): For drilling into masonry, brick, and concrete. This mode combines rotary action with a hammering motion.
5.4 מצב טורבו
The Turbo Mode button, located on top of the drill, provides an immediate increase in speed for faster results when needed.
- הקש על טורבו button during operation to engage maximum speed.
- Release the button to return to the previously selected speed setting.

Figure 5: The Turbo Mode button, when pressed, provides increased speed for rapid task completion.
5.5 Anti-Kickback Feature
The drill is equipped with an advanced anti-kickback braking technology. If the drill bit binds during operation, the system will detect the sudden rotational force and rapidly stop the motor to reduce the risk of kickback and potential injury.
5.6 תאורת LED משולבת
An LED light is integrated into the drill to illuminate the work area, improving visibility in dimly lit conditions. The light activates when the trigger is pressed.

Figure 6: The integrated LED light provides illumination for improved visibility in dark work environments.
5.7 Drilling into Masonry (Hammer Drill Mode)
When drilling into masonry, brick, or concrete:
- Select Hammer Drill Mode.
- Ensure the auxiliary handle is securely attached and held firmly with both hands.
- Use appropriate masonry drill bits.
- Apply steady, firm pressure to the drill, allowing the hammering action to break up the material.

Figure 7: The FLEX hammer drill in action, demonstrating its capability to drill into tough materials with 1,400 in-lbs of torque.
6. תחזוקה
6.1 ניקוי
- תמיד נתק את מארז הסוללות לפני ביצוע כל ניקוי או תחזוקה.
- השתמשו במברשת רכה או באוויר דחוס כדי לנקות אבק ופסולת מפתחי האוורור.
- נגב את בית הכלי עם מודפסamp בַּד. אין להשתמש בכימיקלים קשים או בחומרי ניקוי שוחקים.
- שמרו על לסתות הצ'אק נקיות וחופשיות מפסולת כדי להבטיח אחיזה נכונה של הביט.
6.2 אחסון
- אחסנו את הכלי, הסוללות והמטען במקום קריר ויבש, הרחק מאור שמש ישיר ולחות.
- Ensure batteries are partially charged (not fully depleted or fully charged for long-term storage) before storing.
- Store the tool in its carrying case to protect it from damage.
7. פתרון תקלות
| בְּעָיָה | סיבה אפשרית | פִּתָרוֹן |
|---|---|---|
| המקדחה לא מתחילה. | הסוללה לא טעונה או לא מותקנת כראוי. Forward/Reverse selector in center (locked) position. | Charge battery and ensure it is securely installed. Move selector to forward or reverse position. |
| אובדן חשמל במהלך הפעולה. | טעינת הסוללה נמוכה. הגנת עומס יתר הופעלה. | טען מחדש את הסוללה. Reduce pressure on the tool; allow it to cool down. |
| ביט מחליק בצ'אק. | הצ'אק לא מהודק מספיק. לסתות הצ'אק מלוכלכות או שחוקות. | הדקו היטב את הצ'אק. Clean chuck jaws. If problem persists, chuck may need replacement. |
| רטט או רעש מוגזמים. | Damaged or bent drill bit. רכיבים רופפים. | Replace drill bit. Check for loose screws or parts. If problem persists, discontinue use and contact service. |
8. מפרטים
| תכונה | פְּרָט |
|---|---|
| מספר דגם | FX1271T-2B |
| כרך ידtage | 24 וולט |
| גודל צ'אק | 1/2 אינץ' |
| סוג צ 'אק | Full-Metal Ratcheting |
| מומנט מירבי | 1400 אינץ' פאונד |
| מהירות סיבוב מקסימלית | 2500 סל"ד |
| מספר מהירויות | 2 |
| קיבולת סוללה (כלולה) | 2.5 Ah, 5.0 Ah Lithium-Ion |
| Charger Type (Included) | מטען מהיר 160W |
| תכונות מיוחדות | Turbo Mode, Anti-Kickback, LED Light, Brushless Motor |
| משקל פריט | 15.37 פאונד (ערכה) |
| מידות המוצר | 7.2"L x 4"W x 10"H (Tool) |
| קיבולת קידוח (עץ) | 2 אינץ' |
| קיבולת קידוח (מתכת) | 2 אינץ' |
9. אחריות ותמיכה
9.1 אחריות מוגבלת לכל החיים של FLEX
This FLEX tool is protected by the FLEX Limited Lifetime Warranty. To qualify for this warranty, you must register your new FLEX tool, battery, or charger within 30 days of purchase through December 31, 2025. Registration can be completed at registermyFLEX.com.
Please refer to the official FLEX website or your product packaging for full terms and conditions of the warranty.
9.2 תמיכת לקוחות
For technical assistance, replacement parts, or warranty claims, please contact FLEX customer support. Contact information can typically be found on the FLEX official webבאתר או על אריזת המוצר שלך.
When contacting support, please have your model number (FX1271T-2B) and purchase date available.