tectake 404970
tectake® Clamp Awning User Manual
דגם: 404970
1. הקדמה
Thank you for choosing the tectake® Clamp Awning. This manual provides essential information for the safe and efficient use of your new awning. Designed for balconies and terraces, this clamp awning offers flexible sun, privacy, and light rain protection without the need for drilling. Its robust construction and easy operation make it an ideal addition to your outdoor space.

Image: The tectake Clamp Awning shown in different extended positions, highlighting its versatility for sun and privacy protection.

Image: The tectake Clamp Awning installed on a modern terrace, providing shade and enhancing the outdoor living area.
2. הוראות בטיחות
אנא קראו בעיון את כל הוראות הבטיחות לפני ההרכבה והשימוש. אי הקפדה על הוראות אלה עלולה לגרום לפציעה או נזק למוצר.
- תנאי רוח: Do not use the awning in strong winds, heavy rain, or snow. Retract the awning completely during adverse weather conditions to prevent damage.
- יַצִיבוּת: Ensure the telescopic poles are securely clamped between the floor and ceiling. The non-slip plastic caps must be firmly seated to provide maximum stability.
- הַרכָּבָה: Assembly should ideally be performed by two adults to ensure safety and proper installation.
- מִרוָח: Ensure there is sufficient clearance around the awning when extending or retracting to avoid obstructions or collisions.
- ילדים וחיות מחמד: הרחיקו ילדים וחיות מחמד מהסוכך במהלך הפעולה.
- תַחזוּקָה: בדקו באופן קבוע את כל הרכיבים לאיתור בלאי, נזק או חיבורים רופפים. אין להשתמש בסוכך אם חלקים כלשהם פגומים.
3. תכולת החבילה
אנא ודא שכל החלקים קיימים לפני תחילת ההרכבה:
- Awning Fabric (Polyester with water-repellent coating)
- Telescopic Poles (Aluminium)
- Support Arms (Aluminium)
- כננת ידיים
- Mounting Hardware (Screws, connectors)
- Non-slip Plastic Caps
- מדריך הוראות
4. התקנה והרכבה
The tectake® Clamp Awning is designed for easy, no-drill installation. Follow these steps for a secure setup:
- הכן את המיקום: Choose a suitable location on your balcony or terrace with a stable floor and ceiling for clamping the telescopic poles. Ensure the surface is clean and free of debris.
- Assemble Telescopic Poles: Connect the sections of the telescopic poles according to the provided diagrams. Adjust the height of the poles using the screw mechanism to fit snugly between your floor and ceiling. Ensure the non-slip plastic caps are securely attached to both ends of the poles.
- Attach Support Arms: Secure the support arms to the telescopic poles at the desired height. These arms will hold the awning fabric.
- Mount Awning Fabric: Carefully attach the awning fabric to the main roller and the front bar, ensuring it is evenly distributed and aligned.
- Install Hand Crank: Attach the hand crank mechanism to the designated point on the awning. The crank can be mounted on either side for convenience.
- התאמות סופיות: Once assembled, use the hand crank to extend the awning slightly. Make any final height or angle adjustments to the telescopic poles and support arms to achieve optimal tension and stability. Ensure the awning is level and securely clamped.

Image: Visual representation of the simple, no-drill assembly process for the tectake Clamp סְכָכָה.
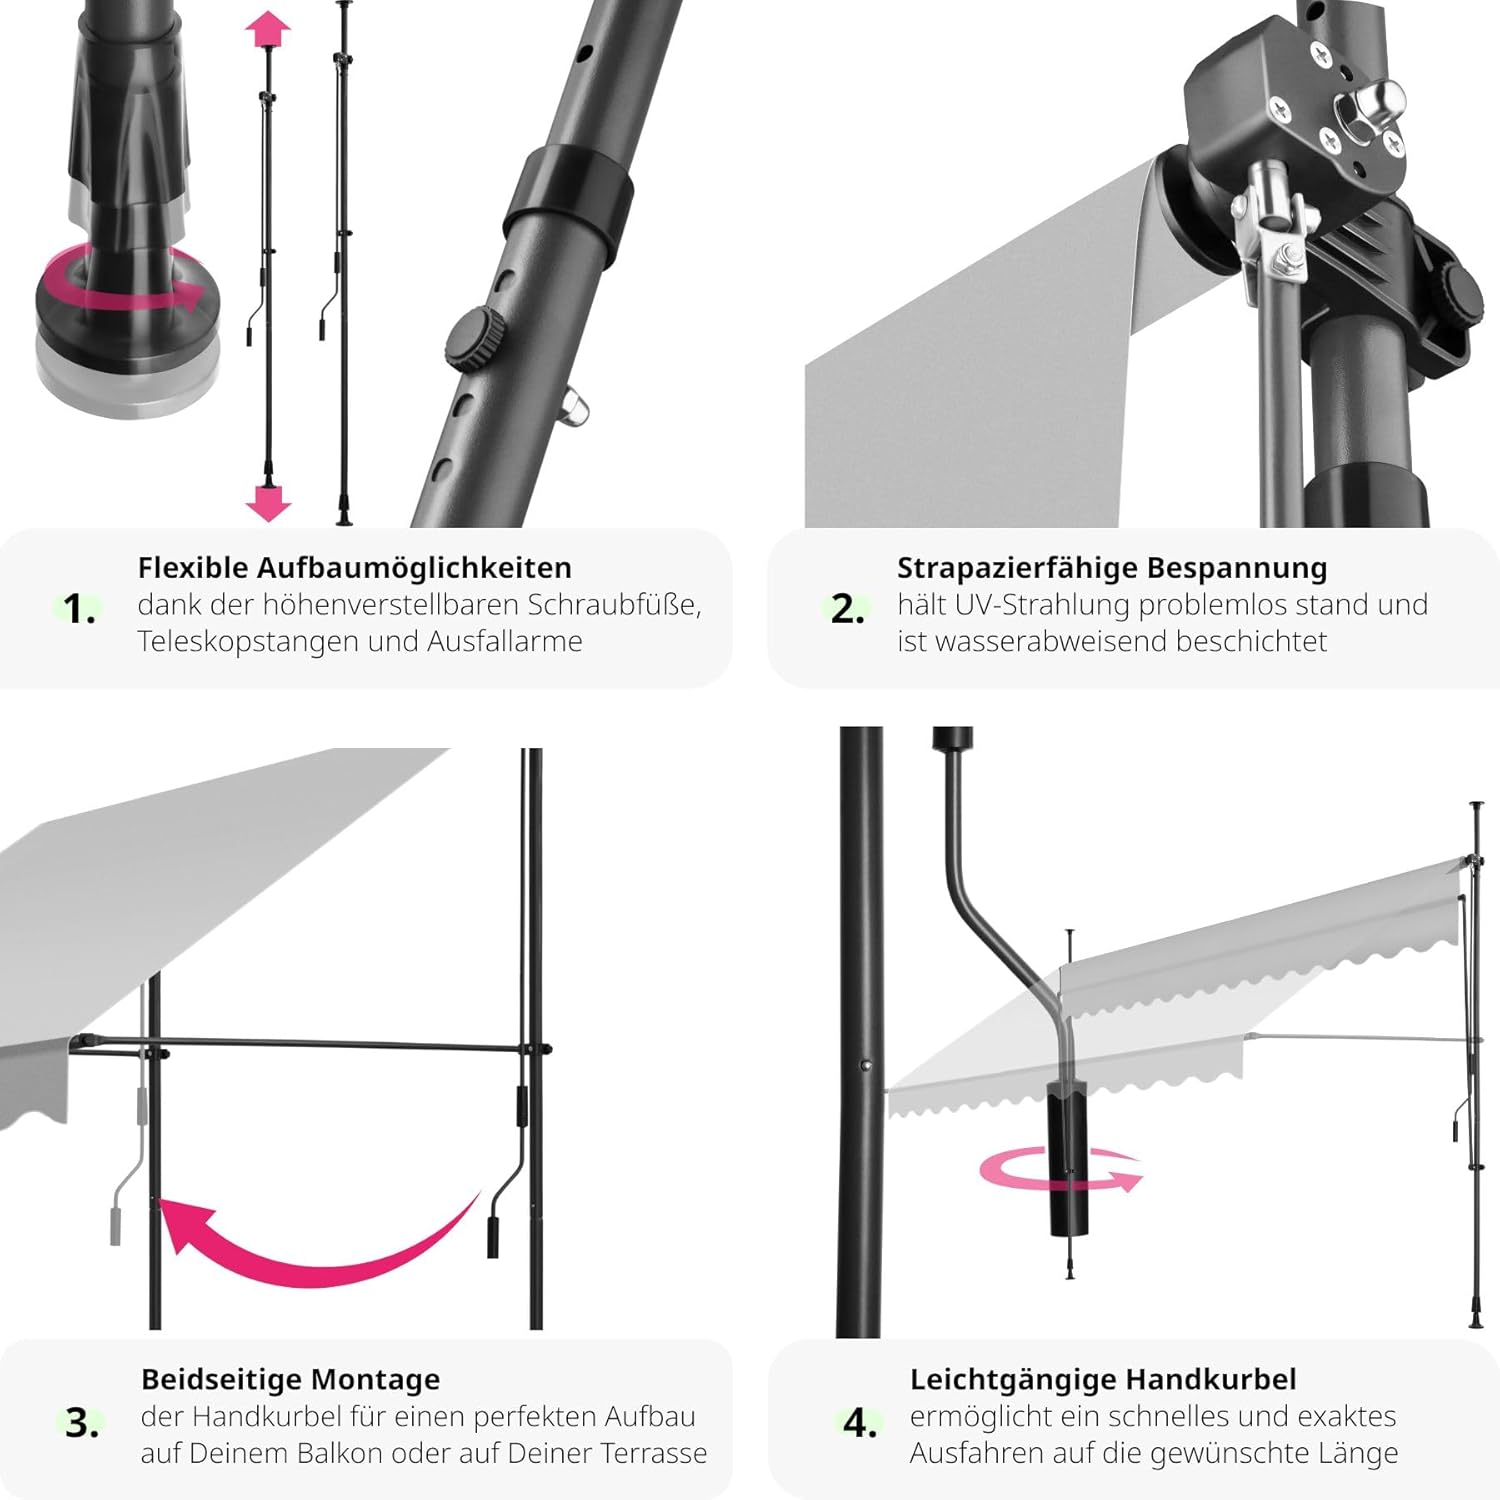
תמונה: תקריב views illustrating flexible setup options, durable fabric, bilateral crank mounting, and the smooth hand crank mechanism.
5. הוראות הפעלה
Operating your tectake® Clamp Awning is straightforward:
- הרחבת הסוכך: Turn the hand crank clockwise to extend the awning fabric. Continue turning until the awning reaches your desired length and angle.
- משיכת הסוכך: Turn the hand crank counter-clockwise to retract the awning fabric. Ensure the fabric rolls up smoothly and evenly.
- Adjusting Angle/Position: The awning can be extended diagonally for overhead sun protection or adjusted to a more vertical position to act as a privacy screen or windbreak. Adjust the support arms as needed to achieve the desired angle.

Image: The awning demonstrating its ability to be used diagonally for sun protection and vertically as a privacy screen.
6. תחזוקה וטיפול
Proper maintenance will extend the life of your awning:
- ניקוי הבד: The water-repellent polyester fabric is easy to clean. Use a soft brush or cloth with mild soap and water to remove dirt. Rinse thoroughly with clean water and allow to air dry completely before retracting. Do not use harsh chemicals or abrasive cleaners.
- טיפול במסגרת: Wipe down the powder-coated steel and aluminum components with a damp בד לפי הצורך.
- אחסון עונתי: If storing the awning for an extended period, ensure it is clean and completely dry to prevent mold or mildew. Store in a dry, protected area.
- בדיקה רגילה: Periodically check all screws, connections, and the clamping mechanism to ensure they are tight and secure.

Image: Visual representation of the awning's UV-resistant and water-repellent properties, crucial for durability and easy maintenance.

Image: The awning shown in both sunny and rainy conditions, highlighting its wind and weather resistant design.
7. פתרון תקלות
אם נתקלתם בבעיות עם הסוכך שלכם, עיינו בבעיות הנפוצות ובפתרונות הבאות:
| בְּעָיָה | סיבה אפשרית | פִּתָרוֹן |
|---|---|---|
| הסוכך לא יציב או מתנדנד. | Telescopic poles not securely clamped or loose connections. | Ensure poles are extended to maximum tension and plastic caps are firmly seated. Check all screws and connections for tightness. |
| Awning fabric does not extend/retract smoothly. | Obstruction, misaligned fabric, or damaged crank mechanism. | Check for any obstructions. Ensure fabric is rolling evenly. Inspect the hand crank for damage. |
| Fabric sags or collects water. | Insufficient tension or incorrect angle. | Adjust the height of the telescopic poles and the angle of the support arms to create proper tension and allow water runoff. |
8. מפרטים
| תכונה | פְּרָט |
|---|---|
| מספר דגם | 404970 |
| מידות כוללות (רוחב x עומק x גובה) | Approx. 400 x 120 x 211-304 cm |
| מִשׁקָל | כ. 11.5 ק"ג |
| חוֹמֶר | Polyester, Alloy Steel, Polyurethane, Aluminium, Polyethylene |
| עובי הבד | 180 גרם/מ"ר |
| הגנת UV | UV-Schutz 50+ |
| מִבצָע | Hand-operated (Crank) |
| טווח כוונון גובה | 211 ס"מ עד 304 ס"מ |

Image: Technical diagram showing the precise dimensions of the awning, including width, depth, and adjustable height range.

תמונה: סקירה מקיפהview of the product's dimensions and technical specifications.
9. אחריות ותמיכה
For warranty information or technical support, please contact tectake customer service. Details can typically be found on the product packaging or the official tectake webאֲתַר.
תמיכה מקוונת: Visit the official tectake webאתר לשאלות נפוצות, רישום מוצרים ומשאבי תמיכה נוספים.
מַגָע: עיין במסמכי הרכישה שלך לקבלת פרטי קשר ספציפיים עבור האזור שלך.
Ask a question about this manual
Ask about setup, troubleshooting, compatibility, parts, safety, or missing instructions. Manuals+ will review the question and use this page’s manual context to help answer it.