
1. מבוא ומעלהview
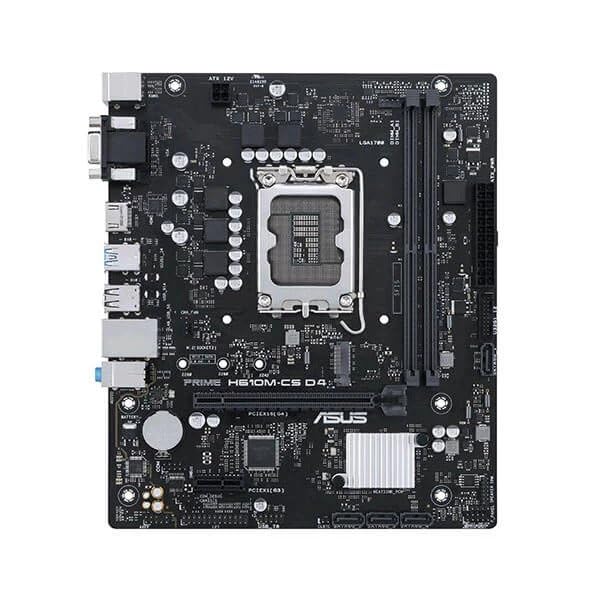
This manual provides detailed instructions for the installation, operation, and maintenance of your ASUS Prime H610M-CS D4 motherboard. Designed for Intel 12th Gen processors, this motherboard features an LGA1700 socket and supports DDR4 memory, offering a stable foundation for your personal computer build.
תכונות עיקריות:
- שקע אינטל LGA 1700: Ready for 12th Gen Intel processors.
- קירור מקיף: Features a PCH heatsink for efficient heat dissipation.
- Ultrafast connectivity: Includes a 32Gbps M.2 slot, Realtek 1 Gb Ethernet, and USB 3.2 Gen 1 ports.
- הגנה 5X III: Multiple hardware safeguards ensure all-round protection and durability.
- Luminous anti-moisture coating: Protects key components from moisture and corrosion, enhancing longevity.
2. התקנה והתקנה
Before beginning installation, ensure your system is powered off and unplugged from the wall outlet. Handle the motherboard by its edges to avoid static discharge.
2.1. התקנת מעבד
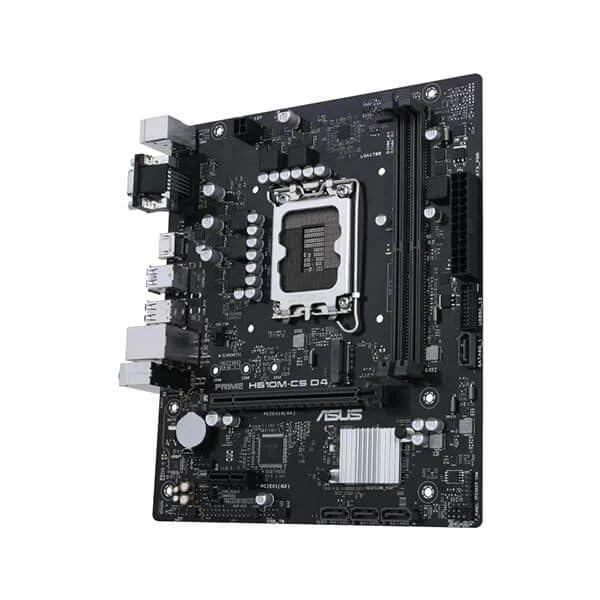
- אתר את שקע ה-LGA1700 בלוח האם.
- פתח את ידית שקע המעבד והרם את לוח הטעינה.
- Carefully align the Intel 12th Gen processor with the socket, ensuring the triangular mark on the CPU matches the mark on the socket. Do not force the CPU into the socket.
- הורד את משטח המטען ואבטח אותו בעזרת הידית.
2.2. התקנת זיכרון (RAM)
- פתחו את הקליפסים בשני קצוות חריצי זיכרון DDR4.
- יישר את החריץ במודול זיכרון DDR4 עם החריץ בחריץ ה-DIMM.
- לחץ בחוזקה על שני קצוות מודול הזיכרון עד שהקליפסים יתייצבו במקומם.
2.3. Cooler and Graphics Card Installation
- התקן את מקרר המעבד שלך בהתאם להוראות היצרן.
- Insert your graphics card into the primary PCIe x16 slot, ensuring it is fully seated and secured with the retention clip.
2.4. חיבורי חשמל
- חבר את מחבר החשמל ATX בעל 24 הפינים מספק הכוח שלך ללוח האם.
- חבר את מחבר החשמל ATX 12V בעל 8 פינים (או 4 פינים) ללוח האם.
2.5. Case Mounting and Front Panel Connections
- Mount the motherboard into your PC case using the appropriate standoffs and screws.
- Connect the front panel headers (power button, reset button, USB ports, audio jacks) to their respective pins on the motherboard. Refer to the motherboard's detailed diagram for exact pin locations.
3. הוראות הפעלה
3.1. אתחול ראשון והגדרת BIOS
- לאחר שכל הרכיבים הותקנו וחוברו, הפעל את המערכת.
- הקש על DEL or F2 הקש שוב ושוב במהלך האתחול כדי להיכנס לכלי תוכנית ההתקנה של BIOS/UEFI.
- הגדר את סדר האתחול, זמן המערכת והגדרות נחוצות אחרות. שמור את השינויים וצא.
3.2. התקנת דרייבר
After installing your operating system, install the latest drivers for the motherboard chipset, audio, LAN, and any other integrated components. These can typically be found on the ASUS support webאתר עבור דגם לוח האם הספציפי שלך.
3.3. קישוריות
- M.2 חריץ: Utilize the 32Gbps M.2 slot for high-speed NVMe SSDs.
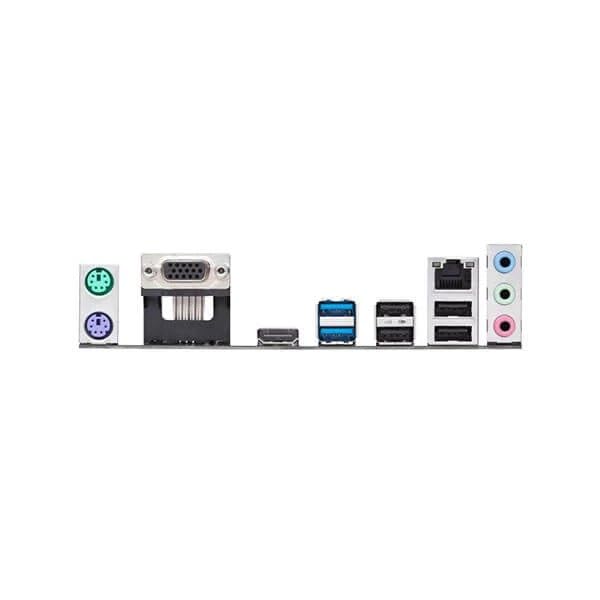
- אתרנט: Connect to your network using the Realtek 1 Gb Ethernet port.
- יציאות USB: Use the available USB 3.2 Gen 1 ports for high-speed peripheral connections.
4. תחזוקה
4.1. ניקיון
- נקו באופן קבוע אבק ממארז המחשב ומרכיבי לוח האם באמצעות אוויר דחוס. ודאו שהמערכת כבויה ומנותקת מהחשמל לפני הניקוי.
- Avoid using liquid cleaners directly on motherboard components.
4.2. עדכוני BIOS/UEFI
בדוק מעת לעת את התמיכה של ASUS webאתר לעדכוני BIOS/UEFI. עדכונים יכולים לשפר את יציבות המערכת, תאימות וביצועים. יש לפעול בקפידה אחר ההוראות שמספקת ASUS בעת ביצוע עדכון BIOS.
4.3. הגנה מפני לחות
The motherboard features a luminous anti-moisture coating designed to protect key components. While this coating provides enhanced durability, it is still recommended to operate the system in a dry, well-ventilated environment to prevent moisture buildup.
5. פתרון תקלות
אם אתם נתקלים בבעיות עם לוח האם שלכם, עיינו בשלבי פתרון הבעיות הנפוצים הבאים.
5.1. אין חשמל / אין אתחול
- Ensure all power cables (24-pin ATX, 8-pin ATX 12V) are securely connected to the motherboard and power supply.
- Verify that the power supply switch is in the ON position.
- Check front panel power button connections to the motherboard.
- בדוק עם ספק כוח אחר אם אפשר.
5.2. אין פלט תצוגה
- Ensure your monitor is connected to the graphics card (if installed) or the motherboard's integrated graphics port (HDMI/VGA).
- התקן מחדש את כרטיס המסך ואת מודולי הזיכרון.
- Clear CMOS settings (refer to your motherboard's full manual for jumper location).
5.3. רכיב לא זוהה
- Check that the component (e.g., M.2 SSD, RAM, PCIe card) is correctly installed and seated.
- Verify that the component is compatible with the motherboard.
- Update BIOS/UEFI to the latest version.
6. מפרטים
| תכונה | פְּרָט |
|---|---|
| מותג | ASUS |
| סִדרָה | רִאשׁוֹנִי |
| מספר דגם | Asus Prime H610M-Cs |
| שקע מעבד | LGA1700 |
| מעבדים תואמים | Intel Core מהדור ה-12 |
| טכנולוגיית זיכרון | DDR4 |
| זיכרון מרבי נתמך | 1 GB (Note: This value from source data may be a typo, typical motherboards support much higher RAM capacities.) |
| מהירות שעון זיכרון | 1600 מגה-הרץ (Note: This value from source data may be a typo or base speed, actual supported speeds are typically higher for DDR4.) |
| ממשק כרטיס מסך | מְשׁוּלָב |
| סוג קישוריות | Wi-Fi (Note: While "Wi-Fi" is listed, the feature bullets mention "Realtek 1 Gb Ethernet", implying wired LAN. Wi-Fi capability might require an add-in card or be an error in the source data.) |
| מספר יציאות HDMI | 1 |
| מספר יציאות אתרנט | 1 |
| מידות המוצר (LxWxH) | 26.5 x 6 x 27 ס"מ |
| משקל פריט | 770 גרם |
| ארץ מוצא | סִין |
Note: Specifications are subject to change without notice. For the most up-to-date information, please refer to the official ASUS product page. Some values from the source data (e.g., Maximum Memory Supported, Memory Clock Speed, Connectivity Type) appear to be inconsistent with typical motherboard specifications and may be data entry errors.
7. אחריות ותמיכה
7.1. מידע על אחריות
Your ASUS Prime H610M-CS D4 motherboard is covered by a limited warranty provided by ASUS. The specific terms and duration of the warranty may vary by region and retailer. Please retain your proof of purchase for warranty claims. For detailed warranty information, visit the official ASUS support webאֲתַר.
7.2. תמיכה טכנית
לסיוע טכני, הורדות מנהלי התקנים, עדכוני BIOS ומידע נוסף על המוצר, אנא בקרו באתר התמיכה הרשמי של ASUS webאֲתַר: www.asus.com/support/. You may also contact ASUS customer service directly for personalized support.