
1. הקדמה
Thank you for choosing the ENERMAX PABYS PB30 ECB-PB30-BB-ARGB ATX PC Case. This manual provides essential information for the proper installation, operation, and maintenance of your new PC case. Please read this manual thoroughly before beginning the assembly process to ensure optimal performance and safety.

איור 1: חזית view of the ENERMAX PABYS PB30 PC case.
2. תכונות מוצר
The ENERMAX PABYS PB30 PC case is designed to provide a robust and aesthetically pleasing enclosure for your PC components. Key features include:
- Edge-to-Edge Tempered Glass Side Panel: מציע ברור view of your internal components and RGB lighting.
- Addressable RGB Lighting Synchronization Support: Compatible with major motherboard RGB software for unified lighting control.
- Pre-installed Square-shaped Lighting RGB Fan: Enhances cooling and visual appeal right out of the box.
- Removable HDD Cage: Facilitates easier cable management and provides flexibility for power supply installation.
3. הוראות התקנה
3.1. פריקה והכנה
- הוציאו בזהירות את מארז המחשב מהאריזה שלו.
- הנח את המארז על משטח יציב ושטוח.
- Remove the tempered glass side panel by unscrewing the thumb screws located at the rear of the case and gently pulling the panel away. Set it aside on a soft, non-abrasive surface to prevent scratches.
3.2. התקנת רכיבים
Follow these steps to install your PC components:
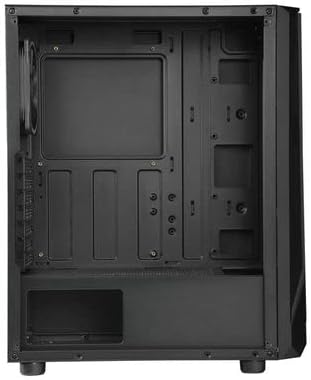
Figure 2: Interior layout of the ENERMAX PABYS PB30 PC case.
- התקנת לוח אם: Align your ATX, MicroATX, or Mini-ITX motherboard with the standoffs inside the case. Secure it with the provided screws.
- התקנת יחידת אספקת חשמל (PSU): Install your PSU into the dedicated compartment at the bottom rear of the case. Secure it with screws from the rear.
- התקנת כונן אחסון: Utilize the removable HDD cage for 3.5-inch drives or dedicated mounts for 2.5-inch SSDs. Secure drives with appropriate screws.
- התקנת כרטיס הרחבה: Remove the necessary expansion slot covers (7 available) at the rear of the case. Insert your graphics card or other expansion cards and secure them with screws.
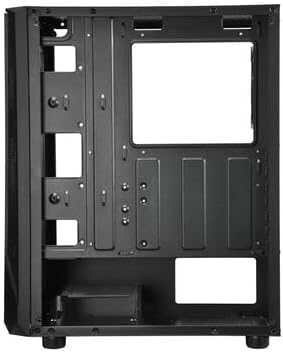
איור 3: אזור ניהול כבלים מאחורי מגש לוח האם.
3.3. ניהול כבלים
Route all power and data cables through the designated cutouts and tie-down points behind the motherboard tray. This improves airflow and maintains a clean interior aesthetic. The removable HDD cage can assist in managing PSU cables.
3.4. חיבורי לוח קדמי
Connect the front panel cables (USB 3.2 Gen1 x1, USB 2.0 x1, HD Audio, Power, Reset, LED) from the case to the corresponding headers on your motherboard. Refer to your motherboard manual for exact header locations.
4. תפעול
4.1. הדלק
Once all components are installed and cables are connected, replace the side panel. Connect your monitor, keyboard, mouse, and power cable to the PSU. Press the power button on the front panel to start your system.
4.2. בקרת תאורת RGB
The pre-installed RGB fan and any other addressable RGB components connected to the case can be controlled via your motherboard's RGB synchronization software (e.g., ASUS Aura Sync, MSI Mystic Light Sync, GIGABYTE RGB Fusion, ASRock Polychrome Sync). Ensure the RGB cables are correctly connected to the motherboard's 3-pin 5V ARGB header.
5. תחזוקה
תחזוקה שוטפת מסייעת להבטיח ביצועים אופטימליים ואורך חיים של מארז המחשב והרכיבים שלו.
- ניקוי מסנן אבק: Periodically remove and clean any dust filters (if present) to maintain good airflow and prevent dust buildup inside the case.
- ניקוי חיצוני: נגב את המשטחים החיצוניים עם רך, דamp cloth. Avoid harsh chemicals that may damage the finish or tempered glass.
- הסרת אבק פנימי: Use compressed air to gently remove dust from internal components and fan blades. Ensure the system is powered off and unplugged before cleaning.
6. פתרון תקלות
אם אתם נתקלים בבעיות בבניית המחשב שלכם, שקלו את השלבים הנפוצים הבאים לפתרון בעיות:
- אין כוח: Ensure the PSU is switched on, the power cable is securely connected, and all motherboard power connectors (24-pin ATX, 8-pin CPU) are properly seated. Check front panel power button connection to the motherboard.
- מאווררים שלא מסתובבים: Verify that all fan cables are correctly connected to the motherboard fan headers or any fan controller. Check BIOS settings for fan control.
- RGB Lighting Not Working/Syncing: Confirm that the ARGB cable is connected to the correct 3-pin 5V ARGB header on the motherboard. Ensure your motherboard's RGB software is installed and configured correctly.
- אין פלט תצוגה: Ensure your graphics card is properly seated in its PCIe slot and all necessary power cables are connected. Check that your monitor cable is connected to the graphics card, not the motherboard (if using a dedicated GPU).
7. מפרטים
| תכונה | תֵאוּר |
|---|---|
| שם הדגם | ECB-PB30-BB-ARGB |
| תמיכה בגורם צורה | ATX, MicroATX, Mini-ITX |
| יציאות קלט / פלט קדמיות | 1x USB 3.2 Gen1, 1x USB 2.0, HD Audio |
| חריצי הרחבה | 7 |
| מידות (L x W x H) | 375 x 200 x 458 מ"מ |
| צֶבַע | שָׁחוֹר |
| חומרים | זכוכית מחוסמת, פלדה |
| שיטת קירור | קירור אוויר |
8. אחריות ותמיכה
ENERMAX products are manufactured to the highest quality standards. For warranty information, technical support, or service inquiries, please refer to the official ENERMAX webאתר או צור קשר עם הספק המקומי שלך. שמור את הוכחת הרכישה שלך לצורך תביעות אחריות.