1. הקדמה
This manual provides essential instructions for the proper installation, operation, and maintenance of your Interphone Cellularline U-Com 6R Motorcycle Bluetooth Intercom. Please read this manual thoroughly before using the device to ensure optimal performance and safety.
The U-Com 6R is designed to enhance your riding experience with reliable Bluetooth 5.2 communication, allowing connection with up to two riders over a distance of 1 kilometer. It offers compatibility with various OEM and GPS systems and features a long-lasting, replaceable battery.
2. מידע בטיחות
Always prioritize safety while riding. Operating the intercom should not distract you from road conditions or traffic. Ensure the device is securely mounted and all cables are properly routed to avoid interference with helmet functionality or rider movement.
- אל תנסה לפרק או לשנות את המכשיר.
- הרחק את המכשיר מטמפרטורות קיצוניות ומאור שמש ישיר.
- ודא שמכסה שקע הטעינה סגור היטב כאשר אינו נטען כדי לשמור על עמידות למים.
- Adjust volume to a safe level that allows you to hear ambient traffic sounds.
3. תכולת החבילה
ודא שכל הפריטים המפורטים להלן כלולים בחבילה שלך:
- U-Com 6R Main Unit
- Helmet Mounting Bracket (Clip and Adhesive options)
- סט רמקולים
- מיקרופון בום
- מיקרופון קווי
- כבל טעינה USB-C
- Velcro Pads for Speakers and Microphones
- ספוגי מיקרופון
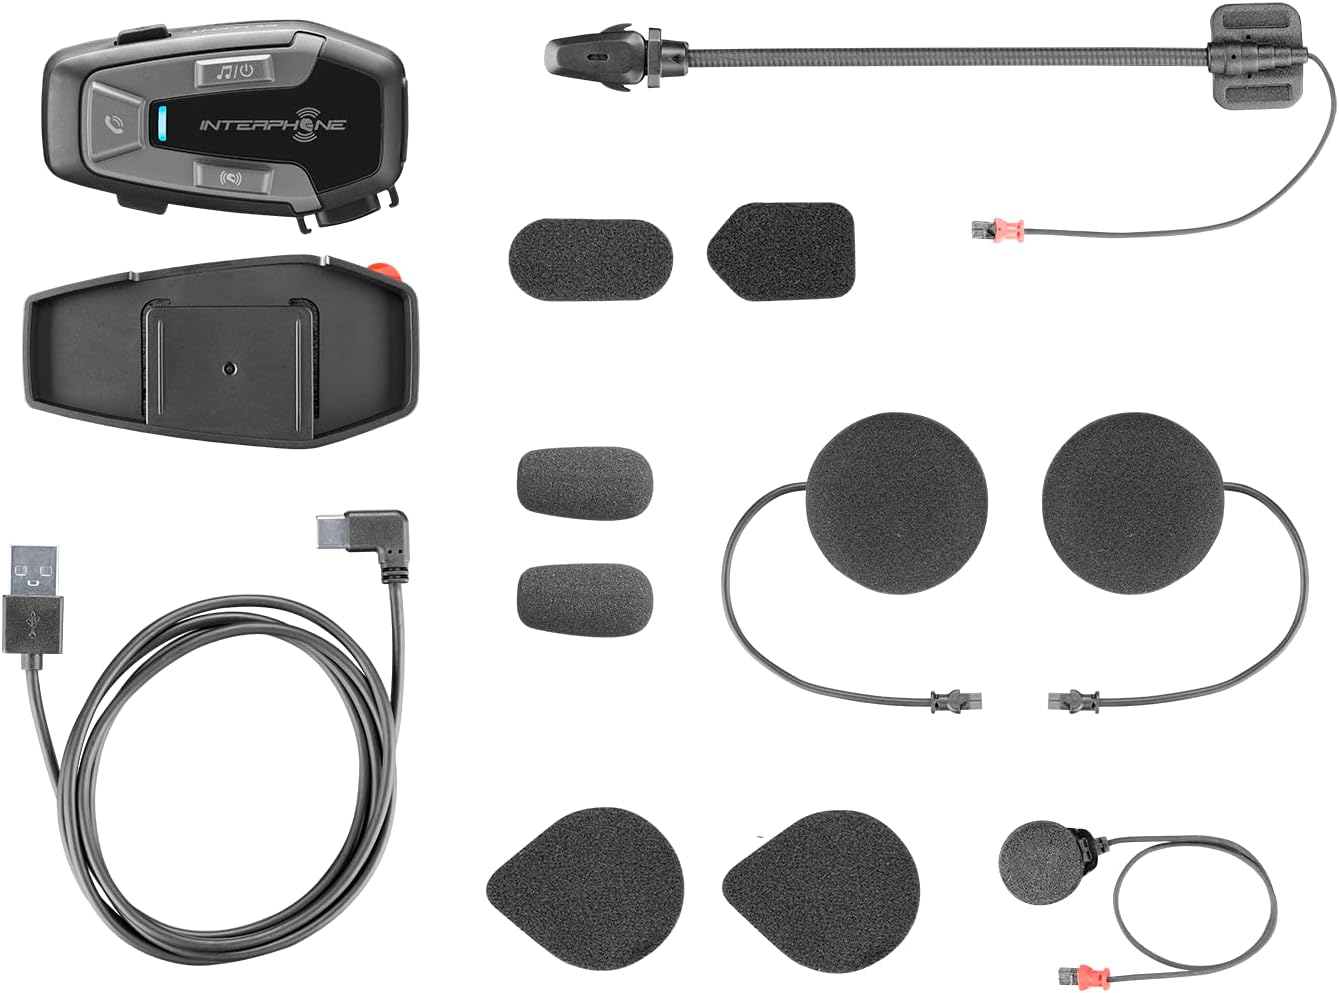
איור 3.1: All components included in the Interphone U-Com 6R package. This image displays the main intercom unit, mounting accessories, speakers, two types of microphones (boom and wired), and the USB-C charging cable.
4. המכשיר נגמרview
4.1. Main Unit Controls

איור 4.1: חֲזִית view of the Interphone U-Com 6R main unit. This image highlights the primary control buttons for music, call management, and intercom functions, along with the LED indicator.
- לחצן מוזיקה: שולט בהשמעת מוזיקה (הפעלה/השהיה, דילוג על רצועות).
- כפתור חיוג: Manages phone calls (answer/end, voice assistant).
- לחצן אינטרקום: Initiates and manages intercom conversations.
- מחוון LED: מציג את סטטוס המכשיר (צימוד, טעינה, חשמל).
4.2. יציאות ומחברים

איור 4.2: צַד view of the Interphone U-Com 6R unit. This image clearly shows the USB-C charging port and the speaker/microphone connector.
- יציאת USB-C: משמש לטעינת המכשיר.
- Speaker/Microphone Connector: Connects the speaker and microphone assembly to the main unit.
5. התקנה
5.1. הרכבת היחידה הראשית
The U-Com 6R can be mounted to your helmet using either the clip mount or the adhesive mount.
- קליפ Mount: Slide the clip between the helmet shell and the inner padding on the left side. Ensure it is securely fastened.
- תושבת דבק: Clean the desired mounting area on the left side of your helmet. Peel off the protective film from the 3M adhesive on the bracket and firmly press it onto the helmet for at least 30 seconds. Allow 24 hours for the adhesive to fully cure before use.

איור 5.1: Adhesive mounting bracket for the Interphone U-Com 6R. This image shows the bracket with the 3M adhesive backing, ready for attachment to a helmet.
5.2. התקנת רמקולים ומיקרופון
Position the speakers inside the helmet's ear pockets. The microphone should be placed in front of your mouth, ensuring clear voice pickup.
- Attach the speakers to the helmet's interior using the provided Velcro pads. Ensure the speaker with the shorter wire is for the left ear and the longer wire for the right.
- Choose the appropriate microphone for your helmet type:
- מיקרופון בום: Ideal for open-face or modular helmets. Attach it to the inside of the helmet near your mouth.
- מיקרופון קווי: Suitable for full-face helmets. Attach it to the inside of the chin bar, close to your mouth.
- Connect the speaker and microphone assembly to the main U-Com 6R unit.
- Tuck all wires neatly under the helmet padding to prevent discomfort or entanglement.

איור 5.2: Installation of speakers and wired microphone inside a full-face helmet. This diagram illustrates the placement of the flat speakers in the ear recesses and the wired microphone near the chin bar.

איור 5.3: Installation of speakers and boom microphone inside an open-face helmet. This diagram shows the placement of speakers and the flexible boom microphone extending towards the rider's mouth.
6. התקנה ותפעול בסיסי
6.1. טעינת ההתקן
Before first use, fully charge the U-Com 6R. Connect the supplied USB-C cable to the charging port on the unit and to a USB power source. The LED indicator will show charging status and turn off when fully charged. A full charge provides approximately 15 hours of talk time.
6.2. הפעלה/כיבוי
- הפעלה: Press and hold the Music button for 3 seconds. The LED will flash blue.
- כיבוי: Press and hold the Music button for 5 seconds. The LED will turn red and then off.
6.3. צימוד Bluetooth עם טלפון נייד
- With the U-Com 6R powered off, press and hold the Call button for 5 seconds until the LED flashes red and blue alternately, indicating pairing mode.
- בטלפון הנייד שלך, הפעל את Bluetooth וחפש מכשירים חדשים.
- Select "Interphone U-Com 6R" from the list of available devices.
- Once paired, the LED on the U-Com 6R will flash blue periodically.
6.4. Intercom Pairing (Up to 2 Riders)
The U-Com 6R supports communication with one other rider. For Mesh 2.0 technology with multiple riders, refer to the advanced features section or the full online manual.
- Ensure both U-Com 6R units are powered on and not connected to other devices.
- On both units, press and hold the Intercom button for 5 seconds until the LED flashes red and blue alternately.
- The units will automatically search and pair with each other. Once connected, the LEDs will flash blue.
- To initiate an intercom conversation, briefly press the Intercom button on either unit.
7. תפעול
7.1. שיחות טלפון
- תשובה לשיחה: לחץ לחיצה קצרה על כפתור התקשר.
- סיום שיחה: לחץ לחיצה קצרה על כפתור התקשר.
- דחה שיחה: לחץ והחזק את לחצן השיחה למשך 2 שניות.
- עוזר קולי: Briefly press the Call button twice to activate your phone's voice assistant (Siri, Google Assistant).
7.2. השמעת מוזיקה
- הפעל/השהה: Briefly press the Music button.
- הרצועה הבאה: Press the Music button twice.
- רצועה קודמת: Press the Music button three times.
7.3. התאמת עוצמת הקול
The U-Com 6R features dedicated buttons for volume control, typically integrated with the main control panel. Refer to the device overview (Figure 4.1) for button locations.
- הגדל את עוצמת הקול: לחץ על כפתור 'הגברת עוצמת הקול'.
- הפחת עוצמת הקול: לחץ על כפתור 'הנמכת עוצמת הקול'.
7.4. GPS and OEM System Compatibility
The U-Com 6R is designed with Bluetooth 5.2 to ensure broad compatibility with various GPS navigation devices and original equipment manufacturer (OEM) systems found on motorcycles. Pair these devices as you would a mobile phone, following their respective pairing instructions.
8. תחזוקה
- ניקוי: השתמש רך, דamp מטלית לניקוי היחידה. אין להשתמש בחומרי ניקוי שוחקים או ממסים.
- עמידות במים: The U-Com 6R is waterproof. However, ensure the USB-C port cover is fully sealed to maintain its water-resistant properties.
- טיפול בסוללה: For optimal battery life, avoid fully discharging the battery frequently. Charge the device regularly, especially if it will be stored for extended periods. The integrated battery is replaceable, extending the product's lifespan.
- אִחסוּן: אחסן את המכשיר במקום קריר ויבש כאשר אינו בשימוש.
9. פתרון תקלות
| בְּעָיָה | סיבה אפשרית | פִּתָרוֹן |
|---|---|---|
| המכשיר לא נדלק. | סוללה חלשה. | טען את המכשיר במלואו. |
| לא ניתן להתאים לטלפון/אינטרקום. | Device not in pairing mode; distance too far; interference. | Ensure device is in pairing mode (flashing red/blue). Move closer to the other device. Turn off other Bluetooth devices. |
| אין שמע או איכות שמע ירודה. | Volume too low; speakers incorrectly positioned; loose connection. | Increase volume. Check speaker placement and connections. Ensure microphone is correctly positioned. |
| חיבור האינטרקום נותק לעתים קרובות. | Out of range; environmental interference. | Stay within 1 km range. Avoid areas with strong radio interference. |
9.1. איפוס להגדרות היצרן
If issues persist, a factory reset may resolve them. Consult the full online manual or contact customer support for specific instructions on performing a factory reset for the U-Com 6R.
10. מפרטים
| תכונה | פְּרָט |
|---|---|
| מספר דגם | INTERPHOUCOM6R |
| גרסת בלוטות' | 5.2 |
| טווח אינטרקום | Up to 1 Kilometer (between 2 riders) |
| זמן דיבור | בערך שעתיים |
| סוג סוללה | Lithium Polymer (included, replaceable) |
| קישוריות | Bluetooth, Mesh 2.0 (compatible with Sena) |
| עמידות במים | כֵּן |
| מִשׁקָל | 0.36 קילוגרם (12.7 אונקיות) |
| מידות | 9.09 x 5.83 x 2.64 ס"מ (חבילה) |
| תְאִימוּת | GPS and OEM systems, most other brands on the market |
11. אחריות ותמיכה
Interphone products are manufactured to high-quality standards. For warranty information, please refer to the warranty card included with your product or visit the official Interphone website. For technical support or further assistance, please contact Interphone customer service through their official channels.
ניתן למצוא מידע נוסף ומשאבי תמיכה על ידי ביקור באתר Interphone Store on Amazon.