
1. הקדמה
The Intelbras GX 3000 is a multifunction wireless mesh router designed to provide high-speed internet connectivity via 5G/4G networks and Wi-Fi 6. This device integrates advanced Qualcomm technology for both its 5G modem and Wi-Fi 6 solution, ensuring high performance and reliability. It supports up to 128 devices simultaneously on the Wi-Fi network and offers wired connectivity options. The GX 3000 is suitable for various environments, from home to office, providing robust network performance.
This manual provides instructions for setting up, operating, and maintaining your Intelbras GX 3000 router. Please read it carefully before use.
2. Package Contents & Device Overview
2.1. תכולת החבילה
- Intelbras GX 3000 Wireless Mesh Router
- מתאם מתח
- כבל רשת
- מדריך התחלה מהירה (לא כלול במדריך זה)
2.2. המכשיר נגמרview
איור 1: חזית View of the GX 3000 Router
This image displays the front of the Intelbras GX 3000 router, showing its sleek white design and LED indicators for 5G, 4G, call status, Wi-Fi, and WPS button.

Figure 2: GX 3000 Router with Highlighted Indicators and Ports
This image provides a closer look at the router, emphasizing the LED indicators on the front (5G, 4G, Call, Wi-Fi, WPS) and the various ports located on the rear panel, including LAN, WAN, and TEL ports.
2.2.1. יציאות בפאנל האחורי

Figure 3: Rear Panel of the GX 3000 Router
This image shows the rear panel of the router, clearly displaying the LAN, WAN, and TEL ports for wired connections.
- יציאות LAN: For connecting wired devices such as computers, smart TVs, or gaming consoles.
- יציאת WAN: For connecting to an external modem or internet source (if not using 5G/4G).
- יציאת טל: For voice services (if supported by your service provider).
- קלט כוח: מתחבר למתאם החשמל המצורף.
2.2.2. Bottom Panel Features

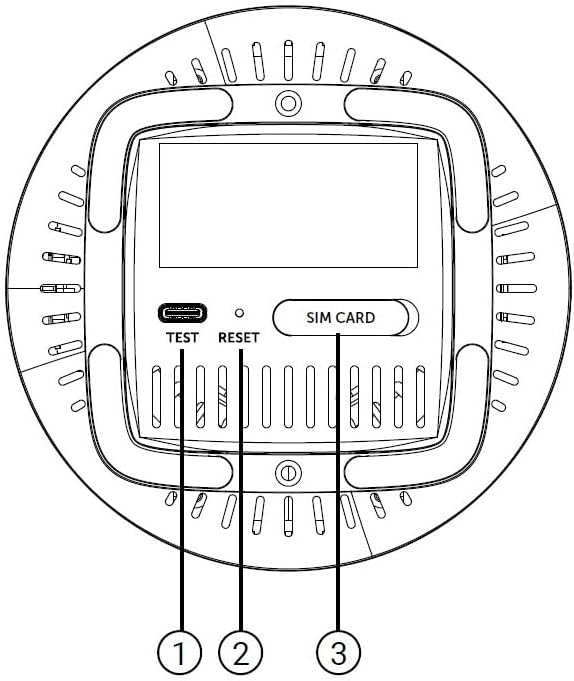
Figure 4: Bottom Panel Features of the GX 3000 Router
This diagram illustrates the bottom panel of the router, highlighting the TEST port, RESET button, and SIM CARD slot.
- TEST Port: For diagnostic purposes.
- כפתור אתחול: Used to restore factory default settings. Press and hold for 10 seconds while the device is powered on.
- SIM CARD Slot: Insert your 5G/4G SIM card here for mobile broadband connectivity.
3. התקנה
3.1. השמה ראשונית
Place the router in a central location within your desired coverage area, away from obstructions, metal objects, and other electronic devices that may cause interference. Ensure good ventilation around the device.
3.2. הכנסת כרטיס ה-SIM
- ודא שהנתב כבוי.
- Locate the SIM CARD slot on the bottom panel of the router (refer to Figure 4).
- Insert your activated 5G/4G SIM card into the slot with the gold contacts facing down and the notched corner oriented correctly. Push until it clicks into place.
- כדי להוציא, דחפו בעדינות את כרטיס ה-SIM פנימה שוב עד שיבקיע החוצה.
3.3. חיבור חשמל
- Connect one end of the power adapter to the Power Input port on the rear of the router.
- חבר את הקצה השני של מתאם החשמל לשקע חשמלי רגיל.
- The router will power on automatically. Wait for the LED indicators to stabilize.
3.4. Wired Connections (Optional)
If you wish to connect devices via Ethernet:
- Connect one end of the provided network cable to a LAN port on the rear of the router.
- Connect the other end of the network cable to the Ethernet port of your computer, smart TV, or other wired device.
3.5. חיבור Wi-Fi ראשוני
The default Wi-Fi network name (SSID) and password are usually printed on a label on the bottom of the router. Follow these steps to connect:
- במכשיר האלחוטי שלך (סמארטפון, מחשב נייד, טאבלט), פתח את הגדרות ה-Wi-Fi.
- Scan for available networks and select the SSID corresponding to your GX 3000 router.
- הזן את סיסמת ה-Wi-Fi המוגדרת כברירת מחדל כאשר תתבקש.
- לאחר החיבור, תוכלו לגשת לנתב web interface to customize settings.
4. הוראות הפעלה
4.1. מחווני LED
נוריות הלד בלוח הקדמי מספקות מידע על המצב:
- LED 5G: מציין את מצב רשת ה-5G.
- LED 4G: מציין את מצב רשת ה-4G.
- נורית שיחה: מציין את סטטוס שירות הקול.
- LED Wi-Fi: מציין פעילות ברשת Wi-Fi.
- LED WPS: מציין את מצב פונקציית ה-WPS.
Refer to the full user manual (if provided separately) for detailed LED behavior (e.g., solid, blinking, color) and their meanings.
4.2. גישה ל Web ממשק ניהול
To configure advanced settings, manage your network, or change Wi-Fi credentials, access the router's web מִמְשָׁק:
- Ensure your device is connected to the GX 3000's Wi-Fi network or via an Ethernet cable.
- פתח א web דפדפן (למשל, כרום, פיירפוקס, אדג').
- בשורת הכתובת, הקלד את כתובת ה-IP המוגדרת כברירת מחדל של הנתב (בדרך כלל
192.168.1.1or192.168.0.1) and press Enter. This information is usually on the label on the bottom of the router. - הזן את שם המשתמש והסיסמה המוגדרים כברירת מחדל (נמצאים גם על תווית הנתב).
- You will now be in the router's management interface, where you can customize settings such as Wi-Fi name, password, security protocols, and more.
4.3. Wi-Fi Protected Setup (WPS)
WPS allows you to connect Wi-Fi devices without entering the password manually:
- Press the WPS button on the front of the GX 3000 router (refer to Figure 1). The WPS LED will start blinking.
- Within two minutes, press the WPS button on your client device (e.g., Wi-Fi adapter, printer).
- המכשירים יתחברו אוטומטית.
Note: WPS is a convenient feature but may be less secure than manual password entry.
4.4. Mesh Network Expansion
The GX 3000 supports mesh networking to expand Wi-Fi coverage. You can add other compatible Intelbras Qi5 line products to create a seamless mesh network. Each additional Wi-Fi 6 router can extend coverage by up to 300 m². It is recommended to use up to 6 routers in the same mesh network for optimal performance.
Refer to the specific instructions provided with additional mesh units for pairing and configuration.
5. תחזוקה
5.1. ניקוי המכשיר
- Ensure the router is powered off and unplugged before cleaning.
- השתמש במטלית רכה ויבשה כדי לנגב את החלק החיצוני של המכשיר.
- Do not use liquid cleaners, aerosols, or solvents, as they may damage the casing או רכיבים פנימיים.
- שמרו על פתחי האוורור נקיים מאבק ופסולת.
5.2. עדכוני קושחה
Periodically check the Intelbras official webאתר לעדכוני קושחה. עדכוני קושחה יכולים לשפר את הביצועים, להוסיף תכונות חדשות ולשפר את האבטחה. יש לפעול בקפידה אחר ההוראות המצורפות לחבילת עדכון הקושחה.
5.3. איפוס להגדרות היצרן
If you encounter persistent issues or forget your login credentials, you can reset the router to its factory default settings:
- With the router powered on, locate the RESET button on the bottom panel (refer to Figure 4).
- בעזרת אטב נייר או חפץ מחודד דומה, לחץ והחזק את כפתור האיפוס למשך כ-10 שניות.
- Release the button. The router will restart with all settings restored to their original factory defaults.
- You will need to reconfigure your Wi-Fi settings and any other custom configurations after a factory reset.
6. פתרון תקלות
| בְּעָיָה | סיבה אפשרית | פִּתָרוֹן |
|---|---|---|
| No power / Router not turning on | Power adapter not connected or faulty; Power outlet not working. |
|
| No internet connection (5G/4G) | SIM card not inserted correctly; SIM card not activated; No 5G/4G signal; Service provider issue. |
|
| לא ניתן להתחבר ל-Wi-Fi | Incorrect Wi-Fi password; Wi-Fi disabled; Device too far from router. |
|
| מהירות אינטרנט איטית | Network congestion; Poor signal strength; Interference; Outdated firmware. |
|
| שכחו web סיסמת ממשק | Password forgotten or changed. |
|
7. מפרטים
| תכונה | פְּרָט |
|---|---|
| מותג | Intelbras |
| דֶגֶם | GX 3000 |
| טכנולוגיית קישוריות | 5G, 4G, Wi-Fi 6 (802.11a/b/g/n/ac/ax) |
| מחלקה להקת תדרים | Dual-Band |
| תקן תקשורת אלחוטית | 802.11א |
| קצב העברת נתונים | עד 900 מגה-ביט לשנייה |
| רוחב פס של יציאת LAN | 1000 מגה-ביט לשנייה (Gigabit Ethernet) |
| סוג אנטנה | פְּנִימִי |
| מכשירים תואמים | Computer, Notebook, Tablet, Smart TV |
| תכונות מיוחדות | Remote Access, Mesh Wi-Fi capability |
| צֶבַע | לָבָן |
| משקל פריט | 1000 גרם |
| רכיבים כלולים | Power supply, Network cable |
| Anatel Homologation Number | 13571-22-00180 |
8. אחריות ותמיכה
8.1. מידע על אחריות
Intelbras products are covered by a limited warranty. For specific warranty terms and conditions, please refer to the warranty card included with your product or visit the official Intelbras webאתר. שמור את הוכחת הרכישה שלך לצורך תביעות אחריות.
8.2. תמיכה טכנית
If you require technical assistance or have questions not covered in this manual, please contact Intelbras customer support. You can find contact information (phone numbers, email, support portal) on the official Intelbras webאֲתַר:
Intelbras Official Webאֲתַר: www.intelbras.com.br
When contacting support, please have your product model (GX 3000) and serial number ready.