
1. הקדמה
This manual provides detailed instructions for the setup, operation, and maintenance of your Adler AD 1196B Digital Alarm Clock. Please read this manual thoroughly before using the device to ensure proper function and longevity.
2. המוצר נגמרview
2.1 תכונות עיקריות
- Digital time display with 12/24 hour format.
- תצוגה עם תאורה אחורית לקל viewing, automatically turns off after 4 seconds.
- Three independent alarm time settings.
- Three alarm activation settings: 5 days (weekday), 6 days (weekday + Saturday), 7 days (every day).
- Displays current time, date, indoor temperature, and humidity.
- Battery-powered for portability and backup during power outages.
2.2 תכולת החבילה
- Adler AD 1196B Digital Alarm Clock Unit
- מדריך למשתמש
הערה: נדרשות 2 סוללות AA ואינן כלולות באריזה.

איור 1: חזית view of the Adler AD 1196B Digital Alarm Clock, displaying 12:00, 26°C, 56% humidity, and the current date.
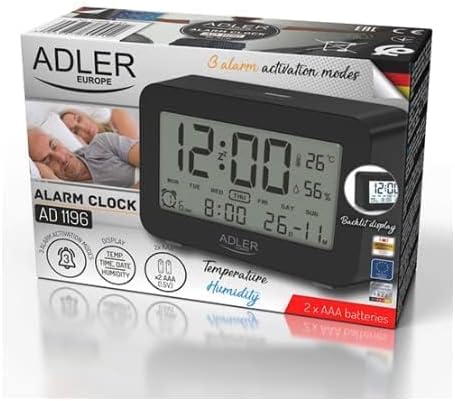
Figure 2: The Adler AD 1196B Digital Alarm Clock shown in its retail packaging, highlighting key features.
3. התקנה
3.1 התקנת סוללה
- אתר את מכסה תא הסוללות בגב השעון המעורר.
- החלק או הרם את המכסה כדי לפתוח את התא.
- הכניסו שתי (2) סוללות AA, תוך הקפדה על הקוטביות הנכונה (+ ו-) כפי שמסומן בתוך התא.
- החזר היטב את מכסה תא הסוללות.
The clock will power on automatically once batteries are inserted. The display will show default settings or begin flashing.
3.2 הפעלה ראשונית
Upon successful battery installation, the display will illuminate. You may need to press a button (e.g., "MODE" or "SET") to activate the display if it remains blank after battery insertion. The backlight will activate briefly and then turn off.
4. הוראות הפעלה
Familiarize yourself with the control buttons, typically located on the back or top of the device. Common buttons include: MODE, SET, UP/+, DOWN/-, ALARM.
4.1 קביעת השעה
- לחץ והחזק את מַעֲרֶכֶת כפתור (או MODE button, depending on model) until the hour digits begin to flash.
- השתמש ב- למעלה/+ or מטה/- כפתורים לכוונון השעה.
- לִלְחוֹץ מַעֲרֶכֶת (אוֹ MODE) again to move to the minute setting.
- השתמש ב- למעלה/+ or מטה/- כפתורים לכוונון הדקות.
- המשך ללחוץ מַעֲרֶכֶת (אוֹ MODE) to cycle through 12/24 hour format, and then to exit time setting mode.
4.2 קביעת התאריך
- מתצוגת הזמן הרגילה, לחצו על MODE button repeatedly until the date display starts flashing or you enter date setting mode.
- The year digits may flash first. Use למעלה/+ or מטה/- להתאים את השנה.
- לִלְחוֹץ MODE to move to the month setting, then adjust with למעלה/+ or מטה/-.
- לִלְחוֹץ MODE to move to the day setting, then adjust with למעלה/+ or מטה/-.
- לִלְחוֹץ MODE again to confirm and exit date setting.
4.3 Setting Alarms (Alarm 1, Alarm 2, Alarm 3)
The AD 1196B features three independent alarms. The process is similar for each.
- הקש על אַזעָקָה לחצן פעם אחת כדי view Alarm 1. Press again for Alarm 2, and a third time for Alarm 3.
- בְּעוֹד viewing the desired alarm (e.g., AL1), press and hold the מַעֲרֶכֶת עד שספרות שעות האזעקה יהבהבו.
- לְהִשְׁתַמֵשׁ למעלה/+ or מטה/- כדי להגדיר את שעת ההתראה.
- לִלְחוֹץ מַעֲרֶכֶת to move to the alarm minute setting.
- לְהִשְׁתַמֵשׁ למעלה/+ or מטה/- כדי להגדיר את דקות השעון המעורר.
- לִלְחוֹץ מַעֲרֶכֶת again to confirm the alarm time.
- כדי להפעיל/לבטל אזעקה, לחצו על הלחצן אַזעָקָה button repeatedly until the alarm icon (e.g., bell symbol) appears or disappears next to the corresponding alarm number (AL1, AL2, AL3).
4.4 Alarm Activation Modes (5, 6, 7 Days)
After setting an alarm time, you can choose its activation frequency:
- While in alarm setting mode (after setting minutes for an alarm), press מַעֲרֶכֶת one more time. The display will show a day indicator (e.g., "5 DAY", "6 DAY", "7 DAY").
- לְהִשְׁתַמֵשׁ למעלה/+ or מטה/- to cycle through the options:
- יום אחד: אזעקה נשמעת בימים שני עד שישי.
- יום אחד: Alarm sounds Monday to Saturday.
- יום אחד: Alarm sounds every day of the week.
- לִלְחוֹץ מַעֲרֶכֶת to confirm your selection and exit alarm setting for that specific alarm.
4.5 פונקציית תאורה אחורית
The display features a backlight for improved visibility in low light conditions. The backlight automatically activates when a button is pressed and turns off after approximately 4 seconds to conserve battery power.
4.6 תצוגת טמפרטורה ולחות
The alarm clock continuously displays the current indoor temperature (in Celsius) and relative humidity percentage. No specific action is required to view these readings; they are shown on the main display.
5. תחזוקה
5.1 ניקוי
To clean the alarm clock, gently wipe the surface with a soft, dry cloth. Do not use abrasive cleaners, solvents, or chemical sprays, as these may damage the display or casing.
5.2 החלפת סוללה
When the display becomes dim or the clock functions erratically, it is time to replace the batteries. Follow the battery installation steps in Section 3.1. Always replace both batteries with new AA batteries of the same type. Dispose of old batteries responsibly according to local regulations.
6. פתרון תקלות
| בְּעָיָה | סיבה אפשרית | פִּתָרוֹן |
|---|---|---|
| התצוגה ריקה או עמומה. | הסוללות חלשות או מותקנות בצורה שגויה. | החליפו את הסוללות בסוללות AA חדשות, תוך הקפדה על קוטביות נכונה. |
| האזעקה לא נשמעת. | האזעקה לא מופעלת או מוגדרת בצורה שגויה. | Ensure the alarm icon is visible on the display. Verify the alarm time and activation mode (5, 6, or 7 days) are set correctly. |
| השעה/תאריך שגויים. | Time/Date was not set or reset after battery change. | Follow instructions in Section 4.1 and 4.2 to set the correct time and date. |
| קריאות הטמפרטורה/לחות נראות לא מדויקות. | Clock is placed near a heat source, vent, or in direct sunlight. | Relocate the clock to a stable environment away from extreme temperature or humidity fluctuations. Allow time for readings to stabilize. |
7. מפרטים
- דֶגֶם: AD 1196B
- מקור כוח: 2 x סוללות AA (לא כלול)
- סוג תצוגה: LCD דיגיטלי עם תאורה אחורית
- פונקציות: Time, Date, Day of Week, Temperature (°C), Humidity (%), 3 Alarms with 3 Activation Modes
- משך תאורה אחורית: בערך 4 שניות
- חוֹמֶר: פּלָסטִי
- מידות (ב x D x H): 11 ס"מ x 3.81 ס"מ x 5 ס"מ
- מִשׁקָל: 1.6 ק"ג
8. אחריות ותמיכה
למידע על אחריות או תמיכה טכנית, אנא עיינו בכרטיס האחריות המצורף למוצר שלכם או צרו קשר ישירות עם היצרן. שמרו את קבלת הרכישה כהוכחת קנייה.
Manufacturer: Adler