
1. הקדמה
This manual provides detailed instructions for the installation, operation, and maintenance of the ASUS TUF Gaming B660M-PLUS WiFi motherboard. This motherboard is designed to support 12th Generation Intel Core processors and DDR5 memory, offering a robust foundation for personal computer systems.
Please read this manual thoroughly before beginning the installation process to ensure proper setup and to prevent damage to components.
2. מידע בטיחות
- Always disconnect the power cord from the wall outlet before touching any internal components.
- יש לענוד רצועת כף יד אנטי-סטטית או לגעת לעתים קרובות בחפץ מתכת מוארק כדי לפרוק חשמל סטטי לפני הטיפול ברכיבים.
- יש להחזיק את הרכיבים בקצוותיהם כדי להימנע ממגע עם מעגלים רגישים.
- ודא אוורור נאות בתוך מארז המחשב כדי למנוע התחממות יתר.
- הרחק את לוח האם מלחות וטמפרטורות קיצוניות.
- Refer to the CPU and memory manufacturer's guidelines for specific installation instructions.
3. תכולת החבילה
ודא שהחבילה שלך מכילה את הפריטים הבאים. אם פריט כלשהו פגום או חסר, פנה לקמעונאי שלך.
- לוח אם ASUS TUF Gaming B660M-PLUS WiFi
- I/O Shield (if not pre-mounted)
- כבלי נתונים SATA
- חבילת ברגים M.2
- אנטנת Wi-Fi
- Support DVD/USB Drive (containing drivers and utilities)
- מדריך למשתמש ומדריך להתחלה מהירה
4. פריסת לוח האם
הכיר את הרכיבים והמחברים העיקריים בלוח האם.

איור 4.1: מלמעלה למטה view of the ASUS TUF Gaming B660M-PLUS WiFi motherboard, showing the CPU socket, DIMM slots, PCIe slots, and heatsinks.
4.1 CPU Socket (LGA 1700)
The LGA 1700 socket supports 12th Generation Intel Core processors. Ensure the CPU is correctly oriented before installation.

Figure 4.2: Close-up of the LGA 1700 CPU socket on the motherboard, ready for processor installation.
4.2 חריצי DDR5 DIMM
This motherboard features four DDR5 DIMM slots, supporting up to 128GB of system memory with speeds up to 6000MHz (OC).
4.3 חריצי PCIe
Includes a PCIe 5.0 x16 slot for graphics cards and multiple PCIe 4.0 M.2 slots for high-speed storage.
4.4 יציאות SATA
Four SATA 6Gb/s ports are available for connecting traditional hard drives and SSDs.
4.5 פאנל קלט/פלט אחורי
The rear I/O panel provides various connectivity options.

איור 4.3: מפורט view of the rear I/O panel, showing USB ports, HDMI, DisplayPort, 2.5G Ethernet, Wi-Fi antenna connectors, and audio jacks.
- יציאות USB: Multiple USB 2.0, USB 3.2 Gen 1, USB 3.2 Gen 2, and USB 3.2 Gen 2x2 Type-C ports.
- יציאות וידאו: HDMI, DisplayPort.
- רֶשֶׁת: 2.5G Ethernet port, Wi-Fi 6 antenna connectors.
- שֶׁמַע: Audio jacks for speakers, microphone, and line-in.
- יציאת S/PDIF: Optical S/PDIF digital audio output.
5. התקנה והתקנה
בצע את השלבים הבאים להתקנה נכונה של לוח האם והרכיבים שלך.
5.1 התקנת המעבד
- פתח את ידית שקע המעבד והרם את לוח הטעינה.
- יישר בזהירות את המעבד עם השקע, וודא שהסימן המשולש על המעבד תואם לסימון שעל השקע.
- הכנס בעדינות את המעבד לשקע מבלי ללחוץ עליו בכוח.
- סגור את משטח הטעינה ולחץ על הידית כלפי מטה עד שתינעל במקומו.

איור 5.1: מלמעלה למטה view of the motherboard with a CPU installed in the LGA 1700 socket.
5.2 Installing RAM (DDR5)
- פתחו את הקליפסים בשני קצוות חריץ ה-DIMM.
- יישר את החריץ במודול זיכרון DDR5 עם המפתח בחריץ ה-DIMM.
- הכנס את מודול הזיכרון בחוזקה לחריץ עד שהקליפסים יתייצבו במקומם.
- For optimal performance, install memory modules in the recommended dual-channel configuration (refer to the motherboard manual for specific slot pairing).
5.3 התקנת התקני אחסון
התקנת SSD M.2:
- Locate the M.2 slots on the motherboard. Some slots may have heatsinks that need to be removed first.
- הכנס את כונן ה-SSD מסוג M.2 לחריץ בזווית של 30 מעלות.
- דחפו את ה-SSD כלפי מטה ואבטחו אותו באמצעות בורג M.2 המצורף או מנגנון Q-Latch.
- אם רלוונטי, חבר מחדש את גוף הקירור M.2.
התקנת כונן SATA:
- חבר קצה אחד של כבל נתונים SATA ליציאת SATA בלוח האם.
- חבר את הקצה השני של כבל הנתונים SATA לכונן הקשיח SATA או לכונן ה-SSD שלך.
- חבר כבל חשמל SATA מספק הכוח שלך לכונן.
5.4 Installing the Graphics Card
- Open the latch on the PCIe 5.0 x16 slot.
- Align your graphics card with the slot and press it down firmly until it clicks into place and the latch closes.
- חברו את כרטיס המסך למארז המחשב באמצעות ברגים.
- חבר את כל כבלי החשמל PCIe הדרושים מספק הכוח לכרטיס המסך.
5.5 חיבור ספק כוח
- Connect the 24-pin ATX power connector from your power supply to the corresponding header on the motherboard.
- Connect the 8-pin and 4-pin (or 8-pin only, depending on your CPU power requirements) ATX 12V power connectors to the motherboard.
5.6 חיבור ראשי הלוח הקדמי
Connect the cables from your computer case's front panel (power button, reset button, USB ports, audio jacks, LED indicators) to the corresponding headers on the motherboard. Refer to the motherboard diagram for exact locations.
5.7 חיבור ציוד היקפי
Connect your monitor, keyboard, mouse, and other peripherals to the appropriate ports on the rear I/O panel.
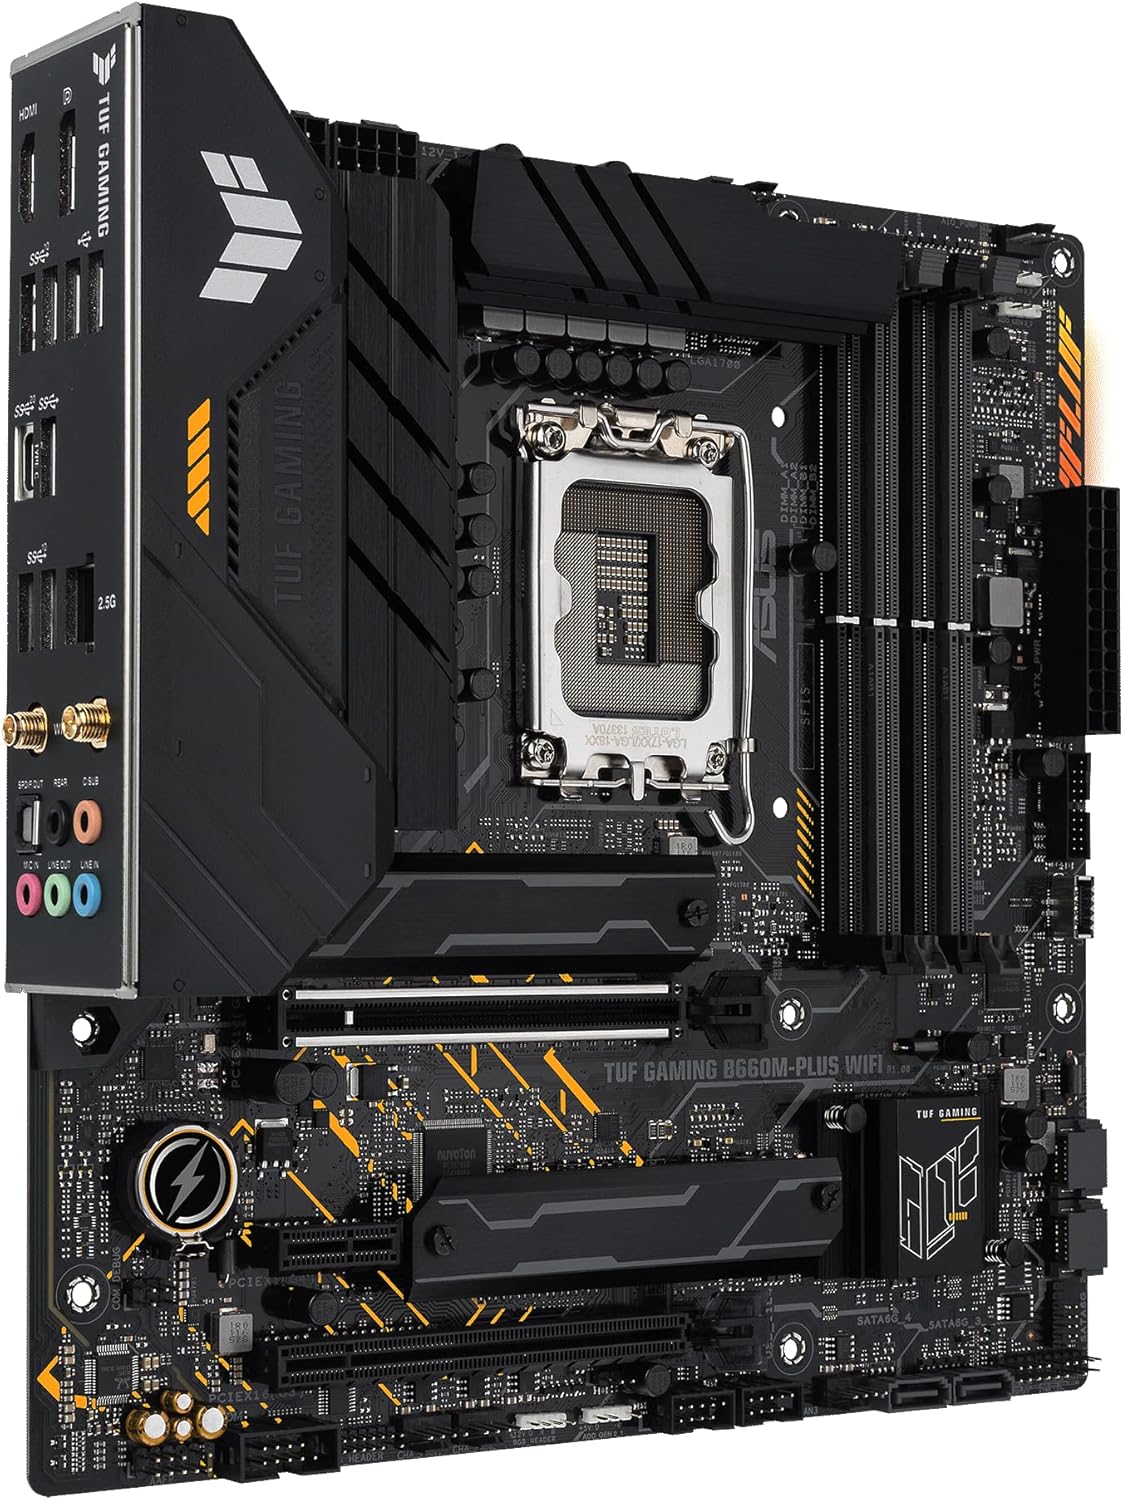
איור 5.2: זוויתי view of the motherboard, highlighting the rear I/O panel and various connectors.
6. הוראות הפעלה
6.1 אתחול ראשון
- After assembling all components, connect the power cord to the power supply and turn on the power switch.
- לחץ על כפתור ההפעלה במארז המחשב שלך.
- The system should power on and display the ASUS logo.
6.2 הגדרת BIOS/UEFI
כדי להיכנס לכלי השירות להגדרת BIOS/UEFI, לחצו על לִמְחוֹק מפתח או F2 key during the Power-On Self-Test (POST) process. Here you can configure system settings, boot order, and monitor hardware status.
6.3 התקנת דרייבר
After installing your operating system, install the necessary drivers for the motherboard components. These can be found on the included support DVD/USB drive or downloaded from the official ASUS support website. The ASUS Armory Crate software can assist with driver and utility installation.
6.4 כלי עזר לתוכנה
The ASUS Armory Crate software provides tools for system monitoring, fan control (Fan Xpert 4), two-way AI noise cancellation, RGB lighting customization, and peripheral management.
7. תחזוקה
- ניקוי: נקו באופן קבוע אבק מתוך מארז המחשב באמצעות אוויר דחוס. ודאו שהמערכת כבויה ומנותקת מהחשמל לפני הניקוי.
- עדכוני BIOS/UEFI: בדוק מעת לעת את התמיכה של ASUS website for BIOS/UEFI updates. Updates can improve system stability, compatibility, and performance. Follow the instructions provided by ASUS carefully when updating the BIOS/UEFI.
- עדכוני דרייבר: עדכן את מנהלי ההתקנים שלך כדי להבטיח ביצועים אופטימליים ותאימות עם תוכנות וחומרה חדשות.
8. פתרון תקלות
אם נתקלת בבעיות, שקול את השלבים הנפוצים הבאים לפתרון בעיות:
- אין כוח: Ensure all power cables (24-pin, 8-pin/4-pin CPU, PCIe for GPU) are securely connected. Check the power supply switch and wall outlet.
- אין תצוגה: ודא שהצג מחובר לכרטיס המסך (או ללוח האם אם משתמשים בכרטיס מסך משולב) ודלוק. התקן מחדש את מודולי כרטיס המסך ואת ה-RAM.
- חוסר יציבות/קריסות מערכת: Check RAM installation and compatibility. Ensure CPU cooler is properly installed. Update drivers and BIOS/UEFI.
- רכיב לא זוהה: Reseat the component (e.g., M.2 SSD, SATA drive, PCIe card). Check cable connections. Verify settings in BIOS/UEFI.
For more detailed troubleshooting or persistent issues, refer to the comprehensive manual on the ASUS support webאתר או צור קשר עם התמיכה הטכנית של ASUS.
9. מפרטים
| תכונה | מִפרָט |
|---|---|
| מותג | ASUS |
| שם הדגם | TUF GAMING B660M-PLUS WIFI |
| שקע מעבד | LGA 1700 |
| מעבדים תואמים | Intel LGA 1700 (12th Gen Intel Core) |
| סוג ערכת שבבים | אינטל B660 |
| טכנולוגיית זיכרון RAM | DDR5 |
| מהירות שעון זיכרון | עד 6000 מגה-הרץ (OC) |
| Max RAM Memory Size | 128 ג'יגה-בייט |
| חריצי זיכרון זמינים | 4 |
| ממשק כרטיס מסך | PCI Express 5.0 |
| Total PCIe Ports | 3 (1x PCIe 5.0 x16, others for M.2/expansion) |
| Total SATA Ports | 4 |
| יציאות USB | Rear: USB 3.2 Gen 2x2 Type-C, USB 3.2 Gen 2, USB 3.2 Gen 1, USB 2.0. Front: USB 3.2 Gen 1 Type-C, USB 3.2 Gen 1, USB 2.0. |
| אתרנט | 2.5G Ethernet |
| קישוריות אלחוטית | Wi-Fi 6 |
| יציאות וידאו | HDMI, DisplayPort |
| גורם צורה | מיקרו ATX |
| מספר דגם | 90MB1AZ0-M1EAY0 |
10. אחריות ותמיכה
ASUS products are designed with quality and reliability in mind. For information regarding your product's warranty, please refer to the warranty card included in your package or visit the official ASUS webאֲתַר.
לתמיכה טכנית, הורדות מנהלי התקנים, עדכוני BIOS ותיעוד נוסף, אנא בקרו באתר התמיכה הרשמי של ASUS webאֲתַר:
When contacting support, please have your motherboard model name (TUF GAMING B660M-PLUS WIFI) and serial number ready.