
1. הקדמה
This manual provides detailed instructions for the safe and efficient operation of your InFocus P120 INL412 Multimedia Projector (Model INL4128). Please read this manual thoroughly before using the projector and keep it for future reference. This projector is designed for high-quality image projection, suitable for various applications including presentations, home entertainment, and gaming.
2. מידע בטיחות
יש להקפיד על אמצעי הזהירות הבאים כדי למנוע נזק למקרן ולהבטיח את בטיחות המשתמש:
- אוורור: Ensure adequate ventilation around the projector. Do not block ventilation openings. Maintain a minimum distance of 30 cm (12 inches) from walls or other objects.
- מקור כוח: השתמש רק בספק הכוח ובעוצמת המתח שצוינוtage. Connect the power cord securely.
- חוֹם: The projector generates heat during operation. Do not touch the projector's vents or exhaust areas directly after use.
- תפוקת אור: אל תסתכל ישירות לתוך עדשת המקרן כאשר ה-lamp דולק, מכיוון שהאור החזק עלול לגרום נזק לעיניים.
- מיקום: Place the projector on a stable, level surface. Avoid placing it in direct sunlight, near heat sources, or in areas with high humidity or dust.
- ניקוי: נתקו את כבל החשמל לפני הניקוי. השתמשו במטלית רכה ויבשה. אין להשתמש בחומרי ניקוי נוזליים או בתרסיס.
- שֵׁרוּת: אל תנסה לטפל במקרן בעצמך. יש לפנות לאנשי שירות מוסמכים בכל הנוגע לטיפול.
3. המוצר נגמרview
3.1 Top Panel and Lens Area
The top panel features the control buttons for basic operation and the lens area with focus and zoom adjustments.

איור 3.1: למעלה view of the InFocus P120 INL412 projector, highlighting the control panel on the right and the lens adjustment area on the left. The InFocus logo is visible on the top surface.
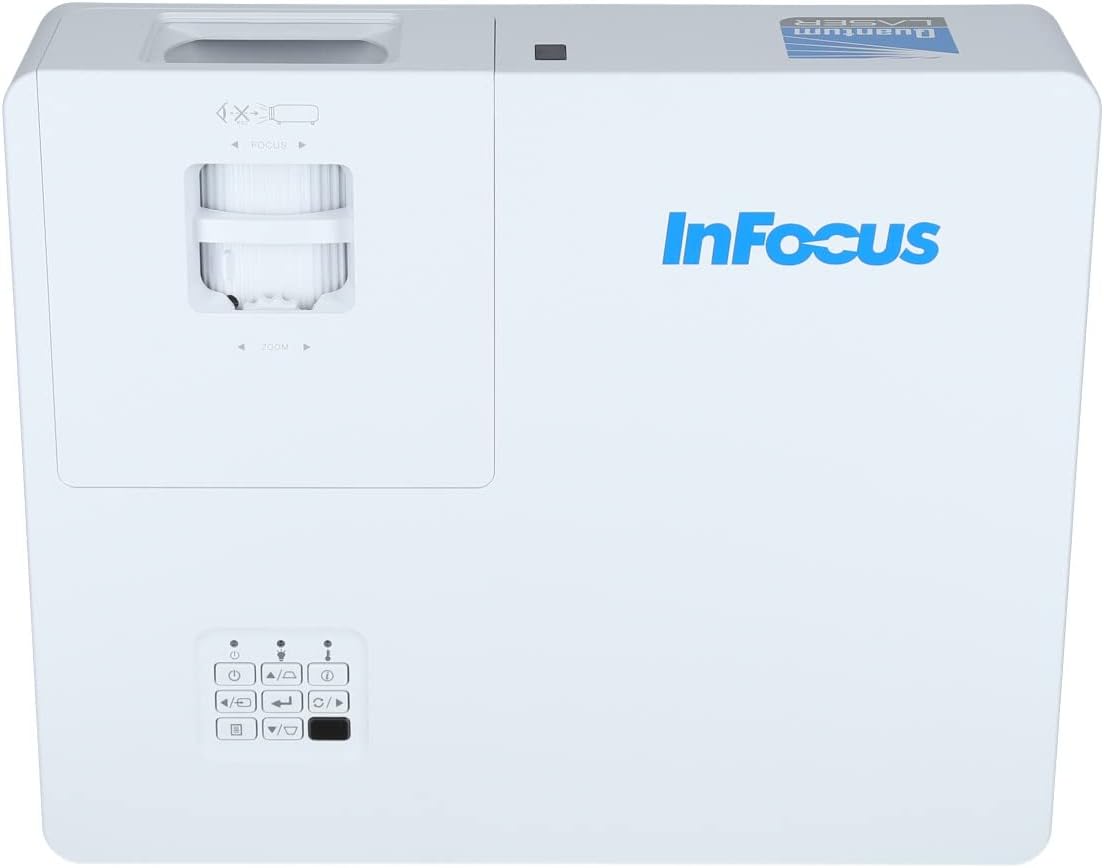
איור 3.2: סוגר view of the projector's top panel, showing the focus and zoom rings near the lens opening and the array of control buttons for power, menu, source selection, and navigation.
3.2 חיבורי לוח אחורי
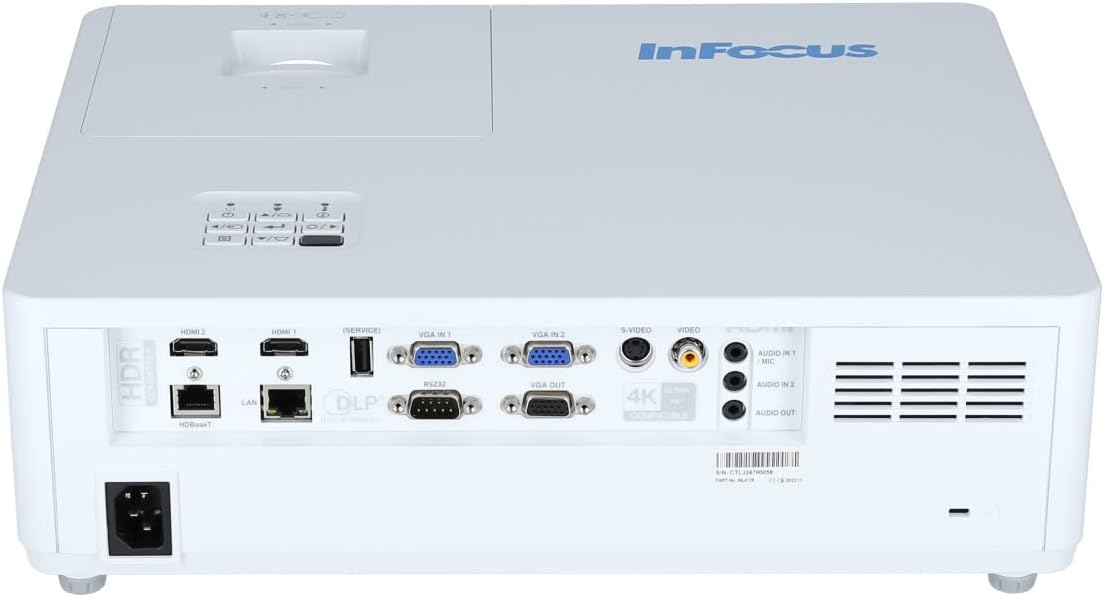
הפאנל האחורי מספק מגוון יציאות קלט ופלט לחיבור התקנים חיצוניים.

Figure 3.3: Rear panel of the InFocus P120 INL412 projector, displaying a comprehensive array of connectivity options including HDMI (x2), USB, S-Video, Ethernet (LAN), VGA In (x2), VGA Out, RS232, and Audio In/Out ports. The power input is located on the bottom left.
Key ports include:
- HDMI 1 ו-2: For connecting high-definition digital video and audio sources.
- USB: For connecting USB devices, potentially for media playback or firmware updates.
- S-Video: For connecting older video sources.
- VGA IN 1 & 2: For connecting computers or other devices with VGA output.
- יציאת VGA: לחיבור למסך חיצוני.
- Ethernet (LAN): לצורך קישוריות ובקרה לרשת.
- Audio IN 1 & 2 / Audio OUT: עבור חיבורי שמע אנלוגיים.
- RS232: עבור שליטה סדרתית.
- קלט כוח: לחיבור כבל החשמל AC.
3.3 Front and Side Panels
The front panel houses the projection lens and front ventilation, while the side panels feature additional ventilation grilles.

איור 3.4: חזית view of the InFocus P120 INL412 projector, displaying the main projection lens on the right and the extensive front ventilation grille on the left, crucial for heat dissipation.
איור 3.5: צד view of the InFocus P120 INL412 projector, illustrating the side ventilation grilles that contribute to maintaining optimal operating temperature.
4. התקנה
4.1 מיקום המקרן
Position the projector on a stable, flat surface or mount it securely. Ensure the projector is within the optimal projection distance for your screen size. Maintain clear space around the projector for proper ventilation.
4.2 חיבור התקנים
Before connecting any cables, ensure the projector and all source devices are powered off.
- חיבור HDMI: Connect an HDMI cable from your source device (e.g., laptop, Blu-ray player, gaming console) to either the HDMI 1 or HDMI 2 port on the projector.
- חיבור VGA: Connect a VGA cable from your computer to either VGA IN 1 or VGA IN 2. For audio, connect a separate audio cable from your computer's audio output to the corresponding Audio IN port on the projector.
- חיבור USB: Insert a USB drive into the USB port for media playback (if supported by firmware) or service functions.
- חיבור אתרנט (LAN): Connect an Ethernet cable to the LAN port for network control or updates.
- פלט שמע: If using external speakers, connect an audio cable from the Audio OUT port on the projector to your audio system.
4.3 חיבור מתח
Connect the power cord to the projector's power input and then plug the other end into a grounded electrical outlet.
5. הוראות הפעלה
5.1 הפעלה/כיבוי
- הפעלה: הקש על כּוֹחַ בלוח הבקרה של המקרן או בשלט רחוק. נורית חיווי ההפעלה תשתנה.
- כיבוי: הקש על כּוֹחַ button again. A confirmation message may appear. Press the button a second time to confirm shutdown. Allow the projector to cool down before unplugging it.
5.2 כוונון מיקוד וזום
Rotate the focus ring around the lens until the image appears sharp and clear. Use the zoom ring to adjust the image size to fit your screen.
5.3 בחירת מקור קלט
הקש על מָקוֹר button on the control panel or remote control to cycle through available input sources (HDMI 1, HDMI 2, VGA 1, VGA 2, S-Video, USB). Select the input corresponding to your connected device.
5.4 ניווט בתפריט
השתמש ב- תַפרִיט button to access the on-screen display (OSD) menu. Use the arrow buttons to navigate through menu options and the לְהַכנִיס לחצן כדי לבחור. לחץ תַפרִיט שוב ליציאה.
6. תחזוקה
6.1 ניקוי העדשה
Gently wipe the lens with a soft, lint-free cloth specifically designed for optical surfaces. Do not use abrasive cleaners or excessive force, as this can scratch the lens.
6.2 Cleaning the Projector Exterior
השתמש במטלית רכה ויבשה כדי לנקות את מקרן המקרן.asing. For stubborn dirt, dampen the cloth slightly with water, then wipe dry immediately. Avoid getting liquids into the projector's openings.
6.3 טיפול באוורור
Regularly check the projector's ventilation grilles for dust accumulation. Use a soft brush or a vacuum cleaner with a brush attachment to gently remove dust from the vents to ensure proper airflow and prevent overheating.
7. פתרון תקלות
7.1 לא מוצגת תמונה
- Ensure the projector is powered on and the power indicator light is solid.
- Verify that the video cable (HDMI, VGA, etc.) is securely connected to both the projector and the source device.
- Check that the correct input source is selected on the projector.
- Confirm that the source device (laptop, player) is powered on and outputting a signal.
7.2 התמונה מטושטשת או לא בפוקוס
- כוונן את טבעת המיקוד שעל עדשת המקרן עד שהתמונה חדה.
- ודא שהמקרן נמצא במרחק הנכון מהמסך.
- נקו את עדשת המקרן אם היא נראית מלוכלכת.
7.3 אין סאונד
- If using HDMI, ensure the source device's audio output is set to HDMI.
- If using VGA, ensure a separate audio cable is connected from the source to the projector's Audio IN port.
- בדוק את הגדרות עוצמת הקול הן במקרן והן במכשיר המקור.
- If using external speakers, ensure they are properly connected to the Audio OUT port and powered on.
8. מפרטים
| תכונה | פְּרָט |
|---|---|
| מותג | InFocus |
| יַצרָן | בפוקוס |
| שם הדגם | P120 INL412 |
| מספר דגם | INL4128 |
| שָׁנָה | 2023 |
| ממשק חומרה | Ethernet, HDMI, S-Video, USB |
| מספר פריטים | 1 |
| יחס גובה-רוחב | 16:9 |
| מהtage | 341 וואט |
| סוללות כלולות | לֹא |
| סוללות נדרשות | לֹא |
| גורם צורה | שולחן עבודה |
| סוג הרכבה | תושבת לשולחן |
| שלט רחוק כלול | כֵּן |
| מידות המוצר | 56.13 x 46.48 x 25.15 ס"מ |
| משקל פריט | 5.5 ק"ג |
| גודל תמונה מקסימלי | 308.28 אינץ' |
| גודל תמונה מינימלי | 910.63 מילימטרים |
| תאריך זמין ראשון | 5 בינואר 2022 |
9. אחריות ותמיכה
For warranty information and technical support, please refer to the documentation included with your purchase or visit the official InFocus webאתר. שמור את הוכחת הרכישה שלך לצורך תביעות אחריות.