
מָבוֹא
This manual provides detailed instructions for the installation, operation, and maintenance of your Hama 00118498 Monitor Desk Mount. Designed to enhance your ergonomic workspace, this monitor arm allows for flexible positioning of your display, promoting a comfortable and productive environment. Please read these instructions carefully before beginning installation.
הוראות התקנה
Follow these steps to correctly install your Hama 00118498 Monitor Desk Mount.
1. חיבור משטח השולחןamp
- הנח את השולחן clamp assembly onto the edge of your desk. Ensure the desk surface is sturdy and can support the weight of the mount and your monitor.
- הדקו את clamp screw firmly until the mount is securely fastened to the desk. Do not overtighten.
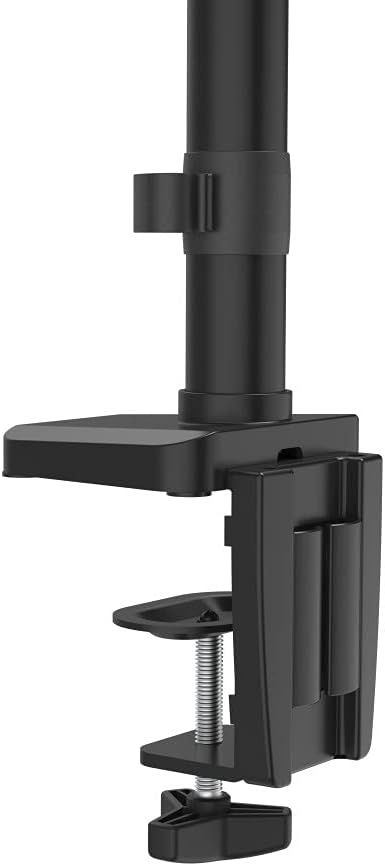
תמונה: שולחן העבודהamp mechanism, showing how it attaches to the desk edge for secure mounting.
2. חיבור הצג
- Ensure your monitor is VESA compatible (100x100mm or 75x75mm).
- Carefully attach the VESA plate from the monitor arm to the back of your monitor using the provided screws. Make sure the screws are tightened securely.
- Slide the monitor (with the attached VESA plate) onto the arm's mounting head. Ensure it clicks into place or is secured with any locking mechanism provided.

Image: The monitor arm's VESA plate and adjustable joint, ready for monitor attachment.

תמונה: צד view of the assembled monitor arm, highlighting the VESA mount and integrated cable management channels.
3. ניהול כבלים
Utilize the integrated cable management system to route your monitor cables neatly along the arm. This helps maintain a tidy workspace and prevents cable clutter.
הוראות הפעלה
The Hama 00118498 Monitor Desk Mount offers various adjustment options for optimal viewנוחות.
- התאמת גובה: The integrated pneumatic spring allows for smooth and effortless vertical height adjustment. Gently push or pull the monitor to your desired height.
- לְהִסְתוֹבֵב: The arm can swivel horizontally, allowing you to rotate your monitor to share your screen or change your viewזווית ing.
- הטיה: Adjust the monitor's tilt angle (up or down) to reduce glare and find the most comfortable viewעמדה.
- רוֹטַציָה: Rotate your monitor from landscape to portrait orientation as needed for different tasks.
Adjustments should be smooth. If the monitor does not hold its position, refer to the troubleshooting section for tension adjustments.
תַחזוּקָה
תחזוקה שוטפת מבטיחה את אורך החיים והביצועים האופטימליים של זרוע הצג שלכם.
- ניקוי: Wipe the surface of the monitor arm with a soft, damp בַּד. הימנע משימוש בחומרי ניקוי שוחקים או ממסים.
- בדוק חיבורים: בדקו מעת לעת את כל הברגים והחיבורים כדי לוודא שהם נשארים מהודקים היטב. הדקו מחדש במידת הצורך.
- סִיכָה: The pneumatic spring is maintenance-free. Do not attempt to lubricate internal components.
פתרון בעיות
If you encounter issues with your Hama 00118498 Monitor Desk Mount, refer to the following common problems and solutions:
- ניטור שקיעה או אי-החזקת מיקום: The tension of the pneumatic spring may need adjustment. Locate the tension adjustment screw (usually found on the arm joint) and turn it clockwise to increase tension for heavier monitors, or counter-clockwise for lighter monitors. Adjust gradually until the monitor holds its position.
- קשה להזיז את המסך: If the arm is too stiff, the tension may be too high. Turn the tension adjustment screw counter-clockwise to decrease tension.
- Arm Feels Loose on Desk: ודא שהשולחן clamp is fully tightened. If the desk surface is too thin or fragile, consider adding a protective pad between the clamp and the desk.
- תנודות בצג: Check all mounting screws on the VESA plate and the arm joints to ensure they are securely fastened.
מפרטים
| תכונה | פְּרָט |
|---|---|
| מספר דגם | 00118498 |
| סוג הרכבה | שולחן כתיבהamp |
| סוג תנועה | Rotating, Swivel, Tilt, Height Adjustable (Pneumatic Spring) |
| מותג | חמה |
| חוֹמֶר | אֲלוּמִינְיוּם |
| צֶבַע | שָׁחוֹר |
| מכשירים תואמים | צג |
| גודל מינימלי תואם | 10 אינץ' |
| גודל תואם מקסימלי | 32 אינץ' |
| משקל פריט | 2.2 קילוגרם |
| ארץ מוצא | סִין |
אחריות ותמיכה
For warranty information or technical support, please refer to the documentation included with your purchase or visit the official Hama website. You can typically find support contact details, FAQs, and additional resources there.
חמה הרשמית Webאֲתַר: www.hama.com