זמן אספקה ETA251590000
ETA Falco Smart Robot Vacuum Cleaner with Mopping Function User Manual
דגם: ETA251590000
1. הקדמה
Thank you for choosing the ETA Falco Smart Robot Vacuum Cleaner with Mopping Function. This manual provides essential information for the safe and efficient operation, maintenance, and troubleshooting of your device. Please read this manual thoroughly before using the product and keep it for future reference.
מידע בטיחות חשוב
- Always ensure the robot is placed on a stable, level surface.
- הרחק את המכשיר ממים ולחות.
- Do not allow children or unauthorized persons to operate the robot.
- Use only the original charging adapter and accessories provided.
- Before cleaning or maintenance, ensure the robot is powered off and unplugged from the charging station.
- Avoid operating the robot near open flames or flammable materials.
2. המוצר נגמרview
רכיבים ובקרות
Familiarize yourself with the main parts and controls of your ETA Falco Smart robot vacuum cleaner.
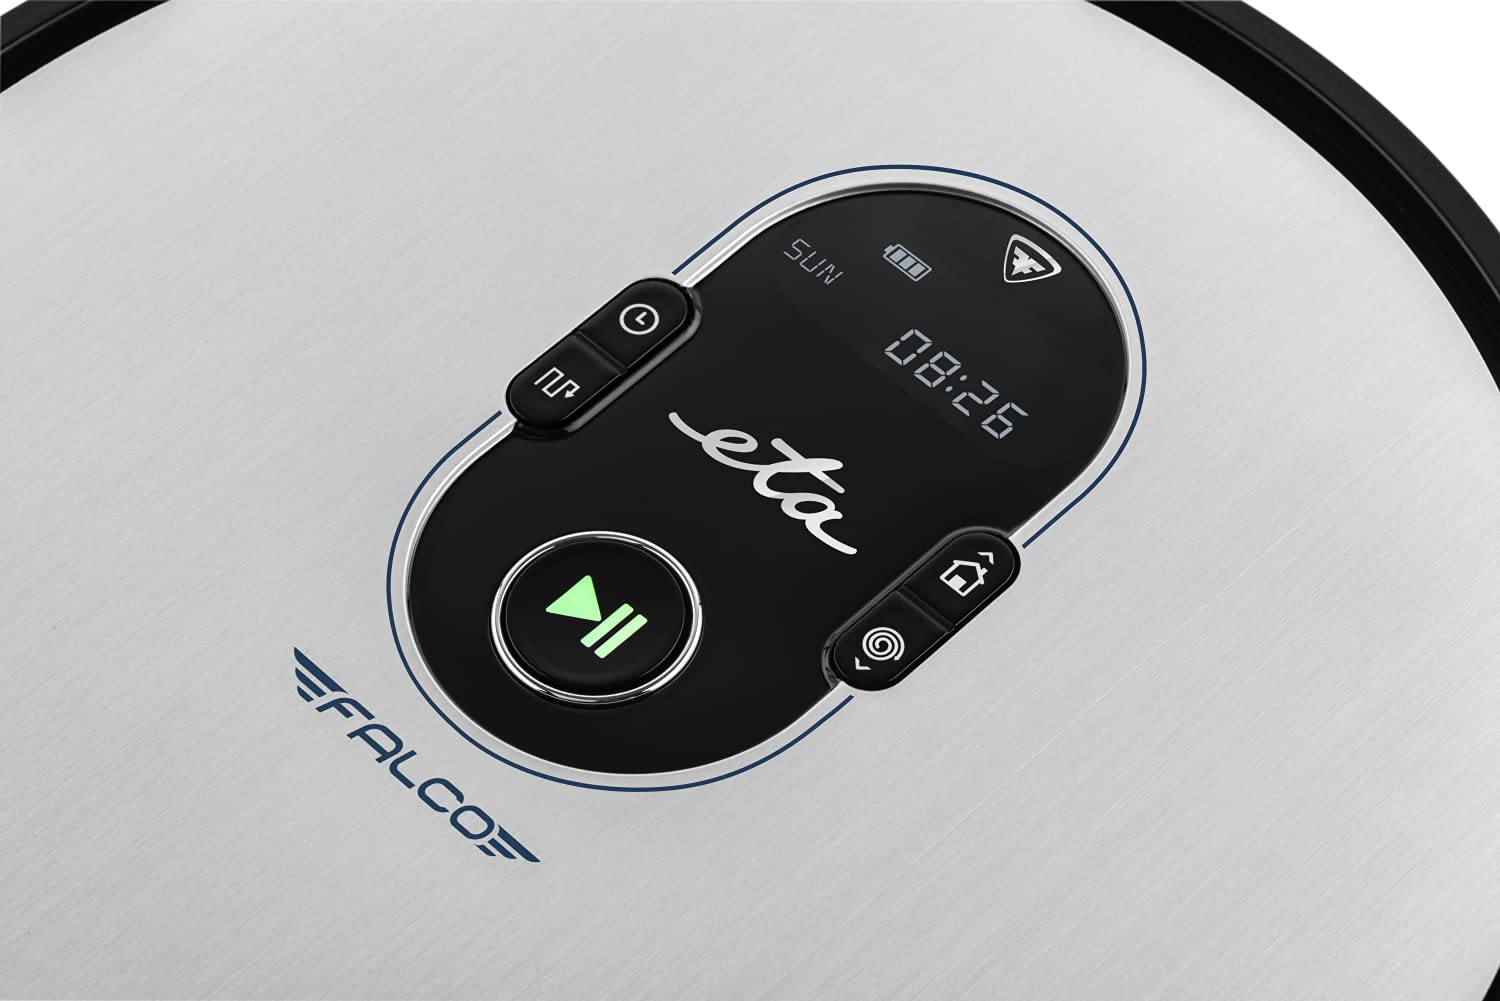
תמונה 2.1: Top panel controls. This image shows the main control panel on the top of the robot, including buttons for power, scheduling, and return to charging station, along with a digital display.

תמונה 2.2: הצד התחתון view. This image displays the bottom of the robot, highlighting the main brush, two side brushes, and the mop attachment.

תמונה 2.3: Underside diagram. This diagram labels the key components on the robot's underside, including the side brushes, main brush, and mop attachment.
3. תכולת החבילה
בעת פירוק האריזה, אנא ודאו שכל הפריטים הבאים נמצאים:
- ETA Falco Smart Robot Vacuum Cleaner
- תחנת טעינה
- מתאם טעינה
- שְׁלַט רָחוֹק
- 2x Spare Side Brushes
- Special Rotary and Lamella Brush
- 2x Cleaning Cloths (Mop Pads)
- מסנן HEPA רזרבי
- Mop Attachment with 300 ml Water Tank
- קיר וירטואלי
4. התקנה
4.1 טעינה ראשונית
- הצב את תחנת הטעינה כנגד קיר באזור פתוח, וודא שאין מכשולים בטווח של מטר אחד לצדדים ו-2 מטרים מלפנים.
- Connect the charging adapter to the charging station and plug it into a power outlet.
- Place the robot vacuum cleaner on the charging station. Ensure the charging contacts align. The robot will begin charging automatically. A full charge takes approximately 5 hours.
4.2 התקנת מברשות צד
Attach the side brushes to the designated posts on the underside of the robot by pressing them down until they click into place. Ensure the 'L' and 'R' markings on the brushes match the corresponding markings on the robot.
4.3 Connecting to the ETA SMART App
The ETA SMART app enhances the functionality of your robot. Download the app from your smartphone's app store. Follow the in-app instructions to connect your robot to your home Wi-Fi network and pair it with the app.
4.4 Setting up the Virtual Wall
The virtual wall creates an invisible barrier to restrict the robot's access to certain areas. Place the virtual wall device on the floor where you want to create a boundary. Ensure the infrared beam is directed towards the area you wish to block. The robot will detect this beam and avoid crossing it.

תמונה 4.1: Robot with charging station and virtual wall. This image shows the robot positioned near its charging station, with a virtual wall device placed nearby to illustrate its function.
5. הוראות הפעלה
5.1 מצבי ניקוי
The ETA Falco Smart offers four distinct cleaning modes:
- לִכאוֹב: General cleaning mode for optimal coverage.
- קלַאסִי: Standard cleaning pattern.
- קָצֶה: מנקה לאורך קירות וקצוות רהיטים.
- לְזַהוֹת: Concentrated cleaning in a specific area.
You can select these modes via the ETA SMART app or the remote control.
5.2 תזמון ניקיון
Use the ETA SMART app to set a cleaning schedule for your robot. You can program specific times and days for the robot to automatically start cleaning.
5.3 שליטה ידנית
You can manually control the robot's movement and functions using the remote control or the ETA SMART app. The app also allows you to monitor cleaning activity, battery charge, and view cleaning routes.

תמונה 5.1: ETA Smart App features. This image displays the ETA Smart App interface on a smartphone, highlighting features such as remote control, cleaning history, activity monitoring, battery status, cleaning modes (SMART, CLASSIC, EDGE, SPOT), cleaning schedule, mopping intensity control, and suction power adjustment.
5.4 פונקציית ניקוי
- Fill the 300 ml water tank with clean water. Do not use detergents or cleaning solutions that are not approved for robot vacuums.
- Attach a clean mop pad to the mop attachment.
- Slide the mop attachment into the designated slot on the underside of the robot.
- התחל מחזור ניקוי. הרובוט יאבק וינקה בו זמנית.
6. תחזוקה
תחזוקה שוטפת מבטיחה ביצועים אופטימליים ומאריכה את תוחלת החיים של שואב האבק הרובוטי שלכם.
6.1 Cleaning the Dust Bin and Filter
- לחץ על לחצן שחרור פח האבק והסר את פח האבק.
- פתחו את פח האשפה ורוקנו את תכולתו לפח אשפה.
- Remove the HEPA filter and primary filter. Tap them gently to remove dust. If washable, rinse under running water and allow to air dry completely before reinserting.
- Wipe the inside of the dust bin with a dry cloth.
- Reassemble the filters and dust bin, then reinsert into the robot.
6.2 ניקוי המברשת הראשית
- הפוך את הרובוט.
- הסר את מכסה המברשת הראשית על ידי לחיצה על לשוניות השחרור.
- הרם את המברשת הראשית.
- Use the cleaning tool (if provided) or scissors to remove hair and debris tangled around the brush.
- Clean the brush compartment.
- החזירו את המברשת הראשית למקום ואבטחו את המכסה.
6.3 ניקוי מברשות צד
Periodically check the side brushes for tangled hair or debris. If necessary, remove them by gently pulling upwards and clean them. Replace worn or damaged brushes with the spare ones provided.
6.4 ניקוי משטח הסחבה ומיכל המים
After each mopping session, remove the mop pad and wash it thoroughly. Empty any remaining water from the water tank and rinse it. Allow both to air dry completely before storing or reusing.
6.5 ניקוי חיישני
Wipe the anti-drop sensors, bumper sensors, and charging contacts on the robot and charging station with a clean, dry cloth to ensure proper function.
7. פתרון תקלות
If your robot vacuum cleaner encounters an issue, refer to the following common problems and solutions:
| בְּעָיָה | סיבה אפשרית | פִּתָרוֹן |
|---|---|---|
| הרובוט לא נדלק | סוללה חלשה; כבוי | Charge the robot; Ensure power switch is ON |
| הרובוט לא נטען | Charging contacts dirty; Charging station unplugged | נקו את מגעי הטעינה; ודאו שתחנת הטעינה מחוברת לחשמל |
| ביצועי ניקוי גרועים | מיכל אבק מלא; מברשות סבוכים; פילטר סתום | רוקנו את מיכל האבק; נקו את המברשות; נקו/החליפו את המסנן |
| רובוט נתקע לעתים קרובות | מכשולים על הרצפה; חיישנים מלוכלכים | Clear floor of cables/small items; Clean sensors |
| Virtual wall not working | Virtual wall batteries low; Incorrect placement | Replace batteries; Adjust virtual wall position |
אם הבעיה נמשכת לאחר ניסיון פתרונות אלה, אנא צור קשר עם תמיכת הלקוחות.
8. מפרטים
Technical specifications for the ETA Falco Smart Robot Vacuum Cleaner (Model ETA251590000):
| תכונה | פְּרָט |
|---|---|
| יַצרָן | זמן הגעה |
| מידות המוצר (L x W x H) | 32.5 x 33.5 x 7.5 ס"מ |
| מִשׁקָל | 250 גרם |
| מספר דגם של פריט | ETA251590000 (T2261) |
| צבע דגם | כְּחוֹל |
| חוֹמֶר | פּלָסטִי |
| סוג כוח | מופעל על סוללה |
| כרך ידtage | 3 Volts (14.4V Li-ion battery, 2400 mAh) |
| מספר הפריטים בחבילה | 1 |
| תכונות מיוחדות | Pet brush compatibility, Smart App control, Floating brush system, HEPA filter, Virtual wall |
| רכיבים כלולים | Battery, Filter, Charging station, Adapter, Remote control, Side brushes, Rotary brush, Cleaning cloths, Mop attachment, Virtual wall |
| הרכב סוללה | ליתיום-יון |
| חיי סוללה | עד 120 דקות |
| זמן טעינה | כ. 5 שעות |
| המלצת משטח | לְרַבֵּד |
| סוג בקר | שליטה באפליקציה |
| זמינות חלקי חילוף | מידע לא זמין על חלקי חילוף |
9. אחריות ותמיכה
For warranty information, product support, or to inquire about spare parts, please refer to the warranty card included with your purchase or visit the official ETA webאתר. שמור את הוכחת הרכישה שלך לצורך תביעות אחריות.