
1. הקדמה
Thank you for choosing the Greadio MD-T26 Portable AM/FM/SW Radio. This manual provides detailed instructions for the proper setup, operation, and maintenance of your radio. Please read this manual thoroughly before use to ensure optimal performance and longevity of your device.
The Greadio MD-T26 is a versatile portable radio featuring AM, FM, and Shortwave (SW) bands, an LCD display for clear frequency and time viewing, and dual power options for both indoor and outdoor use. It is designed for ease of use with large, accessible controls and a built-in speaker for clear audio.

איור 1: חזית view of the Greadio MD-T26 Portable AM/FM/SW Radio.
2. תכונות מוצר
- קליטה רב-תדרית: Receives AM, FM, and Shortwave (SW) frequencies.
- תצוגת LCD: Clear digital display for frequency and time settings.
- אפשרויות צריכת חשמל כפולות: Operates via AC power or 4 x D cell batteries (not included).
- רמקול איכותי: Integrated 2W speaker for clear sound output.
- בקרת צלילים: Adjustable tone settings (Low/High) for personalized audio.
- שקע אוזניות: 3.5mm stereo earphone jack for private listening.
- עיצוב נייד: מצויד בידית חזקה להובלה קלה.
3. התקנה
3.1 הפעלת הרדיו
The Greadio MD-T26 radio offers two methods for power supply:
- ספק כוח AC: For indoor use, connect the included AC power cable to the radio's AC input jack and then plug it into a standard wall outlet.
- ספק כוח סוללה: For portable use, insert four (4) D cell batteries (not included) into the battery compartment located on the back of the radio. Ensure correct polarity (+/-) as indicated inside the compartment.
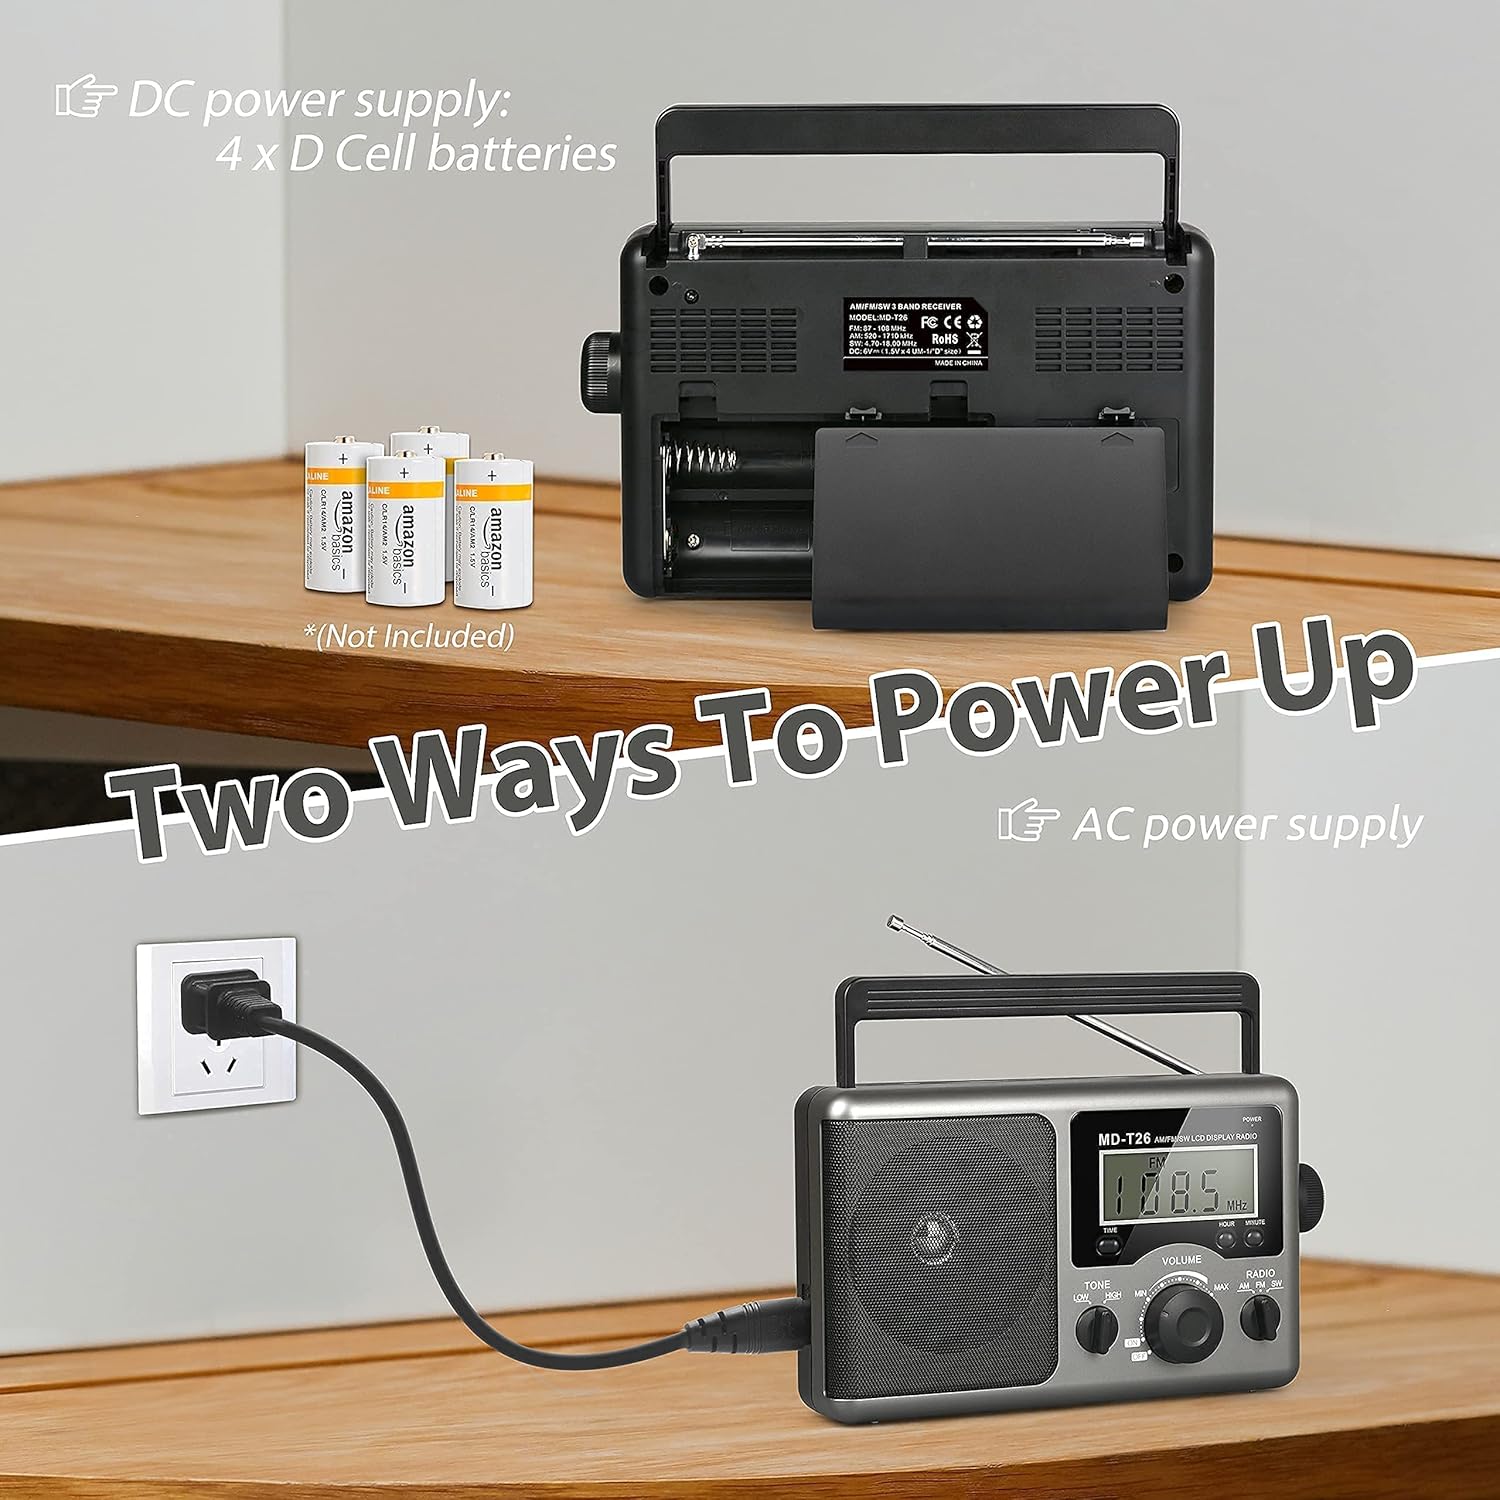
Figure 2: Illustration of AC power connection and battery compartment for D cell batteries.
3.2 כוונון אנטנה
For optimal reception, adjust the antenna as follows:
- FM/SW Reception: Extend the telescopic antenna fully and adjust its angle for the clearest signal.
- קבלת פנים בבוקר: The radio uses a built-in ferrite rod antenna for AM. Rotate the entire radio unit to find the strongest signal.
4. הוראות הפעלה
4.1 בקרות מעלview

איור 3: מפורט view of the radio's control panel.
- כפתור הפעלה: Located on the top right, press to turn the radio ON/OFF.
- כפתור כוונון: Located on the right side, rotate to select radio stations.
- ידית VOLUME: Located on the front panel, rotate to adjust the sound level.
- RADIO Band Selector: Switch between AM, FM, and SW bands.
- מתג טון: Select between LOW and HIGH tone settings.
- TIME/HOUR/MINUTE Buttons: Used for setting the time on the LCD display.
4.2 Turning On and Selecting a Band
- הקש על כּוֹחַ button to turn on the radio. The LCD display will illuminate.
- השתמש ב- רָדִיוֹ band selector switch to choose your desired band: AM, FM, or SW.
4.3 כיוון לתחנה
לאחר בחירת רצועה, סובבו באיטיות את כִּונוּן knob on the right side of the radio. Observe the frequency displayed on the LCD screen. Stop rotating when you hear your desired station clearly.
4.4 התאמת עוצמת הקול והצליל
- כֶּרֶך: סובב את ה כֶּרֶך כפתור בפאנל הקדמי עם כיוון השעון כדי להגביר את עוצמת הקול ונגד כיוון השעון כדי להנמיך אותה.
- טוֹן: השתמש ב- טוֹן switch to select between 'LOW' for a warmer sound or 'HIGH' for a brighter sound, according to your preference.
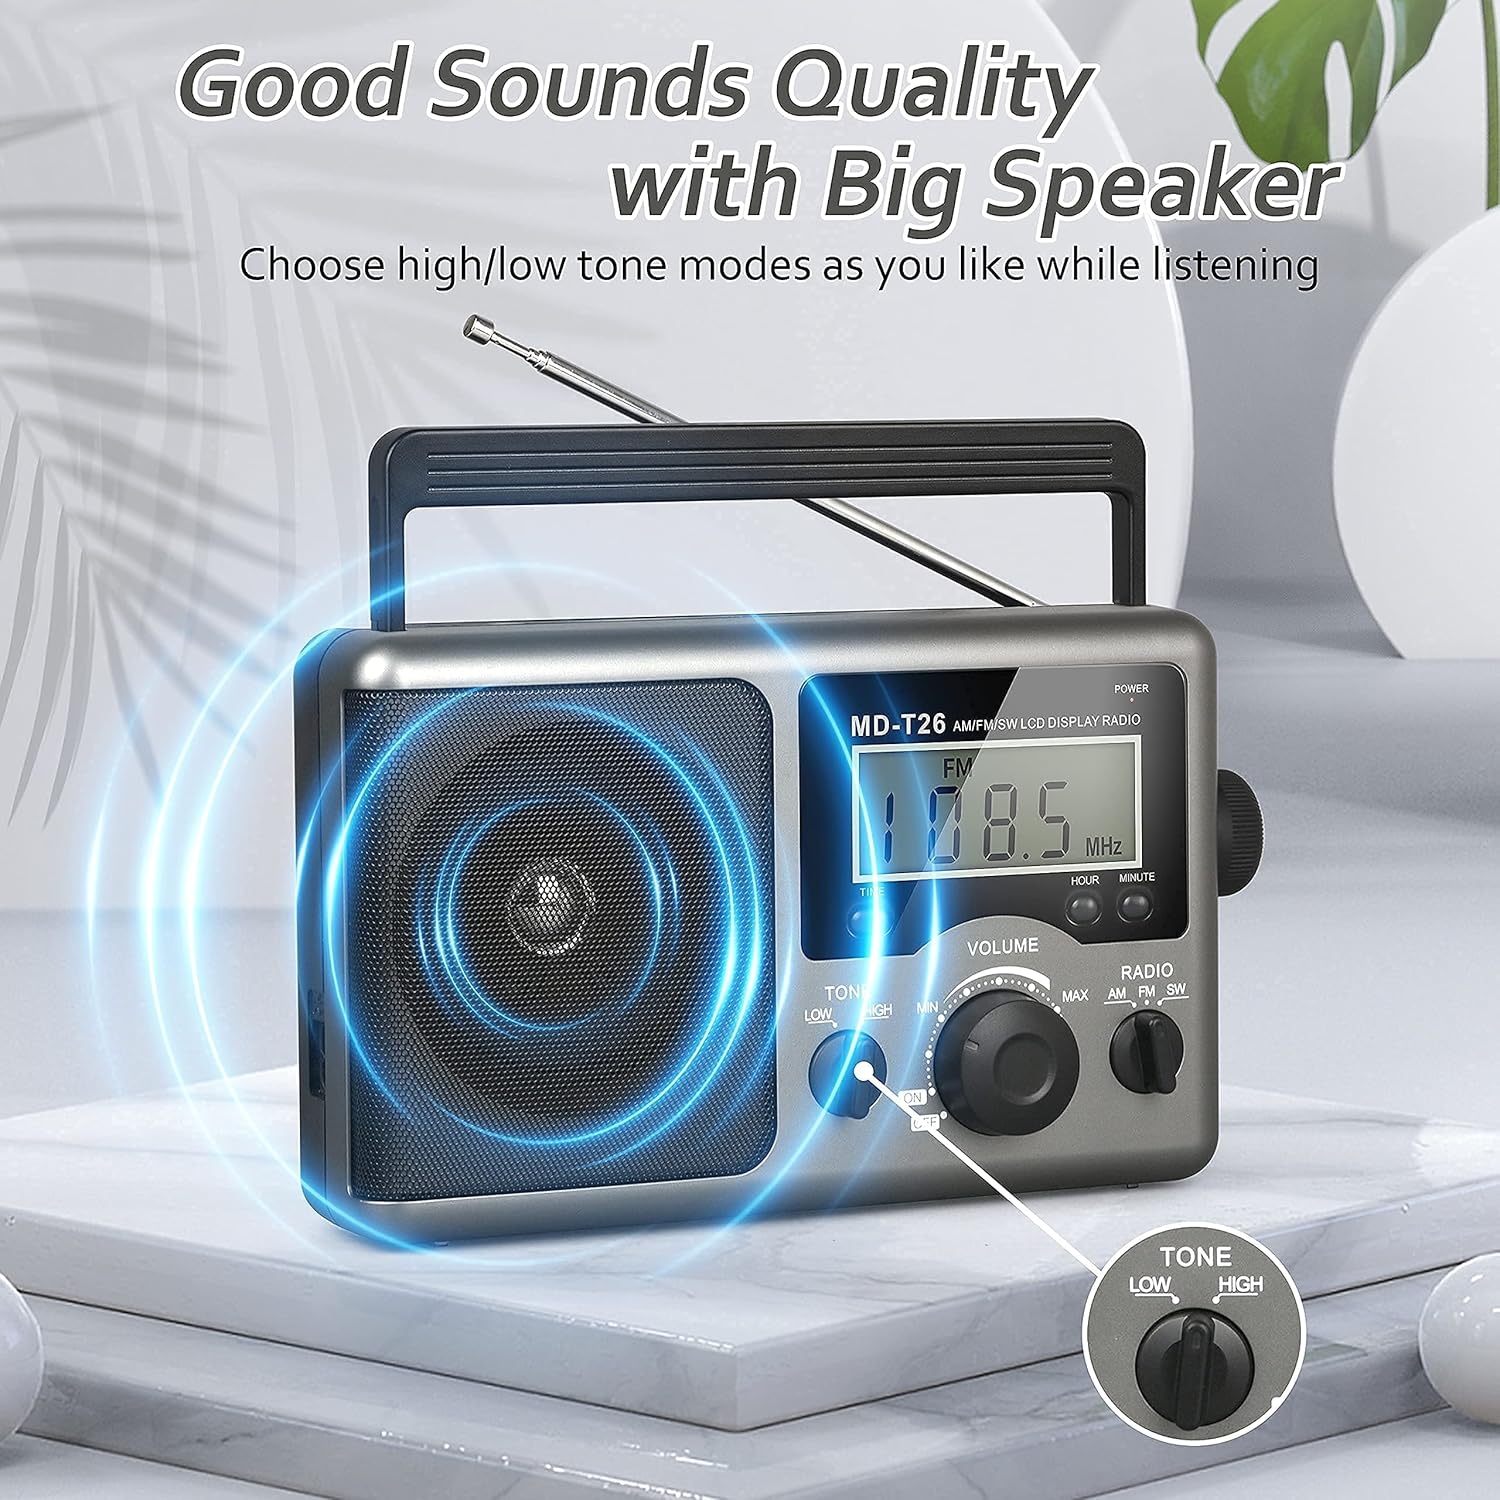
Figure 4: Speaker and Tone control detail.
4.5 קביעת השעה
The LCD display can also show the current time. To set the time:
- הקש על זְמַן button once to enter time setting mode.
- השתמש ב- שָׁעָה כפתור להתאמת השעה.
- השתמש ב- דַקָה כפתור להתאמת הדקה.
- The time system is 24-hour format.
4.6 שימוש בשקע האוזניות
For private listening, plug any standard 3.5mm stereo earphones (not included) into the שקע אוזניות located on the side of the radio. The internal speaker will automatically mute when earphones are connected.
5. תחזוקה
- ניקוי: נגבו את החלק החיצוני של הרדיו בעזרת מטלית רכה ויבשה. אין להשתמש בחומרי ניקוי שוחקים או ממסים.
- טיפול בסוללה: If the radio will not be used for an extended period, remove the D cell batteries to prevent leakage and damage.
- אִחסוּן: יש לאחסן את הרדיו במקום קריר ויבש, הרחק מאור שמש ישיר וטמפרטורות קיצוניות.
- עמידות במים: הרדיו הזה הוא לא עמיד במים. Avoid exposure to rain, moisture, or splashing water.
6. פתרון תקלות
| בְּעָיָה | סיבה אפשרית | פִּתָרוֹן |
|---|---|---|
| אין כוח | AC cable not connected, batteries depleted or incorrectly inserted. | בדוק את חיבור כבל החשמל. החלף סוללות או ודא שהקוטביות נכונה. |
| קליטה גרועה / סטטי | Antenna not extended/adjusted, weak signal area, interference. | Extend and adjust telescopic antenna (FM/SW). Rotate radio for AM. Move to an area with better signal. Avoid sources of electronic interference. |
| אין קול מהרמקול | Volume too low, earphones connected. | Increase volume. Disconnect earphones if not intended for private listening. |
| תצוגת LCD לא עובדת | בעיית חשמל, תקלה פנימית. | בדוק את ספק הכוח. אם הבעיה נמשכת, צור קשר עם תמיכת הלקוחות. |
7. מפרטים
| תכונה | פְּרָט |
|---|---|
| מותג | גראדיו |
| מספר דגם | MD-T26 |
| טכנולוגיית קישוריות | Auxiliary (for earphone) |
| טכנולוגיית טיונר | AM, FM, SW |
| מקור כוח | AC Power, 4 x D Cell Batteries |
| מכשירים תואמים | אֹזְנִיָה |
| סוג תצוגה | LCD |
| ממשק חומרה | שקע אודיו 3.5mm |
| רמת עמידות במים | לא עמיד במים |
8. אחריות ותמיכה
8.1 מידע אחריות
Greadio provides a אחריות ל-12 חודשים for this product, covering manufacturing defects from the date of purchase. Additionally, a אחריות להחזר הכסף של 30 יום מוצע.
אחריות זו אינה מכסה נזק שנגרם כתוצאה משימוש לרעה, תאונה, שינוי לא מורשה או בלאי רגיל.
8.2 תמיכת לקוחות
For any questions, technical assistance, or warranty claims, please contact Greadio customer service. We offer שירות לקוחות 24/7 לסייע לך.
אנא עיינו באריזת המוצר או בהוראות הקמעונאי webאתר לקבלת פרטי הקשר העדכניים ביותר.