
1. הקדמה
Thank you for choosing the Galax Quasar GX600-WH Gaming PC Case. This manual provides essential information for the proper installation, operation, and maintenance of your new PC case. Please read this manual thoroughly before beginning installation to ensure optimal performance and safety.
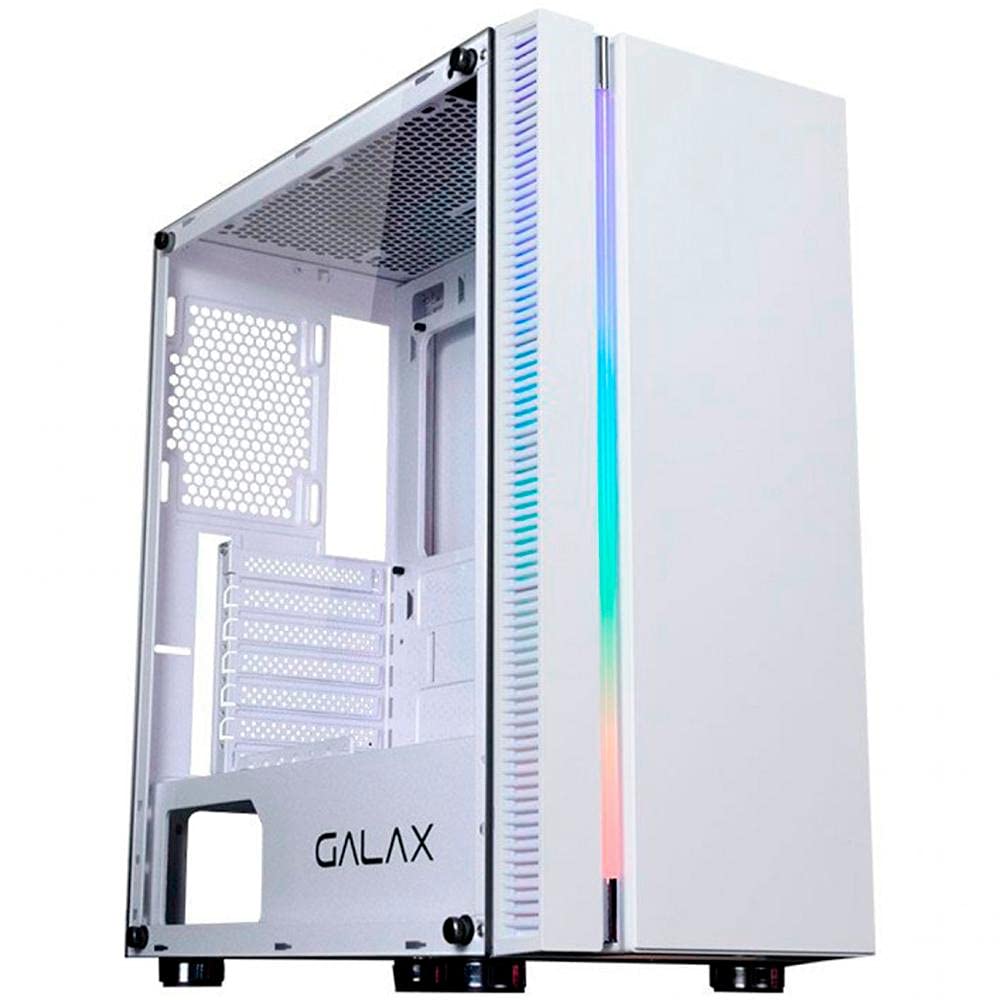
איור 1.1: חֲזִית view of the Galax Quasar GX600-WH Gaming PC Case, showcasing its integrated RGB lighting and minimalist design.
2. מידע בטיחות
אנא הקפידו על אמצעי הזהירות הבאים כדי למנוע נזק למוצר ולהבטיח את בטיחות המשתמש:
- Always disconnect the power supply from the wall outlet before installing or removing any components inside the PC case.
- Handle the tempered glass panel with care. It is fragile and can break if dropped or subjected to impact.
- Avoid placing the PC case in direct sunlight, near heat sources, or in areas with high humidity.
- הקפידו על אוורור נאות כדי למנוע התחממות יתר. אל תחסום את פתחי האוורור.
- הרחיקו חלקים קטנים וברגים מהישג ידם של ילדים.
3. תכולת החבילה
ודא שכל הפריטים נמצאים בחבילה:
- Galax Quasar GX600-WH Mid Tower PC Case
- קופסת אביזרים (ברגים, מעמדים, אזיקוני כבלים)
- מדריך למשתמש (מסמך זה)
Note: Fans are not included with this product and must be purchased separately.
4. המוצר נגמרview
4.1. תכונות עיקריות
- Integrated RGB lighting on the front panel.
- Simple and minimalist design.
- Tempered glass side panel for component display.
- Front panel connectivity: 1x USB 3.0, 2x USB 2.0, 1x 3.5mm Audio, 1x 3.5mm Microphone.
- Rubber grommets for cable management.
- PSU shroud cutout to display power supply model.
- Magnetic dust filter on the top panel.
4.2. זיהוי רכיבים
Familiarize yourself with the main parts of the PC case:
- Front Panel with RGB Lighting
- לוח צד זכוכית מחוסמת
- Steel Side Panel (right side)
- פאנל עליון עם מסנן אבק מגנטי
- Rear Panel (I/O shield cutout, PCI-E slots)
- Front I/O Ports (USB, Audio)
- מעטה PSU
- Drive Bays (2.5" and 3.5")
איור 4.1: Internal layout of the GX600-WH case, highlighting motherboard tray, drive bays, and cable routing options.
5. התקנה והתקנה
Follow these steps to install your PC components:
5.1. הכנת התיק
- הנח את המארז על משטח ישר ויציב.
- Remove the tempered glass side panel by unscrewing the thumb screws and carefully pulling it away. Set it aside on a soft, non-abrasive surface.
- Remove the steel side panel by unscrewing the thumb screws and sliding it backward.
5.2. התקנת לוח אם
- Install the I/O shield into the cutout on the rear panel of the case.
- Align your ATX, Micro-ATX, or Mini-ITX motherboard with the pre-installed standoffs. Additional standoffs may be required for certain motherboard sizes; install them as needed.
- אבטחו את לוח האם באמצעות הברגים המצורפים.
5.3. התקנת יחידת ספק כוח (PSU)
- Position the PSU into the dedicated compartment at the bottom rear of the case.
- Ensure the PSU fan faces downwards (if the case has a bottom vent) or upwards (if no bottom vent).
- אבטחו את ספק הכוח באמצעות ברגים מחלקו האחורי של המארז.
5.4. התקנת כונן אחסון
- 2.5" Drives (SSDs): Locate the 2.5" drive mounts behind the motherboard tray or on the PSU shroud. Secure the SSDs using the provided screws.
- 3.5" Drives (HDDs): Locate the 3.5" drive cage. Slide the HDDs into the trays and secure them, typically with tool-less clips or screws.
5.5. Expansion Card (GPU, etc.) Installation
- הסר את כיסויי חריצי ה-PCI-E הדרושים מחלקו האחורי של המארז.
- Insert your expansion card (e.g., graphics card) into the appropriate PCI-E slot on the motherboard.
- אבטחו את הכרטיס בעזרת בורג.
5.6. Fan and Radiator Installation (Optional)
The GX600-WH supports various fan and radiator configurations:
- רֹאשׁ: Up to 2x 120mm fans or a 240mm radiator.
- חֲזִית: Up to 2x 120mm fans, 1x 140mm fan, or a 240mm radiator.
- אֲחוֹרִי: 1x 120mm fan or a 120mm radiator.
Install fans/radiators using the appropriate screws, ensuring correct airflow direction.
5.7. ניהול כבלים
Route all cables (PSU, data, front panel) through the rubber grommets and cable tie points behind the motherboard tray to maintain a clean interior and optimize airflow.
איור 5.1: Illustration of the cable routing space behind the motherboard tray, demonstrating the use of rubber grommets for neat cable management.
6. הוראות הפעלה
6.1. חיבור ציוד היקפי
Once all internal components are installed and secured, replace both side panels. Connect your monitor, keyboard, mouse, and other peripherals to the appropriate ports on your motherboard's I/O shield and graphics card.
6.2. הפעלה
- חבר את כבל החשמל לספק הכוח שלך ולאחר מכן לשקע בקיר.
- העבר את מתג ההפעלה בספק הכוח למצב "ON".
- Press the power button on the front panel of the GX600-WH case. The integrated RGB lighting should illuminate, and your system should begin to boot.
איור 6.1: מְפוֹרָט view of the front I/O panel, showing the power button, USB 3.0, USB 2.0, and audio jacks.
7. תחזוקה
Regular maintenance helps prolong the life of your PC components and ensures optimal performance.
- מסנני אבק: The top panel features a magnetic dust filter. Regularly remove and clean it with water or a soft brush. Ensure it is completely dry before reattaching.
- ניקוי פנים: Periodically open the side panels and use compressed air to remove dust buildup from fans, heatsinks, and other components.
- ניקוי חיצוני: נגב את המשטחים החיצוניים עם רך, דamp cloth. Avoid abrasive cleaners or solvents. For the tempered glass, use a glass cleaner and a microfiber cloth.
8. פתרון תקלות
אם אתם נתקלים בבעיות במארז המחשב שלכם, עיינו בבעיות הנפוצות ובפתרונות הבאות:
| בְּעָיָה | סיבה אפשרית | פִּתָרוֹן |
|---|---|---|
| המחשב לא נדלק. | PSU switch off, power cables loose, front panel connector issue. | Ensure PSU switch is ON. Check all power connections (24-pin, 8-pin CPU, GPU). Verify front panel power button connector is correctly attached to the motherboard. |
| יציאות USB בלוח הקדמי אינן פועלות. | USB header cable not connected or incorrectly connected to motherboard. | Check the USB 3.0 and USB 2.0 header cables are securely connected to the correct pins on your motherboard. |
| Front panel audio jacks not working. | HD Audio cable not connected or incorrectly connected to motherboard. | Ensure the HD Audio cable is securely connected to the correct audio header on your motherboard. |
| תאורת RGB לא עובדת. | RGB cable not connected to motherboard or controller. | Verify the RGB cable from the front panel is connected to a compatible RGB header on your motherboard or an external RGB controller. |
9. מפרטים
| תכונה | פְּרָט |
|---|---|
| סוג מקרה | מגדל אמצע |
| חומרים | פלדת SGCC, זכוכית מחוסמת |
| צֶבַע | לָבָן |
| תמיכה בלוח אם | ATX, מיקרו ATX, מיני ITX |
| חריצי הרחבה | 7 Horizontal PCI-E |
| דרייב בייס | 2x 2.5 אינץ', 2x 3.5 אינץ' |
| יציאות קלט / פלט קדמיות | 1x USB 3.0, 2x USB 2.0, 1x 3.5mm Audio, 1x 3.5mm Microphone |
| תמיכת מאווררים (למעלה) | 2x120 מ"מ |
| תמיכת מאוורר (קדמית) | 2x 120 מ"מ או 1x 140 מ"מ |
| תמיכה למאוורר (אחורי) | 1x120 מ"מ |
| תמיכת רדיאטור (עליון) | עד 240 מ"מ |
| תמיכת רדיאטור (קדמית) | עד 240 מ"מ |
| תמיכה לרדיאטור (אחורי) | 120 מ"מ |
| אורך GPU מקסימלי | 345 מ"מ |
| מקסימום גובה מצנן מעבד | 160 מ"מ |
| מידות (L x W x H) | 474 מ"מ x 257 מ"מ x 488 מ"מ |
| משקל פריט | 6.25 ק"ג |
איור 9.1: Technical drawing illustrating the dimensions of the Galax Quasar GX600-WH case.
10. אחריות ותמיכה
The Galax Quasar GX600-WH PC Case comes with a אחריות ל-12 חודשים מתאריך הרכישה. אחריות זו מכסה פגמי ייצור ופגמים בחומר בשימוש רגיל.
האחריות אינה מכסה:
- Damage caused by improper installation, accident, abuse, misuse, natural disaster, or unauthorized modification.
- Cosmetic damage, including but not limited to scratches, dents, and broken plastic on ports, that does not affect functionality.
- בלאי רגיל.
For technical support or warranty claims, please contact your local Galax distributor or retailer with your proof of purchase.