
1. הקדמה
This manual provides detailed instructions for the installation, operation, and maintenance of the VIVOTEK ND9323P H.265 8-Channel Embedded PoE Network Video Recorder (NVR). Please read this manual thoroughly before using the product to ensure proper and safe operation. Keep this manual for future reference.
2. מידע בטיחות
Observe the following safety precautions to prevent damage to the NVR and to ensure user safety:
- ספק כוח: Use only the power adapter supplied with the NVR. Ensure the power source matches the NVR's voltagדרישות ה.
- אוורור: אין לחסום פתחי אוורור. התקן את ה-NVR באזור מאוורר היטב כדי למנוע התחממות יתר.
- סְבִיבָה: Avoid exposing the NVR to water, moisture, extreme temperatures, or direct sunlight. Do not place heavy objects on the NVR.
- שֵׁרוּת: אל תנסה לתת שירות למוצר זה בעצמך. הפנה את כל השירות לאנשי שירות מוסמכים.
- טיפול: Handle the NVR with care. Avoid dropping or subjecting it to strong impacts.
3. תכולת החבילה
Carefully unpack the box and ensure all items are present and in good condition. If any items are missing or damaged, contact your vendor immediately.
- VIVOTEK ND9323P NVR Unit
- מתאם מתח
- עכבר USB
- מדריך התקנה מהירה
- Accessory Pack (Screws for HDD installation, Ethernet cable)
- Case (referring to the NVR enclosure itself)
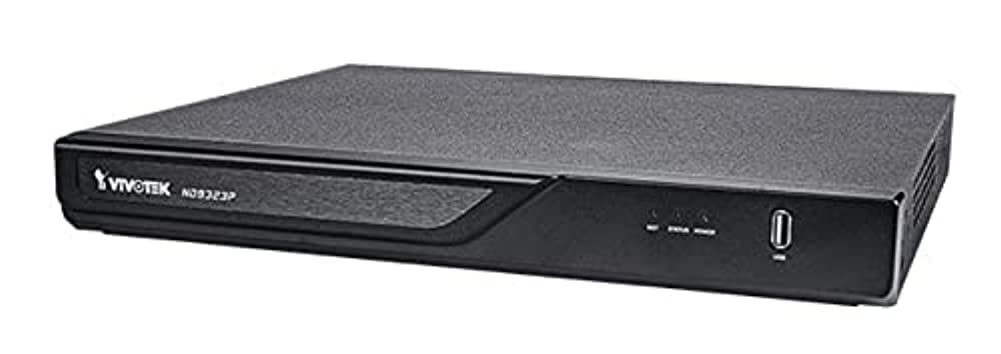
Figure 3.1: VIVOTEK ND9323P NVR unit. This image shows the front panel of the NVR, typically featuring status indicators and USB ports.
4. המוצר נגמרview
The VIVOTEK ND9323P is an 8-channel embedded Network Video Recorder designed for IP surveillance systems. It supports H.265 video compression for efficient storage and bandwidth usage. With its integrated Power over Ethernet (PoE) ports, it simplifies camera installation by providing both power and data connectivity through a single Ethernet cable.
4.1 תכונות עיקריות
- 8-Channel Video Input
- H.265/H.264 Video Compression
- 8 x 802.3at/af PoE Ports
- Local Display Output (HDMI/VGA)
- Remote Access via VIVOTEK VIVOCloud App or VMS
- Supports up to 16TB HDD storage (HDD not included)
4.2 לוחות קדמיים ואחוריים
Refer to the Quick Installation Guide for detailed diagrams of the front and rear panels, indicating ports and indicators.
- פאנל קדמי: Power LED, HDD LED, Network LED, USB ports.
- לוח אחורי: Power input, LAN port, PoE ports (1-8), HDMI output, VGA output, Audio I/O, USB ports.
5. התקנה
5.1 התקנת כונן קשיח (אופציונלי)
The NVR does not typically include a pre-installed hard drive. Follow these steps to install a 3.5-inch SATA hard drive:
- פתחו והסירו את המכסה העליון של ה-NVR.
- חבר את כבלי הנתונים והחשמל של ה-SATA מה-NVR לכונן הקשיח.
- אבטחו את הכונן הקשיח למארז ה-NVR באמצעות הברגים המצורפים.
- החזר את המכסה העליון וחזק אותו בעזרת ברגים.
פֶּתֶק: Ensure the NVR is powered off and unplugged before installing or removing a hard drive.
5.2 חיבורים פיזיים
- חיבור מצלמות: Connect your IP cameras to the NVR's PoE ports (1-8) using Ethernet cables. The NVR will provide power and network connectivity to the cameras.
- התחבר לרשת: Connect the NVR's LAN port to your local network router or switch using an Ethernet cable.
- חיבור תצוגה: חבר צג ליציאת HDMI או VGA של ה-NVR.
- חבר עכבר: חבר את עכבר ה-USB לאחת מיציאות ה-USB של ה-NVR.
- הפעלה: חבר את ספק הכוח לכניסת החשמל של ה-NVR ולאחר מכן חבר אותו לשקע חשמל. ה-NVR יופעל אוטומטית.
5.3 תצורה ראשונית
Upon first boot, the NVR will guide you through a setup wizard on the connected monitor:
- בחירת שפה: בחר את השפה המועדפת עליך.
- הגדרת סיסמה: צור סיסמה חזקה עבור חשבון המנהל. זה קריטי לאבטחה.
- הגדרות רשת: Configure network settings (DHCP or Static IP). DHCP is recommended for most home users.
- זמן ותאריך: הגדר את אזור הזמן, התאריך והשעה הנכונים.
- אתחול הכונן הקשיח: If you installed a new hard drive, the NVR will prompt you to format it. Confirm to proceed. אַזהָרָה: Formatting will erase all data on the drive.
- חיפוש והוספה של מצלמה: The NVR will automatically search for connected VIVOTEK cameras. Select and add them to the NVR.
- סִיוּם: Complete the wizard to access the NVR's live view.
6. הפעלת ה-NVR
6.1 גישה ל-NVR
You can access and manage the NVR through various methods:
- תצוגה מקומית: Directly via the connected monitor and USB mouse.
- Web דפדפן: הזן את כתובת ה-IP של ה-NVR לתוך web דפדפן במחשב המחובר לאותה רשת.
- VIVOTEK VIVOCloud App: Download the mobile app for remote viewאינג וניהול.
- VIVOTEK VAST 2 VMS: For advanced management and multi-NVR systems.
6.2 בשידור חי View
החי view displays real-time video feeds from all connected cameras. You can switch between single-camera view, רשת מרובת מצלמות view, ולהתאים אישית את פריסת התצוגה.
6.3 הגדרות הקלטה
הגדר לוחות זמנים ומצבי הקלטה עבור כל מצלמה:
- הקלטה רציפה: רישומים 24/7.
- הקלטת זיהוי תנועה: מקליט רק כאשר מזוהה תנועה.
- הקלטה מתוזמנת: רישומים בתקופות זמן ספציפיות.
- הקלטת אירוע: Records based on external triggers or alarms.
Access these settings through the NVR's main menu: Configuration > Recording > Schedule.
6.4 השמעה
כדי לחזורview foo מוקלטtage:
- מהתפריט הראשי, בחר השמעה.
- בחרו את המצלמה/ות ואת טווח התאריך/שעה שברצונכם לצלם מחדשview.
- Use the timeline and playback controls (play, pause, fast forward, rewind) to navigate through the footage.
6.5 Event Management and Notifications
Configure the NVR to respond to events such as motion detection, camera tampering, or network disconnection. The NVR can send email notifications, trigger alarms, or start recording.
Access these settings via: Configuration > Event.
7. תחזוקה
7.1 עדכוני קושחה
Regularly check for and install firmware updates to ensure optimal performance, security, and access to new features. Firmware can be updated via the NVR's web interface or local display menu: Configuration > System > Firmware Upgrade.
זְהִירוּת: Do not power off the NVR during a firmware upgrade. This can cause permanent damage.
7.2 ניהול כונן קשיח
Monitor the health of your hard drive(s) and ensure sufficient storage space. The NVR will automatically overwrite the oldest recordings when the disk is full, based on your settings.
Access HDD status and settings via: Configuration > Storage > HDD Management.
7.3 ניקוי
Keep the NVR unit clean and free from dust. Use a soft, dry cloth for cleaning. Do not use liquid cleaners or aerosols.
8. פתרון תקלות
This section addresses common issues you might encounter with your VIVOTEK ND9323P NVR.
8.1 אין תצוגת וידאו על הצג
- בדוק כבלים: ודא שכבל ה-HDMI/VGA מחובר היטב גם ל-NVR וגם לצג.
- קלט צג: ודא שהצג מוגדר למקור הקלט הנכון (HDMI/VGA).
- כוח NVR: Confirm the NVR is powered on and its power LED is illuminated.
8.2 Cameras Not Showing Up / No Image
- חיבור PoE: Ensure cameras are properly connected to the NVR's PoE ports. Check if the PoE port LEDs on the NVR are active.
- כוח מצלמה: If not using PoE, ensure cameras are receiving power from their own power adapters.
- קישוריות רשת: Verify the NVR and cameras are on the same network segment if not directly connected via PoE.
- מצב המצלמה: Check the camera's own status indicators.
- NVR Camera Management: עבור אל Configuration > Camera > Camera Management to ensure cameras are added and enabled. Try rescanning for cameras.
8.3 Cannot Access NVR via Web דפדפן
- כתובת IP: Confirm the NVR's IP address is correct and that your computer is on the same network.
- כבל רשת: Ensure the NVR's LAN port is connected to your network.
- חומת אש: Temporarily disable your computer's firewall to check if it's blocking access.
- תאימות דפדפן: Use a recommended web דפדפן (למשל, כרום, פיירפוקס).
8.4 סיסמה שכחת
If you forget the administrator password, you may need to perform a factory reset. Refer to the VIVOTEK support website or contact technical support for the specific procedure for your model, as this often involves a physical reset button or a specific utility.
9. מפרטים
The following table lists the key specifications for the VIVOTEK ND9323P NVR:
| תכונה | מִפרָט |
|---|---|
| מספר דגם | ND9323P |
| מותג | VIVOTEK |
| מספר ערוצים | 8 |
| טכנולוגיית קישוריות | אתרנט |
| מכשירים תואמים | Camera, Mobile Device |
| דחיסת וידאו | H.265, H.264 |
| יציאות PoE | 8 x 802.3at/af |
| מידות המוצר | 19.69 x 19.69 x 11.02 אינץ' |
| משקל פריט | 0.01 אונקיות |
| יַצרָן | ויוווטק |
10. אחריות ותמיכה
VIVOTEK products are covered by a limited warranty. For detailed warranty terms and conditions, please refer to the warranty card included with your product or visit the official VIVOTEK webאֲתַר.
For technical support, product registration, or to download the latest firmware and software, please visit the VIVOTEK support portal:
VIVOTEK Official Support Webאֲתַר
When contacting support, please have your NVR's model number (ND9323P) and serial number ready.