
Docooler XUH6362338938855GM
Docooler JINGSHA X99-8D3 Motherboard User Manual
Model: XUH6362338938855GM
1. מבוא ומעלהview
The Docooler JINGSHA X99-8D3 is a high-performance ATX gaming motherboard designed for LGA2011 V3 processors. It features four-channel DDR3 memory support, an M.2 NVME slot for high-speed storage, and multiple PCI-E expansion slots, making it suitable for demanding computing tasks and gaming setups. This manual will guide you through the installation, configuration, and maintenance of your motherboard.
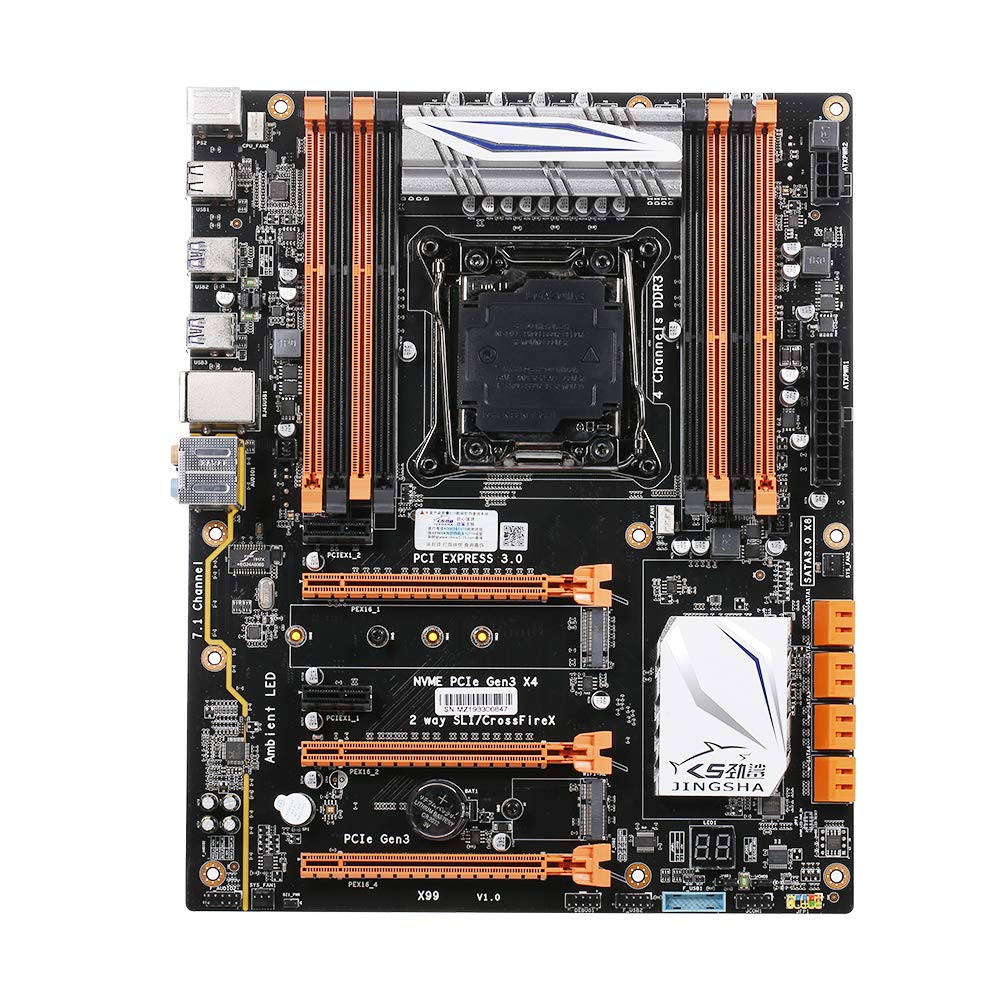
איור 1.1: מלמעלה למטה view of the Docooler JINGSHA X99-8D3 Motherboard, showcasing its layout with CPU socket, RAM slots, and various expansion slots.
2. תכונות עיקריות
- M.2 NVME Support: Equipped with an M.2 hard disk port, supporting high-speed PCI-E NVME X4 for optimal operating system and application driver performance.
- Quad-Channel DDR3 Memory: Features 8 DDR3 memory slots across 4 channels, significantly improving capacity and performance, supporting up to 256GB.
- Digital Diagnostic Card: Integrated digital diagnostic card automatically tests hardware devices to ensure proper operation and assist in troubleshooting.
- Multiple PCI-E Expansion Slots: Provides 3 PCI-E expanded slots, configurable as X16/X8 to handle various workloads and multi-GPU setups.
- בנייה עמידה: Built with a 10-layer PCB and high-quality capacitors for enhanced stability and heat resistance.

Figure 2.1: Diagram illustrating the six core technologies and features of the motherboard, including 4-channel DDR3*8, M.2 hard disk interface, digital diagnostic card, 7.1 channel audio, SATA3.0*8 interface, and Crossfire support.
3. תכולת החבילה
אנא ודא שכל הפריטים המפורטים להלן נמצאים בחבילה שלך:
- 1x Docooler JINGSHA X99-8D3 Motherboard
- 1x כבל SATA
- 1x I/O Baffle (Backplate)
- 1x CPU Fan Board
- A bag of screws
4. מפרטים
| תכונה | מִפרָט |
|---|---|
| דֶגֶם | X99-8D3 |
| גורם צורה | ATX |
| Graphic Slot | PCIE3.0 16X*3 |
| כרטיס רשת | כרטיס רשת Gigabit |
| ערוץ אודיו | 7.1 ערוצים |
| CPU Type Support | LGA2011 V3 (2629V3/2649V3/2669V3/2678V3/2696V3/2676V3/2673V3) |
| שכבות PCB | 10 שכבות |
| חריץ זיכרון | DDR3*8 |
| קיבולת זיכרון מקסימלית | 256GB |
| ממשק SATA | SATA3.0*8, M.2 NVME |
| PS/2 Interface | עכבר / מקלדת |
| ספק כוח | 8 PIN*1, 24 PIN*1 |
| ממשק USB | USB3.0*6, USB2.0*6 |
| Expanded Interface | PCIE 1X*2, M.2 WIFI*1 |
| גודל פריט | 30.2 x 24.4 ס"מ (11.89 x 9.61 אינץ') |
| משקל פריט | 930.5 גרם (32.82 אונקיות) |

איור 4.1: מפורט view of the motherboard's rear I/O panel, showing PS/2 ports, USB 2.0, USB 3.0, Gigabit Network Port, and 7.1 Audio Ports.
5. התקנה והתקנה
Before beginning installation, ensure your system is powered off and unplugged from the wall outlet. Handle the motherboard by its edges to avoid static discharge.
5.1 התקנת המעבד
- Locate the LGA2011 V3 CPU socket on the motherboard.
- Gently push down the CPU retention lever and swing it open.
- Align the triangular mark on your CPU with the corresponding mark on the socket. Carefully place the CPU into the socket without forcing it.
- סגור את ידית האחיזה כדי לאבטח את המעבד.
- מרחו שכבה דקה ואחידה של משחה תרמית על החלק העליון של המעבד.
- Install the CPU cooler according to its manufacturer's instructions, ensuring proper contact and pressure.

איור 5.1: תקריב view of the LGA2011 V3 CPU socket on the motherboard, ready for CPU installation.
5.2 Installing RAM Modules
- פתחו את הקליפסים בשני קצוות חריצי זיכרון DDR3.
- יישר את החריץ שבמודול ה-RAM עם המפתח בחריץ הזיכרון.
- Press down firmly on both ends of the RAM module until the clips snap into place, securing the module.
- For optimal performance, install RAM modules in matching pairs across the four channels as indicated in the motherboard manual or silkscreen.

איור 5.2: View of the eight DDR3 RAM slots on the motherboard, showing their arrangement for quad-channel memory configuration.
5.3 Installing Storage Devices (M.2 NVME & SATA)
- SSD מסוג M.2 NVME: Locate the M.2 slot. Insert the M.2 SSD at an angle into the slot, then gently push it down and secure it with the provided screw.
- כונני SATA: Connect your SATA SSDs or HDDs to the SATA 3.0 ports using SATA data cables. Ensure the power supply SATA power connectors are also attached to the drives.

Figure 5.3: Close-up of the M.2 interface on the motherboard, highlighting its position and the PCI-E Gen3 X4 connection for high-speed data transfer.
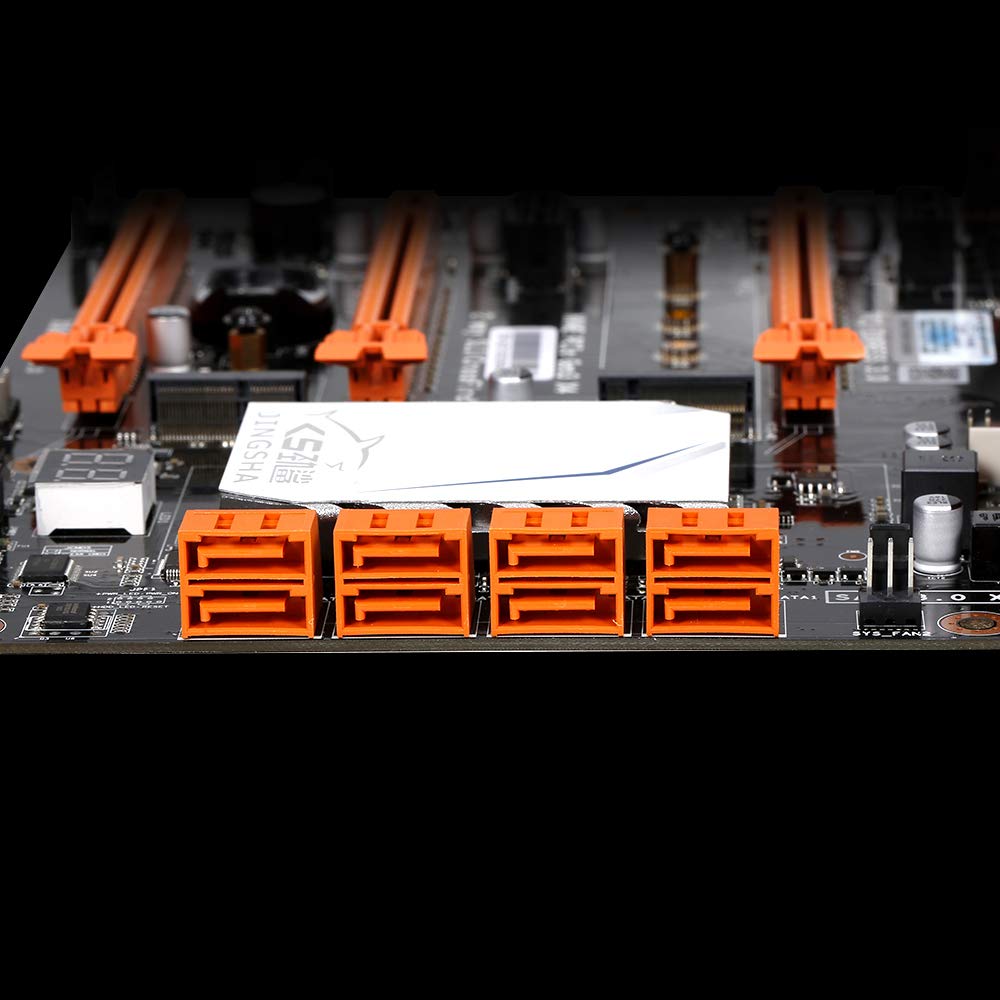
איור 5.4: View of the eight orange SATA 3.0 ports on the motherboard, providing ample connectivity for storage devices.
5.4 חיבור ספק כוח
- חבר את מחבר החשמל ATX בעל 24 הפינים מיחידת ספק הכוח (PSU) שלך ליציאה המתאימה בלוח האם.
- Connect the 8-pin CPU power connector (EPS12V) from your PSU to the 8-pin port near the CPU socket.
5.5 Installing Expansion Cards (PCIe)
- Locate the desired PCI-E 3.0 x16 or x1 slots.
- הסר את כיסוי חריץ ההרחבה המתאים ממארז המחשב שלך.
- Align the expansion card with the slot and press down firmly until it is fully seated. Secure the card with a screw to the case.

איור 5.5: זוויתי view of the motherboard, highlighting the three PCI Express 3.0 x16 slots and the smaller PCIe x1 slots, ready for graphics cards and other expansion cards.
6. הפעלת לוח האם
6.1 אתחול ראשון והגדרת BIOS
- לאחר הרכבת כל הרכיבים, חברו את הצג, המקלדת והעכבר.
- Power on your system. During the initial boot sequence, repeatedly press the DEL or F2 key (common for JINGSHA motherboards) to enter the BIOS/UEFI setup utility.
- ב-BIOS, ודא שכל הרכיבים המותקנים (מעבד, זיכרון RAM, אחסון) מזוהים כהלכה.
- הגדר את סדר האתחול כדי לתעדף את מדיית ההתקנה של מערכת ההפעלה שלך (כונן USB או DVD).
- שמור את השינויים וצא מה-BIOS. המערכת תופעל מחדש.
6.2 התקנת מערכת הפעלה
Follow the instructions provided with your operating system (e.g., Windows, Linux) to complete the installation process. Ensure you install all necessary drivers for the motherboard's chipsets, network, audio, and other components from the manufacturer's webאתר או דיסק מנהל ההתקן המצורף.
7. תחזוקה
תחזוקה נאותה מבטיחה את אורך החיים והפעולה היציבה של לוח האם שלך.
- הסרת אבק: יש לנקות באופן קבוע אבק מלוח האם והרכיבים באמצעות אוויר דחוס. יש לוודא שהמערכת כבויה ומנותקת מהחשמל לפני הניקוי.
- עדכוני BIOS: Periodically check the Docooler or JINGSHA official website for BIOS updates. BIOS updates can improve compatibility, stability, and performance. Follow update instructions carefully to avoid damaging the motherboard.
- עדכוני דרייבר: עדכן את מנהלי ההתקנים של המערכת שלך כדי להבטיח ביצועים אופטימליים ותאימות עם תוכנות וחומרה חדשות.
- תנאים סביבתיים: Operate the motherboard in a well-ventilated environment with stable temperature and humidity to prevent overheating and component degradation.
8. פתרון תקלות
סעיף זה עוסק בבעיות נפוצות שאתה עשוי להיתקל בהן.
8.1 אין חשמל / אין אתחול
- ודא שמחברי ה-ATX בעלי 24 פינים ומחברי החשמל של המעבד בעלי 8 פינים מחוברים היטב ללוח האם.
- Check if the power supply unit (PSU) is switched on and connected to a working power outlet.
- Verify that the front panel power button cable is correctly connected to the motherboard's header.
8.2 אין פלט תצוגה
- Ensure your graphics card (if dedicated) is properly seated in its PCI-E slot and has all necessary power cables connected.
- Check that your monitor cable is securely connected to the graphics card or motherboard (if integrated graphics are used, though X99 typically requires a dedicated GPU).
- Try reseating your RAM modules. Incorrectly seated RAM is a common cause of no display.
8.3 POST Code Display (Digital Diagnostic Card)
The motherboard is equipped with a digital diagnostic card (POST code display) that shows a two-digit code during boot-up. Refer to the motherboard's detailed technical documentation (often available on the manufacturer's website) for a list of POST codes and their meanings. This can help pinpoint the exact component causing a boot failure.

איור 8.1: תקריב view showing the integrated digital diagnostic card (POST code display) on the motherboard, which assists in identifying hardware issues during boot.
9. אחריות ותמיכה
For warranty information and technical support, please refer to the documentation provided with your purchase or visit the official Docooler or JINGSHA webאתר. שמור את הוכחת הרכישה שלך לצורך תביעות אחריות.
Ask a question about this manual
Ask about setup, troubleshooting, compatibility, parts, safety, or missing instructions. Manuals+ will review the question and use this page’s manual context to help answer it.