1. הקדמה
This manual provides essential information for the safe and efficient operation of your DL 10-in-1 Vintage Bluetooth Record Player. This versatile audio system integrates a turntable, CD player, cassette player, AM/FM radio, Bluetooth connectivity, and USB recording capabilities. Please read this manual thoroughly before use and retain it for future reference.
2. הוראות בטיחות
יש להקפיד על אמצעי הזהירות הבאים כדי למנוע התחשמלות, שריפה או נזק ליחידה:
- אין לחשוף מכשיר זה לגשם או לחות.
- אין לחסום פתחי אוורור. יש להתקין בהתאם להוראות היצרן.
- אין להתקין ליד מקורות חום כלשהם כגון רדיאטורים, אוגרי חום, תנורים או מכשירים אחרים (כולל ampמחצבים) המייצרים חום.
- הגן על כבל החשמל מפני הליכה או צביטה, במיוחד בתקעים, בשקעי נוחות ובנקודה שבה הם יוצאים מהמכשיר.
- השתמש רק בתוספות/אביזרים שצוינו על ידי היצרן.
- נתק את המכשיר מהחשמל במהלך סופות ברקים או כאשר אינו בשימוש לפרקי זמן ארוכים.
- הפנה כל טיפול לצוות שירות מוסמך. שירות נדרש כאשר המכשיר ניזוק בכל דרך שהיא, כגון כבל או תקע חשמל פגומים, נוזל נשפך או חפצים נפלו לתוך המכשיר, המכשיר נחשף לגשם או לחות, אינו פועל כרגיל , או הושמט.
3. תכולת החבילה
ודא שכל הפריטים המפורטים להלן כלולים בחבילה שלך:
- 1 x DL 10-in-1 Stereo Turntable Unit
- מתאם 1 x 45 סל"ד
- 1 x מחט סטיילוס חלופית
- 1 x מדריך הוראות (מסמך זה)
- 1 x מתאם מתח AC
4. המוצר נגמרview
The DL 10-in-1 Vintage Bluetooth Record Player combines multiple audio playback options in a classic design. Familiarize yourself with the main components and controls.
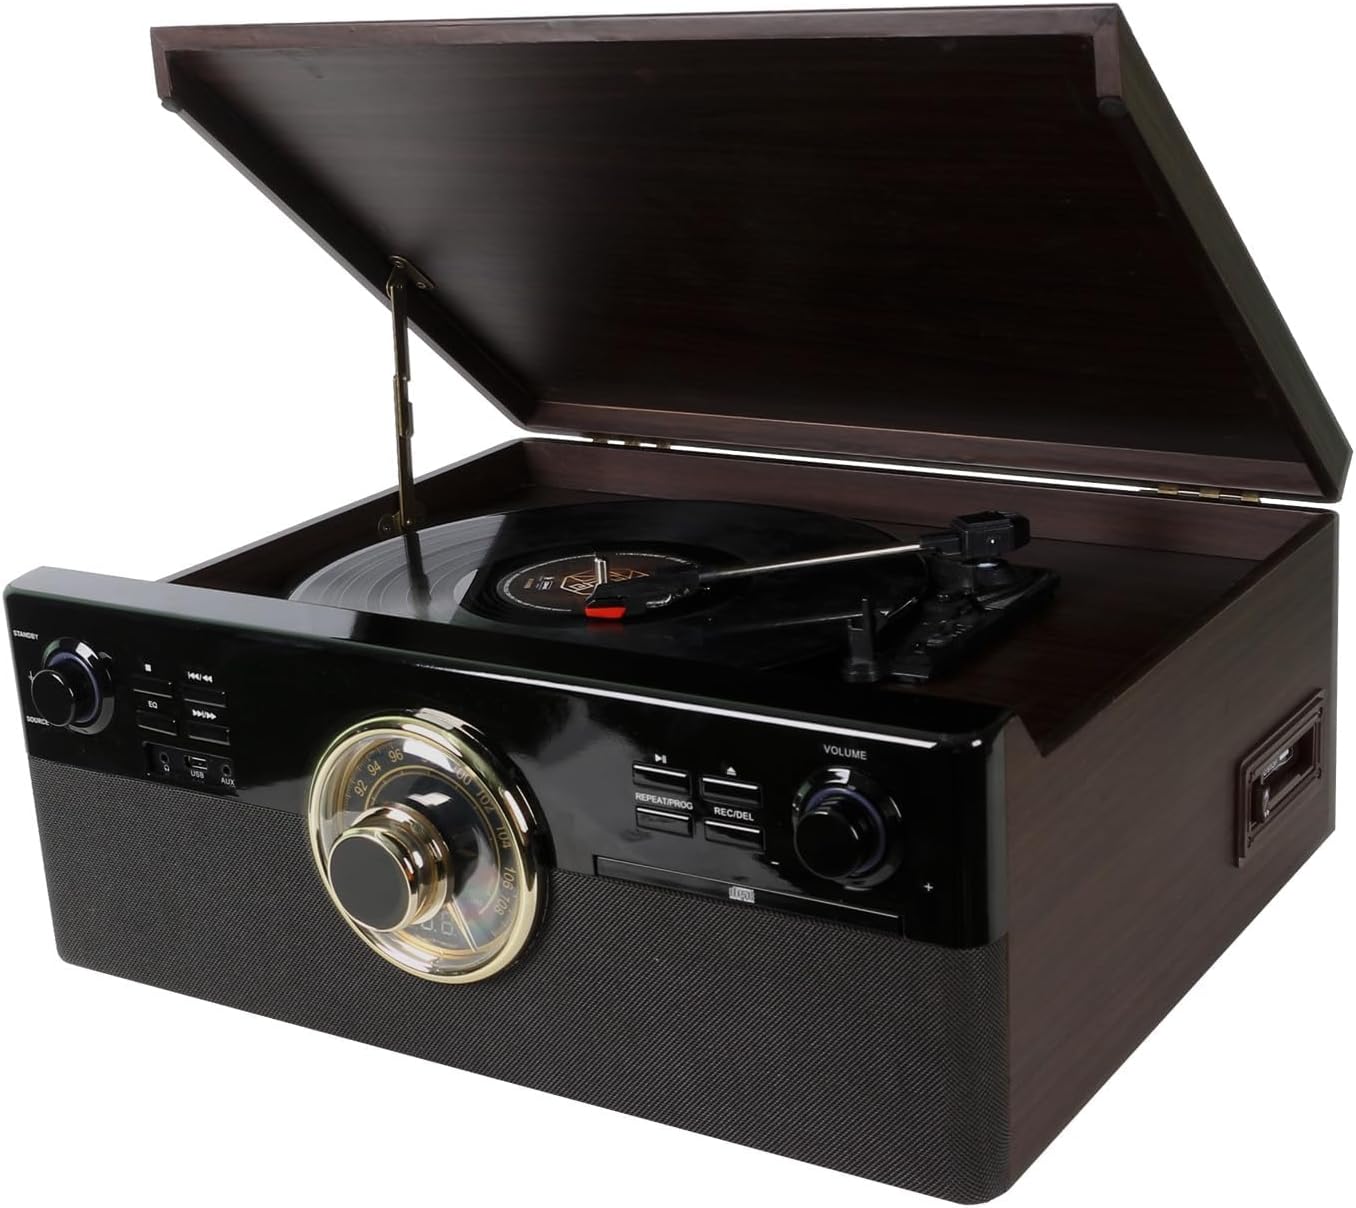
תמונה: זווית קדמית view of the DL 10-in-1 Vintage Bluetooth Record Player with the turntable lid open, showcasing its classic design and integrated controls.

Image: Visual representation of the 10 integrated functions: Vinyl Record, CD, Cassette, Bluetooth, FM Radio, USB, Stereo Speaker, Headphone, Aux In, and Line Out.
4.1 בקרות בלוח הקדמי
- כפתור הפעלה/ווליום: Turns the unit on/off and adjusts the master volume.
- Source Selector Knob: Switches between Phono, CD, Cassette, Radio, Bluetooth, and AUX input modes.
- חוגת מקלט רדיו: For selecting AM/FM radio stations.
- פקדי נגן תקליטורים: Play/Pause, Stop, Skip Forward/Backward, Repeat, Program.
- יציאת USB: להשמעת MP3 files and recording audio.
- כפתור הקלטה/מחיקה: Initiates USB recording or deletes files.

תמונה: מפורט view showing the turntable's ruby stylus, the radio tuner dial, and the volume knob with surrounding playback controls.
4.2 חיבורי לוח אחורי
- Line Out (RCA): התחבר לחיצוני ampמרים או רמקולים מופעלים.
- כניסת מתח AC: Connect the provided AC power adapter.

Image: Close-up of the USB port and AUX input, located on the front or side panel for easy access.

Image: Close-up of the circular radio tuner dial with frequency markings, used for selecting AM/FM stations.
5. התקנה
בצע את השלבים הבאים כדי להגדיר את הפטיפון שלך:
- פריקת אריזה: הוצא בזהירות את היחידה מאריזתה. שמור את האריזה להובלה או אחסון עתידיים.
- מיקום: הנח את היחידה על משטח ישר ויציב, הרחק מאור שמש ישיר, מקורות חום, אבק או רעידות מוגזמות.
- חיבור חשמל: Connect the AC power adapter to the AC power input on the rear of the unit, then plug the adapter into a wall outlet.
- הכנת פטיפון: Remove the protective cap from the stylus. Ensure the tone arm is unlocked from its rest.
- Antenna (Radio): הרחב את אנטנת החוט FM לקבלת קליטת רדיו אופטימלית.
6. הוראות הפעלה
6.1 הפעלה/כיבוי ועוצמת קול
- סובב את ה כפתור הפעלה/ווליום clockwise to turn the unit on. The indicator light will illuminate.
- Continue rotating clockwise to increase volume; rotate counter-clockwise to decrease volume.
- סובב את ה כפתור הפעלה/ווליום counter-clockwise until it clicks to turn the unit off.
6.2 ניגון תקליטי ויניל
- הרם את מכסה הפטיפון.
- הניחו תקליט על מגש הפטיפון. אם אתם מנגנים סינגל במהירות 45 סל"ד, הניחו את מתאם 45 הסל"ד על הציר המרכזי.
- בחרו את המהירות המתאימה (33 1/3, 45 או 78 סל"ד) באמצעות מתג בורר המהירות.
- סובב את ה Source Selector Knob to 'PHONO'.
- Gently lift the tone arm from its rest and position it over the desired track on the record.
- Lower the tone arm slowly onto the record. Playback will begin automatically.
- At the end of the record, the turntable will stop automatically (if auto-stop is enabled). Lift the tone arm and return it to its rest.
6.3 השמעת תקליטורים
- סובב את ה Source Selector Knob to 'CD'.
- לחץ על כפתור EJECT כדי לפתוח את מגש התקליטורים.
- הנח תקליטור כאשר צד התווית פונה כלפי מעלה במגש.
- Press the EJECT button again to close the tray. The unit will read the CD.
- לחץ על לחצן PLAY/PAUSE כדי להתחיל את ההשמעה.
- Use the SKIP buttons to navigate between tracks.

Image: Close-up of the CD player tray, showing a compact disc being inserted for playback.
6.4 Playing Cassettes
- סובב את ה Source Selector Knob to 'TAPE'.
- הכנס קלטת לתוך חריץ הקלטת בצד היחידה.
- Press the PLAY button on the cassette deck to begin playback.
- Use the FAST FORWARD and REWIND buttons as needed.
- Press the STOP/EJECT button to stop playback and remove the tape.

Image: Close-up of the cassette player slot, indicating the 'AUTO STOP' feature for tape playback.
6.5 תפעול בלוטות'
- סובב את ה Source Selector Knob to 'BLUETOOTH'. The Bluetooth indicator will flash.
- הפעל את Bluetooth בטלפון החכם או בטאבלט שלך וחפש מכשירים זמינים.
- Select 'DL-179D99' (or similar name) from the list of devices.
- לאחר הצימוד, נורית הבלוטות' תפסיק להבהב ותמשיך לפעול באופן קבוע.
- You can now stream audio from your device to the record player.
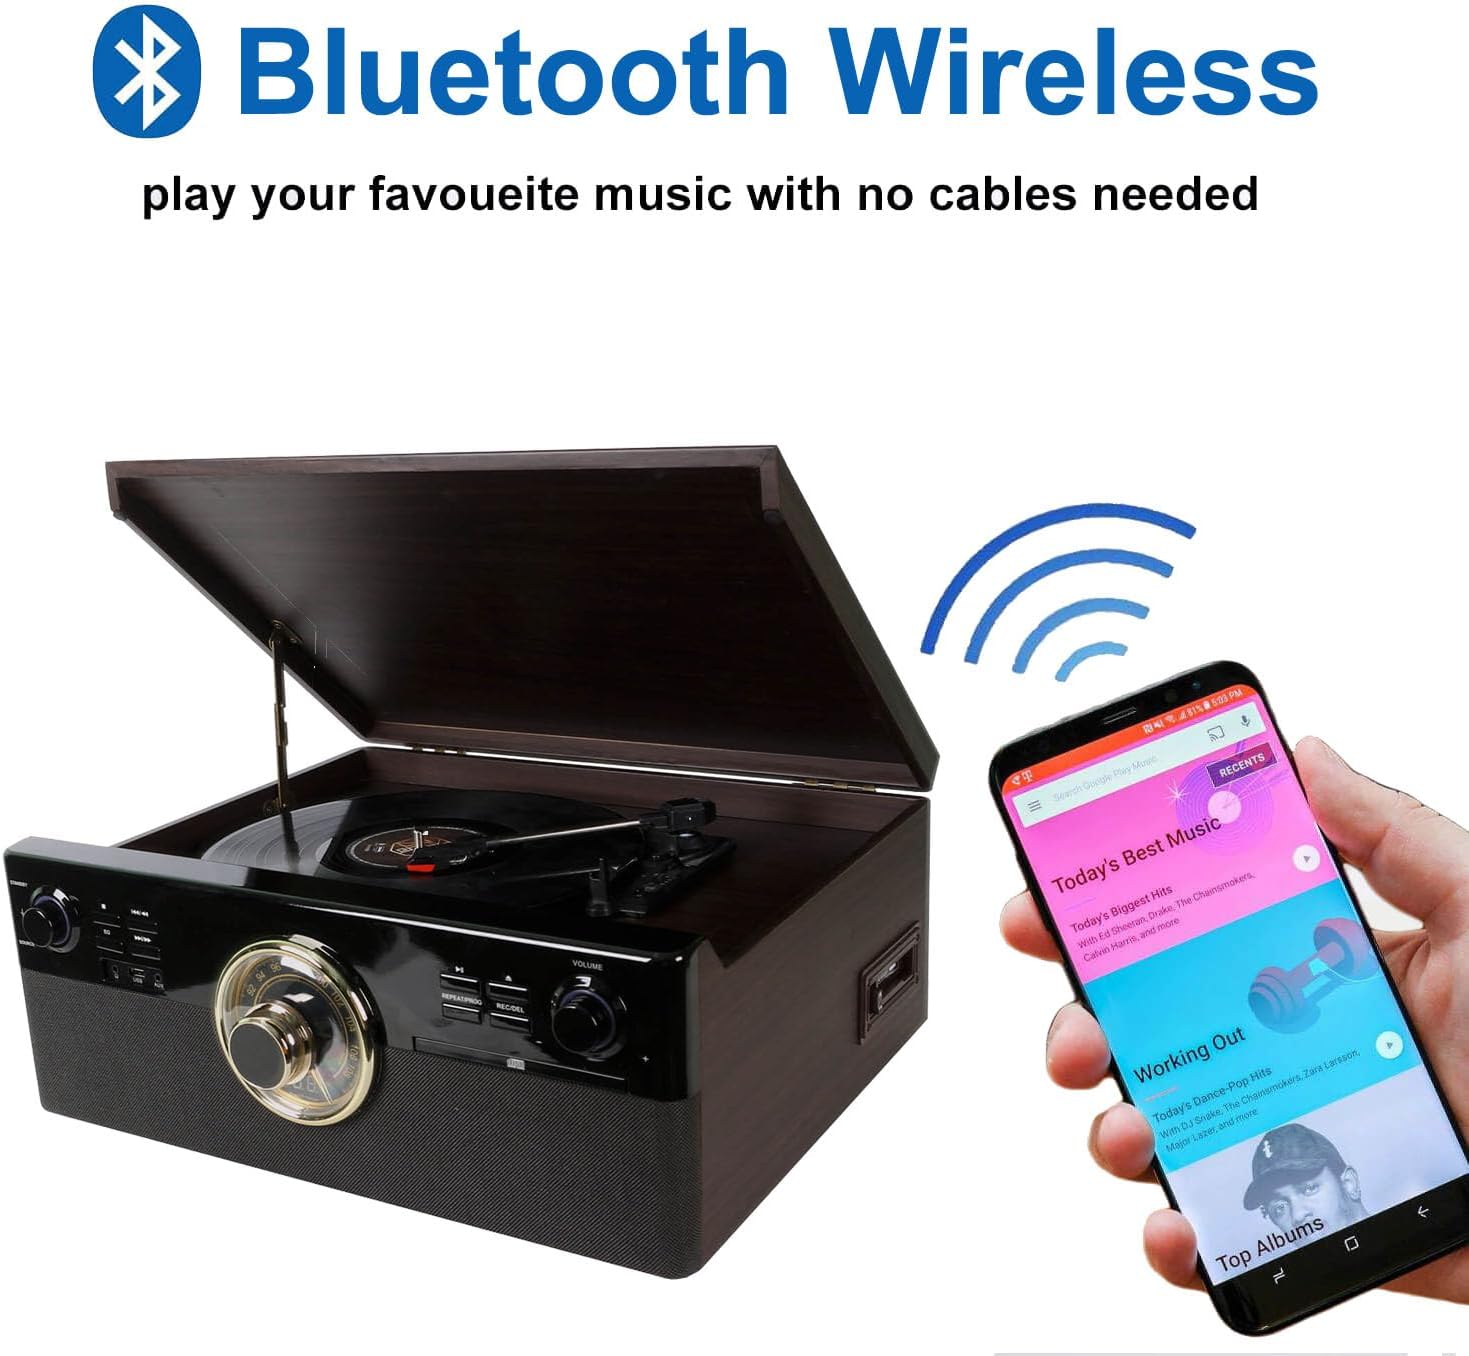
Image: The record player with a smartphone displaying a music app, illustrating wireless Bluetooth connectivity for audio streaming.
6.6 השמעה והקלטה באמצעות USB
- השמעת USB: Insert a USB drive into the USB port. Rotate the Source Selector Knob to 'USB'. The unit will automatically detect and play MP3 files. Use the playback controls to navigate.
- USB Recording (from Vinyl, CD, Cassette, AUX):
- הכנס כונן USB ליציאת ה- USB.
- Select the desired source (PHONO, CD, TAPE, or AUX).
- Start playback on the source (e.g., play a record, CD, or cassette).
- הקש על REC/DEL button. The recording indicator will flash, and recording will begin.
- הקש על REC/DEL לחצן שוב כדי לעצור את ההקלטה. ההקלטה file will be saved as an MP3 on the USB drive.
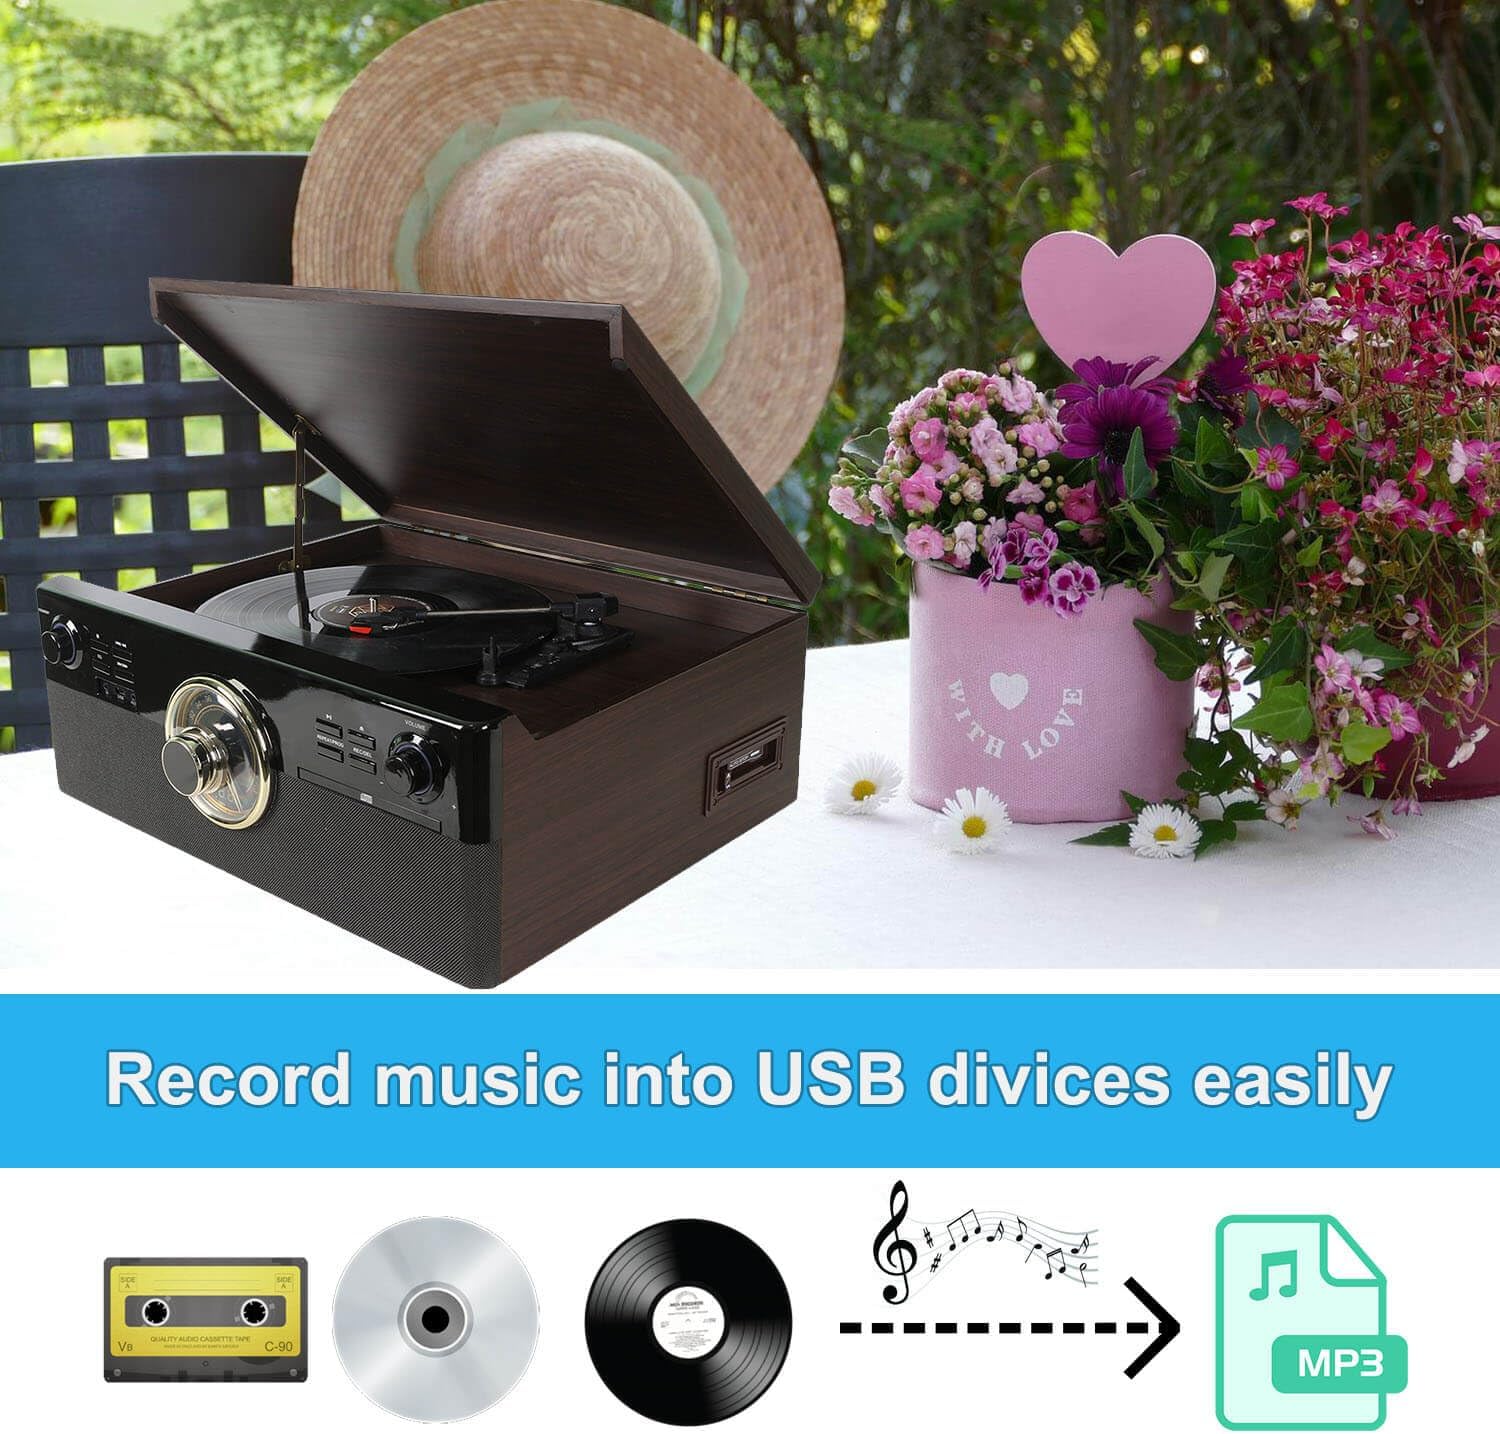
Image: A visual diagram illustrating the process of recording audio from cassette, CD, or vinyl records directly to a USB device as MP3 files.
6.7 תפעול רדיו
- סובב את ה Source Selector Knob to 'RADIO'.
- התאם את Radio Tuner Dial לבחירת תחנת AM או FM הרצויה.
- Extend the FM wire antenna for better reception.
6.8 External Audio Input (AUX IN)
- Connect an external audio device (e.g., MP3 player) to the AUX IN port using a 3.5mm audio cable (not included).
- סובב את ה Source Selector Knob to 'AUX'.
- השמע אודיו מהמכשיר המחובר שלך.
6.9 External Audio Output (LINE OUT)
- Connect the RCA LINE OUT jacks on the rear of the unit to the audio input jacks of an external ampרמקולים או רמקולים חשמליים באמצעות כבל RCA (לא כלול).
- ודא שהחיצוניות ampשהמגבר/רמקולים דולקים ומוגדרים לקלט הנכון.
- Audio from the record player will now be routed through the external system.

Image: Diagram illustrating the connection of the RCA Line Out ports on the back of the unit to external speakers for enhanced audio output.
7. תחזוקה
7.1 ניקוי היחידה
- נגבו את היחידה במטלית רכה ויבשה. אין להשתמש בחומרי ניקוי שוחקים או ממסים.
- Keep the dust cover closed when not in use to protect the turntable.
7.2 החלפת עט סטיילוס
The stylus (needle) is a consumable part and should be replaced after approximately 300-500 hours of use to maintain sound quality and prevent damage to your records. A replacement stylus is included in your package.
- Gently pull the old stylus cartridge downwards and forwards to detach it from the tone arm.
- Align the new stylus cartridge with the tone arm.
- Push the new stylus cartridge upwards and backwards until it clicks into place.
8. פתרון תקלות
If you experience issues with your unit, refer to the following table for common problems and solutions:
| בְּעָיָה | סיבה אפשרית | פִּתָרוֹן |
|---|---|---|
| אין כוח | Power cord not connected; Unit not turned on. | Ensure power cord is securely plugged in; Rotate Power/Volume knob clockwise to turn on. |
| אין קול | Volume too low; Incorrect source selected; External speakers not connected/powered. | Increase volume; Select correct source; Check external speaker connections and power. |
| פטיפון לא מסתובב | Unit not powered on; Belt dislodged; Tone arm locked. | Ensure unit is on; Check if the drive belt is properly seated (refer to maintenance); Unlock tone arm. |
| בלוטות' לא מתאמת | Incorrect source; Device too far; Bluetooth not enabled on external device. | Select 'BLUETOOTH' source; Move device closer; Enable Bluetooth on your smartphone/tablet. |
| קליטת רדיו גרועה | אנטנה לא מורחבת; אות חלש. | Fully extend the FM wire antenna; Try repositioning the unit. |
| CD skipping | CD dirty or scratched; Unit on unstable surface. | Clean CD with a soft cloth; Place unit on a stable, vibration-free surface. |
9. מפרטים
- דֶגֶם: DL-179D99
- מידות המוצר: 18.9 x 17.52 x 7.68 אינץ'
- משקל פריט: 17.81 פאונד
- צריכת חשמל (במצב פעיל): 9 וואט
- מהירויות פטיפון: 33 1/3, 45, 78 סל"ד
- סוג מנוע: מנוע DC
- קישוריות: Bluetooth, USB, AUX In, Line Out (RCA)
- השמעת מדיה: Vinyl records, CDs, Cassette tapes, AM/FM Radio, USB MP3
- הַקלָטָה: Vinyl, CD, Cassette to USB MP3
- רכיבים כלולים: Stereo Turntable, 45 RPM Adapter, Replacement Stylus Needle, Instruction Manual, AC Power Adapter
10. אחריות ותמיכה
This product is covered by a standard manufacturer's warranty against defects in materials and workmanship. For specific warranty terms, duration, and to register your product, please refer to the warranty card included in your package or contact the manufacturer directly.
For technical support, troubleshooting assistance, or to inquire about replacement parts, please contact DL customer service through the retailer where the product was purchased or visit the official DL webאתר ליצירת קשר.