
1. הקדמה
The ASUS ROG Strix X570-E Gaming ATX Motherboard is designed to deliver robust performance and extensive features for 2nd and 3rd generation AMD Ryzen AM4 processors. It integrates advanced connectivity and cooling solutions to enhance your computing experience. Key features include:
- שקע AMD AM4 ו-PCIe 4.0: Optimized for Zen 3 Ryzen 5000 & 3rd Gen AMD Ryzen CPUs, offering the latest in connectivity.
- Aura Sync RGB: ASUS-exclusive Aura Sync RGB lighting with RGB headers and addressable Gen 2 headers for personalized aesthetics.
- קירור מקיף: Features an active PCH heatsink, MOS heatsink with 8mm heatpipe, dual on-board M.2 heatsinks, and a water pump plus header to maintain optimal temperatures.
- Gaming Connectivity: Supports PCIe 4.0, HDMI 2.0, DisplayPort 1.2, dual M.2 slots, and USB 3.2 Type-A and Type-C connectors.
- רשתות משחקים: Equipped with 2.5Gbps LAN and Intel Gigabit Ethernet with ASUS LANGuard, Wi-Fi 6 (802.11Ax) with MU-MIMO, and Gateway teaming via GameFirst V for superior online performance.
2. התקנה
2.1 לוח אם מעלview
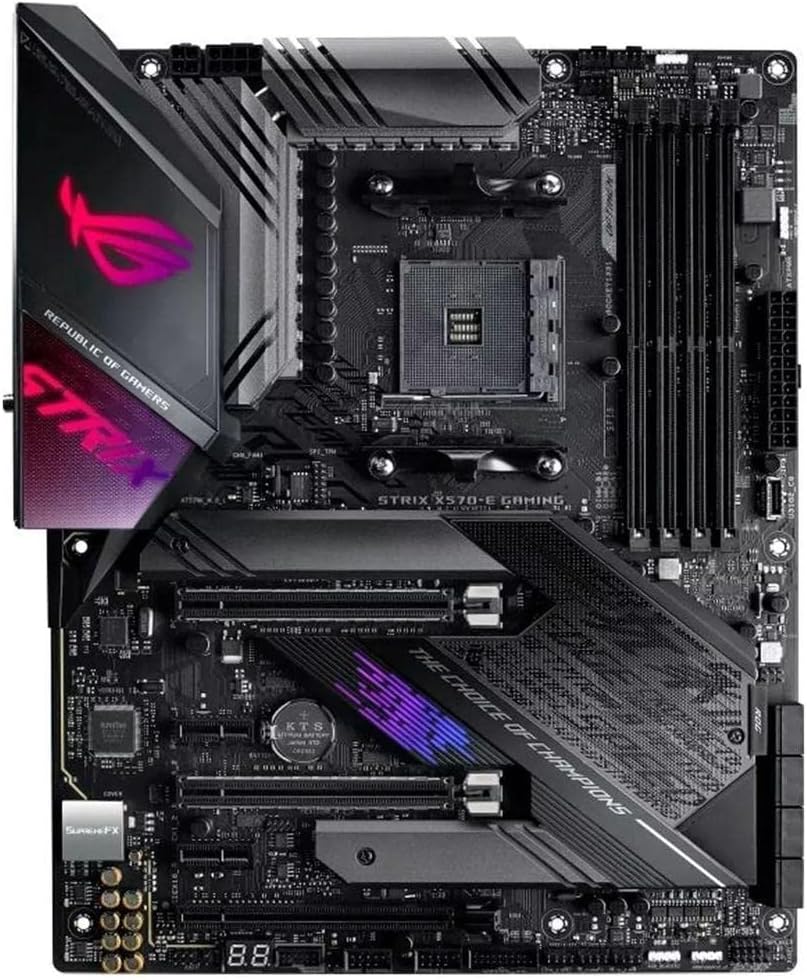
איור 1: מלמעלה למטה view of the ASUS ROG Strix X570-E Gaming Motherboard, highlighting the CPU socket, DIMM slots, and heatsinks.
2.2 התקנת מעבד
This motherboard features an AM4 socket, compatible with AMD Ryzen 5000 and 3000 series processors. Carefully align your CPU with the socket, ensuring the golden triangle on the CPU matches the triangle on the socket. Lower the CPU into place without force and secure the retention arm.
2.3 התקנת זיכרון (RAM)
The motherboard supports up to 128GB of DDR4 memory across four DIMM slots. For optimal performance, install memory modules in the recommended dual-channel configuration as specified in the detailed manual. Open the clips on both ends of the DIMM slot, align the memory module, and press firmly until the clips snap into place.
2.4 חיבורי חשמל
Connect the 24-pin ATX power connector from your power supply to the corresponding port on the motherboard. Additionally, connect the 8-pin EPS 12V power connector (and optionally the 4-pin connector if your power supply has it and your system demands high power) to the CPU power ports located near the CPU socket.
2.5 Storage (M.2 SSDs)

Figure 2: Motherboard view with M.2 heatsinks removed, revealing the M.2 slots for SSD installation.
The motherboard features dual M.2 slots, both equipped with heatsinks for optimal thermal management of high-speed NVMe SSDs. To install an M.2 SSD, remove the heatsink, insert the SSD into the slot, and secure it with the provided screw or tool-less latch mechanism. Reattach the heatsink after installation.
2.6 כרטיסי הרחבה (PCIe)
The motherboard includes multiple PCIe 4.0 slots, with the primary PCIe 4.0 x16 slot being metal-reinforced for heavy graphics cards. Align your expansion card with the desired slot and press firmly until it is seated correctly. Secure the card with a screw to your chassis.
2.7 פאנל קלט/פלט אחורי

איור 3: מפורט view of the motherboard's rear input/output panel, showing various ports and connectors.
The integrated I/O shield provides a range of connectivity options:
- יציאות וידאו: HDMI 2.0, DisplayPort 1.2
- יציאות USB: Multiple USB 3.2 Gen 2 Type-A and Type-C ports.
- רשת: 2.5Gbps LAN and Intel Gigabit Ethernet.
- אַלחוּט: Wi-Fi 6 (802.11Ax) antenna connectors.
- שקעי אודיו: Standard 3.5mm audio jacks and S/PDIF optical out.
- כפתורי שירות: BIOS Flashback button and Clear CMOS button.
2.8 Internal Headers
Connect front panel USB ports, fan headers, and RGB lighting strips to the corresponding headers on the motherboard. Refer to the detailed manual for exact header locations and pin configurations.
3. הפעלה
3.1 הגדרות BIOS/UEFI
To access the BIOS/UEFI setup, press the DEL or F2 key during system startup. The UEFI BIOS Utility offers various modes, including EZ Mode for basic settings and Advanced Mode for detailed configurations. Within Advanced Mode, you can adjust CPU and memory settings (AI Tweaker), monitor system status (Monitor), configure boot options (Boot), and access utility tools (Tool).
3.2 Software Features (Armoury Crate)
Install ASUS Armoury Crate software from the official ASUS website to unlock full control over your motherboard's features. Armoury Crate provides a centralized dashboard for:
- ניטור מערכת: Real-time display of CPU frequency, core voltage, temperature, and fan speeds.
- סנכרון הילה: Synchronize RGB lighting effects across compatible ASUS components and peripherals.
- בקרת מאוורר: Adjust fan curves and profileלקירור ורמות רעש אופטימליות.
- Scenario Profiles: Create and manage performance profiles for different usage scenarios (e.g., gaming, silent).
Video 1: Official ASUS ROG X570 Series Motherboard overview, הצגהasinתכונות עיקריות ועיצוב.
4. תחזוקה
4.1 מערכת קירור
The motherboard's comprehensive cooling system, including active PCH heatsink, MOS heatsink, and dual M.2 heatsinks, is designed to maintain stable performance. Ensure proper airflow within your PC case and regularly clean dust from fans and heatsinks to prevent overheating.
4.2 עדכוני BIOS
בדקו באופן קבוע את התמיכה של ASUS website for the latest BIOS updates. Updating your BIOS can improve system stability, compatibility, and performance. The motherboard features a BIOS Flashback button on the rear I/O panel, allowing you to update the BIOS without a CPU or memory installed. Refer to the detailed manual for the BIOS Flashback procedure.
5. פתרון תקלות
5.1 Q-Code Display
The motherboard features a Q-Code display (POST code display) that shows two-digit codes during startup. These codes can help diagnose issues if your system fails to boot. Refer to the motherboard manual's troubleshooting section for a list of Q-Codes and their meanings.
5.2 לחצן נקה CMOS
If you encounter system instability or boot issues after changing BIOS settings, you can use the Clear CMOS button on the rear I/O panel to reset the BIOS to its default settings. Power off your system and press the Clear CMOS button for a few seconds.
6. מפרטים
| תכונה | מִפרָט |
|---|---|
| מותג | ASUS |
| סִדרָה | ROG STRIX X570-E GAMING |
| מספר דגם של פריט | ROG STRIX X570-E GAMING |
| שקע מעבד | שקע AM4 |
| מעבדים תואמים | AMD Ryzen דור שלישי (Zen 3 Ryzen 5000 ומעבדי AMD Ryzen דור שלישי) |
| סוג ערכת שבבים | AMD 570X |
| טכנולוגיית זיכרון RAM | זיכרון DDR4 SDRAM (DIMM) |
| מהירות זיכרון | 2133 MHz (supports up to 4400 MHz via overclocking) |
| קיבולת זיכרון RAM מקסימלית | 128 ג'יגה-בייט |
| סוג אלחוטי | Wi-Fi 6 (802.11Ax) with MU-MIMO, Bluetooth |
| LAN | 2.5Gbps LAN and Intel Gigabit Ethernet with ASUS LANGuard |
| חריצי PCIe | PCIe 4.0 תמיכה |
| M.2 חריצים | Dual on-board M.2 heatsinks |
| יציאות USB 2.0 | 2 |
| משקל פריט | 2.5 פאונד |
| מידות המוצר | 13.5 x 10.75 x 3.03 אינץ' |
7. אחריות ותמיכה
למידע על אחריות, תמיכה טכנית והורדת מנהלי התקנים, אנא בקרו באתר התמיכה הרשמי של ASUS website. You can find detailed contact information and resources by searching for your specific motherboard model.
תמיכה של ASUS Webאֲתַר: www.asus.com/support/