
1. הקדמה
This manual provides essential instructions for the safe and effective use of your DT321B Digital Multimeter. This portable device is designed for measuring AC/DC voltage, DC current, resistance, and includes features for diode testing, continuity, battery testing, and transistor (hFE) measurements. Please read this manual thoroughly before operation and retain it for future reference.
2. מידע בטיחות
Always observe basic safety precautions when using this multimeter to reduce the risk of fire, electric shock, or personal injury.
- אין ליישם כרךtage או זרם שחורג מהמגבלות המרביות שצוינו עבור המולטימטר.
- ודא שחוטי הבדיקה במצב תקין ומחוברים כראוי לפני ביצוע מדידות כלשהן.
- Never use the multimeter if it appears damaged or if the test leads are damaged.
- היזהרו בעבודה עם וולtagמעל 30V AC RMS, 42V שיא, או 60V DC. נפחים אלהtagהם מהווים סכנת הלם.
- Always disconnect power to the circuit under test before measuring resistance or continuity.
- Do not operate the multimeter in explosive atmospheres.
- החליפו סוללות כאשר מופיע מחוון סוללה חלשה כדי להבטיח קריאות מדויקות.
3. המוצר נגמרview
The DT321B Digital Multimeter features a clear LCD display and a rotary switch for selecting various measurement functions. Input jacks are provided for connecting test leads.

איור 3.1: חזית view of the DT321B Digital Multimeter with key components labeled. The display shows numerical readings, the hold button freezes the current reading, and the rotary switch selects measurement functions. The '10A' jack is for high current measurements, 'COM' is the common ground, and 'VΩmA' is for voltage, התנגדות ומדידות זרם נמוך.
The multimeter includes a blue backlight for improved visibility in low-light conditions and a data hold function to freeze the displayed reading.
4. התקנה
4.1 התקנת סוללה
The DT321B Digital Multimeter requires two 1.5V batteries (Type 7, typically AAA) for operation. To install or replace batteries:
- ודא שהמולטימטר כבוי.
- אתר את מכסה תא הסוללה בגב היחידה.
- שחררו את הברגים המחזיקים והסירו את המכסה.
- Insert the two 1.5V batteries, observing the correct polarity (+ and -) as indicated inside the compartment.
- החזר את מכסה תא הסוללה למקומו ואבטח אותו בעזרת הבורג/ים.
5. הוראות הפעלה
Before making any measurements, ensure the test leads are securely plugged into the correct input jacks.

Figure 5.1: The DT321B Multimeter with test probes connected. The black probe is connected to the 'COM' (common) jack, and the red probe is connected to the 'VΩmA' jack for most voltage, התנגדות ומדידות זרם נמוך.
5.1 מדידת DC כרךtagה (V–)
- הכנס את כבל הבדיקה האדום לשקע 'VΩmA' ואת כבל הבדיקה השחור לשקע 'COM'.
- כוון את המתג הסיבובי לעוצמת הזרם הישר הרצויהtage (V–) range (e.g., 200m, 2, 20, 200, 1000V). If the voltage is unknown, start with the highest range and work downwards.
- חברו את חיישןי הבדיקה לרוחב הרכיב או המעגל המיועד למדידה.
- קרא את הכרךtagערך e בתצוגת ה-LCD.
5.2 מדידת AC כרךtagה (V∼)
- הכנס את כבל הבדיקה האדום לשקע 'VΩmA' ואת כבל הבדיקה השחור לשקע 'COM'.
- כוון את המתג הסיבובי לעוצמת ה-AC הרצויהtage (V∼) range (e.g., 200, 750V).
- חברו את חיישןי הבדיקה לרוחב הרכיב או המעגל המיועד למדידה.
- קרא את הכרךtagערך e בתצוגת ה-LCD.
5.3 מדידת זרם ישר (A–)
זְהִירוּת: To avoid damage to the multimeter or the circuit, never connect the test leads in parallel across a voltage source when measuring current. Always connect in series.
- For currents up to 200mA, insert the red test lead into the 'VΩmA' jack. For currents up to 10A, insert the red test lead into the '10A MAX' jack. The black test lead always goes into the 'COM' jack.
- Set the rotary switch to the desired DC Current (A–) range (e.g., 200u, 2m, 20m, 200m, 10A).
- Open the circuit where current is to be measured and connect the multimeter in series with the circuit.
- קרא את הערך הנוכחי בצג ה-LCD.
5.4 מדידת התנגדות (Ω)
זְהִירוּת: Ensure the circuit under test is completely de-energized before measuring resistance.
- הכנס את כבל הבדיקה האדום לשקע 'VΩmA' ואת כבל הבדיקה השחור לשקע 'COM'.
- Set the rotary switch to the desired Resistance (Ω) range (e.g., 200, 2k, 20k, 200k, 2M).
- חברו את חיישןי הבדיקה לרוחב הרכיב המיועד למדידה.
- קרא את ערך ההתנגדות על גבי צג ה-LCD.
5.5 בדיקת דיודה
- הכנס את כבל הבדיקה האדום לשקע 'VΩmA' ואת כבל הבדיקה השחור לשקע 'COM'.
- Set the rotary switch to the diode symbol (→|).
- חבר את הגשוש האדום לאנודה ואת הגשוש השחור לקתודה של הדיודה. התצוגה תציג את עוצמת הקול הקדמית.tagטיפה e.
- Reverse the probes. The display should show 'OL' (open loop) for a good diode.
5.6 מבחן המשכיות
- הכנס את כבל הבדיקה האדום לשקע 'VΩmA' ואת כבל הבדיקה השחור לשקע 'COM'.
- Set the rotary switch to the continuity symbol (♫).
- Connect the test probes across the circuit or component. If continuity exists (resistance below a certain threshold), the buzzer will sound.
5.7 Battery Testing (1.5V / 9V)
- הכנס את כבל הבדיקה האדום לשקע 'VΩmA' ואת כבל הבדיקה השחור לשקע 'COM'.
- Set the rotary switch to the '1.5V BATT' or '9V BATT' position.
- חבר את הגשוש האדום להדק החיובי ואת הגשוש השחור להדק השלילי של הסוללה.
- קרא את כרך הסוללהtage בתצוגה.
5.8 בדיקת טרנזיסטור (hFE)
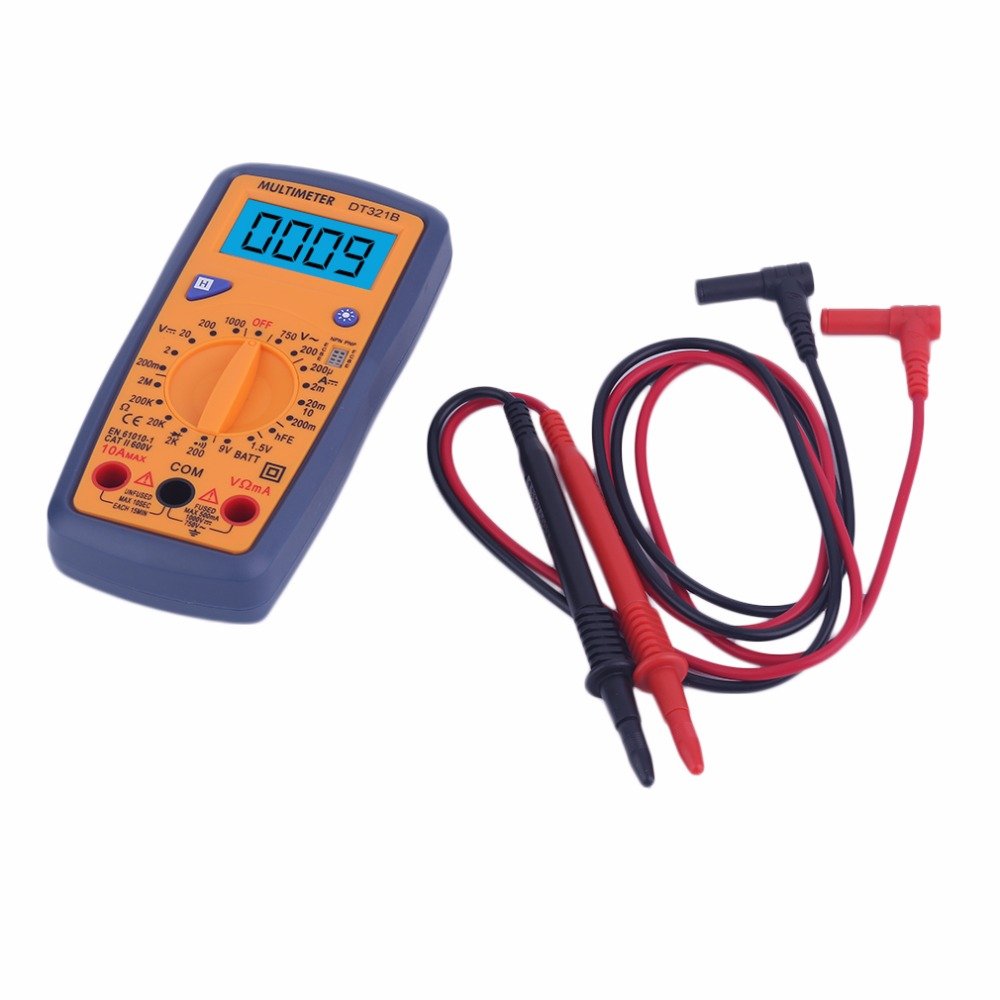
Figure 5.2: The DT321B Multimeter in use, with an inset showing a transistor being tested. The multimeter can measure the hFE (current gain) of NPN and PNP transistors.
- כוונו את המתג הסיבובי למצב 'hFE'.
- Identify the NPN or PNP type of the transistor.
- Insert the transistor leads (Emitter, Base, Collector) into the corresponding sockets in the 'hFE' test socket on the multimeter.
- קרא את ערך ה-hFE על גבי צג ה-LCD.
5.9 פונקציית החזקת נתונים
Press the 'Hold' button to freeze the current reading on the display. Press it again to release the hold function and resume live readings.
5.10 פונקציית תאורה אחורית
The multimeter features a blue backlight. Press the backlight button (often integrated with the 'Hold' button or a separate button with a light symbol) to turn the backlight on or off for improved visibility.
6. תחזוקה
6.1 ניקוי
נגב את המארז עם המודעהamp מטלית וחומר ניקוי עדין. אין להשתמש בחומרים שוחקים או ממסים. יש לוודא שהמולטימטר יבש לחלוטין לפני השימוש.
6.2 החלפת סוללה
When the low battery symbol appears on the display, replace the batteries as described in Section 4.1. Remove batteries if the multimeter is not used for extended periods to prevent leakage.
7. פתרון תקלות
- אין תצוגה או תצוגה חלשה: בדוק את התקנת הסוללה וטעינה. החלף סוללות במידת הצורך.
- קריאות שגויות: Ensure the rotary switch is set to the correct function and range. Check test lead connections. Verify the circuit under test is properly prepared (e.g., de-energized for resistance).
- מוצג 'OL' (עומס יתר): The measured value exceeds the selected range. Switch to a higher range or check for an open circuit.
- אין זמזם המשכיות: Ensure the multimeter is in continuity mode and the circuit is closed.
8. מפרטים
| מְדִידָה | לָנוּעַ | דִיוּק |
|---|---|---|
| DC כרךtage | 200mV, 2V, 20V, 200V, 1000V | ±0.5% |
| AC כרךtage | 200V, 750V | ±1.0% |
| זרם DC | 200uA, 2mA, 20mA, 200mA, 10A | ±1.8% |
| הִתנַגְדוּת | 200Ω, 2kΩ, 20kΩ, 200kΩ, 2MΩ | ±1.0% |
מפרט כללי:
- גודל מסך LCD: 45x23 מ"מ
- גודל מוצר: 160x76x32 מ"מ
- ספק כוח: 2 x 1.5V batteries (Type 7 / AAA)
- כרך נמוךtage Symbol Display: כֵּן
- הגנת עומס יתר: כֵּן
- Diode Detection: כֵּן
- On-off Detection & Buzzer: כֵּן
- זיהוי קיבולת הסוללה: 1.5V / 9V
- Transistor Detection (hFE): כֵּן
- שמירת נתונים: כֵּן
- תצוגת תאורה אחורית: כֵּן
9. אחריות ותמיכה
Specific warranty and support information for the DT321B Digital Multimeter is not available in the provided product details. Please refer to the retailer or manufacturer's website for any applicable warranty terms or customer support contacts.