1. הקדמה
Thank you for choosing the Walfront LCD Digital Programmable Weekly Timer Switch. This device is designed for automatic control of various electrical appliances based on user-defined schedules. Please read this manual carefully before installation and operation to ensure proper use and to prevent damage.
2. מידע בטיחות
אַזהָרָה: Electrical installation should only be performed by qualified personnel. Disconnect power before installation or maintenance to prevent electric shock.
- ודא את נפח הקלטtage matches the timer's specifications (24V for this model).
- Do not exceed the maximum load capacity of 16A 250VAC (resistive load).
- הרחק את המכשיר ממים ולחות מוגזמת.
- אל תנסה לפרק או לתקן את היחידה בעצמך. צור קשר עם התמיכה אם מתעוררות בעיות.
3. המוצר נגמרview
The Walfront LCD Digital Programmable Weekly Timer Switch is a high-precision device built with durable, moisture-resistant, and corrosion-protected materials. It features a clear LCD display and supports up to 16 ON/OFF programs daily and weekly.
3.1 תכונות עיקריות
- High-quality construction for long lifespan.
- Automatic ON/OFF control for various electrical devices.
- Built-in 1.2V/40mA rechargeable battery for memory retention.
- Industrial-grade chip for high precision and strong anti-interference.
- Up to 16 ON and 16 OFF programming settings per day/week.
- LCD display showing real-time, hour, minute, and ON/AUTO/OFF status.
- DIN rail mounting design.
3.2 רכיבים

תמונה 1: חֲזִית view of the Walfront LCD Digital Programmable Weekly Timer Switch. Shows the LCD display and control buttons.

תמונה 2: בְּחֲזָרָה view of the timer switch, illustrating the wiring terminals and basic electrical specifications printed on the unit.
4. התקנה והתקנה
This timer is designed for DIN rail mounting. Ensure the DIN rail is securely installed before attaching the timer.
4.1 תרשים חיווט

תמונה 3: Wiring diagrams showing direct connection (left) and connection with an AC contactor (right). The direct connection illustrates neutral and live wire inputs and load output. The AC contactor diagram shows 220V power input and output to the load device.
חיווט ישיר: Connect the neutral and live wires to the designated input terminals (L and N). Connect the load to the output terminals (typically 3 and 4 for normally open, or 3 and 5 for normally closed, as indicated on the device). Refer to the diagram on the device for exact terminal numbering.
Wiring with AC Contactor: For higher loads, connect the timer to control an AC contactor. The timer's output will switch the coil of the contactor, which in turn controls the main power to the load. This setup is shown on the right side of Image 3.
4.2 Initial Power-Up and Battery Charging
Upon first use, connect the timer to power. The internal 1.2V/40mA rechargeable battery will begin charging. If the display is blank or shows incorrect time, allow it to charge for a few minutes. Press the "Reset" button (often labeled with a small 'R' or 'C' and requires a pointed object) to clear all settings and start fresh.
5. הוראות הפעלה
5.1 הגדרת השעה הנוכחית
- הקש על "CLOCK" button (often labeled with a clock icon) and hold it.
- תוך כדי אחיזה "CLOCK", לחץ על "D+" לחצן כדי להגדיר את היום הנוכחי בשבוע.
- תוך כדי אחיזה "CLOCK", לחץ על "H+" לחצן כדי להגדיר את השעה הנוכחית.
- תוך כדי אחיזה "CLOCK", לחץ על "M+" לחצן כדי להגדיר את הדקה הנוכחית.
- שחרר את "CLOCK" כפתור. השעה מוגדרת כעת.
5.2 Setting 12/24 Hour Mode
By default, the timer operates in 24-hour mode. To switch between 12-hour (AM/PM) and 24-hour modes, press and hold the "CLOCK" button for approximately 5 seconds. The display will show "AM" for 12-hour mode or switch back to 24-hour format.
5.3 תכנות לוחות זמנים של הפעלה/כיבוי
The timer supports up to 16 ON and 16 OFF programs. Each program consists of an ON time and an OFF time.
- הקש על "פרוג" לחצן פעם אחת. הצג יציג "1 ON".
- לִלְחוֹץ "D+" to select the day(s) for this ON program (e.g., Mon-Fri, Sat-Sun, or specific days).
- לִלְחוֹץ "H+" כדי להגדיר את שעת ההפעלה הרצויה.
- לִלְחוֹץ "M+" כדי להגדיר את דקת ההפעלה הרצויה.
- לִלְחוֹץ "פרוג" שוב. התצוגה תציג "1 OFF".
- חזור על שלבים 2-4 כדי להגדיר את זמן הכיבוי עבור התוכנית הראשונה.
- המשך ללחוץ "פרוג" to cycle through "2 ON", "2 OFF", up to "16 ON", "16 OFF", setting each as needed.
- לאחר הגדרת כל התוכניות הרצויות, לחצו על הלחצן "CLOCK" button to exit programming mode and return to real-time display.
פֶּתֶק: If you need to cancel a program, press the "פרוג" button to select the program, then press the "MANUAL" button until "----" appears on the display for that program's time slot.
5.4 הפעלה ידנית (הפעלה/אוטומטית/כיבוי)
הקש על "MANUAL" כפתור כדי לעבור בין מצבי ההפעלה:
- עַל: The output is continuously ON, ignoring all programs.
- אוטומטי: הטיימר פועל בהתאם ללוחות הזמנים של הדלקה/כיבוי המתוכנתים.
- OFF The output is continuously OFF, ignoring all programs.
ודא שהטיימר פועל "AUTO" mode for programmed operation.
5.5 פונקציית נעילת מקשים
To prevent accidental changes to settings, the timer features a key lock function.

תמונה 4: The timer display showing the key lock symbol, indicating that the buttons are locked.
- To lock the keys: Press and hold the "C/R" (Cancel/Reset) button for approximately 4 seconds until a lock symbol appears on the LCD.
- To unlock the keys: Press and hold the "C/R" button again for approximately 4 seconds until the lock symbol disappears.
6. מפרטים
| פָּרָמֶטֶר | עֵרֶך |
|---|---|
| קלט כרךtage | AC/DC 24V (This model) |
| Contact Rated Voltage | AC 180V~264V (50/60Hz) |
| כושר העמסה | 16A 250VAC (Resistive Load) |
| פעולות הפעלה/כיבוי | 16 ON / 16 OFF (Manual/Auto) |
| לְהַצִיג | LCD |
| צריכת חשמל | 4.5VA (Max) |
| שְׁגִיאָה | ≤2 seconds/day (at 25℃) |
| שיטת הרכבה | DIN Rail (sold separately) |
| טווח תזמון | דקה אחת עד 1 שעות |
| מרווח מינימלי | דקה אחת |
| טמפרטורת הפעלה | -10℃ עד 55℃ |
| לחות הפעלה | 35-85% RH |
| מידות (L x W x H) | 86 x 36 x 65 מ"מ |
| סוללה פנימית | 1.2V/40mA rechargeable, >15 days backup |
| מספר מעגלים | Changeover switch (SPDT) |
| חיי שירות | Mechanical: 107, Electrical: 105 |
| מִשׁקָל | 125 גרם |
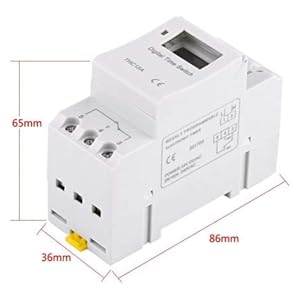
תמונה 5: Diagram illustrating the dimensions of the timer switch: 86mm length, 36mm width, and 65mm height.
7. תחזוקה
- שמרו על ניקיון הטיימר ואבק. השתמשו במטלית יבשה ורכה לניקוי.
- אין להשתמש בחומרי ניקוי שוחקים או ממסים.
- בדקו מעת לעת את חיבורי החיווט כדי לוודא שהם מאובטחים.
- The internal battery is designed for long life and typically does not require replacement. If the timer loses settings frequently after power outagייתכן שהסוללה תזדקק לתחזוקה על ידי טכנאי מוסמך.
8. פתרון תקלות
| בְּעָיָה | סיבה אפשרית | פִּתָרוֹן |
|---|---|---|
| התצוגה ריקה. | No power supply or internal battery discharged. | Check power connections. Allow the timer to charge for a few minutes after connecting to power. |
| הטיימר אינו פועל/כבה כפי שתוכנת. | Timer is not in "AUTO" mode, programs are incorrect, or key lock is active. | Press "MANUAL" until "AUTO" is displayed. Review and correct programs. Unlock keys if necessary. |
| הכפתורים אינם מגיבים. | Key lock function is active. | Press and hold "C/R" for 4 seconds to unlock the keys. |
| הזמן אינו מדויק. | Minor drift (within specifications) or internal battery issue. | Reset and re-set the time. If inaccuracy persists or settings are lost frequently, contact support. |
9. אחריות ותמיכה
Walfront strives to provide high-quality products. If you encounter any issues with your product, please contact us for prompt assistance. We offer return and refund services for product defects.
For support, please refer to the contact information provided with your purchase or visit the Walfront store on Amazon: Walfront Amazon Store.